User Guide
Page 1
User Guide What You Can Do with This Machine Getting Started Copy Fax Print Scan Document Server Web Image Monitor Adding Paper and Toner Troubleshooting Appendix For information not in "Read This First" before using the machine. For safe and correct use, be sure to read the Safety Information in this manual, refer to the HTML/PDF files on the supplied CD-ROM.
User Guide What You Can Do with This Machine Getting Started Copy Fax Print Scan Document Server Web Image Monitor Adding Paper and Toner Troubleshooting Appendix For information not in "Read This First" before using the machine. For safe and correct use, be sure to read the Safety Information in this manual, refer to the HTML/PDF files on the supplied CD-ROM.
User Guide
Page 6
...Function 194 When Messages Are Displayed on Your Computer Screen 209 Messages Displayed When Using the Scanner Function 209 11. Adding Paper and Toner Loading Paper into Paper Trays...127 Loading Paper into the Bypass Tray...131 Printing from the Bypass Tray Using the Printer Function 133... Two-sided Paper 137 Recommended Paper Sizes and Types...140 Thick Paper...145 Envelopes...146 Adding Toner...149 Sending Faxes or Scanned Documents When Toner Has Run Out 151 Disposing of Used Toner...151 10. Appendix Trademarks...215 4 Web Image Monitor Displaying Top Page...123 Viewing Received Fax...
...Function 194 When Messages Are Displayed on Your Computer Screen 209 Messages Displayed When Using the Scanner Function 209 11. Adding Paper and Toner Loading Paper into Paper Trays...127 Loading Paper into the Bypass Tray...131 Printing from the Bypass Tray Using the Printer Function 133... Two-sided Paper 137 Recommended Paper Sizes and Types...140 Thick Paper...145 Envelopes...146 Adding Toner...149 Sending Faxes or Scanned Documents When Toner Has Run Out 151 Disposing of Used Toner...151 10. Appendix Trademarks...215 4 Web Image Monitor Displaying Top Page...123 Viewing Received Fax...

User Guide
Page 28
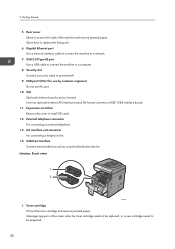
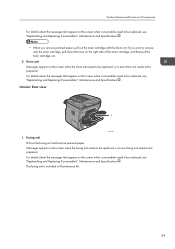
... overheating. 12. Extender for the exposure glass Open this cover to prevent originals from falling off. 10. Memory cover Remove this cover to replace the toner cartridge and the drum unit. 16. 2.
... overheating. 12. Extender for the exposure glass Open this cover to prevent originals from falling off. 10. Memory cover Remove this cover to replace the toner cartridge and the drum unit. 16. 2.
User Guide
Page 30
... board. 11. Interior: Front view 1 2 CXC403 1. G3 interface unit connector For connecting a telephone line. 14. Messages appear on the screen when the toner cartridge needs to be replaced, or a new cartridge needs to a network. 7. USB port H (Port for use by customer engineer) Do not use this...connect the machine to install SD cards. 12. Open here to access the inside of the machine and remove jammed paper. Toner cartridge Pull out the toner cartridge and remove jammed paper. Rear cover Open to replace the fusing unit. 6. External telephone connector For connecting an external ...
... board. 11. Interior: Front view 1 2 CXC403 1. G3 interface unit connector For connecting a telephone line. 14. Messages appear on the screen when the toner cartridge needs to be replaced, or a new cartridge needs to a network. 7. USB port H (Port for use by customer engineer) Do not use this...connect the machine to install SD cards. 12. Open here to access the inside of the machine and remove jammed paper. Toner cartridge Pull out the toner cartridge and remove jammed paper. Rear cover Open to replace the fusing unit. 6. External telephone connector For connecting an external ...
User Guide
Page 31
... unit and remove jammed paper. The fusing unit is included in Maintenance Kit. 29 Guide to Names and Functions of the toner cartridge, and then pull the toner cartridge out. 2. For details about the messages that appear on the screen when consumables need to be replaced, see "Replenishing... and Replacing Consumables", Maintenance and Specifications . • When you want to be replaced, or a new fusing unit needs to remove only the toner cartridge, pull down the lever on the screen when the fusing unit needs to be prepared. For details about the messages that appear on the...
... unit and remove jammed paper. The fusing unit is included in Maintenance Kit. 29 Guide to Names and Functions of the toner cartridge, and then pull the toner cartridge out. 2. For details about the messages that appear on the screen when consumables need to be replaced, see "Replenishing... and Replacing Consumables", Maintenance and Specifications . • When you want to be replaced, or a new fusing unit needs to remove only the toner cartridge, pull down the lever on the screen when the fusing unit needs to be prepared. For details about the messages that appear on the...

User Guide
Page 37
... Web pages to the [Home] screen. To display the [Home] screen, press the [Home] key. 7 1 2 8 3 9 4 5 10 6 11 CXC448 1. Supply Information icon Press to check the toner, paper, and maintenance guidance. 2. [Copier] Press to make settings for using the machine as a printer. 35 For details about how to use the fax function...
... Web pages to the [Home] screen. To display the [Home] screen, press the [Home] key. 7 1 2 8 3 9 4 5 10 6 11 CXC448 1. Supply Information icon Press to check the toner, paper, and maintenance guidance. 2. [Copier] Press to make settings for using the machine as a printer. 35 For details about how to use the fax function...

User Guide
Page 45
...]. send and store them . • Programs can be recalled easily. High compression PDF scan In [Send Settings], select [Full Color] You can save paper and toner. Scanner mode Program name Program description Effect Easy PDF scan In [Send Settings], select [Full Color] You can save paper. PDF] under [Combine] in [Other...
...]. send and store them . • Programs can be recalled easily. High compression PDF scan In [Send Settings], select [Full Color] You can save paper and toner. Scanner mode Program name Program description Effect Easy PDF scan In [Send Settings], select [Full Color] You can save paper. PDF] under [Combine] in [Other...

User Guide
Page 129
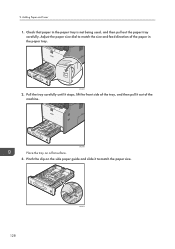
... edges may crease or the paper may damage the tray. • When loading a low number of paper in too tightly. CXC630 127 Adding Paper and Toner This chapter describes how to raise the envelope lever all the way up. When printing a document, specify the same paper size and type in the...
... edges may crease or the paper may damage the tray. • When loading a low number of paper in too tightly. CXC630 127 Adding Paper and Toner This chapter describes how to raise the envelope lever all the way up. When printing a document, specify the same paper size and type in the...
User Guide
Page 130
Check that paper in the paper tray. Pinch the clip on a flat surface. 3. Adding Paper and Toner 1. Pull the tray carefully until it stops, lift the front side of the tray, and then pull it to match the size and feed direction of the machine. CXC663 2. Adjust the paper size dial to match the paper size. 128 CXC613 CXC664 Place the tray on the side paper guide and slide it out of the paper in the paper tray is not being used, and then pull out the paper tray carefully. 9.
Check that paper in the paper tray. Pinch the clip on a flat surface. 3. Adding Paper and Toner 1. Pull the tray carefully until it stops, lift the front side of the tray, and then pull it to match the size and feed direction of the machine. CXC663 2. Adjust the paper size dial to match the paper size. 128 CXC613 CXC664 Place the tray on the side paper guide and slide it out of the paper in the paper tray is not being used, and then pull out the paper tray carefully. 9.
User Guide
Page 132
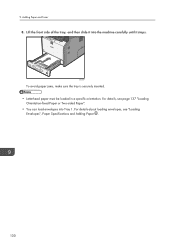
9. For details, see "Loading Envelopes", Paper Specifications and Adding Paper . 130 CXC667 To avoid paper jams, make sure the tray is securely inserted. • Letterhead paper must be loaded in a specific orientation. Adding Paper and Toner 8. Lift the front side of the tray, and then slide it stops. For details about loading envelopes, see page 137 "Loading Orientation-fixed Paper or Two-sided Paper". • You can load envelopes into the machine carefully until it into Tray 1.
9. For details, see "Loading Envelopes", Paper Specifications and Adding Paper . 130 CXC667 To avoid paper jams, make sure the tray is securely inserted. • Letterhead paper must be loaded in a specific orientation. Adding Paper and Toner 8. Lift the front side of the tray, and then slide it stops. For details about loading envelopes, see page 137 "Loading Orientation-fixed Paper or Two-sided Paper". • You can load envelopes into the machine carefully until it into Tray 1.
User Guide
Page 134
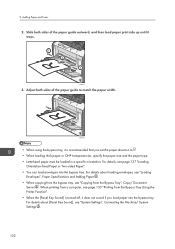
... the paper width. Slide both sides of the paper guide outward, and then load paper print side up until it stops. 1 2 1 CXC611 3. Adding Paper and Toner 2.
... the paper width. Slide both sides of the paper guide outward, and then load paper print side up until it stops. 1 2 1 CXC611 3. Adding Paper and Toner 2.
User Guide
Page 136
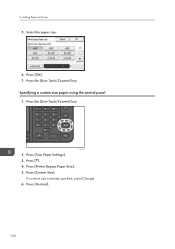
Press [OK]. 7. Press [Printer Bypass Paper Size]. 5. If a custom size is already specified, press [Change]. 6. Press [ ]. 4. Adding Paper and Toner 5. Specifying a custom size paper using the control panel 1. Press the [User Tools/Counter] key. Press [Tray Paper Settings]. 3. CXC251 2. Select the paper size. 6. Press [Custom Size]. Press the [User Tools/Counter] key. Press [Vertical]. 134 9.
Press [OK]. 7. Press [Printer Bypass Paper Size]. 5. If a custom size is already specified, press [Change]. 6. Press [ ]. 4. Adding Paper and Toner 5. Specifying a custom size paper using the control panel 1. Press the [User Tools/Counter] key. Press [Tray Paper Settings]. 3. CXC251 2. Select the paper size. 6. Press [Custom Size]. Press the [User Tools/Counter] key. Press [Vertical]. 134 9.
User Guide
Page 138
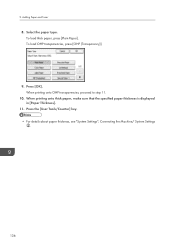
To load OHP transparencies, press [OHP (Transparency)]. 9. Press the [User Tools/Counter] key. • For details about paper thickness, see "System Settings", Connecting the Machine/ System Settings . 136 Select the paper type. To load thick paper, press [Plain Paper]. Press [OK]. When printing onto OHP transparencies, proceed to step 11. 10. Adding Paper and Toner 8. 9. When printing onto thick paper, make sure that the specified paper thickness is displayed in [Paper Thickness]. 11.
To load OHP transparencies, press [OHP (Transparency)]. 9. Press the [User Tools/Counter] key. • For details about paper thickness, see "System Settings", Connecting the Machine/ System Settings . 136 Select the paper type. To load thick paper, press [Plain Paper]. Press [OK]. When printing onto OHP transparencies, proceed to step 11. 10. Adding Paper and Toner 8. 9. When printing onto thick paper, make sure that the specified paper thickness is displayed in [Paper Thickness]. 11.

User Guide
Page 140
... orientation-fixed paper from the bypass tray, specify the paper size. In order to make copies correctly, place the paper upside down . Adding Paper and Toner Original orientation Exposure glass ADF Portrait ( ) Landscape ( ) • Paper orientation • Copier mode When placing originals in the ADF and copy on orientation-fixed paper...
... orientation-fixed paper from the bypass tray, specify the paper size. In order to make copies correctly, place the paper upside down . Adding Paper and Toner Original orientation Exposure glass ADF Portrait ( ) Landscape ( ) • Paper orientation • Copier mode When placing originals in the ADF and copy on orientation-fixed paper...
User Guide
Page 142
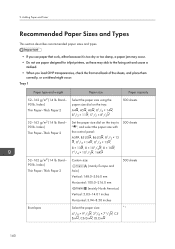
Index) Thin Paper-Thick Paper 2 52-162 g/m2 (14 lb. Bond- 90 lb. Bond- 90 lb. Adding Paper and Toner Recommended Paper Sizes and Types This section describes recommended paper sizes and types. • If you use paper that curls, either because it is too ...
Index) Thin Paper-Thick Paper 2 52-162 g/m2 (14 lb. Bond- 90 lb. Bond- 90 lb. Adding Paper and Toner Recommended Paper Sizes and Types This section describes recommended paper sizes and types. • If you use paper that curls, either because it is too ...
User Guide
Page 144
...) Vertical: 5.83-14.01 inches Horizontal: 3.94-8.50 inches 500 sheets Bypass tray Paper type and weight 52-162 g/m2 (14 lb. 9. Adding Paper and Toner Paper type and weight 52-162 g/m2 (14 lb. Thick Paper 2: *2 142
...) Vertical: 5.83-14.01 inches Horizontal: 3.94-8.50 inches 500 sheets Bypass tray Paper type and weight 52-162 g/m2 (14 lb. 9. Adding Paper and Toner Paper type and weight 52-162 g/m2 (14 lb. Thick Paper 2: *2 142

User Guide
Page 146
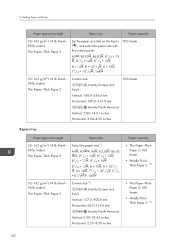
... by one from the bypass tray. • Flatten out curled sheets before loading them. • Depending on which function you are using . Adding Paper and Toner Paper Thickness *1 Plain Paper 2 Middle Thick Thick Paper 1 Thick Paper 2 Paper weight 75-90 g/m2 (20-24 lb. Index) *1 Print quality will decrease if the...
... by one from the bypass tray. • Flatten out curled sheets before loading them. • Depending on which function you are using . Adding Paper and Toner Paper Thickness *1 Plain Paper 2 Middle Thick Thick Paper 1 Thick Paper 2 Paper weight 75-90 g/m2 (20-24 lb. Index) *1 Print quality will decrease if the...
User Guide
Page 148
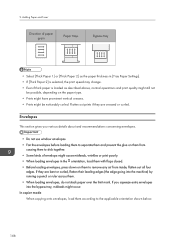
Adding Paper and Toner Direction of envelope might be noticeably curled. Envelopes This section gives you squeeze extra envelopes into the machine) by running a pencil or ruler across them ...
Adding Paper and Toner Direction of envelope might be noticeably curled. Envelopes This section gives you squeeze extra envelopes into the machine) by running a pencil or ruler across them ...

User Guide
Page 150
... creased, dirtied, or misprinted. Print one size and type of envelope at a time. • To get better output quality, it thicker. 148 Adding Paper and Toner When loading envelopes, select "Envelope" as the paper types using both the User Tools and printer driver, and specify the thickness of an envelope have...
... creased, dirtied, or misprinted. Print one size and type of envelope at a time. • To get better output quality, it thicker. 148 Adding Paper and Toner When loading envelopes, select "Envelope" as the paper types using both the User Tools and printer driver, and specify the thickness of an envelope have...

User Guide
Page 151
... ignite on contact with naked flame. • Do not store toner (new or used toner). Consult a doctor if necessary. • If toner or used ), toner containers, and components that the toner is explosion-proof and dust ignition-proof. If toner is possible to electrical contact flickering inside the vacuum cleaner. However, it is spilled on the...
... ignite on contact with naked flame. • Do not store toner (new or used toner). Consult a doctor if necessary. • If toner or used ), toner containers, and components that the toner is explosion-proof and dust ignition-proof. If toner is possible to electrical contact flickering inside the vacuum cleaner. However, it is spilled on the...


