
User Guide
Page 6
... Common Problems...161 Paper Feed Problems...162 4 7. Maintaining the Machine Replacing the Print Cartridge...155 Cautions When Cleaning...157 Cleaning the Inside of Report...129 Printer Features Settings...131 Network Settings...132 8.
... Common Problems...161 Paper Feed Problems...162 4 7. Maintaining the Machine Replacing the Print Cartridge...155 Cautions When Cleaning...157 Cleaning the Inside of Report...129 Printer Features Settings...131 Network Settings...132 8.
User Guide
Page 7
...Removing Scanning Jams...168 Print Quality Problems...170 Checking the Condition of the Machine...192 General Function Specifications...192 Printer Function Specifications...194 Copier Function Specifications...194 Scanner Function Specifications...195 Fax Function Specifications...196 Trademarks...197 INDEX...199 ... the Machine...190 Disposal...190 Where to Inquire...190 Consumables...191 Print Cartridge...191 Specifications of the Machine 170 Printer Problems...171 Print Positions Do Not Match Display Positions 172 Copier Problems...173 Scanner Problems...174 Fax Problems...175 ...
...Removing Scanning Jams...168 Print Quality Problems...170 Checking the Condition of the Machine...192 General Function Specifications...192 Printer Function Specifications...194 Copier Function Specifications...194 Scanner Function Specifications...195 Fax Function Specifications...196 Trademarks...197 INDEX...199 ... the Machine...190 Disposal...190 Where to Inquire...190 Consumables...191 Print Cartridge...191 Specifications of the Machine 170 Printer Problems...171 Print Positions Do Not Match Display Positions 172 Copier Problems...173 Scanner Problems...174 Fax Problems...175 ...
User Guide
Page 15
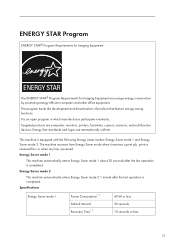
... development and dissemination of products that feature energy saving functions. It is pressed. This machine is completed. Energy Star standards and logos are computers, monitors, printers, facsimiles, copiers, scanners, and multifunction devices. Targeted products are internationally uniform. Energy Saver mode 1 This machine automatically enters Energy Saver mode 1 about 30 seconds after...
... development and dissemination of products that feature energy saving functions. It is pressed. This machine is completed. Energy Star standards and logos are computers, monitors, printers, facsimiles, copiers, scanners, and multifunction devices. Targeted products are internationally uniform. Energy Saver mode 1 This machine automatically enters Energy Saver mode 1 about 30 seconds after...

User Guide
Page 29
...characters 10 characters 13 characters 26 characters 5 characters 10 characters 13 characters 26 characters 27 Click [Smart Organizing Monitor for SP xxx Series Status]. 5. Click [Smart Organizing Monitor for SP xxx Series]. 4. On the [Wi-Fi] tab, set to [802.11 Ad-hoc Mode]. 9. Specify settings... [Communication Mode:] is not selected, click [Select Device...], and then select the machine's model. 6. On the [User Tool] tab, click [Printer Configuration]. 8. The maximum number of characters that can be used are using is set [Communication Mode:] to [802.11 Ad-hoc Mode], [WPA2...
...characters 10 characters 13 characters 26 characters 5 characters 10 characters 13 characters 26 characters 27 Click [Smart Organizing Monitor for SP xxx Series Status]. 5. Click [Smart Organizing Monitor for SP xxx Series]. 4. On the [Wi-Fi] tab, set to [802.11 Ad-hoc Mode]. 9. Specify settings... [Communication Mode:] is not selected, click [Select Device...], and then select the machine's model. 6. On the [User Tool] tab, click [Printer Configuration]. 8. The maximum number of characters that can be used are using is set [Communication Mode:] to [802.11 Ad-hoc Mode], [WPA2...
User Guide
Page 33
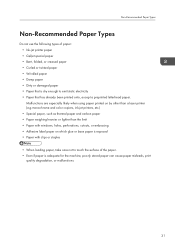
Malfunctions are especially likely when using paper printed on by other than a laser printer (e.g.monochrome and color copiers, ink-jet printers, etc.) • Special paper, such as thermal paper and carbon paper • Paper weighing heavier or lighter than the limit • Paper with ... paper is exposed • Paper with clips or staples • When loading paper, take care not to touch the surface of paper: • Ink-jet printer paper • GelJet special paper • Bent, folded, or creased paper • Curled or twisted paper • Wrinkled paper • Damp paper •...
Malfunctions are especially likely when using paper printed on by other than a laser printer (e.g.monochrome and color copiers, ink-jet printers, etc.) • Special paper, such as thermal paper and carbon paper • Paper weighing heavier or lighter than the limit • Paper with ... paper is exposed • Paper with clips or staples • When loading paper, take care not to touch the surface of paper: • Ink-jet printer paper • GelJet special paper • Bent, folded, or creased paper • Curled or twisted paper • Wrinkled paper • Damp paper •...

User Guide
Page 34
Feed direction 3. Approx. 4.2 mm (0.2 inches) 4. 2. Loading Paper Print Area The diagram below shows the area of the paper that the machine can print on the paper size and printer driver settings. • Adjust the print position by specifying [Registration] in [System Settings]. 32 Print area 2. Approx. 4.2 mm (0.2 inches) • The print area may vary depending on . From the printer driver 4 4 3 1 3 2 CHZ904 1.
Feed direction 3. Approx. 4.2 mm (0.2 inches) 4. 2. Loading Paper Print Area The diagram below shows the area of the paper that the machine can print on the paper size and printer driver settings. • Adjust the print position by specifying [Registration] in [System Settings]. 32 Print area 2. Approx. 4.2 mm (0.2 inches) • The print area may vary depending on . From the printer driver 4 4 3 1 3 2 CHZ904 1.

User Guide
Page 37
... the bypass tray. Straighten curled paper before loading. When printing a document, specify the paper size and paper type and select the paper tray in the printer driver so that the settings configured when paper is enabled. • Curled paper may jam. Otherwise, the paper in the bypass tray is fed first...
... the bypass tray. Straighten curled paper before loading. When printing a document, specify the paper size and paper type and select the paper tray in the printer driver so that the settings configured when paper is enabled. • Curled paper may jam. Otherwise, the paper in the bypass tray is fed first...

User Guide
Page 45
On the [User Tool] tab, click [Printer Configuration]. 7. Click [OK]. 11. In the [Horizontal: (100 to 356 mm)] box, enter the length. 10. Click [Close]. • You cannot specify the settings of the paper in the [Measurement Unit:] list. 8. On the [System] tab, select [mm] or [inch] in the bypass tray via Smart Organizing Monitor. 43 In the [Vertical: (148 to 216 mm)] box, enter the width. 9. Loading Paper 5. Click [OK]. 6.
On the [User Tool] tab, click [Printer Configuration]. 7. Click [OK]. 11. In the [Horizontal: (100 to 356 mm)] box, enter the length. 10. Click [Close]. • You cannot specify the settings of the paper in the [Measurement Unit:] list. 8. On the [System] tab, select [mm] or [inch] in the bypass tray via Smart Organizing Monitor. 43 In the [Vertical: (148 to 216 mm)] box, enter the width. 9. Loading Paper 5. Click [OK]. 6.

User Guide
Page 51
...to print a document from your computer. 1. Change any print settings if necessary. The following print settings can be specified using the printer driver: • Printing multiple pages on a sheet • Splitting a single page across multiple sheets • Printing on both sides... of sheets • Not having blank pages printed • Having prints sorted • Saving printer driver settings as a file • Recalling and deleting saved printer properties settings • Printing on a custom size paper • Printing a large paper size document on smaller size ...
...to print a document from your computer. 1. Change any print settings if necessary. The following print settings can be specified using the printer driver: • Printing multiple pages on a sheet • Splitting a single page across multiple sheets • Printing on both sides... of sheets • Not having blank pages printed • Having prints sorted • Saving printer driver settings as a file • Recalling and deleting saved printer properties settings • Printing on a custom size paper • Printing a large paper size document on smaller size ...

User Guide
Page 53
Canceling a Print Job You can cancel print jobs using either the machine's control panel or your computer. 2. Double-click the printer icon on the task tray of your computer, depending on the status of the job. Canceling a print job before being canceled. • It may take a ...
Canceling a Print Job You can cancel print jobs using either the machine's control panel or your computer. 2. Double-click the printer icon on the task tray of your computer, depending on the status of the job. Canceling a print job before being canceled. • It may take a ...
User Guide
Page 74
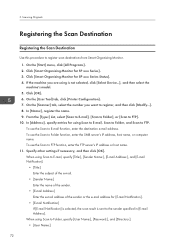
On the [User Tool] tab, click [Printer Configuration]. 7. On the [Scanner] tab, select the number you are using is sent to the sender specified in [E-mail Address:]. In [Address:], specify entries for [E-... [Scan to E-mail], [Scan to Folder], or [Scan to Folder, specify [User Name:], [Password:], and [Directory:]. • [User Name:] 72 Click [Smart Organizing Monitor for SP xxx Series Status]. 4. If the machine you want to FTP. In [Name:], register the name. 9. Click [Smart Organizing Monitor for...
On the [User Tool] tab, click [Printer Configuration]. 7. On the [Scanner] tab, select the number you are using is sent to the sender specified in [E-mail Address:]. In [Address:], specify entries for [E-... [Scan to E-mail], [Scan to Folder], or [Scan to Folder, specify [User Name:], [Password:], and [Directory:]. • [User Name:] 72 Click [Smart Organizing Monitor for SP xxx Series Status]. 4. If the machine you want to FTP. In [Name:], register the name. 9. Click [Smart Organizing Monitor for...

User Guide
Page 76
On the [User Tool] tab, click [Printer Configuration]. 7. 5. On the [Scanner] tab, select the number you want to register, and then click [Modify...]. Scanning Originals 5. Click [OK]. 6. Click [Close]. 74 Click [Apply]. 10. To delete a destination, select its registration number, and then click [Delete]. 8. Click [OK]. 11. Modify the destination, and then click [OK]. To delete a destination, and then click [Yes]. 9.
On the [User Tool] tab, click [Printer Configuration]. 7. 5. On the [Scanner] tab, select the number you want to register, and then click [Modify...]. Scanning Originals 5. Click [OK]. 6. Click [Close]. 74 Click [Apply]. 10. To delete a destination, select its registration number, and then click [Delete]. 8. Click [OK]. 11. Modify the destination, and then click [OK]. To delete a destination, and then click [Yes]. 9.
User Guide
Page 84
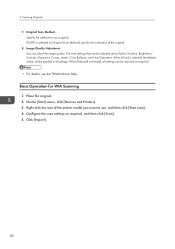
...required. • For details, see the TWAIN driver Help. When [Manual] is selected in [Original Scan Method], specify the orientation of the printer model you want to use, and then click [Start scan]. 4. Right-click the icon of the original. 8. Scanning Originals 7. On the [...Start] menu, click [Devices and Printers]. 3. The scan settings that can be adjusted are as follow: Rotation, Brightness/ Contrast, Sharpness, Curves, Levels, Color Balance, and Hue/Saturation. Click...
...required. • For details, see the TWAIN driver Help. When [Manual] is selected in [Original Scan Method], specify the orientation of the printer model you want to use, and then click [Start scan]. 4. Right-click the icon of the original. 8. Scanning Originals 7. On the [...Start] menu, click [Devices and Printers]. 3. The scan settings that can be adjusted are as follow: Rotation, Brightness/ Contrast, Sharpness, Curves, Levels, Color Balance, and Hue/Saturation. Click...
User Guide
Page 89
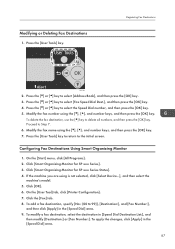
...to delete all numbers, and then press the [OK] key. On the [Start] menu, click [All Programs]. 2. Click [Smart Organizing Monitor for SP xxx Series Status]. 4. To add a fax destination, specify [No.: (00 to select [Address Book], and then press the [OK] key. ...and number keys, and then press the [OK] key. 7. Registering Fax Destinations CTT129 2. Click [Smart Organizing Monitor for SP xxx Series]. 3. On the [User Tool] tab, click [Printer Configuration]. 7. Modifying or Deleting Fax Destinations 1. Modify the fax name using is not selected, click [Select Device...], and then...
...to delete all numbers, and then press the [OK] key. On the [Start] menu, click [All Programs]. 2. Click [Smart Organizing Monitor for SP xxx Series Status]. 4. To add a fax destination, specify [No.: (00 to select [Address Book], and then press the [OK] key. ...and number keys, and then press the [OK] key. 7. Registering Fax Destinations CTT129 2. Click [Smart Organizing Monitor for SP xxx Series]. 3. On the [User Tool] tab, click [Printer Configuration]. 7. Modifying or Deleting Fax Destinations 1. Modify the fax name using is not selected, click [Select Device...], and then...

User Guide
Page 102
......]. 3. You can click [Browse...] to ten pages (including the cover sheet) at a time.) The procedure in the [Address List:], and then click [Set as the printer, and then click [Print]. 4. Open the file you want to attach a fax cover sheet, click [Cover Sheet] tab. 6. If you want to send. 2. Repeat this...
......]. 3. You can click [Browse...] to ten pages (including the cover sheet) at a time.) The procedure in the [Address List:], and then click [Set as the printer, and then click [Print]. 4. Open the file you want to attach a fax cover sheet, click [Cover Sheet] tab. 6. If you want to send. 2. Repeat this...

User Guide
Page 103
Double-click the printer icon on the task bar of your computer, depending on a pulse-dialing line, insert "T" in a fax number. Select the print job you want to cancel ... FAX driver properties dialog box appears. 3. Press the [Facsimile] key. 2. To continue sending a fax, press the [2] key (2: No). Select the PC Fax driver as the printer, and then click a button such as necessary, and then click [OK]. 101 Configure settings as [Preferences]. Canceling while the machine is receiving a fax from the...
Double-click the printer icon on the task bar of your computer, depending on a pulse-dialing line, insert "T" in a fax number. Select the print job you want to cancel ... FAX driver properties dialog box appears. 3. Press the [Facsimile] key. 2. To continue sending a fax, press the [2] key (2: No). Select the PC Fax driver as the printer, and then click a button such as necessary, and then click [OK]. 101 Configure settings as [Preferences]. Canceling while the machine is receiving a fax from the...

User Guide
Page 104
... then change the registered information, select the destination you to register destinations in the PC FAX address book. 1. On the [Start] menu, click [Devices and Printers]. 2. Open the PC FAX address book. 2. Enter the destination information. Registering destinations This section describes how to specify PC FAX destinations quickly and easily. Click...
... then change the registered information, select the destination you to register destinations in the PC FAX address book. 1. On the [Start] menu, click [Devices and Printers]. 2. Open the PC FAX address book. 2. Enter the destination information. Registering destinations This section describes how to specify PC FAX destinations quickly and easily. Click...

User Guide
Page 105
Editing a Fax Cover Sheet This section describes how to a destination, a confirmation message appears. Configure settings as the printer, and then click [Print]. 3. Using the Fax Function from the [Address List:] area, and then click [Add to Group]. Click [OK]. 6. To save the changes, ...
Editing a Fax Cover Sheet This section describes how to a destination, a confirmation message appears. Configure settings as the printer, and then click [Print]. 3. Using the Fax Function from the [Address List:] area, and then click [Add to Group]. Click [OK]. 6. To save the changes, ...
User Guide
Page 111
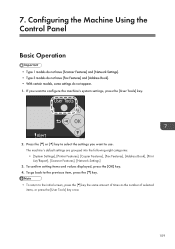
CTT129 2. The machine's default settings are grouped into the following eight categories: • [System Settings], [Printer Features], [Copier Features], [Fax Features], [Address Book], [Print List/Report], [Scanner Features], [Network Settings] 3. Press the [ ] or [ ] key to select the settings you want to ...
CTT129 2. The machine's default settings are grouped into the following eight categories: • [System Settings], [Printer Features], [Copier Features], [Fax Features], [Address Book], [Print List/Report], [Scanner Features], [Network Settings] 3. Press the [ ] or [ ] key to select the settings you want to ...

User Guide
Page 133
The printing stops temporarily if an error is set to ignore errors on the settings specified in the tray. Printer Features Settings Printer Features Settings I/O Timeout Timeout: USB Specifies how many seconds the machine waits for print data if the data is not loaded in the control panel. ...
The printing stops temporarily if an error is set to ignore errors on the settings specified in the tray. Printer Features Settings Printer Features Settings I/O Timeout Timeout: USB Specifies how many seconds the machine waits for print data if the data is not loaded in the control panel. ...


