
User Guide
Page 3
... Accumulator Symbol (For EU countries only 6 Important Safety Instructions ...7 Notes to Components...9 Exterior...9 Interior...10 Installing the Driver and Software...11 Quick Install...11 Installing the Printer Driver...11 Upgrading or Deleting the Printer Driver 11 What is Smart Organizing Monitor?...14 2. Guide to the Machine Guide to Users in the State of...
... Accumulator Symbol (For EU countries only 6 Important Safety Instructions ...7 Notes to Components...9 Exterior...9 Interior...10 Installing the Driver and Software...11 Quick Install...11 Installing the Printer Driver...11 Upgrading or Deleting the Printer Driver 11 What is Smart Organizing Monitor?...14 2. Guide to the Machine Guide to Users in the State of...
User Guide
Page 5
.... The preceding list is meant as a guide only and is prohibited by local law: bank notes, revenue stamps, bonds, stock certificates, bank drafts, checks, passports, driver's licenses. Documents or data might be liable for any item for any documents created by applicable laws, in no event will the manufacturer be erased...
.... The preceding list is meant as a guide only and is prohibited by local law: bank notes, revenue stamps, bonds, stock certificates, bank drafts, checks, passports, driver's licenses. Documents or data might be liable for any item for any documents created by applicable laws, in no event will the manufacturer be erased...
User Guide
Page 12
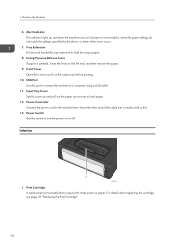
... this cover up red when the machine runs out of paper or consumables, when the paper settings do not match the settings specified by the driver, or when other end of the cable into a nearby wall outlet. 13.
... this cover up red when the machine runs out of paper or consumables, when the paper settings do not match the settings specified by the driver, or when other end of the cable into a nearby wall outlet. 13.
User Guide
Page 13
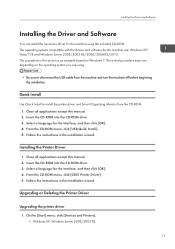
... all applications except this machine are using the included CD-ROM. Insert the CD-ROM into the CD-ROM drive. 3. Installing the Printer Driver 1. On the [Start] menu, click [Devices and Printers]. • Windows XP, Windows Server 2003/2003 R2: 11 Quick Install Use...2008 R2/2012. From the CD-ROM menu, click [DDST Printer Driver]. 5. Upgrading or Deleting the Printer Driver Upgrading the printer driver 1. The actual procedure may vary depending on Windows 7. The operating systems compatible with the drivers and software for this manual. 2. Select a language for the ...
... all applications except this machine are using the included CD-ROM. Insert the CD-ROM into the CD-ROM drive. 3. Installing the Printer Driver 1. On the [Start] menu, click [Devices and Printers]. • Windows XP, Windows Server 2003/2003 R2: 11 Quick Install Use...2008 R2/2012. From the CD-ROM menu, click [DDST Printer Driver]. 5. Upgrading or Deleting the Printer Driver Upgrading the printer driver 1. The actual procedure may vary depending on Windows 7. The operating systems compatible with the drivers and software for this manual. 2. Select a language for the ...
User Guide
Page 14
...click [Control Panel]. Right-click the icon of the machine you want to modify, and then click [Printer properties]. 3. Click [New Driver...], and then click [Next]. 5. Click [Finish]. 10. Click [Yes]. 4. When the [Control Panel] window appears, click [View devices and ..., and then click [Delete]. 3. Click any printer icon, and then click [Print server properties]. 12 Click [Browse...], and then select the printer driver location. 7. Restart the computer. Click [Next]. 9. 1. Click [OK], and then specify the printer model. 8. When the [Control Panel] window...
...click [Control Panel]. Right-click the icon of the machine you want to modify, and then click [Printer properties]. 3. Click [New Driver...], and then click [Next]. 5. Click [Finish]. 10. Click [Yes]. 4. When the [Control Panel] window appears, click [View devices and ..., and then click [Delete]. 3. Click any printer icon, and then click [Print server properties]. 12 Click [Browse...], and then select the printer driver location. 7. Restart the computer. Click [Next]. 9. 1. Click [OK], and then specify the printer model. 8. When the [Control Panel] window...

User Guide
Page 15
Click [Remove...]. 8. Select [Remove driver and driver package.], and then click [OK]. 9. Click [Yes]. 10. Click [Close] to close the print server properties window. 13 Click [Delete]. 11. Click [OK]. 12. Click the [Change Driver Settings] button if it is displayed. 7. Click the [Drivers] tab. 6. Installing the Driver and Software 5.
Click [Remove...]. 8. Select [Remove driver and driver package.], and then click [OK]. 9. Click [Yes]. 10. Click [Close] to close the print server properties window. 13 Click [Delete]. 11. Click [OK]. 12. Click the [Change Driver Settings] button if it is displayed. 7. Click the [Drivers] tab. 6. Installing the Driver and Software 5.
User Guide
Page 19
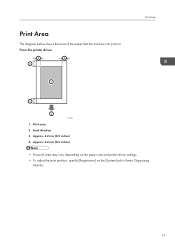
Approx. 4.2 mm (0.2 inches) 4. From the printer driver 4 4 3 1 Print Area 3 2 CHZ904 1. Approx. 4.2 mm (0.2 inches) • The print area may vary depending on the paper size and printer driver settings. • To adjust the print position, specify [Registration] on . Feed direction 3. Print area 2. Print Area The diagram below shows the area of the paper that the machine can print on the [System] tab in Smart Organizing Monitor. 17
Approx. 4.2 mm (0.2 inches) 4. From the printer driver 4 4 3 1 Print Area 3 2 CHZ904 1. Approx. 4.2 mm (0.2 inches) • The print area may vary depending on the paper size and printer driver settings. • To adjust the print position, specify [Registration] on . Feed direction 3. Print area 2. Print Area The diagram below shows the area of the paper that the machine can print on the [System] tab in Smart Organizing Monitor. 17
User Guide
Page 20
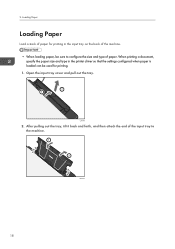
After pulling out the tray, tilt it back and forth, and then attach the end of paper. Loading Paper Loading Paper Load a stack of paper for printing in the printer driver so that the settings configured when paper is loaded can be sure to configure the size and type of the input tray to the machine. 1 2 CXP004 18 When printing a document, specify the paper size and type in the input tray on the back of the machine. • When loading paper, be used for printing. 1. Open the input tray cover and pull out the tray. 2 1 CXP044 2. 2.
After pulling out the tray, tilt it back and forth, and then attach the end of paper. Loading Paper Loading Paper Load a stack of paper for printing in the printer driver so that the settings configured when paper is loaded can be sure to configure the size and type of the input tray to the machine. 1 2 CXP004 18 When printing a document, specify the paper size and type in the input tray on the back of the machine. • When loading paper, be used for printing. 1. Open the input tray cover and pull out the tray. 2 1 CXP044 2. 2.
User Guide
Page 25
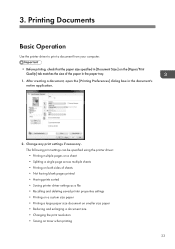
... that the paper size specified in [Document Size:] on toner when printing 23 3. The following print settings can be specified using the printer driver: • Printing multiple pages on a sheet • Splitting a single page across multiple sheets • Printing on both sides of sheets... • Not having blank pages printed • Having prints sorted • Saving printer driver settings as a file • Recalling and deleting saved printer properties settings • Printing on a custom size paper • Printing a large ...
... that the paper size specified in [Document Size:] on toner when printing 23 3. The following print settings can be specified using the printer driver: • Printing multiple pages on a sheet • Splitting a single page across multiple sheets • Printing on both sides of sheets... • Not having blank pages printed • Having prints sorted • Saving printer driver settings as a file • Recalling and deleting saved printer properties settings • Printing on a custom size paper • Printing a large ...
User Guide
Page 28
...; If the error message appears again, check whether the specified paper size matches the size of the paper in both the application and the printer driver. If the error message is too small for the print job, the printed image will be cropped. 1. Application (e.g., WordPad): Click [Page Setup] on the [File...
...; If the error message appears again, check whether the specified paper size matches the size of the paper in both the application and the printer driver. If the error message is too small for the print job, the printed image will be cropped. 1. Application (e.g., WordPad): Click [Page Setup] on the [File...
User Guide
Page 29
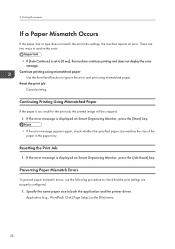
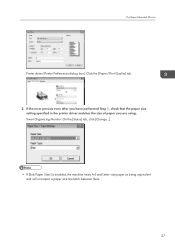
Smart Organizing Monitor: On the [Status] tab, click [Change...]. • If [Sub Paper Size:] is enabled, the machine treats A4 and Letter-size paper as being equivalent and will not report a paper size mismatch between them. 27 If the error persists even after you have performed Step 1, check that the paper size setting specified in the printer driver matches the size of paper you are using. If a Paper Mismatch Occurs Printer driver (Printer Preferences dialog box): Click the [Paper/Print Quality] tab. 2.
Smart Organizing Monitor: On the [Status] tab, click [Change...]. • If [Sub Paper Size:] is enabled, the machine treats A4 and Letter-size paper as being equivalent and will not report a paper size mismatch between them. 27 If the error persists even after you have performed Step 1, check that the paper size setting specified in the printer driver matches the size of paper you are using. If a Paper Mismatch Occurs Printer driver (Printer Preferences dialog box): Click the [Paper/Print Quality] tab. 2.

User Guide
Page 33
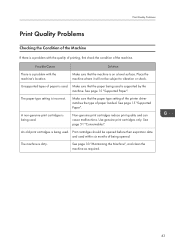
...Adjust the printing position or density to improve the printing quality when printed results are using Smart Organizing Monitor. Click [Smart Organizing Monitor for SP xxx Series Status]. 4. If the machine you are not satisfactory. • Enable or disable Energy Saver Mode, and specify the amount of... time that can be modified using is an inconsistency in paper size and/or type settings between the machine and the printer driver. • Specify the period of the machine settings that will elapse before switching to it fails to modify the machine's settings. 1. Click...
...Adjust the printing position or density to improve the printing quality when printed results are using Smart Organizing Monitor. Click [Smart Organizing Monitor for SP xxx Series Status]. 4. If the machine you are not satisfactory. • Enable or disable Energy Saver Mode, and specify the amount of... time that can be modified using is an inconsistency in paper size and/or type settings between the machine and the printer driver. • Specify the period of the machine settings that will elapse before switching to it fails to modify the machine's settings. 1. Click...
User Guide
Page 45
...'s location. Place the machine where it will not be opened . Unsupported types of the machine. Make sure that the paper type setting of the printer driver matches the type of being used is supported by the machine. A non-genuine print cartridges is being used . See page 15 "Supported Paper". See page...
...'s location. Place the machine where it will not be opened . Unsupported types of the machine. Make sure that the paper type setting of the printer driver matches the type of being used is supported by the machine. A non-genuine print cartridges is being used . See page 15 "Supported Paper". See page...
User Guide
Page 46
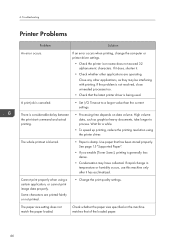
... printing. • Processing time depends on the machine matches that of the loaded paper. 44 Cannot print properly when using the printer driver. 6. If an error occurs when printing, change in temperature or humidity occurs, use this machine only after it . • Check...canceled. • Set I/O Timeout to process. Some characters are operating. A print job is damp. If rapid change the computer or printer driver settings. • Check the printer icon name does not exceed 32 alphanumeric characters. If the problem is not resolved, close unneeded processes too. ...
... printing. • Processing time depends on the machine matches that of the loaded paper. 44 Cannot print properly when using the printer driver. 6. If an error occurs when printing, change in temperature or humidity occurs, use this machine only after it . • Check...canceled. • Set I/O Timeout to process. Some characters are operating. A print job is damp. If rapid change the computer or printer driver settings. • Check the printer icon name does not exceed 32 alphanumeric characters. If the problem is not resolved, close unneeded processes too. ...
User Guide
Page 47
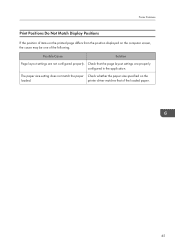
Printer Problems Print Positions Do Not Match Display Positions If the position of items on the printed page differs from the position displayed on the loaded. The paper size setting does not match the paper Check whether the paper size specified on the computer screen, the cause may be one of the loaded paper. 45 printer driver matches that the page layout settings are not configured properly. Check that of the following. Possible Cause Solution Page layout settings are properly configured in the application.
Printer Problems Print Positions Do Not Match Display Positions If the position of items on the printed page differs from the position displayed on the loaded. The paper size setting does not match the paper Check whether the paper size specified on the computer screen, the cause may be one of the loaded paper. 45 printer driver matches that the page layout settings are not configured properly. Check that of the following. Possible Cause Solution Page layout settings are properly configured in the application.
User Guide
Page 48
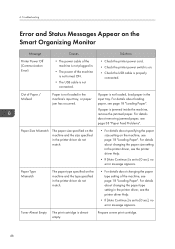
...Off (Communication Error) • The power cable of the machine, see page 38 "Paper Feed Problems". For details about loading paper, see the printer driver Help. • If [Auto Continue:] is not plugged in the input tray. For details about changing the paper type setting in the printer... driver, see page 18 "Loading Paper". For details about changing the paper type setting of the machine is set to [0 sec], no error message appears. Prepare...
...Off (Communication Error) • The power cable of the machine, see page 38 "Paper Feed Problems". For details about loading paper, see the printer driver Help. • If [Auto Continue:] is not plugged in the input tray. For details about changing the paper type setting in the printer... driver, see page 18 "Loading Paper". For details about changing the paper type setting of the machine is set to [0 sec], no error message appears. Prepare...
User Guide
Page 49
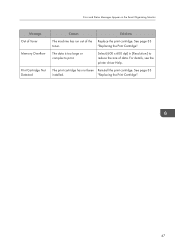
"Replacing the Print Cartridge". The data is too large or complex to reduce the size of the Replace the print cartridge. For details, see the printer driver Help. "Replacing the Print Cartridge". 47 See page 33 installed. Error and Status Messages Appear on the Smart Organizing Monitor Message Out of Toner Memory Overflow Print Cartridge Not Detected Causes Solutions The machine has run out of data. The print cartridge has not been Reinstall the print cartridge. Select [600 x 600 dpi] in [Resolution:] to print. See page 33 toner.
"Replacing the Print Cartridge". The data is too large or complex to reduce the size of the Replace the print cartridge. For details, see the printer driver Help. "Replacing the Print Cartridge". 47 See page 33 installed. Error and Status Messages Appear on the Smart Organizing Monitor Message Out of Toner Memory Overflow Print Cartridge Not Detected Causes Solutions The machine has run out of data. The print cartridge has not been Reinstall the print cartridge. Select [600 x 600 dpi] in [Resolution:] to print. See page 33 toner.
User Guide
Page 59
... C Changing the custom paper size 21 Cleaning 35, 36 Common problems 37 Condition of the machine 43 Configuration page 30 Consumables 51 D Delete 12 Disclaimer 3 Driver 11 Duplex 24 E Error messages 46 Exterior 9 F Firmware 32 I Important Safety Instructions 5, 7 Install 11 Interior 10, 36 Introduction 3 J Job cancel 25 L Legal prohibition 3 Loading paper...
... C Changing the custom paper size 21 Cleaning 35, 36 Common problems 37 Condition of the machine 43 Configuration page 30 Consumables 51 D Delete 12 Disclaimer 3 Driver 11 Duplex 24 E Error messages 46 Exterior 9 F Firmware 32 I Important Safety Instructions 5, 7 Install 11 Interior 10, 36 Introduction 3 J Job cancel 25 L Legal prohibition 3 Loading paper...


