Configuration Guide
Page 1
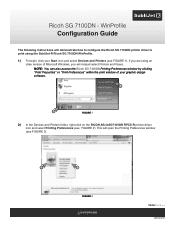
... WinProfile Configuration Guide The following instructions will demonstrate how to configure the Ricoh SG 7100DN printer driver to print using an older version of 4 >> v20130218 If you are using the SubliJet-R Ricoh SG 7100DN WinProfile. 1.) To begin, click your graphic design software. 2 1... FIGURE 1 2.) In the Devices and Printers folder, right-click on the RICOH AficioSG7100DN RPCS-R printer driver icon and select Printing Preferences (see ...
... WinProfile Configuration Guide The following instructions will demonstrate how to configure the Ricoh SG 7100DN printer driver to print using an older version of 4 >> v20130218 If you are using the SubliJet-R Ricoh SG 7100DN WinProfile. 1.) To begin, click your graphic design software. 2 1... FIGURE 1 2.) In the Devices and Printers folder, right-click on the RICOH AficioSG7100DN RPCS-R printer driver icon and select Printing Preferences (see ...
Configuration Guide
Page 2
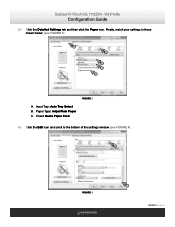
Input Tray: Auto Tray Select B. Finally, match your settings to the bottom of the settings window (see FIGURE 3) 1 2 A B C FIGURE 3 A. Paper Type: Inkjet Plain Paper C. SubliJet-R: Ricoh SG 7100DN - WinProfile Configuration Guide 3.) Click the Detailed Settings tab and then click the Paper icon. Check Quick Paper Feed 4.) Click the Edit icon and scroll to those shown below: (see FIGURE 4). 1 FIGURE 4 2 PAGE 2 of 4 >>
Input Tray: Auto Tray Select B. Finally, match your settings to the bottom of the settings window (see FIGURE 3) 1 2 A B C FIGURE 3 A. Paper Type: Inkjet Plain Paper C. SubliJet-R: Ricoh SG 7100DN - WinProfile Configuration Guide 3.) Click the Detailed Settings tab and then click the Paper icon. Check Quick Paper Feed 4.) Click the Edit icon and scroll to those shown below: (see FIGURE 4). 1 FIGURE 4 2 PAGE 2 of 4 >>
Configuration Guide
Page 3
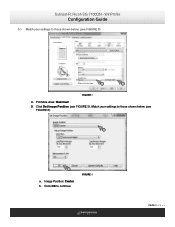
Match your settings to those shown below : (see FIGURE 5) A B FIGURE 5 A. Image Position: Center b. Click OK to those shown below (see FIGURE 5). Click Set Image Position (see FIGURE 6). Printable Area: Maximum B. WinProfile Configuration Guide 5.) Match your settings to continue FIGURE 6 PAGE 3 of 4 >> SubliJet-R: Ricoh SG 7100DN - a b a.
Match your settings to those shown below : (see FIGURE 5) A B FIGURE 5 A. Image Position: Center b. Click OK to those shown below (see FIGURE 5). Click Set Image Position (see FIGURE 6). Printable Area: Maximum B. WinProfile Configuration Guide 5.) Match your settings to continue FIGURE 6 PAGE 3 of 4 >> SubliJet-R: Ricoh SG 7100DN - a b a.
Configuration Guide
Page 4
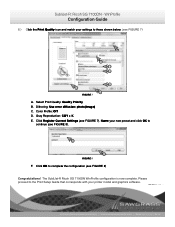
Dithering: Use error diffusion: photo(image) C. The SubliJet-R Ricoh SG 7100DN WinProfile configuration is now complete. Name your printer model and graphics software. PAGE 4 of 4 >> Color Profile: Off D. Click OK to continue (see FIGURE 8) Congratulations! WinProfile ... 8). 1 2 FIGURE 8 F. Gray Reproduction: CMY + K E. Please proceed to those shown below: (see FIGURE 7). Select Print Quality: Quality Priority B. Click Register Current Settings (see FIGURE 7) A B C D E F FIGURE 7 A. SubliJet-R: Ricoh SG 7100DN -
Dithering: Use error diffusion: photo(image) C. The SubliJet-R Ricoh SG 7100DN WinProfile configuration is now complete. Name your printer model and graphics software. PAGE 4 of 4 >> Color Profile: Off D. Click OK to continue (see FIGURE 8) Congratulations! WinProfile ... 8). 1 2 FIGURE 8 F. Gray Reproduction: CMY + K E. Please proceed to those shown below: (see FIGURE 7). Select Print Quality: Quality Priority B. Click Register Current Settings (see FIGURE 7) A B C D E F FIGURE 7 A. SubliJet-R: Ricoh SG 7100DN -


