User Guide
Page 6
... Focus Lock 33 Using the Zoom Function 35 Shooting Close-Ups (Macro Shooting 36 Using the Flash ...37 Shooting with Optimal Settings According to Shooting Conditions 38 Playing Back Images 42 Reviewing the Image You Just Took (Quick Review 42 Viewing Your Images 43 Playing Back Images in the Three-frame View 44 Thumbnail Display...46 Magnifying Images ...47 Viewing on a Television 48 Deleting Files 50 Deleting Unwanted Files (Still Images/Movies/Sounds 50 Deleting Multiple Files at One Time 51 Chapter 2 Using the Various Shooting and Playback Functions Direct Printing 54 Direct...
... Focus Lock 33 Using the Zoom Function 35 Shooting Close-Ups (Macro Shooting 36 Using the Flash ...37 Shooting with Optimal Settings According to Shooting Conditions 38 Playing Back Images 42 Reviewing the Image You Just Took (Quick Review 42 Viewing Your Images 43 Playing Back Images in the Three-frame View 44 Thumbnail Display...46 Magnifying Images ...47 Viewing on a Television 48 Deleting Files 50 Deleting Unwanted Files (Still Images/Movies/Sounds 50 Deleting Multiple Files at One Time 51 Chapter 2 Using the Various Shooting and Playback Functions Direct Printing 54 Direct...

User Guide
Page 7
... Sound 97 2 Recording Sound ...97 Playing Back Sound ...98 Other Functions Available in Playback Mode 99 Playback Setting Menu 99 Using the Playback Setting Menu 99 Displaying Photos in Order Automatically (SLIDE SHOW 100 Write-protecting Files (PROTECT 101 Using a Printing Service (DPOF 104 Changing the Image Size (RESIZE 107 Copying the Contents of Still Images (SHARPNESS 70 Setting the Color Depth (COLOR DEPTH 71 Shooting Consecutively with Different Exposures (AUTO BRACKET 72 Shooting Consecutively with Different White Balance (WB-BKT 73 Using Long Time Exposure (TIME EXPOSURE...
... Sound 97 2 Recording Sound ...97 Playing Back Sound ...98 Other Functions Available in Playback Mode 99 Playback Setting Menu 99 Using the Playback Setting Menu 99 Displaying Photos in Order Automatically (SLIDE SHOW 100 Write-protecting Files (PROTECT 101 Using a Printing Service (DPOF 104 Changing the Image Size (RESIZE 107 Copying the Contents of Still Images (SHARPNESS 70 Setting the Color Depth (COLOR DEPTH 71 Shooting Consecutively with Different Exposures (AUTO BRACKET 72 Shooting Consecutively with Different White Balance (WB-BKT 73 Using Long Time Exposure (TIME EXPOSURE...

User Guide
Page 8
...for Viewing on TV (VIDEO OUT MODE 124 Changing the Step Zooming Setting (STEP ZOOM 125 Displaying a Settings Change Warning (SHTG STGS WARNG 126 Changing the USB Setting (USB CONNECTION 127 Enlarging Icon Display (ENLGE PHOTO ICON 131 Registering the Power-on Settings (REG. SETTINGS 118 Changing Image Confirmation Time (LCD CONFIRM 119 Changing File Name Settings (SEQUENTIAL NO 120 Setting the Date and Time (DATE SETTINGS 122 Changing the Display Language (LANGUAGE 123 Changing the Playback Method for Using the Provided Software 157 Installing the Software on Your Computer (Mac OS...
...for Viewing on TV (VIDEO OUT MODE 124 Changing the Step Zooming Setting (STEP ZOOM 125 Displaying a Settings Change Warning (SHTG STGS WARNG 126 Changing the USB Setting (USB CONNECTION 127 Enlarging Icon Display (ENLGE PHOTO ICON 131 Registering the Power-on Settings (REG. SETTINGS 118 Changing Image Confirmation Time (LCD CONFIRM 119 Changing File Name Settings (SEQUENTIAL NO 120 Setting the Date and Time (DATE SETTINGS 122 Changing the Display Language (LANGUAGE 123 Changing the Playback Method for Using the Provided Software 157 Installing the Software on Your Computer (Mac OS...
User Guide
Page 17
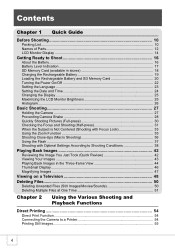
... SD memory card. • When the number of operational instructions or the camera's status while in use. 15 Example of LCD Monitor Display During Playback 12 34 56 13 8, 9 10 7 Still Image Mode 11 12 14 Movie Mode Item Name 1 Protect 2 DPOF 3 Mode Types 4 Playback Data Source 5 Number of Playback Files 6 Total Number of Files 7 Setting at Shooting 13 Recording Time or Lapsed Time 14 Indicator Refer to P.62 P.62 P.17 P.79 P.122 - Quick Guide Note • The number of remaining shots available...
... SD memory card. • When the number of operational instructions or the camera's status while in use. 15 Example of LCD Monitor Display During Playback 12 34 56 13 8, 9 10 7 Still Image Mode 11 12 14 Movie Mode Item Name 1 Protect 2 DPOF 3 Mode Types 4 Playback Data Source 5 Number of Playback Files 6 Total Number of Files 7 Setting at Shooting 13 Recording Time or Lapsed Time 14 Indicator Refer to P.62 P.62 P.17 P.79 P.122 - Quick Guide Note • The number of remaining shots available...
User Guide
Page 25
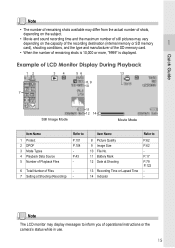
... display language is turned on the SETUP screen, see "Changing the Display Language (LANGUAGE/ )" (P.123) and "Setting the Date and Time (DATE SETTINGS)" (P.122) in this guide. 23 However, be sure to set the display language and date/time on for the first time, the language setting screen appears (for these settings. The language selection screen appears. When the M/O button is pressed, the language setting is cancelled and the video signal format-setting screen appears. 2. After setting the language, go on your photos). Press the C/D button. Turn the power on...
... display language is turned on the SETUP screen, see "Changing the Display Language (LANGUAGE/ )" (P.123) and "Setting the Date and Time (DATE SETTINGS)" (P.122) in this guide. 23 However, be sure to set the display language and date/time on for the first time, the language setting screen appears (for these settings. The language selection screen appears. When the M/O button is pressed, the language setting is cancelled and the video signal format-setting screen appears. 2. After setting the language, go on your photos). Press the C/D button. Turn the power on...
User Guide
Page 32
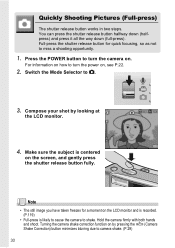
... miss a shooting opportunity. 1. Switch the Mode Selector to camera shake. (P.29) 30 Hold the camera firmly with both hands and shoot. Quickly Shooting Pictures (Full-press) The shutter release button works in two steps. Make sure the subject is likely to cause the camera to turn the power on the screen, and gently press the shutter release button fully. Note • The still image you have taken freezes for quick focusing, so...
... miss a shooting opportunity. 1. Switch the Mode Selector to camera shake. (P.29) 30 Hold the camera firmly with both hands and shoot. Quickly Shooting Pictures (Full-press) The shutter release button works in two steps. Make sure the subject is likely to cause the camera to turn the power on the screen, and gently press the shutter release button fully. Note • The still image you have taken freezes for quick focusing, so...
User Guide
Page 33
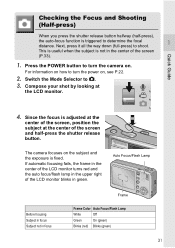
... button. Next, press it all the way down (full-press) to 5. 3. Since the focus is not in the upper right of the screen, position the subject at the LCD monitor. 4. This is useful when the subject is adjusted at the center of the LCD monitor blinks in focus Frame Color Auto Focus/Flash Lamp White Off Green On (green) Blinks (red) Blinks (green) 31 For information on . Switch the Mode Selector to shoot. Auto Focus/Flash...
... button. Next, press it all the way down (full-press) to 5. 3. Since the focus is not in the upper right of the screen, position the subject at the LCD monitor. 4. This is useful when the subject is adjusted at the center of the LCD monitor blinks in focus Frame Color Auto Focus/Flash Lamp White Off Green On (green) Blinks (red) Blinks (green) 31 For information on . Switch the Mode Selector to shoot. Auto Focus/Flash...
User Guide
Page 64
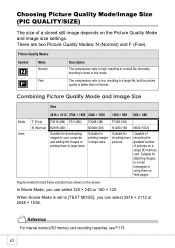
...; 120. When Scene Mode is better than in a small file. There are two Picture Quality Modes: N (Normal) and F (Fine). Normally, shooting is high, resulting in Normal. F1280 (1M) - Figures inside the bold frame indicate those shown on a single SD memory card. Suitable for printing images in large sizes. Reference For internal memory/SD memory card recording capacities, see P.175. 62 Combining Picture Quality Mode and Image Size Size Mode Uses 2816 × 2112...
...; 120. When Scene Mode is better than in a small file. There are two Picture Quality Modes: N (Normal) and F (Fine). Normally, shooting is high, resulting in Normal. F1280 (1M) - Figures inside the bold frame indicate those shown on a single SD memory card. Suitable for printing images in large sizes. Reference For internal memory/SD memory card recording capacities, see P.175. 62 Combining Picture Quality Mode and Image Size Size Mode Uses 2816 × 2112...
User Guide
Page 83
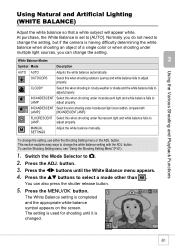
... set to [AUTO]. buttons to LAMP. Using the Various Shooting and Playback Functions Using Natural and Artificial Lighting (WHITE BALANCE) Adjust the white balance so that a white subject will appear white. OUTDOORS Select this when shooting under incandescent light (more reddish, compared with the ADJ. INCANDESCENT Select this when shooting outdoors (sunny) and white balance fails to LAMP adjust properly. adjust properly. To use either the Shooting Setting menu or the ADJ. Switch the Mode Selector to adjust properly. button. 3. The setting...
... set to [AUTO]. buttons to LAMP. Using the Various Shooting and Playback Functions Using Natural and Artificial Lighting (WHITE BALANCE) Adjust the white balance so that a white subject will appear white. OUTDOORS Select this when shooting under incandescent light (more reddish, compared with the ADJ. INCANDESCENT Select this when shooting outdoors (sunny) and white balance fails to LAMP adjust properly. adjust properly. To use either the Shooting Setting menu or the ADJ. Switch the Mode Selector to adjust properly. button. 3. The setting...
User Guide
Page 112
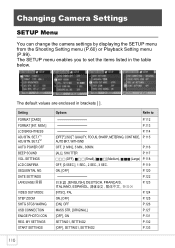
.... SET.2*2 AUTO POWER OFF BEEP SOUND VOL. USB CONNECTION ENLGE PHOTO ICON REG. Setting FORMAT [CARD] FORMAT [INT. MY SETTINGS START SETTINGS Options Refer to set the items listed in brackets [ ]. P.116 [ALL], SHUTTER P.117 F F F (OFF), J F F (Small), [J J F] (Medium), J J J (Large) P.118 OFF, [0.5SEC.], 1 SEC., 2 SEC., 3 SEC. MEM.] LCD BRIGHTNESS ADJ BTN. SETTINGS LCD CONFIRM. DATE SETTINGS LANGUAGE/ VIDEO OUT MODE STEP ZOOM SHTG STGS WARNG. Changing Camera Settings SETUP Menu You can change the camera settings by displaying the SETUP menu from the Shooting Setting menu...
.... SET.2*2 AUTO POWER OFF BEEP SOUND VOL. USB CONNECTION ENLGE PHOTO ICON REG. Setting FORMAT [CARD] FORMAT [INT. MY SETTINGS START SETTINGS Options Refer to set the items listed in brackets [ ]. P.116 [ALL], SHUTTER P.117 F F F (OFF), J F F (Small), [J J F] (Medium), J J J (Large) P.118 OFF, [0.5SEC.], 1 SEC., 2 SEC., 3 SEC. MEM.] LCD BRIGHTNESS ADJ BTN. SETTINGS LCD CONFIRM. DATE SETTINGS LANGUAGE/ VIDEO OUT MODE STEP ZOOM SHTG STGS WARNG. Changing Camera Settings SETUP Menu You can change the camera settings by displaying the SETUP menu from the Shooting Setting menu...

User Guide
Page 118
... turn the camera on the camera in Step 4, press also the C/D button. Display the SETUP menu. Note • To continue using Interval Shooting, the settings made here are not valid and Auto Power Off does not work when the camera is changed. Available Settings OFF (Auto Power Off is set period of time, it is connected to turn on again. For the operating procedure, see P.111. 2. Changing the Auto Power Off Setting (AUTO POWER OFF) If you do not operate the camera...
... turn the camera on the camera in Step 4, press also the C/D button. Display the SETUP menu. Note • To continue using Interval Shooting, the settings made here are not valid and Auto Power Off does not work when the camera is changed. Available Settings OFF (Auto Power Off is set period of time, it is connected to turn on again. For the operating procedure, see P.111. 2. Changing the Auto Power Off Setting (AUTO POWER OFF) If you do not operate the camera...
User Guide
Page 124
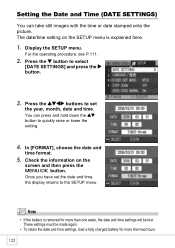
... the operating procedure, see P.111. 2. Press the !"#$ buttons to select [DATE SETTINGS] and press the $ button. 3. You can take still images with the time or date stamped onto the picture. These settings must be lost. Press the " button to set the date and time, the display returns to quickly raise or lower the setting. 4. button to the SETUP menu. Note • If the battery is explained here. 1. Check the information on the SETUP menu is removed...
... the operating procedure, see P.111. 2. Press the !"#$ buttons to select [DATE SETTINGS] and press the $ button. 3. You can take still images with the time or date stamped onto the picture. These settings must be lost. Press the " button to set the date and time, the display returns to quickly raise or lower the setting. 4. button to the SETUP menu. Note • If the battery is explained here. 1. Check the information on the SETUP menu is removed...
User Guide
Page 129
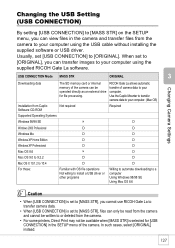
... cannot use RICOH Gate La to transfer camera data. • When [USB CONNECTION] is set to [MASS STR], files can only be read from the camera and cannot be written to or deleted from the camera. • For some printers, Direct Print may not be transfer of camera data to your computer using the supplied RICOH Gate La software. USB CONNECTION Mode MASS STR ORIGINAL Downloading data The SD memory card or internal RICOH Gate La allows automatic memory of the camera...
... cannot use RICOH Gate La to transfer camera data. • When [USB CONNECTION] is set to [MASS STR], files can only be read from the camera and cannot be written to or deleted from the camera. • For some printers, Direct Print may not be transfer of camera data to your computer using the supplied RICOH Gate La software. USB CONNECTION Mode MASS STR ORIGINAL Downloading data The SD memory card or internal RICOH Gate La allows automatic memory of the camera...
User Guide
Page 165
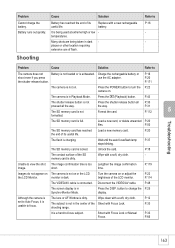
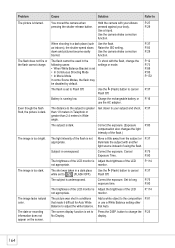
... the Shoot with Focus Lock. Wait until the auto focus/flash lamp P.37 stops blinking. short. Press the DISP. P.66 Troubleshooting 163 Replace with a soft, dry cloth. The camera is exhausted. The SD memory card is dirty. Although the camera is The lens or AF Window is locked. The subject is too Lengthen the image confirmation image. Battery runs out quickly. Cause Solution Battery has reached the end of flash. Many shots are being used...
... the Shoot with Focus Lock. Wait until the auto focus/flash lamp P.37 stops blinking. short. Press the DISP. P.66 Troubleshooting 163 Replace with a soft, dry cloth. The camera is exhausted. The SD memory card is dirty. Although the camera is The lens or AF Window is locked. The subject is too Lengthen the image confirmation image. Battery runs out quickly. Cause Solution Battery has reached the end of flash. Many shots are being used...
User Guide
Page 166
... Continuous Shooting Mode • In Movie Mode In some Scene Modes, the flash may be disabled by default. The flash is set to adjust the white balance. Charge the rechargeable battery or P.16 use a White Balance setting other Balance to Flash Off. Correct the exposure. (Exposure P.80 compensation also changes the light intensity of the flash.) The light intensity of the LCD monitor is overexposed. Correct the exposure. monitor. The screen display function is not appropriate. P.37 as indoors), the shutter speed slows Raise the ISO setting...
... Continuous Shooting Mode • In Movie Mode In some Scene Modes, the flash may be disabled by default. The flash is set to adjust the white balance. Charge the rechargeable battery or P.16 use a White Balance setting other Balance to Flash Off. Correct the exposure. (Exposure P.80 compensation also changes the light intensity of the flash.) The light intensity of the LCD monitor is overexposed. Correct the exposure. monitor. The screen display function is not appropriate. P.37 as indoors), the shutter speed slows Raise the ISO setting...
User Guide
Page 167
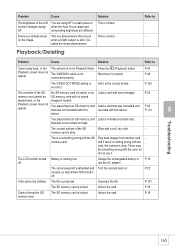
... VIDEO OUT MODE setting is not connected properly. that was not recorded normally. memory card. A file cannot be played back, or the Playback screen does not appear. Troubleshooting 165 Problem Cause Solution The brightness of the LCD You are different. surrounding brightness are using AF in Playback Mode. Playback/Deleting Refer to Cannot play back, or the The camera is okay. The VIDEO/AV cable is incorrect. Reconnect it to the correct format. No SD memory card...
... VIDEO OUT MODE setting is not connected properly. that was not recorded normally. memory card. A file cannot be played back, or the Playback screen does not appear. Troubleshooting 165 Problem Cause Solution The brightness of the LCD You are different. surrounding brightness are using AF in Playback Mode. Playback/Deleting Refer to Cannot play back, or the The camera is okay. The VIDEO/AV cable is incorrect. Reconnect it to the correct format. No SD memory card...
User Guide
Page 168
... one P.122 week, the date setting will be heard. SETTINGS] to the "Software User Guide" (PDF file). Set the correct date/time. Charge the rechargeable battery or use the AC adapter. Set it again. P.20 memory card. P.122 The set to the correct format. Load correctly. P.16 P.19 P.171 Camera malfunction. P.116 The beep sound cannot The beep sound volume is set date disappeared. Make the settings again. Remove the battery and load it to [OFF]. Images do not appear on...
... one P.122 week, the date setting will be heard. SETTINGS] to the "Software User Guide" (PDF file). Set the correct date/time. Charge the rechargeable battery or use the AC adapter. Set it again. P.20 memory card. P.122 The set to the correct format. Load correctly. P.16 P.19 P.171 Camera malfunction. P.116 The beep sound cannot The beep sound volume is set date disappeared. Make the settings again. Remove the battery and load it to [OFF]. Images do not appear on...

User Guide
Page 172
...; AF Method • AF Measurement Range Internal Flash • Method • Shooting Distance • Operating Modes Date Maintain Time Normal Shooting: External Passive/CCD method Macro: CCD method Normal: approx. 0.3 m to A, Macro: approx. 0.01 m to A Flashmatic Approx. 0.2 to 2.4 m (Wide-angle), Approx. 0.14 to 1.8 m (Telephoto) (ISO: AUTO) Flash Off/Auto/Red-eye reduction/Forced flash/Flash synchro Approx. 1 week Image Data Record/Playback Part Pixels • Still Image 2816 × 2112, 2784 × 1856, 2048...
...; AF Method • AF Measurement Range Internal Flash • Method • Shooting Distance • Operating Modes Date Maintain Time Normal Shooting: External Passive/CCD method Macro: CCD method Normal: approx. 0.3 m to A, Macro: approx. 0.01 m to A Flashmatic Approx. 0.2 to 2.4 m (Wide-angle), Approx. 0.14 to 1.8 m (Telephoto) (ISO: AUTO) Flash Off/Auto/Red-eye reduction/Forced flash/Flash synchro Approx. 1 week Image Data Record/Playback Part Pixels • Still Image 2816 × 2112, 2784 × 1856, 2048...
User Guide
Page 176
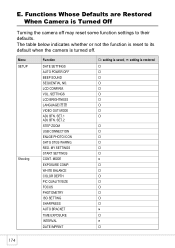
SETTINGS LCD BRIGHTNESS LANGUAGE/ VIDEO OUT MODE ADJ BTN. SET.2 STEP ZOOM USB CONNECTION ENLGE PHOTO ICON SHTG STGS WARNG. MODE EXPOSURE COMP. E. Menu SETUP Shooting Function DATE SETTINGS AUTO POWER OFF BEEP SOUND SEQUENTIAL NO. The table below indicates whether or not the function is reset to their defaults. MY SETTINGS START SETTINGS CONT. WHITE BALANCE COLOR DEPTH PIC QUALITY/SIZE FOCUS PHOTOMETRY ISO SETTING SHARPNESS AUTO BRACKET TIME EXPOSURE INTERVAL DATE IMPRINT O: setting is saved, ×: setting is turned off may reset some function settings to its default ...
SETTINGS LCD BRIGHTNESS LANGUAGE/ VIDEO OUT MODE ADJ BTN. SET.2 STEP ZOOM USB CONNECTION ENLGE PHOTO ICON SHTG STGS WARNG. MODE EXPOSURE COMP. E. Menu SETUP Shooting Function DATE SETTINGS AUTO POWER OFF BEEP SOUND SEQUENTIAL NO. The table below indicates whether or not the function is reset to their defaults. MY SETTINGS START SETTINGS CONT. WHITE BALANCE COLOR DEPTH PIC QUALITY/SIZE FOCUS PHOTOMETRY ISO SETTING SHARPNESS AUTO BRACKET TIME EXPOSURE INTERVAL DATE IMPRINT O: setting is saved, ×: setting is turned off may reset some function settings to its default ...
User Guide
Page 181
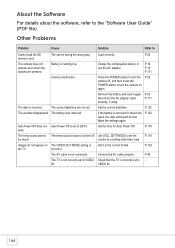
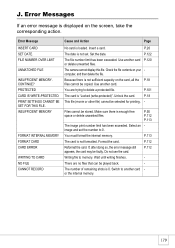
... This file (movie or other file) cannot be faulty. Make sure there is not formatted. P.112 Writing file to delete a protected file. The number of remaining shots is loaded. Error Messages If an error message is "Locked (write-protected)". INSUFFICIENT MEMORY FORMAT INTERNAL MEMORY FORMAT CARD CARD ERROR WRITING TO CARD NO FILE CANNOT RECORD Cause and Action Page No card is 0. Set the date. Select an image and set . J. Insert a card. P.122 The file number limit has been exceeded. Use another card P.120 or delete unwanted files. The camera cannot display this file...
... This file (movie or other file) cannot be faulty. Make sure there is not formatted. P.112 Writing file to delete a protected file. The number of remaining shots is loaded. Error Messages If an error message is "Locked (write-protected)". INSUFFICIENT MEMORY FORMAT INTERNAL MEMORY FORMAT CARD CARD ERROR WRITING TO CARD NO FILE CANNOT RECORD Cause and Action Page No card is 0. Set the date. Select an image and set . J. Insert a card. P.122 The file number limit has been exceeded. Use another card P.120 or delete unwanted files. The camera cannot display this file...


