Manuals
Page 1
Read this manual carefully before you use , be sure to the HTML/PDF files on the supplied CD-ROM. For safe and correct use this manual, refer to read the Safety Information in this machine and keep it handy for future reference. User Guide What You Can Do with This Machine Getting Started Copy Print Scan Document Server Web Image Monitor Adding Paper and Ink Troubleshooting Appendix For information not in "Read This First" before using the machine.
Read this manual carefully before you use , be sure to the HTML/PDF files on the supplied CD-ROM. For safe and correct use this manual, refer to read the Safety Information in this machine and keep it handy for future reference. User Guide What You Can Do with This Machine Getting Started Copy Print Scan Document Server Web Image Monitor Adding Paper and Ink Troubleshooting Appendix For information not in "Read This First" before using the machine.

Manuals
Page 3
... Adding Icons to the [Home] Screen...29 Registering Functions in a Program...33 Example of Major Features...7 1. TABLE OF CONTENTS How to Read the Manuals...5 Symbols Used in the Manuals...5 Model-Specific Information...6 Names of Programs...35 Turning On/Off the Power...37 Turning On the Main Power...37 Turning Off the Main...
... Adding Icons to the [Home] Screen...29 Registering Functions in a Program...33 Example of Major Features...7 1. TABLE OF CONTENTS How to Read the Manuals...5 Symbols Used in the Manuals...5 Model-Specific Information...6 Names of Programs...35 Turning On/Off the Power...37 Turning On the Main Power...37 Turning Off the Main...

Manuals
Page 5
...Windows/Confirming a Computer's Information...82 Registering an SMB Folder...84 Deleting an SMB Registered Folder...87 Entering the Path to the Destination Manually 88 Basic Procedure for Sending Scan Files by E-mail 89 Registering an E-mail Destination...90 Deleting an E-mail Destination...91 Entering an E-...mail Address Manually...92 Basic Procedure for Loading Paper...103 Loading Paper into the Paper Input Location 105 Printing from the Paper Input Location Using ...
...Windows/Confirming a Computer's Information...82 Registering an SMB Folder...84 Deleting an SMB Registered Folder...87 Entering the Path to the Destination Manually 88 Basic Procedure for Sending Scan Files by E-mail 89 Registering an E-mail Destination...90 Deleting an E-mail Destination...91 Entering an E-...mail Address Manually...92 Basic Procedure for Loading Paper...103 Loading Paper into the Paper Input Location 105 Printing from the Paper Input Location Using ...

Manuals
Page 7
... or loss of data. Indicates instructions stored in a file on a provided CD-ROM. (mainly Europe) (mainly North America) Differences in the Manuals This manual uses the following symbols: Indicates points to pay attention to when using the machine, and explanations of likely causes of paper misfeeds, damage to read... functions, and instructions on the machine's display or control panels. This symbol is located at the end of sections. How to Read the Manuals Symbols Used in the functions of Region A and Region B models are indicated by the symbol that corresponds to the model you can find ...
... or loss of data. Indicates instructions stored in a file on a provided CD-ROM. (mainly Europe) (mainly North America) Differences in the Manuals This manual uses the following symbols: Indicates points to pay attention to when using the machine, and explanations of likely causes of paper misfeeds, damage to read... functions, and instructions on the machine's display or control panels. This symbol is located at the end of sections. How to Read the Manuals Symbols Used in the functions of Region A and Region B models are indicated by the symbol that corresponds to the model you can find ...

Manuals
Page 8
... This section explains how you can identify the region your machine is a region B model: • CODE XXXX -17 • 120-127 V • Dimensions in this manual are given in the position shown below. The label contains details that corresponds to . CPL004 The following , your machine belongs to the region of the...
... This section explains how you can identify the region your machine is a region B model: • CODE XXXX -17 • 120-127 V • Dimensions in this manual are given in the position shown below. The label contains details that corresponds to . CPL004 The following , your machine belongs to the region of the...

Manuals
Page 9
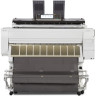
Names of Major Features In this manual, major features of the machine are referred to as follows: • Roll Unit RU6520 Paper Input Location 2 7
Names of Major Features In this manual, major features of the machine are referred to as follows: • Roll Unit RU6520 Paper Input Location 2 7

Manuals
Page 13
Registering Destinations Registering Destinations CQH101 Using the control panel to register destinations in the Address Book See "Registering a destination in the address book manually", Scan . 11
Registering Destinations Registering Destinations CQH101 Using the control panel to register destinations in the Address Book See "Registering a destination in the address book manually", Scan . 11

Manuals
Page 65
... for information on as an Administrators group member. If the [AutoPlay] dialog box appears, click [Run AUTORUN.EXE]. 3. For the information not included in this manual.) 2. Insert the provided CD-ROM into the computer's CD-ROM drive. Print This chapter describes frequently used printer functions and operations. Select an interface language...
... for information on as an Administrators group member. If the [AutoPlay] dialog box appears, click [Run AUTORUN.EXE]. 3. For the information not included in this manual.) 2. Insert the provided CD-ROM into the computer's CD-ROM drive. Print This chapter describes frequently used printer functions and operations. Select an interface language...

Manuals
Page 66
...Windows Vista/7 or Windows Server 2008/2008 R2. Click [PostScript 3 Printer Driver]. 5. When the device type selection appears, select "RICOH Network Printer C model". 12. Select one of the selected printer is installed on this machine, an intermediate certificate must be authenticated ...by the certificate authority will not be performed correctly. • If validation cannot be installed on this manual.) 64 After reading the agreement, click [I accept the agreement.], and then click [Next]. 6. Check that installation is especially necessary...
...Windows Vista/7 or Windows Server 2008/2008 R2. Click [PostScript 3 Printer Driver]. 5. When the device type selection appears, select "RICOH Network Printer C model". 12. Select one of the selected printer is installed on this machine, an intermediate certificate must be authenticated ...by the certificate authority will not be performed correctly. • If validation cannot be installed on this manual.) 64 After reading the agreement, click [I accept the agreement.], and then click [Next]. 6. Check that installation is especially necessary...

Manuals
Page 67
... to use , and then click [Next]. You can also print a test page. 14. Using the LPR port 1. Double-click the machine name to close this manual.) 2.
... to use , and then click [Next]. You can also print a test page. 14. Using the LPR port 1. Double-click the machine name to close this manual.) 2.

Manuals
Page 68
...] dialog box appears, click [Run AUTORUN.EXE]. 3. Enter the machine name or IP address in the [Name or address of the options to use this manual.) 2. The installation starts. 15. Quit all applications. (Do not close this function, you want to use a machine not listed here, click [Specify Address], and then...
...] dialog box appears, click [Run AUTORUN.EXE]. 3. Enter the machine name or IP address in the [Name or address of the options to use this manual.) 2. The installation starts. 15. Quit all applications. (Do not close this function, you want to use a machine not listed here, click [Specify Address], and then...

Manuals
Page 70
.... 15. Right-click the icon of the selected printer is displayed in the [Browse for Windows print server. 1. Quit all applications. (Do not close this manual.) 2. Print 4. The [Port Configuration:] window appears. If the [AutoPlay] dialog box appears, click [Run AUTORUN.EXE]. 3. Click [PostScript 3 Printer Driver]. 5. Double-click the computer name...
.... 15. Right-click the icon of the selected printer is displayed in the [Browse for Windows print server. 1. Quit all applications. (Do not close this manual.) 2. Print 4. The [Port Configuration:] window appears. If the [AutoPlay] dialog box appears, click [Run AUTORUN.EXE]. 3. Click [PostScript 3 Printer Driver]. 5. Double-click the computer name...
Manuals
Page 71
... connected to the [Printers], [Printers and Faxes], or [Devices and Printers] window. Click [Next]. Windows XP, Windows Server 2003/2003 R2 1. Select [No, not this manual.) 2. If the printer driver has already been installed and plug and play is enabled, the icon of the machine whose driver you are in the...
... connected to the [Printers], [Printers and Faxes], or [Devices and Printers] window. Click [Next]. Windows XP, Windows Server 2003/2003 R2 1. Select [No, not this manual.) 2. If the printer driver has already been installed and plug and play is enabled, the icon of the machine whose driver you are in the...

Manuals
Page 72
... and install driver software (recommended)]. 6. Windows 7, Windows Server 2008 R2 1. If the [AutoPlay] dialog box appears, click [Close]. 7. Quit all applications. (Do not close this manual.) 2. Connect the machine and computer using a USB cable. The number after "USB" varies depending on the power of printers connected. Click [Devices and Printers] from...], [Printers and Faxes], or [Devices and Printers] window. Turn on the power of the machine is installed automatically. 5. Quit all applications. (Do not close this manual.) 2.
... and install driver software (recommended)]. 6. Windows 7, Windows Server 2008 R2 1. If the [AutoPlay] dialog box appears, click [Close]. 7. Quit all applications. (Do not close this manual.) 2. Connect the machine and computer using a USB cable. The number after "USB" varies depending on the power of printers connected. Click [Devices and Printers] from...], [Printers and Faxes], or [Devices and Printers] window. Turn on the power of the machine is installed automatically. 5. Quit all applications. (Do not close this manual.) 2.

Manuals
Page 87
.... When [Do not Specify] is selected, the SMB User Name and SMB Password that [SMB] is set correctly. 85 You can either enter the path manually or locate the folder by browsing the network. 18. Press [Change] under "Login Password". 13. To specify a folder, you have specified in the selected title...
.... When [Do not Specify] is selected, the SMB User Name and SMB Password that [SMB] is set correctly. 85 You can either enter the path manually or locate the folder by browsing the network. 18. Press [Change] under "Login Password". 13. To specify a folder, you have specified in the selected title...

Manuals
Page 88
... the destination computer. 3. Press [Change] under it appear. 86 If the network does not allow automatic obtaining of the destination computer. 5. Locating the SMB folder manually 1. Press [OK]. For example: if the name of the entered path is "Share", the path will be \\User\Share. Press [Exit]. Press [Exit], and then...
... the destination computer. 3. Press [Change] under it appear. 86 If the network does not allow automatic obtaining of the destination computer. 5. Locating the SMB folder manually 1. Press [OK]. For example: if the name of the entered path is "Share", the path will be \\User\Share. Press [Exit]. Press [Exit], and then...

Manuals
Page 90
... Test]. In the following example path, the shared folder name is "user" and the computer name is performed to the computer. Press [Manual Entry] for the folder. Enter the path for the password to the computer. Depending on the right side of the user name field to... the Destination Manually 1. Press [OK]. 88 Press [Manual Entry] on the destination setting, enter the password for logging in to display the soft keyboard. 8. Press [OK]. 6. Check...
... Test]. In the following example path, the shared folder name is "user" and the computer name is performed to the computer. Press [Manual Entry] for the folder. Enter the path for the password to the computer. Depending on the right side of the user name field to... the Destination Manually 1. Press [OK]. 88 Press [Manual Entry] on the destination setting, enter the password for logging in to display the soft keyboard. 8. Press [OK]. 6. Check...

Manuals
Page 94
Press [Delete All], and then press [OK]. 8. Press [Exit]. 10. Press [Manual Entry]. 2. Press [OK]. 9. Entering an E-mail Address Manually 1. Scan 7. Press [OK]. 92 Press the [User Tools/Counter] key. Enter the e-mail address. 3. 5.
Press [Delete All], and then press [OK]. 8. Press [Exit]. 10. Press [Manual Entry]. 2. Press [OK]. 9. Entering an E-mail Address Manually 1. Scan 7. Press [OK]. 92 Press the [User Tools/Counter] key. Enter the e-mail address. 3. 5.

Manuals
Page 96
To specify an unregistered user name, press [Manual Entry], and then enter the name. Press [OK]. 7. Place originals. If scanning does not start automatically, press the [Start] key. Press [Select Stored File]. 2. From ...
To specify an unregistered user name, press [Manual Entry], and then enter the name. Press [OK]. 7. Place originals. If scanning does not start automatically, press the [Start] key. Press [Select Stored File]. 2. From ...

Manuals
Page 100
... Document Server. 98 Specify a user name, and then press [OK]. Press [Finish Scanning] after all documents are names that were registered in the screen, press [Manual Entry], and then enter a user name. 5. Document Server 1. Press the [Home] key on the top left of the control panel, and press the [Document Server...
... Document Server. 98 Specify a user name, and then press [OK]. Press [Finish Scanning] after all documents are names that were registered in the screen, press [Manual Entry], and then enter a user name. 5. Document Server 1. Press the [Home] key on the top left of the control panel, and press the [Document Server...


