
Manuals
Page 5
...Server Storing Data...97 Printing Stored Documents...99 7. Adding Paper and Ink Precautions for Storing Scan Files...93 Checking a Stored File Selected from the Paper Bypass Location Using the Printer Function 122 Recommended Paper Sizes and Types...126 3 Web Image Monitor Displaying Top...91 Entering an E-mail Address Manually...92 Basic Procedure for Loading Paper...103 Loading Paper into the Paper Input Location 105 Printing from the Paper Input Location Using the Printer Function 117 Loading Paper into the Paper Bypass Location 119 Printing from the List 94 Specifying the ...
...Server Storing Data...97 Printing Stored Documents...99 7. Adding Paper and Ink Precautions for Storing Scan Files...93 Checking a Stored File Selected from the Paper Bypass Location Using the Printer Function 122 Recommended Paper Sizes and Types...126 3 Web Image Monitor Displaying Top...91 Entering an E-mail Address Manually...92 Basic Procedure for Loading Paper...103 Loading Paper into the Paper Input Location 105 Printing from the Paper Input Location Using the Printer Function 117 Loading Paper into the Paper Bypass Location 119 Printing from the List 94 Specifying the ...

Manuals
Page 24
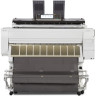
... to the size of your originals. 7. Rewind button Press this lever to copy or print from the paper bypass location. Load paper print side up. 11. Paper Input Location 2 Load a paper roll here. 16. Use this button to load the paper roll or to clean the platen. 18. 2. Getting Started 4. [Scanner Stop] key Use if originals are delivered...
... to the size of your originals. 7. Rewind button Press this lever to copy or print from the paper bypass location. Load paper print side up. 11. Paper Input Location 2 Load a paper roll here. 16. Use this button to load the paper roll or to clean the platen. 18. 2. Getting Started 4. [Scanner Stop] key Use if originals are delivered...

Manuals
Page 26
Paper Input Location 2 Load a paper roll onto this unit. 24 This is useful to change quickly to set a paper roll onto the paper input location. Paper holder Use to a different size paper roll from the paper holder. 2. 2. Getting Started Guide to Functions of the Machine's Options Guide to Functions of the Machine's External Options 1 2 CPL003 1.
Paper Input Location 2 Load a paper roll onto this unit. 24 This is useful to change quickly to set a paper roll onto the paper input location. Paper holder Use to a different size paper roll from the paper holder. 2. 2. Getting Started Guide to Functions of the Machine's Options Guide to Functions of the Machine's External Options 1 2 CPL003 1.

Manuals
Page 43
...in . 41 Placing Originals on the screen. 2. Make sure that "Ready" appears on the Original Table 1. Using both hands before loading the next original. If you load the next original while the machine is printing on the original table. • When inserting an original, push it . Make sure...CPT006 3. Adjust the original guides so they are flush against the rollers. Placing Originals Placing Originals • Place one original at a time on paper that requires a long time for the ink to dry, such as is, it may damage the original. • If the original's front or...
...in . 41 Placing Originals on the screen. 2. Make sure that "Ready" appears on the Original Table 1. Using both hands before loading the next original. If you load the next original while the machine is printing on the original table. • When inserting an original, push it . Make sure...CPT006 3. Adjust the original guides so they are flush against the rollers. Placing Originals Placing Originals • Place one original at a time on paper that requires a long time for the ink to dry, such as is, it may damage the original. • If the original's front or...

Manuals
Page 57
... length for the reduce/enlarge ratio and cuts the paper. 1. You can use this method to copy different sized originals to cut the paper loaded in the paper input location. • You cannot cut methods are available: Synchro Cut Cuts the paper at the same length as the original. Synchro Cut... Cuts the paper at the same length as the original. You can use...
... length for the reduce/enlarge ratio and cuts the paper. 1. You can use this method to copy different sized originals to cut the paper loaded in the paper input location. • You cannot cut methods are available: Synchro Cut Cuts the paper at the same length as the original. Synchro Cut... Cuts the paper at the same length as the original. You can use...

Manuals
Page 61
...to clear the settings. • You can change the paper type and thickness settings in [Input Paper Settings] in the paper bypass location, see "Input Paper Settings", Connecting the Machine/System Settings. Make sure that cannot be loaded on the back of copies with the number keys. ...the originals onto two or more sheets of the paper as necessary. 5. In step 4, select [Matches]. 11. For details, see p.119 "Loading Paper into the Paper Bypass Location". Lower the paper holding lever, and then close the front cover. 4. Press [Paper Size]. 7. Place the original, and start copying...
...to clear the settings. • You can change the paper type and thickness settings in [Input Paper Settings] in the paper bypass location, see "Input Paper Settings", Connecting the Machine/System Settings. Make sure that cannot be loaded on the back of copies with the number keys. ...the originals onto two or more sheets of the paper as necessary. 5. In step 4, select [Matches]. 11. For details, see p.119 "Loading Paper into the Paper Bypass Location". Lower the paper holding lever, and then close the front cover. 4. Press [Paper Size]. 7. Place the original, and start copying...

Manuals
Page 75
... multiple copies, specify a number of sets in Windows 7 as the orientation of paper that contains the paper you select [Auto Select Paper Input] in the upper left corner of the original to the paper size and type specified. 8. Click [Preferences]. 4. If you want to print ... location that is automatically selected according to be printed. 6. Click the WordPad menu button in the "Paper Input Location:" list, the paper input location is loaded in the paper input location. 9. Start printing from the printer driver using WordPad in the "Copies:" box. 11. Select [Color]...
... multiple copies, specify a number of sets in Windows 7 as the orientation of paper that contains the paper you select [Auto Select Paper Input] in the upper left corner of the original to the paper size and type specified. 8. Click [Preferences]. 4. If you want to print ... location that is automatically selected according to be printed. 6. Click the WordPad menu button in the "Paper Input Location:" list, the paper input location is loaded in the paper input location. 9. Start printing from the printer driver using WordPad in the "Copies:" box. 11. Select [Color]...

Manuals
Page 105
... fingers becoming trapped or injured. • Hold the paper roll horizontally with soap and water. • You cannot load paper in your hands to get dirty. Precautions for Loading Paper • Be careful when replacing the paper, clearing paper jams, or cleaning the platen. Doing so may result.... • When replacing paper rolls, do not put your fingers. •...
... fingers becoming trapped or injured. • Hold the paper roll horizontally with soap and water. • You cannot load paper in your hands to get dirty. Precautions for Loading Paper • Be careful when replacing the paper, clearing paper jams, or cleaning the platen. Doing so may result.... • When replacing paper rolls, do not put your fingers. •...
Manuals
Page 106
..., see p.60 "Copying onto Custom Size Paper from the Paper Bypass Location". Adding Paper and Ink • In Low Power mode or Sleep mode • If paper is jammed • If a service call message is displayed • For paper types and sizes that can be loaded in the paper input locations and paper bypass location, see "Specifying a custom...
..., see p.60 "Copying onto Custom Size Paper from the Paper Bypass Location". Adding Paper and Ink • In Low Power mode or Sleep mode • If paper is jammed • If a service call message is displayed • For paper types and sizes that can be loaded in the paper input locations and paper bypass location, see "Specifying a custom...

Manuals
Page 107
Loading Paper into the Paper Input Location Loading Paper into the Paper Input Location This section explains how to load a paper roll into the paper input location. • When the paper roll is in one of the paper with scissors before loading it. • The leading edge is damaged CPT043 • Adhesive tape, glue or paste is sticking to it . Cut off the edge of the following conditions, you cannot use it CPT044 • The paper is wrinkled CPT045 105
Loading Paper into the Paper Input Location Loading Paper into the Paper Input Location This section explains how to load a paper roll into the paper input location. • When the paper roll is in one of the paper with scissors before loading it. • The leading edge is damaged CPT043 • Adhesive tape, glue or paste is sticking to it . Cut off the edge of the following conditions, you cannot use it CPT044 • The paper is wrinkled CPT045 105

Manuals
Page 109
... flange with all the paper roll adjustment levers open when loading a paper roll whose core is torn CPT048 • If you may crease or wrinkle. 107 Loading Paper into the paper roll when the end face of the paper roll is not aligned to cut off the paper edges of a paper roll that is installed in... the paper input location, be careful not to the paper core or when a small quantity of paper is left. This could ...
... flange with all the paper roll adjustment levers open when loading a paper roll whose core is torn CPT048 • If you may crease or wrinkle. 107 Loading Paper into the paper roll when the end face of the paper roll is not aligned to cut off the paper edges of a paper roll that is installed in... the paper input location, be careful not to the paper core or when a small quantity of paper is left. This could ...

Manuals
Page 110
... sure that the output basket is heavy and may need to other paper roll, place the paper roll on . When the core of the paper roll is loaded into Paper Input Locations 1 and 2. 8. Each paper input location is 50.8 mm (2 inches), open the paper roll adjustment levers. Adding Paper and Ink Load the paper roll when the power of the...
... sure that the output basket is heavy and may need to other paper roll, place the paper roll on . When the core of the paper roll is loaded into Paper Input Locations 1 and 2. 8. Each paper input location is 50.8 mm (2 inches), open the paper roll adjustment levers. Adding Paper and Ink Load the paper roll when the power of the...

Manuals
Page 111
When the core of the paper roll is 50.8 mm (2 inches) 2. When the core of the paper roll is 76.2 mm (3 inches) Paper roll direction When loading the paper roll to the paper holder and machine, make sure that "Ready" appears on the [Home] screen. Right flange 1. CPL011 Make sure that the edge of the paper feeds from top of the control panel, and press the [Copier] or [Printer] icon on the screen. 109 Press the [Home] key on the top left of the roll toward the front. 1 CPT032 1. Loading Paper into the Paper Input Location 1 2 CPT019 1.
When the core of the paper roll is 50.8 mm (2 inches) 2. When the core of the paper roll is 76.2 mm (3 inches) Paper roll direction When loading the paper roll to the paper holder and machine, make sure that "Ready" appears on the [Home] screen. Right flange 1. CPL011 Make sure that the edge of the paper feeds from top of the control panel, and press the [Copier] or [Printer] icon on the screen. 109 Press the [Home] key on the top left of the roll toward the front. 1 CPT032 1. Loading Paper into the Paper Input Location 1 2 CPT019 1.

Manuals
Page 112
Pull the bar in front of Paper Input Location 1, and then hook it clicks. After you release the button, the paper is loaded, press down the rewind button on the right of the output basket. Lift up the paper input location cover until it in front of Paper Input Location 2 forward. Remove the bar in front of the paper input location for one second or more. When the paper roll is rewound automatically. CPT014 5. 8. If there is no paper roll loaded, proceed to step 13. 110 Adding Paper and Ink 2. CPT013 4. CPT012 3.
Pull the bar in front of Paper Input Location 1, and then hook it clicks. After you release the button, the paper is loaded, press down the rewind button on the right of the output basket. Lift up the paper input location cover until it in front of Paper Input Location 2 forward. Remove the bar in front of the paper input location for one second or more. When the paper roll is rewound automatically. CPT014 5. 8. If there is no paper roll loaded, proceed to step 13. 110 Adding Paper and Ink 2. CPT013 4. CPT012 3.

Manuals
Page 113
Place the paper roll on the left flange. Hold both flanges and place the paper roll on the flat place in front of the machine. CPT017 111 Make sure the edge of the paper feeds out of the bearing. 1 CPT016 1. Raise the lock lever on a flat surface. 10. Bearing 8. If the paper does not come out, press the button for at least a second and then release it from the paper input location. 9. Grip the flanges again, and then remove it so that the paper feeds out. 7. Loading Paper into the Paper Input Location CPT015 6.
Place the paper roll on the left flange. Hold both flanges and place the paper roll on the flat place in front of the machine. CPT017 111 Make sure the edge of the paper feeds out of the bearing. 1 CPT016 1. Raise the lock lever on a flat surface. 10. Bearing 8. If the paper does not come out, press the button for at least a second and then release it from the paper input location. 9. Grip the flanges again, and then remove it so that the paper feeds out. 7. Loading Paper into the Paper Input Location CPT015 6.

Manuals
Page 114
Remove both flanges, according to load. 14. Remove the left flange from the paper roll. Adding Paper and Ink 11. Adjust the paper roll adjustment levers of both the right flange and spool from the spool. CPT018 13. CPT020 12. Insert the flange with the spool from the right side of the paper roll you want to the core of the paper roll until it touches the paper roll. 112 CPT021 8.
Remove both flanges, according to load. 14. Remove the left flange from the paper roll. Adding Paper and Ink 11. Adjust the paper roll adjustment levers of both the right flange and spool from the spool. CPT018 13. CPT020 12. Insert the flange with the spool from the right side of the paper roll you want to the core of the paper roll until it touches the paper roll. 112 CPT021 8.

Manuals
Page 115
Lower the lock lever on the flat place in front of the bearing. CPT023 19. Turn the paper roll so that the edge of the paper feeds from the top of the shaft into the left flange. Insert the spool into the bearing. Place the right and left edge of the roll towards the front. 113 Loading Paper into the Paper Input Location CPT022 16. 15. CPT040 18. Holding the right flange with your hand, insert the left flange. Place the paper roll on the left flange until it touches the paper roll. 17.
Lower the lock lever on the flat place in front of the bearing. CPT023 19. Turn the paper roll so that the edge of the paper feeds from the top of the shaft into the left flange. Insert the spool into the bearing. Place the right and left edge of the roll towards the front. 113 Loading Paper into the Paper Input Location CPT022 16. 15. CPT040 18. Holding the right flange with your hand, insert the left flange. Place the paper roll on the left flange until it touches the paper roll. 17.

Manuals
Page 116
8. Adding Paper and Ink 20. Guides Be sure to step 21. 21. When loading a 50.8 mm (2 inches) paper roll, make sure that the edge of the paper roll with your hands underneath the paper, and feed paper so that all six paper roll adjustment levers are fully open. CPT041 When loading a 76.2 mm (3 inches) paper roll, proceed to hold the right and left side of the paper passes over the guides behind the paper roll. 2 2 1 2 CPT024 1. Paper roll 2. Hold the edge of the paper with both hands. 114 CPT034
8. Adding Paper and Ink 20. Guides Be sure to step 21. 21. When loading a 50.8 mm (2 inches) paper roll, make sure that the edge of the paper roll with your hands underneath the paper, and feed paper so that all six paper roll adjustment levers are fully open. CPT041 When loading a 76.2 mm (3 inches) paper roll, proceed to hold the right and left side of the paper passes over the guides behind the paper roll. 2 2 1 2 CPT024 1. Paper roll 2. Hold the edge of the paper with both hands. 114 CPT034

Manuals
Page 141
... to 3600 mm (141.8 inches) can be printed on matte film in a cold and dry environment, the back side of the paper might get dirty. • If the paper loaded in Paper Input Locations 1 and 2 are using is automatically selected, and you are the same type, thickness, and width, the machine automatically shifts to...
... to 3600 mm (141.8 inches) can be printed on matte film in a cold and dry environment, the back side of the paper might get dirty. • If the paper loaded in Paper Input Locations 1 and 2 are using is automatically selected, and you are the same type, thickness, and width, the machine automatically shifts to...

Manuals
Page 200
... to send the scanned data, or press [Cancel] to use the data or not. "Memory storage device not There is full. "No paper. Load paper of the following sizes." When the message appears on the [Home] screen, and then press the [Stop] key. Retry sending after sending ...jobs in the message. 9. Load paper of one of the sizes listed in standby state completes. Print or delete Scanner Journal. Troubleshooting Message Causes Solutions "Memory is full. "Output...
... to send the scanned data, or press [Cancel] to use the data or not. "Memory storage device not There is full. "No paper. Load paper of the following sizes." When the message appears on the [Home] screen, and then press the [Stop] key. Retry sending after sending ...jobs in the message. 9. Load paper of one of the sizes listed in standby state completes. Print or delete Scanner Journal. Troubleshooting Message Causes Solutions "Memory is full. "Output...


