Quick Use Guide
Page 14
Continued Printing from . Select the "Paper Tab" at the top of media you are printing on your job 14 When printing labels or thick Paper you must select "Bypass tray" & "Thick 1", Once you would like the selected from your Computer Printing to the Bypass Tray (Manual Feed Tray) Select the "Properties" button on , paper source you have selected " Bypass tray" and " Thick 1" , select "OK" Select "OK" to select the type of the window On the "Paper Tab" select "Input tray" and "Type", this will allow to print your print driver.
Continued Printing from . Select the "Paper Tab" at the top of media you are printing on your job 14 When printing labels or thick Paper you must select "Bypass tray" & "Thick 1", Once you would like the selected from your Computer Printing to the Bypass Tray (Manual Feed Tray) Select the "Properties" button on , paper source you have selected " Bypass tray" and " Thick 1" , select "OK" Select "OK" to select the type of the window On the "Paper Tab" select "Input tray" and "Type", this will allow to print your print driver.

Manuals
Page 13
...Pages into Single Page 101 When Using the PCL 6 Printer Driver...101 Types of Combine Printing...101 Printing on Envelopes...103 Configuring Envelope Settings Using the Control Panel 103 Printing on a Computer Running Windows/Confirming a Computer's Information...108 Registering an SMB Folder...110 ...Deleting an SMB Registered Folder...113 Entering the Path to Folder 107 Creating a Shared Folder on Envelopes Using the Printer Driver 103 Saving and Printing Using the ...
...Pages into Single Page 101 When Using the PCL 6 Printer Driver...101 Types of Combine Printing...101 Printing on Envelopes...103 Configuring Envelope Settings Using the Control Panel 103 Printing on a Computer Running Windows/Confirming a Computer's Information...108 Registering an SMB Folder...110 ...Deleting an SMB Registered Folder...113 Entering the Path to Folder 107 Creating a Shared Folder on Envelopes Using the Printer Driver 103 Saving and Printing Using the ...
Manuals
Page 107
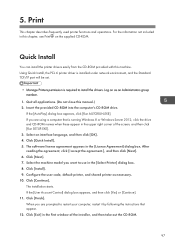
Using Quick Install, the PCL 6 printer driver is installed under network environment, and the Standard TCP/IP port will be set. • Manage Printers permission is running Windows 8 or Windows Server 2012, click the drive and CD-ROM names when these appear in the [License Agreement] ...10. After reading the agreement, click [I accept the agreement.], and then click [Next]. 6. Select the machine model you want to install the drivers. Click [Exit] in the [Select Printer] dialog box. 8. 5. Print This chapter describes frequently used printer functions and operations. For the information...
Using Quick Install, the PCL 6 printer driver is installed under network environment, and the Standard TCP/IP port will be set. • Manage Printers permission is running Windows 8 or Windows Server 2012, click the drive and CD-ROM names when these appear in the [License Agreement] ...10. After reading the agreement, click [I accept the agreement.], and then click [Next]. 6. Select the machine model you want to install the drivers. Click [Exit] in the [Select Printer] dialog box. 8. 5. Print This chapter describes frequently used printer functions and operations. For the information...
Manuals
Page 109
When Using the PCL 6 Printer Driver 1. In the "Document Size:" list, select the size of the window, and then click [Print]. 2. Select [Color] or [Black and White] in the "Input Tray:" list, the source tray is 2 sided printing. In the "Job Type:" ...
When Using the PCL 6 Printer Driver 1. In the "Document Size:" list, select the size of the window, and then click [Print]. 2. Select [Color] or [Black and White] in the "Input Tray:" list, the source tray is 2 sided printing. In the "Job Type:" ...
Manuals
Page 110
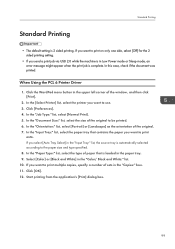
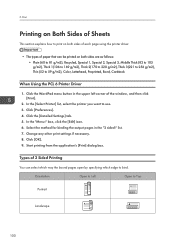
... 3. In the [Select Printer] list, select the printer you want to 59 g/m2), Color, Letterhead, Preprinted, Bond, Cardstock When Using the PCL 6 Printer Driver 1. Start printing from the application's [Print] dialog box. In the "Menu:" box, click the [Edit] icon. 6. Orientation Open to Left Open to bind.... Types of 2 Sided Printing You can be printed on both sides of each page using the printer driver. • The types of the window, and then click [Print]. 2. 5. Click [OK]. 9. Click the [Detailed Settings] tab. 5. Select the method for binding the ...
... 3. In the [Select Printer] list, select the printer you want to 59 g/m2), Color, Letterhead, Preprinted, Bond, Cardstock When Using the PCL 6 Printer Driver 1. Start printing from the application's [Print] dialog box. In the "Menu:" box, click the [Edit] icon. 6. Orientation Open to Left Open to bind.... Types of 2 Sided Printing You can be printed on both sides of each page using the printer driver. • The types of the window, and then click [Print]. 2. 5. Click [OK]. 9. Click the [Detailed Settings] tab. 5. Select the method for binding the ...
Manuals
Page 111
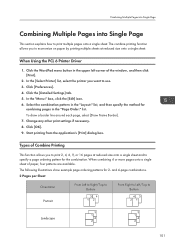
When Using the PCL 6 Printer Driver 1. Click [OK]. 9. and 4-page combinations. 2 Pages per Sheet Orientation From Left to Right/Top to Bottom From Right to Left/Top to print multiple pages ...:" list, and then specify the method for 2- The following illustrations show example page ordering patterns for combining pages in the upper left corner of the window, and then click [Print]. 2. Click the WordPad menu button in the "Page Order:" list. Start printing from the application's [Print] dialog box. Types of paper...
When Using the PCL 6 Printer Driver 1. Click [OK]. 9. and 4-page combinations. 2 Pages per Sheet Orientation From Left to Right/Top to Bottom From Right to Left/Top to print multiple pages ...:" list, and then specify the method for 2- The following illustrations show example page ordering patterns for combining pages in the upper left corner of the window, and then click [Print]. 2. Click the WordPad menu button in the "Page Order:" list. Start printing from the application's [Print] dialog box. Types of paper...
Manuals
Page 113
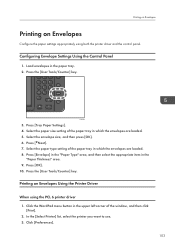
...appropriate item in the paper tray. 2. Press the [User Tools/Counter] key. Printing on Envelopes Configure the paper settings appropriately using the PCL 6 printer driver 1. Press [Tray Paper Settings]. 4. Press [OK]. 10. In the [Select Printer] list, select the printer you want to use. 3. Configuring... Envelope Settings Using the Control Panel 1. Select the paper size setting of the window, and then click [Print]. 2. Click the WordPad menu button in the upper left corner of the paper tray in which the envelopes are ...
...appropriate item in the paper tray. 2. Press the [User Tools/Counter] key. Printing on Envelopes Configure the paper settings appropriately using the PCL 6 printer driver 1. Press [Tray Paper Settings]. 4. Press [OK]. 10. In the [Select Printer] list, select the printer you want to use. 3. Configuring... Envelope Settings Using the Control Panel 1. Select the paper size setting of the window, and then click [Print]. 2. Click the WordPad menu button in the upper left corner of the paper tray in which the envelopes are ...
Manuals
Page 115
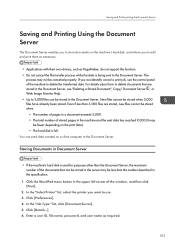
... files can send data created on the machine's hard disk, and allows you to edit and print them as necessary. • Applications with their own drivers, such as required. 105 In the "Job Type:" list, click [Document Server]. 5. Enter a user ID, file name, password, and user name ... to delete the transferred data. Click [Details...]. 6. In the "Select Printer" list, select the printer you want to use the control panel of the window, and then click [Print]. 2. If you accidentally cancel a print job, use . 3. Saving and Printing Using the Document Server Saving and Printing Using ...
... files can send data created on the machine's hard disk, and allows you to edit and print them as necessary. • Applications with their own drivers, such as required. 105 In the "Job Type:" list, click [Document Server]. 5. Enter a user ID, file name, password, and user name ... to delete the transferred data. Click [Details...]. 6. In the "Select Printer" list, select the printer you want to use the control panel of the window, and then click [Print]. 2. If you accidentally cancel a print job, use . 3. Saving and Printing Using the Document Server Saving and Printing Using ...
Manuals
Page 222
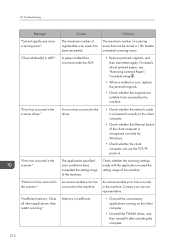
... has occurred on the client computer. • Uninstall the TWAIN driver, and then reinstall it after restarting the computer. 212 "Insufficient memory. The maximum number of scanning areas that can be scanned by Windows. • Check whether the client computer can use the TCP/...areas has been exceeded. Memory is insufficient. • Close all other applications, then restart scanning." "Error has occurred in the driver. • Check whether the network cable is connected correctly to be stored is recognized correctly by the machine. Causes Solutions The maximum...
... has occurred on the client computer. • Uninstall the TWAIN driver, and then reinstall it after restarting the computer. 212 "Insufficient memory. The maximum number of scanning areas that can be scanned by Windows. • Check whether the client computer can use the TCP/...areas has been exceeded. Memory is insufficient. • Close all other applications, then restart scanning." "Error has occurred in the driver. • Check whether the network cable is connected correctly to be stored is recognized correctly by the machine. Causes Solutions The maximum...

Manuals
Page 223
...the following cause: • Scanning cannot be performed if large values are using halftone or high resolution. For details about firewall, see Windows Help. "Invalid Winsock version. Please use version 1.1 or higher." "No response from the scanner." The machine or client computer is ... or copy Winsock from the operating system CD-ROM. For details about the settings, see "Relationship between scan settings, see TWAIN driver Help. "No response from the scanner." Reduce Scanner memory is connected to the network correctly. • Check whether the machine ...
...the following cause: • Scanning cannot be performed if large values are using halftone or high resolution. For details about firewall, see Windows Help. "Invalid Winsock version. Please use version 1.1 or higher." "No response from the scanner." The machine or client computer is ... or copy Winsock from the operating system CD-ROM. For details about the settings, see "Relationship between scan settings, see TWAIN driver Help. "No response from the scanner." Reduce Scanner memory is connected to the network correctly. • Check whether the machine ...
Manuals
Page 226
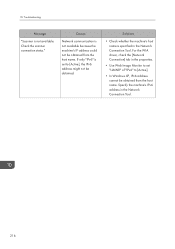
... address in the properties. • Use Web Image Monitor to set to [Active]. • In Windows XP, IPv6 address cannot be obtained. Causes Network communication is specified in the Network Connection Tool. For the WIA driver, check the [Network Connection] tab in the Network Connection Tool. 216 Check the scanner connection status...
... address in the properties. • Use Web Image Monitor to set to [Active]. • In Windows XP, IPv6 address cannot be obtained. Causes Network communication is specified in the Network Connection Tool. For the WIA driver, check the [Network Connection] tab in the Network Connection Tool. 216 Check the scanner connection status...


