Quick Use Guide
Page 8
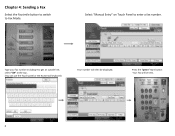
Chapter 4: Sending a Fax Select the Facsimile button to switch to enter a fax number. Type your fax number including 9 to get an outside line, select "OK" at the top . (You can use the Touch panel or the Numerical keyboard) Your number will be displayed. Press the "green" Start button Your Fax will then be Sent. 8 Select "Manual Entry" on Touch Panel to Fax Mode.
Chapter 4: Sending a Fax Select the Facsimile button to switch to enter a fax number. Type your fax number including 9 to get an outside line, select "OK" at the top . (You can use the Touch panel or the Numerical keyboard) Your number will be displayed. Press the "green" Start button Your Fax will then be Sent. 8 Select "Manual Entry" on Touch Panel to Fax Mode.
Quick Use Guide
Page 14
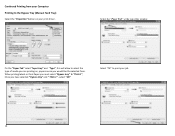
When printing labels or thick Paper you must select "Bypass tray" & "Thick 1", Once you would like the selected from your Computer Printing to the Bypass Tray (Manual Feed Tray) Select the "Properties" button on , paper source you have selected " Bypass tray" and " Thick 1" , select "OK" Select "OK" to select the type of media you are printing on your job 14 Select the "Paper Tab" at the top of the window On the "Paper Tab" select "Input tray" and "Type", this will allow to print your print driver. Continued Printing from .
When printing labels or thick Paper you must select "Bypass tray" & "Thick 1", Once you would like the selected from your Computer Printing to the Bypass Tray (Manual Feed Tray) Select the "Properties" button on , paper source you have selected " Bypass tray" and " Thick 1" , select "OK" Select "OK" to select the type of media you are printing on your job 14 Select the "Paper Tab" at the top of the window On the "Paper Tab" select "Input tray" and "Type", this will allow to print your print driver. Continued Printing from .
Quick Use Guide
Page 15
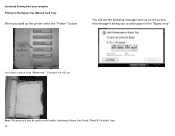
Continued Printing from your computer Printing to the Bypass Tray (Manual Feed Tray) When you walk up the printer select the "Printer" button You will see the following message come up on the screen, this message is asking you to print Lables, letterhead, Heavy Card Stock (Think) & Printable Tabs 15 Note: This process is placed in the "Bypass tray" Once paper is also be used to place paper in the "Bypass tray" Your print job will start.
Continued Printing from your computer Printing to the Bypass Tray (Manual Feed Tray) When you walk up the printer select the "Printer" button You will see the following message come up on the screen, this message is asking you to print Lables, letterhead, Heavy Card Stock (Think) & Printable Tabs 15 Note: This process is placed in the "Bypass tray" Once paper is also be used to place paper in the "Bypass tray" Your print job will start.
Quick Use Guide
Page 19
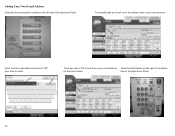
Once you select "OK' you will see your scan to email. Adding Your Own E-mail Address Select the Scanner button located on the main screen. side of the Operations Panel 19 To manually add an e‐mail not in the address book, select manual entry Enter the full e‐mail address and press "OK" your e‐mail address Press the Start Button on the right To complete on the left sideof the Operation Panel.
Once you select "OK' you will see your scan to email. Adding Your Own E-mail Address Select the Scanner button located on the main screen. side of the Operations Panel 19 To manually add an e‐mail not in the address book, select manual entry Enter the full e‐mail address and press "OK" your e‐mail address Press the Start Button on the right To complete on the left sideof the Operation Panel.

Manuals
Page 1
For safe and correct use, be sure to read the Safety Information in this manual, refer to the HTML/PDF files on the supplied CD-ROM. User Guide What You Can Do with This Machine Getting Started Copy Fax Print Scan Document Server Web Image Monitor Adding Paper and Toner Troubleshooting For information not in "Read This First" before using the machine.
For safe and correct use, be sure to read the Safety Information in this manual, refer to the HTML/PDF files on the supplied CD-ROM. User Guide What You Can Do with This Machine Getting Started Copy Fax Print Scan Document Server Web Image Monitor Adding Paper and Toner Troubleshooting For information not in "Read This First" before using the machine.

Manuals
Page 11
... of the Machine's External Options 33 Changing the Display Language...45 How to Use the [Home] Screen...46 Adding Icons to Read the Manuals...6 Symbols Used in the Manuals...6 Model-Specific Information...7 Names of Programs...53 Turning On/Off the Power...57 Turning On the Main Power...57 1 TABLE OF CONTENTS How...
... of the Machine's External Options 33 Changing the Display Language...45 How to Use the [Home] Screen...46 Adding Icons to Read the Manuals...6 Symbols Used in the Manuals...6 Model-Specific Information...7 Names of Programs...53 Turning On/Off the Power...57 Turning On the Main Power...57 1 TABLE OF CONTENTS How...

Manuals
Page 13
...Transmission After the Original Is Scanned 92 Storing a Document...93 Sending Stored Documents...94 Printing the Journal Manually...96 5. Scan Basic Procedure When Using Scan to the Destination Manually 114 Basic Procedure for Sending Scan Files by E-mail 115 Registering an E-mail Destination...116 Deleting ...an E-mail Destination...118 Entering an E-mail Address Manually...118 Basic Procedure for Storing Scan Files...119 3 Print Quick Install...97 Displaying the Printer Driver Properties...98 Standard Printing...99...
...Transmission After the Original Is Scanned 92 Storing a Document...93 Sending Stored Documents...94 Printing the Journal Manually...96 5. Scan Basic Procedure When Using Scan to the Destination Manually 114 Basic Procedure for Sending Scan Files by E-mail 115 Registering an E-mail Destination...116 Deleting ...an E-mail Destination...118 Entering an E-mail Address Manually...118 Basic Procedure for Storing Scan Files...119 3 Print Quick Install...97 Displaying the Printer Driver Properties...98 Standard Printing...99...
Manuals
Page 16
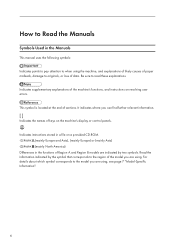
... control panels. Be sure to read these explanations. It indicates where you are using. Read the information indicated by two symbols. How to Read the Manuals Symbols Used in the Manuals This manual uses the following symbols: Indicates points to pay attention to when using , see page 7 "Model-Specific Information". 6
... control panels. Be sure to read these explanations. It indicates where you are using. Read the information indicated by two symbols. How to Read the Manuals Symbols Used in the Manuals This manual uses the following symbols: Indicates points to pay attention to when using , see page 7 "Model-Specific Information". 6

Manuals
Page 17
... The following , your machine is a region A model and "CODE XXXX -29" is a region B model: • CODE XXXX -17 • 120-127 V • Dimensions in this manual are given in two units of the machine, located in the position shown below. If your machine is a Region B model, refer to the inch units...
... The following , your machine is a region A model and "CODE XXXX -29" is a region B model: • CODE XXXX -17 • 120-127 V • Dimensions in this manual are given in two units of the machine, located in the position shown below. If your machine is a Region B model, refer to the inch units...

Manuals
Page 18
Names of Major Features In this manual, major features of the machine are referred to as follows: • Auto Reverse Document Feeder ARDF • Auto Document Feeder ADF (in this manual, "ADF" refers to the ARDF and the one-pass duplex scanning ADF) • Large Capacity Tray LCT 8
Names of Major Features In this manual, major features of the machine are referred to as follows: • Auto Reverse Document Feeder ARDF • Auto Document Feeder ADF (in this manual, "ADF" refers to the ARDF and the one-pass duplex scanning ADF) • Large Capacity Tray LCT 8
Manuals
Page 21
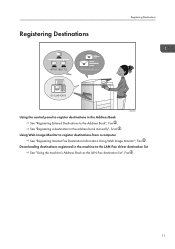
Downloading destinations registered in the Address Book See "Registering Entered Destinations to the Address Book", Fax . Registering Destinations Registering Destinations BRL060S Using the control panel to register destinations in the machine to the LAN-Fax driver destination list See "Using the machine's Address Book as the LAN-Fax destination list", Fax . 11 Using Web Image Monitor to register destinations from a computer See "Registering Internet Fax Destination Information Using Web Image Monitor", Fax . See "Registering a destination in the address book manually", Scan .
Downloading destinations registered in the Address Book See "Registering Entered Destinations to the Address Book", Fax . Registering Destinations Registering Destinations BRL060S Using the control panel to register destinations in the machine to the LAN-Fax driver destination list See "Using the machine's Address Book as the LAN-Fax destination list", Fax . 11 Using Web Image Monitor to register destinations from a computer See "Registering Internet Fax Destination Information Using Web Image Monitor", Fax . See "Registering a destination in the address book manually", Scan .

Manuals
Page 30
... address or host name instead of dialing the destination telephone number (Internet Fax and e-mail transmission). See "Specifying an IP-Fax Destination by Entering It Manually", Fax . • This machine can receive documents sent via Internet Fax or from computers (Internet Fax Reception and Mail to e-mail format, and...8226; To send a document, specify an e-mail address instead of a fax number (IP-Fax Transmission). See "Specifying an Internet Fax Destination by Entering It Manually", Fax . • This machine can receive e-mail messages via Internet Fax (IP-Fax Reception).
... address or host name instead of dialing the destination telephone number (Internet Fax and e-mail transmission). See "Specifying an IP-Fax Destination by Entering It Manually", Fax . • This machine can receive documents sent via Internet Fax or from computers (Internet Fax Reception and Mail to e-mail format, and...8226; To send a document, specify an e-mail address instead of a fax number (IP-Fax Transmission). See "Specifying an Internet Fax Destination by Entering It Manually", Fax . • This machine can receive e-mail messages via Internet Fax (IP-Fax Reception).
Manuals
Page 45
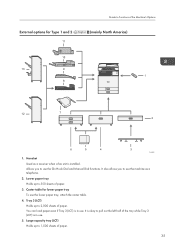
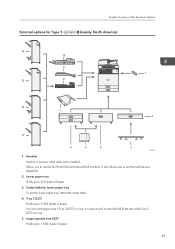
... as a telephone. 2. Large capacity tray (LCT) Holds up to use the machine as a receiver when a fax unit is in use the On Hook Dial and Manual Dial functions. External options for lower paper tray To use . You can load paper even if Tray 3 (LCT) is installed. Tray 3 (LCT) Holds up to...
... as a telephone. 2. Large capacity tray (LCT) Holds up to use the machine as a receiver when a fax unit is in use the On Hook Dial and Manual Dial functions. External options for lower paper tray To use . You can load paper even if Tray 3 (LCT) is installed. Tray 3 (LCT) Holds up to...

Manuals
Page 49
Guide to Functions of paper. 3. External options for lower paper tray To use the On Hook Dial and Manual Dial functions. Lower paper tray Holds up to 550 sheets of the Machine's Options • Finisher booklet tray Copies can be punched if the optional ...
Guide to Functions of paper. 3. External options for lower paper tray To use the On Hook Dial and Manual Dial functions. Lower paper tray Holds up to 550 sheets of the Machine's Options • Finisher booklet tray Copies can be punched if the optional ...
Manuals
Page 53
You can load paper even if Tray 3 (LCT) is in use. Lower paper tray Holds up to use the On Hook Dial and Manual Dial functions. Allows you to 1,500 sheets of paper. 43 It is okay to pull out the left half of the tray while Tray 3 (LCT) ...
You can load paper even if Tray 3 (LCT) is in use. Lower paper tray Holds up to use the On Hook Dial and Manual Dial functions. Allows you to 1,500 sheets of paper. 43 It is okay to pull out the left half of the tray while Tray 3 (LCT) ...
Manuals
Page 103
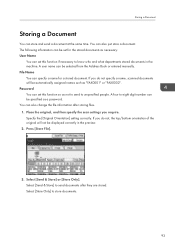
... a Document You can also just store a document. If you do not specify a name, scanned documents will not be selected from the Address Book or entered manually. Select [Send & Store] to send documents after storing files. 1. The following information can also change the file information after they are stored. If you require...
... a Document You can also just store a document. If you do not specify a name, scanned documents will not be selected from the Address Book or entered manually. Select [Send & Store] to send documents after storing files. 1. The following information can also change the file information after they are stored. If you require...

Manuals
Page 104
... name. You cannot use the following transmission methods: • Immediate Transmission • Parallel Memory Transmission • On Hook Dial • Manual Dial 94 To specify an unregistered user name, press [Manual Entry], and then enter the name. The documents stored in the Document Server. Press the [Start] key. 4. Re-enter the password...
... name. You cannot use the following transmission methods: • Immediate Transmission • Parallel Memory Transmission • On Hook Dial • Manual Dial 94 To specify an unregistered user name, press [Manual Entry], and then enter the name. The documents stored in the Document Server. Press the [Start] key. 4. Re-enter the password...
Manuals
Page 106
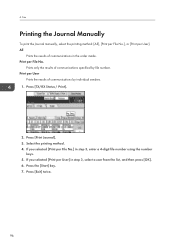
Select the printing method. 4. Fax Printing the Journal Manually To print the Journal manually, select the printing method: [All], [Print per File No.], or [Print per File No. Print per User]. If you selected [Print per File No.] in ...
Select the printing method. 4. Fax Printing the Journal Manually To print the Journal manually, select the printing method: [All], [Print per File No.], or [Print per File No. Print per User]. If you selected [Print per File No.] in ...
Manuals
Page 107
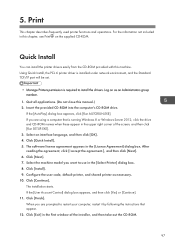
... click [OK]. 4. Click [Next]. 7. The installation starts. Click [Finish]. Quick Install You can install the printer drivers easily from the CD-ROM provided with this manual.) 2. When you want to install the drivers. Print This chapter describes frequently used printer functions and operations. Using Quick Install, the PCL 6 printer driver is...
... click [OK]. 4. Click [Next]. 7. The installation starts. Click [Finish]. Quick Install You can install the printer drivers easily from the CD-ROM provided with this manual.) 2. When you want to install the drivers. Print This chapter describes frequently used printer functions and operations. Using Quick Install, the PCL 6 printer driver is...

Manuals
Page 121
..., and then press [OK]. 16. Enter the login user name of the destination computer, and then press [OK]. 15. You can either enter the path manually or locate the folder by browsing the network. 111 Info] on the right side of "Folder Authentication".
..., and then press [OK]. 16. Enter the login user name of the destination computer, and then press [OK]. 15. You can either enter the path manually or locate the folder by browsing the network. 111 Info] on the right side of "Folder Authentication".


