

User Guide
Page 22
... the Internet [email protected] xxx.xxx.xxx.xxx [email protected] xxx.xxx.xxx.xxx CJQ606 E-mail Transmission and Reception This machine converts scanned document images to Print). Sending and Receiving Faxes via Internet Fax or from Computers", Fax. See "Receiving E-mail by Entering It Manually...", Fax. • This machine can receive email messages via a TCP/IP network. • To send a document, specify an IP address or host name instead of dialing the destination telephone number...
... the Internet [email protected] xxx.xxx.xxx.xxx [email protected] xxx.xxx.xxx.xxx CJQ606 E-mail Transmission and Reception This machine converts scanned document images to Print). Sending and Receiving Faxes via Internet Fax or from Computers", Fax. See "Receiving E-mail by Entering It Manually...", Fax. • This machine can receive email messages via a TCP/IP network. • To send a document, specify an IP address or host name instead of dialing the destination telephone number...

User Guide
Page 54
... are just examples. Facsimile mode Program name Program description Effect Transmission result notification fax Select [Preview] in the initial display and specify [Email TX Results] in [TX Mode]. Specified time fax Specify [Send Later] in [TX Mode]. 2. You can use . Departmental fax...business details or the type of programs given above are correct before and after transmission. Getting Started Program name Program description Effect Storage scan: XXXX Specify a folder in [Target Folder to Store] in [TX transmission Mode]. For details, see "Machine Types" and "...
... are just examples. Facsimile mode Program name Program description Effect Transmission result notification fax Select [Preview] in the initial display and specify [Email TX Results] in [TX Mode]. Specified time fax Specify [Send Later] in [TX Mode]. 2. You can use . Departmental fax...business details or the type of programs given above are correct before and after transmission. Getting Started Program name Program description Effect Storage scan: XXXX Specify a folder in [Target Folder to Store] in [TX transmission Mode]. For details, see "Machine Types" and "...

User Guide
Page 83
... Glass (Memory Transmission) 1. TX] is not highlighted. 2. Repeat this step for Transmissions (Memory Transmission) 9. The machine dials the destination and starts transmission. 81 Make the scan settings you require. 5. Press the [Start] key. 6. Press the [ ] key. Place the first page of the original face down on the exposure glass within 60...
... Glass (Memory Transmission) 1. TX] is not highlighted. 2. Repeat this step for Transmissions (Memory Transmission) 9. The machine dials the destination and starts transmission. 81 Make the scan settings you require. 5. Press the [Start] key. 6. Press the [ ] key. Place the first page of the original face down on the exposure glass within 60...

User Guide
Page 116
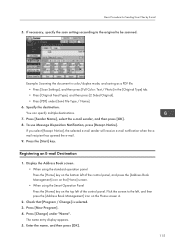
... setting remains, press the [Reset] key. 3. Flick the screen to the left, and then press the [Scanner] icon on the [Home] screen. Scan Basic Procedure for Sending Scan Files by Email 1. Place originals. 114 Display the initial scanner screen. • When using the Smart Operation Panel Press the [Home] key on the top...
... setting remains, press the [Reset] key. 3. Flick the screen to the left, and then press the [Scanner] icon on the [Home] screen. Scan Basic Procedure for Sending Scan Files by Email 1. Place originals. 114 Display the initial scanner screen. • When using the Smart Operation Panel Press the [Home] key on the top...
User Guide
Page 117
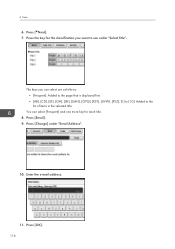
... the control panel. Registering an E-mail Destination 1. Press [Change] under [Send File Type / Name]. 6. Flick the screen to be scanned. Press [New Program]. 4. To use Message Disposition Notification, press [Recept. Press the [Start] key. Notice]. Notice], the selected e-...mail sender will receive e-mail notification when the email recipient has opened the e-mail. 9. Example: Scanning the document in color/duplex mode, and saving as a PDF file. • Press [Scan Settings], and then press [Full Color: Text / Photo] in the [...
... the control panel. Registering an E-mail Destination 1. Press [Change] under [Send File Type / Name]. 6. Flick the screen to be scanned. Press [New Program]. 4. To use Message Disposition Notification, press [Recept. Press the [Start] key. Notice]. Notice], the selected e-...mail sender will receive e-mail notification when the email recipient has opened the e-mail. 9. Example: Scanning the document in color/duplex mode, and saving as a PDF file. • Press [Scan Settings], and then press [Full Color: Text / Photo] in the [...
User Guide
Page 118
Press the key for each title. 8. The keys you can select [Frequent] and one more key for the classification you want to the list of items in the selected title. Enter the e-mail address. 11. Press [Email]. 9. Scan 6. Press [ Next]. 7. Press [OK]. 116 Press [Change] under "Select Title". You can select are as follows: • [Frequent]: Added to the page that is displayed first. • [AB], [CD], [EF], [GH], [IJK], [LMN], [OPQ], [RST], [UVW], [XYZ], [1] to [10]: Added to use under "Email Address". 10. 6.
Press the key for each title. 8. The keys you can select [Frequent] and one more key for the classification you want to the list of items in the selected title. Enter the e-mail address. 11. Press [Email]. 9. Scan 6. Press [ Next]. 7. Press [OK]. 116 Press [Change] under "Select Title". You can select are as follows: • [Frequent]: Added to the page that is displayed first. • [AB], [CD], [EF], [GH], [IJK], [LMN], [OPQ], [RST], [UVW], [XYZ], [1] to [10]: Added to use under "Email Address". 10. 6.

User Guide
Page 119
...top left , and then press the [Address Book Management] icon on the top right of the control panel. Press [Change] under "Email Address". 6. If [Email / Internet Fax Destination] is specified, registered e-mail addresses appear in both Internet fax address display and e-mail address display on the fax...press [OK]. 7. If you want to use Internet fax, specify whether or not to use "Send via SMTP Server". 14. Basic Procedure for Sending Scan Files by the registered name, user code, fax number, folder name, e-mail address, or IP-Fax destination. 4. If [Internet Fax Destination Only]...
...top left , and then press the [Address Book Management] icon on the top right of the control panel. Press [Change] under "Email Address". 6. If [Email / Internet Fax Destination] is specified, registered e-mail addresses appear in both Internet fax address display and e-mail address display on the fax...press [OK]. 7. If you want to use Internet fax, specify whether or not to use "Send via SMTP Server". 14. Basic Procedure for Sending Scan Files by the registered name, user code, fax number, folder name, e-mail address, or IP-Fax destination. 4. If [Internet Fax Destination Only]...

User Guide
Page 198
...Check [Max. The data will be recognized. 10. Press [Send] to send the scanned data, or press [Cancel] to use the data. To check the current status, press [Scanned Files Status]." Email Size] in the Document Server, only some of 128 or more characters may not ... settings as follows: • Increase the e-mail size limit in [Scanner Features]. Scanning has been cancelled. When data transmission fails Message Causes "Authentication with the destination has failed. email size. Sending email has been cancelled. The file size per Max. A network error has occurred and ...
...Check [Max. The data will be recognized. 10. Press [Send] to send the scanned data, or press [Cancel] to use the data. To check the current status, press [Scanned Files Status]." Email Size] in the Document Server, only some of 128 or more characters may not ... settings as follows: • Increase the e-mail size limit in [Scanner Features]. Scanning has been cancelled. When data transmission fails Message Causes "Authentication with the destination has failed. email size. Sending email has been cancelled. The file size per Max. A network error has occurred and ...

