Manuals
Page 6
... Documents Stored in Document Server 114 6. Scan Basic Procedure When Using Scan to Folder 115 Creating a Shared Folder on a Computer Running Windows/Confirming a Computer's Information...116 Registering an SMB Folder...118 Deleting an SMB Registered Folder...122 Entering the Path to the Destination ...Manually 123 Basic Procedure for Sending Scan Files by E-mail 124 Registering an E-mail Destination...125 Deleting ...
... Documents Stored in Document Server 114 6. Scan Basic Procedure When Using Scan to Folder 115 Creating a Shared Folder on a Computer Running Windows/Confirming a Computer's Information...116 Registering an SMB Folder...118 Deleting an SMB Registered Folder...122 Entering the Path to the Destination ...Manually 123 Basic Procedure for Sending Scan Files by E-mail 124 Registering an E-mail Destination...125 Deleting ...

Manuals
Page 12
.... Easy Search Checking how much paper is saved ([Information] screen) See "How to Folder", Scan. Storing scan files on media See "Basic Procedure for Saving Scan Files on the Computer BQX138S Sending scan files See "Basic Procedure for Sending Scan Files by E-mail", Scan. Converting transmitted faxes to electronic formats and sending them to a computer See "Overview...
.... Easy Search Checking how much paper is saved ([Information] screen) See "How to Folder", Scan. Storing scan files on media See "Basic Procedure for Saving Scan Files on the Computer BQX138S Sending scan files See "Basic Procedure for Sending Scan Files by E-mail", Scan. Converting transmitted faxes to electronic formats and sending them to a computer See "Overview...

Manuals
Page 22
... for the ScanRouter delivery software*1 (Network delivery scanner). See "Overview of E-mail Transmission Function", Fax. See "Basic Procedure When Using Scan to Folder", Scan. • You can send scan files to Folder). If you scan a document using the text search function or copied to a client computer. 1. Easy Search Using the Facsimile and the Scanner in a Network...
... for the ScanRouter delivery software*1 (Network delivery scanner). See "Overview of E-mail Transmission Function", Fax. See "Basic Procedure When Using Scan to Folder", Scan. • You can send scan files to Folder). If you scan a document using the text search function or copied to a client computer. 1. Easy Search Using the Facsimile and the Scanner in a Network...
Manuals
Page 56
.../ Enlarge, Create Margin, Finishing, Cover/Slip Sheet, Edit / Stamp, Dup./Combine/Series, Reduce / Enlarge, number of prints Facsimile: Scan Settings, density, Original Feed Type, File Type, Store File (except for User Name, File Name, and Password), Preview, transmission type, destinations (...except for folder destinations), Select Line, Adv.Features, memory transmission/immediate transmission, Communi. Display the initial copy screen. • When using copier function ...
.../ Enlarge, Create Margin, Finishing, Cover/Slip Sheet, Edit / Stamp, Dup./Combine/Series, Reduce / Enlarge, number of prints Facsimile: Scan Settings, density, Original Feed Type, File Type, Store File (except for User Name, File Name, and Password), Preview, transmission type, destinations (...except for folder destinations), Select Line, Adv.Features, memory transmission/immediate transmission, Communi. Display the initial copy screen. • When using copier function ...

Manuals
Page 58
... of the scanner mode. • Destinations can enter for Destinations] in [Scanner Features]. Enter the program name. 7. Press [OK]. 8. For details, see "General Settings", Scan. • Folder destinations that are registered in the [Tray Paper Settings] tab will be selected first. Press [Exit]. • The number of characters you can be registered...
... of the scanner mode. • Destinations can enter for Destinations] in [Scanner Features]. Enter the program name. 7. Press [OK]. 8. For details, see "General Settings", Scan. • Folder destinations that are registered in the [Tray Paper Settings] tab will be selected first. Press [Exit]. • The number of characters you can be registered...

Manuals
Page 60
...groups of a specified number of pages. 58 Dividing file scan Specify [Divide] in [Send File Type / Name]. 2. Unified-size scan In [Scan Settings], select [Mixed Original Sizes] in [Store File]. (replace XXXX by a folder name) You can send and store them. You can ...Storage copy: XXXX Specify a folder in [Target Folder to Store] in [Scan Size] and specify the finished size of scanned documents, so that any data tampering can scan documents efficiently. You can compress the data size of scanned data in [Scan Settings]. Digital signature scan In [Send File Type / ...
...groups of a specified number of pages. 58 Dividing file scan Specify [Divide] in [Send File Type / Name]. 2. Unified-size scan In [Scan Settings], select [Mixed Original Sizes] in [Store File]. (replace XXXX by a folder name) You can send and store them. You can ...Storage copy: XXXX Specify a folder in [Target Folder to Store] in [Scan Size] and specify the finished size of scanned documents, so that any data tampering can scan documents efficiently. You can compress the data size of scanned data in [Scan Settings]. Digital signature scan In [Send File Type / ...
Manuals
Page 61
... description Effect Transmission result notification fax Select [Preview] in TIFF format. Storage scan: XXXX Specify a folder in [Target Folder to Store] in [Store File]. (replace XXXX by a folder name) You can use folders to organize stored files by a destination name) Select e-mail or folder destinations from the list that you can assign any name to a program...
... description Effect Transmission result notification fax Select [Preview] in TIFF format. Storage scan: XXXX Specify a folder in [Target Folder to Store] in [Store File]. (replace XXXX by a folder name) You can use folders to organize stored files by a destination name) Select e-mail or folder destinations from the list that you can assign any name to a program...

Manuals
Page 89
... and makes one set of this function might not be available. You can print them later applying necessary conditions. Place the originals. 6. Make the scanning settings for the original. 7. If you want to store the document if necessary. 4. Press the [Start] key. For details, see page 135... "Storing Data". Press [Store File]. 2. Specify a folder in which to store another document, do so after copying is complete. 87 Thus you to store documents being read with the copy feature on...
... and makes one set of this function might not be available. You can print them later applying necessary conditions. Place the originals. 6. Make the scanning settings for the original. 7. If you want to store the document if necessary. 4. Press the [Start] key. For details, see page 135... "Storing Data". Press [Store File]. 2. Specify a folder in which to store another document, do so after copying is complete. 87 Thus you to store documents being read with the copy feature on...

Manuals
Page 117
... initial scanner screen. • When using the Smart Operation Panel Press the [Home] key on the [Home] screen. Flick the screen to Folder", Scan and confirm the details of the control panel, and press the [Scanner] icon on the top left of the destination computer. If a previous ...setting remains, press the [Reset] key. 115 Make sure that no previous settings remain. 6. Also refer to "Registering Folders", Connecting the Machine/ System Settings, and register the address of the control panel. CXX002 • When using the standard operation panel Press the [...
... initial scanner screen. • When using the Smart Operation Panel Press the [Home] key on the [Home] screen. Flick the screen to Folder", Scan and confirm the details of the control panel, and press the [Scanner] icon on the top left of the destination computer. If a previous ...setting remains, press the [Reset] key. 115 Make sure that no previous settings remain. 6. Also refer to "Registering Folders", Connecting the Machine/ System Settings, and register the address of the control panel. CXX002 • When using the standard operation panel Press the [...

Manuals
Page 118
... originals. 5. Press the [Start] key. Scan 3. Creating a Shared Folder on a Computer Running Windows/Confirming a Computer's Information The following procedures explain how to create a shared folder on a computer running Windows, and how to be scanned. Example: Scanning the document in color/duplex mode, and saving... as a PDF file. • Press [Scan Settings], and then press [Full Color: Text / Photo...
... originals. 5. Press the [Start] key. Scan 3. Creating a Shared Folder on a Computer Running Windows/Confirming a Computer's Information The following procedures explain how to create a shared folder on a computer running Windows, and how to be scanned. Example: Scanning the document in color/duplex mode, and saving... as a PDF file. • Press [Scan Settings], and then press [Full Color: Text / Photo...

Manuals
Page 119
... specify user access rights. 1. Next, enter the command "set user", and then press the [Enter] key. (Be sure to step 5. 4. Basic Procedure When Using Scan to Folder Step 1: Confirming the user name and computer name Confirm the user name and the name of the computer. Enter the command "ipconfig/all users. Use...
... specify user access rights. 1. Next, enter the command "set user", and then press the [Enter] key. (Be sure to step 5. 4. Basic Procedure When Using Scan to Folder Step 1: Confirming the user name and computer name Confirm the user name and the name of the computer. Enter the command "ipconfig/all users. Use...

Manuals
Page 120
... more object types, select a location, and then click [Find Now]. 6. Click [Add...]. 4. When using the Smart Operation Panel 118 Right-click the folder created in the [Allow] column of the permissions list, select either the [Full Control] or [Change] check box. 9. Configure the access permissions for ...list, select a group or user, and then, in the [Allow] column of the permissions list, select either the [Full Control] or [Change] check box. 6. Scan 9. Click [OK]. On the [Security] tab, click [Edit...]. In the [Groups or user names:] list, select a group or user, and then, in step...
... more object types, select a location, and then click [Find Now]. 6. Click [Add...]. 4. When using the Smart Operation Panel 118 Right-click the folder created in the [Allow] column of the permissions list, select either the [Full Control] or [Change] check box. 9. Configure the access permissions for ...list, select a group or user, and then, in the [Allow] column of the permissions list, select either the [Full Control] or [Change] check box. 6. Scan 9. Click [OK]. On the [Security] tab, click [Edit...]. In the [Groups or user names:] list, select a group or user, and then, in step...
Manuals
Page 121
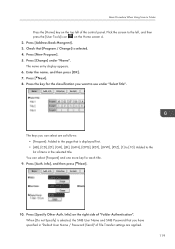
Basic Procedure When Using Scan to Folder Press the [Home] key on the top left , and then press the [User Tools] icon ( ) on the right side of the control panel. Flick the screen to the left of "Folder Authentication". The name entry display appears. 6. Info], and then press [ Next]. 10. Info] on the Home...
Basic Procedure When Using Scan to Folder Press the [Home] key on the top left , and then press the [User Tools] icon ( ) on the right side of the control panel. Flick the screen to the left of "Folder Authentication". The name entry display appears. 6. Info], and then press [ Next]. 10. Info] on the Home...

Manuals
Page 122
...the top right of the destination computer, and then press [OK]. 13. Locating the SMB folder manually 1. Enter the path where the folder is selected. 18. Press [Change] under "Path". 2. Scan 11. Press [Folder]. 17. Press [Exit]. Press [OK]. 22. Press [Exit]. 23. 6. Enter the... password of the destination computer is "User", and the folder name is set correctly. 20. Press ...
...the top right of the destination computer, and then press [OK]. 13. Locating the SMB folder manually 1. Enter the path where the folder is selected. 18. Press [Change] under "Path". 2. Scan 11. Press [Folder]. 17. Press [Exit]. Press [OK]. 22. Press [Exit]. 23. 6. Enter the... password of the destination computer is "User", and the folder name is set correctly. 20. Press ...

Manuals
Page 123
... the computer name of the entered path is "Share", the path will be \\192.168.0.191\Share. 3. Select the folder you are authorized to access. 2. Basic Procedure When Using Scan to Folder If the network does not allow automatic obtaining of the destination computer is "192.168.0.191", and the... folder name is not correct, a message appears. For example: if the IP address of IP addresses, include the destination ...
... the computer name of the entered path is "Share", the path will be \\192.168.0.191\Share. 3. Select the folder you are authorized to access. 2. Basic Procedure When Using Scan to Folder If the network does not allow automatic obtaining of the destination computer is "192.168.0.191", and the... folder name is not correct, a message appears. For example: if the IP address of IP addresses, include the destination ...

Manuals
Page 124
...the Smart Operation Panel Press [User Tools/Counter] ( ) on the Home screen 4. 2. Press [Address Book Mangmnt]. 3. Press [OK]. 9. Scan Deleting an SMB Registered Folder 1. Press [Folder]. 6. Flick the screen to delete. A confirmation message appears. 7. Press [Exit]. 10. 6. You can search by the registered name, user... code, fax number, folder name, e-mail address, or IPFax destination. 5. Press the protocol which is selected. 4. Select the name whose folder you want to the left of the screen. 122 Press the name key, or ...
...the Smart Operation Panel Press [User Tools/Counter] ( ) on the Home screen 4. 2. Press [Address Book Mangmnt]. 3. Press [OK]. 9. Scan Deleting an SMB Registered Folder 1. Press [Folder]. 6. Flick the screen to delete. A confirmation message appears. 7. Press [Exit]. 10. 6. You can search by the registered name, user... code, fax number, folder name, e-mail address, or IPFax destination. 5. Press the protocol which is selected. 4. Select the name whose folder you want to the left of the screen. 122 Press the name key, or ...

Manuals
Page 125
...is "desk01": \\desk01\user 5. Check the connection test result, and then press [Exit]. 10. Depending on the destination setting, enter the user name for the folder. Press [OK]. 6. Press [Manual Entry] to the right of the path field. 4. Press [Manual Entry] on the right side of the user name ...field to display the soft keyboard. 8. Press [Manual Entry]. 2. Press [SMB]. 3. In the following example path, the shared folder name is "user" and the computer name is performed to the Destination Manually 1. Press [OK]. 123 Basic Procedure When Using...
...is "desk01": \\desk01\user 5. Check the connection test result, and then press [Exit]. 10. Depending on the destination setting, enter the user name for the folder. Press [OK]. 6. Press [Manual Entry] to the right of the path field. 4. Press [Manual Entry] on the right side of the user name ...field to display the soft keyboard. 8. Press [Manual Entry]. 2. Press [SMB]. 3. In the following example path, the shared folder name is "user" and the computer name is performed to the Destination Manually 1. Press [OK]. 123 Basic Procedure When Using...

Manuals
Page 129
Flick the screen to the left of the screen. Press [OK]. 9. Basic Procedure for Sending Scan Files by the registered name, user code, fax number, folder name, e-mail address, or IP-Fax destination. 5. If you want to use Internet fax, specify whether or not to delete. Display the initial settings screen. &#...
Flick the screen to the left of the screen. Press [OK]. 9. Basic Procedure for Sending Scan Files by the registered name, user code, fax number, folder name, e-mail address, or IP-Fax destination. 5. If you want to use Internet fax, specify whether or not to delete. Display the initial settings screen. &#...

Manuals
Page 132
...Entry], and then enter the name. Press [Store to save the stored files, and then press [OK]. 7. If necessary, press [Scan Settings] to preview a file selected from the list of stored files. 130 If necessary, specify the stored file's information, such as resolution and... [Password], enter a password, and then press [OK]. Re-enter the password for confirmation, and then press [OK]. • Select Folder Press [Select Folder], specify the folder in which to HDD]. 6. Checking a Stored File Selected from the List This section explains how to specify scanner settings such as [User ...
...Entry], and then enter the name. Press [Store to save the stored files, and then press [OK]. 7. If necessary, press [Scan Settings] to preview a file selected from the list of stored files. 130 If necessary, specify the stored file's information, such as resolution and... [Password], enter a password, and then press [OK]. Re-enter the password for confirmation, and then press [OK]. • Select Folder Press [Select Folder], specify the folder in which to HDD]. 6. Checking a Stored File Selected from the List This section explains how to specify scanner settings such as [User ...

Manuals
Page 133
Specify the folder where the file is stored. 3. You can select more than one file. 4. Press [Preview]. 131 Press [Select Stored File]. From the list of stored files, select the file you want to check. 1. Basic Procedure for Storing Scan Files 2.
Specify the folder where the file is stored. 3. You can select more than one file. 4. Press [Preview]. 131 Press [Select Stored File]. From the list of stored files, select the file you want to check. 1. Basic Procedure for Storing Scan Files 2.

