
AirPrint Guide
Page 11
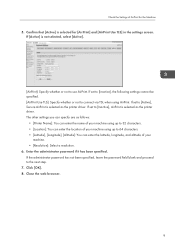
...can enter the latitude, longitude, and altitude of your machine. • [Resolution]: Select a resolution. 6. If the administrator password has not been specified, leave the password field blank and proceed to use AirPrint. Confirm that [Active] is selected as the printer driver. If set to [Active... AirPrint is not selected, select [Active]. [AirPrint]: Specify whether or not to the next step. 7. Click [OK]. 8. Enter the administrator password if it has been specified. Check the Settings of AirPrint for [AirPrint] and [AirPrint Use TLS] in the settings screen. Close the web ...
...can enter the latitude, longitude, and altitude of your machine. • [Resolution]: Select a resolution. 6. If the administrator password has not been specified, leave the password field blank and proceed to use AirPrint. Confirm that [Active] is selected as the printer driver. If set to [Active... AirPrint is not selected, select [Active]. [AirPrint]: Specify whether or not to the next step. 7. Click [OK]. 8. Enter the administrator password if it has been specified. Check the Settings of AirPrint for [AirPrint] and [AirPrint Use TLS] in the settings screen. Close the web ...
AirPrint Guide
Page 12
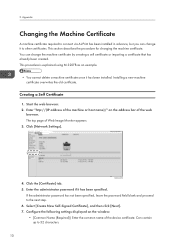
...host name)/" on the window: • [Common Name (Required)]: Enter the common name of Web Image Monitor appears. 3. M0ESAC0050 4. Enter the administrator password if it has been installed. Can contain up to the next step. 6. This section describes the procedure for changing the machine certificate. Click [Network ... A machine certificate required to other certificates. Start the web browser. 2. Installing a new machine certificate overwrites the old certificate. If the administrator password has not been specified, leave the password field blank and proceed to 32 characters. 10
...host name)/" on the window: • [Common Name (Required)]: Enter the common name of Web Image Monitor appears. 3. M0ESAC0050 4. Enter the administrator password if it has been installed. Can contain up to the next step. 6. This section describes the procedure for changing the machine certificate. Click [Network ... A machine certificate required to other certificates. Start the web browser. 2. Installing a new machine certificate overwrites the old certificate. If the administrator password has not been specified, leave the password field blank and proceed to 32 characters. 10
AirPrint Guide
Page 13
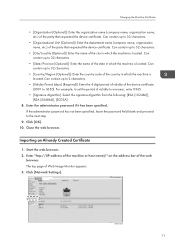
...to 32 characters. • [State/Province (Optional)]: Enter the name of the state in which the machine is located. Enter the administrator password if it has been specified. The top page of the web browser. Can contain up to 32 characters. • [Organizational Unit (... Enter the country code of the country in which the machine is located. Start the web browser. 2. If the administrator password has not been specified, leave the password field blank and proceed to one year, enter 0365. • [Signature Algorithm]: Select the signature algorithm from the following:...
...to 32 characters. • [State/Province (Optional)]: Enter the name of the state in which the machine is located. Enter the administrator password if it has been specified. The top page of the web browser. Can contain up to 32 characters. • [Organizational Unit (... Enter the country code of the country in which the machine is located. Start the web browser. 2. If the administrator password has not been specified, leave the password field blank and proceed to one year, enter 0365. • [Signature Algorithm]: Select the signature algorithm from the following:...

AirPrint Guide
Page 14
... [OK]. 12. Wait for the machine has been installed. 13. Appendix 4. If the administrator password has not been specified, leave the password field blank and proceed to import. 8. Enter the administrator password if it has been specified. 3. Specify an already created certificate you want to the next step.... the private key. 10. "Installed" appears under "Certificate Status" to the next step. 6. If the administrator password has not been specified, leave the password field blank and proceed to show that a device certificate for about one or two minutes, and then click [OK]....
... [OK]. 12. Wait for the machine has been installed. 13. Appendix 4. If the administrator password has not been specified, leave the password field blank and proceed to import. 8. Enter the administrator password if it has been specified. 3. Specify an already created certificate you want to the next step.... the private key. 10. "Installed" appears under "Certificate Status" to the next step. 6. If the administrator password has not been specified, leave the password field blank and proceed to show that a device certificate for about one or two minutes, and then click [OK]....
Firmware Update Guide
Page 10
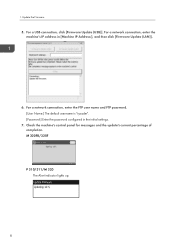
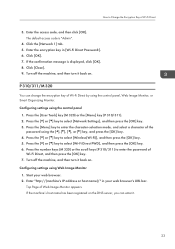
M 320FB/320F P 310/311/M 320 The Alert indicator lights up. 8 For a network connection, enter the machine's IP address in the initial settings. 7. For a USB connection, click [Firmware Update (USB)]. Check the machine's control panel for messages and the update's current percentage of completion. Update the Firmware 5. For a network connection, enter the FTP user name and FTP password. [User Name:] The default username is "sysadm". [Password:] Enter the password configured in [Machine IP Address:], and then click [Firmware Update (LAN)]. 6. 1.
M 320FB/320F P 310/311/M 320 The Alert indicator lights up. 8 For a network connection, enter the machine's IP address in the initial settings. 7. For a USB connection, click [Firmware Update (USB)]. Check the machine's control panel for messages and the update's current percentage of completion. Update the Firmware 5. For a network connection, enter the FTP user name and FTP password. [User Name:] The default username is "sysadm". [Password:] Enter the password configured in [Machine IP Address:], and then click [Firmware Update (LAN)]. 6. 1.

Wi-Fi Direct Guide
Page 6
Easy Setup Using Wi-Fi Direct Connecting Using Windows M 320FB/320F • Before doing the following procedure, enable the Wi-Fi Direct function on your computer. DYG611 2. Press [Wireless (Wi-Fi) Sett.]. 4. Press [OK]. 4 1. Press the wireless LAN icon. For details about enabling the Wi-Fi Direct function, see the computer manual. • In Steps 5 to 8, configure each setting within two minutes. 1. Press [Wi-Fi Direct]. 5. Enter the password using the number keys, and then press [OK]. 3.
Easy Setup Using Wi-Fi Direct Connecting Using Windows M 320FB/320F • Before doing the following procedure, enable the Wi-Fi Direct function on your computer. DYG611 2. Press [Wireless (Wi-Fi) Sett.]. 4. Press [OK]. 4 1. Press the wireless LAN icon. For details about enabling the Wi-Fi Direct function, see the computer manual. • In Steps 5 to 8, configure each setting within two minutes. 1. Press [Wi-Fi Direct]. 5. Enter the password using the number keys, and then press [OK]. 3.
Wi-Fi Direct Guide
Page 10
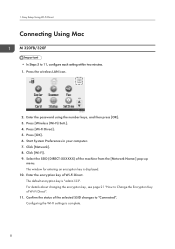
... 11. Confirm the status of the machine from the [Network Name:] pop-up menu. Easy Setup Using Wi-Fi Direct Connecting Using Mac M 320FB/320F • In Steps 5 to "Connected". 1. Press [Wi-Fi Direct]. 5. The default encryption key is displayed. 10. For details about changing the... computer. 7. The window for entering an encryption key is "admin123". Configuring the Wi-Fi settings is complete. 8 Click [Network]. 8. Enter the password using the number keys, and then press [OK]. 3. Select the SSID (DIRECT-XXXXXX) of the selected SSID changes to 11, configure each setting ...
... 11. Confirm the status of the machine from the [Network Name:] pop-up menu. Easy Setup Using Wi-Fi Direct Connecting Using Mac M 320FB/320F • In Steps 5 to "Connected". 1. Press [Wi-Fi Direct]. 5. The default encryption key is displayed. 10. For details about changing the... computer. 7. The window for entering an encryption key is "admin123". Configuring the Wi-Fi settings is complete. 8 Click [Network]. 8. Enter the password using the number keys, and then press [OK]. 3. Select the SSID (DIRECT-XXXXXX) of the selected SSID changes to 11, configure each setting ...
Wi-Fi Direct Guide
Page 13
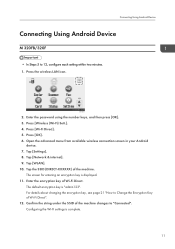
... key, see page 21 "How to 12, configure each setting within two minutes. 1. Tap [Network & internet]. 9. Connecting Using Android Device Connecting Using Android Device M 320FB/320F • In Steps 5 to Change the Encryption Key of the machine. Enter the password using the number keys, and then press [OK]. 3.
... key, see page 21 "How to 12, configure each setting within two minutes. 1. Tap [Network & internet]. 9. Connecting Using Android Device Connecting Using Android Device M 320FB/320F • In Steps 5 to Change the Encryption Key of the machine. Enter the password using the number keys, and then press [OK]. 3.
Wi-Fi Direct Guide
Page 16
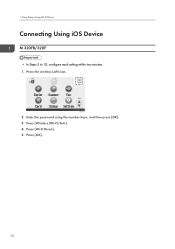
Enter the password using the number keys, and then press [OK]. 3. Press [Wi-Fi Direct]. 5. Press the wireless LAN icon. Press [OK]. 14 DYG611 2. Easy Setup Using Wi-Fi Direct Connecting Using iOS Device M 320FB/320F • In Steps 5 to 10, configure each setting within two minutes. 1. Press [Wireless (Wi-Fi) Sett.]. 4. 1.
Enter the password using the number keys, and then press [OK]. 3. Press [Wi-Fi Direct]. 5. Press the wireless LAN icon. Press [OK]. 14 DYG611 2. Easy Setup Using Wi-Fi Direct Connecting Using iOS Device M 320FB/320F • In Steps 5 to 10, configure each setting within two minutes. 1. Press [Wireless (Wi-Fi) Sett.]. 4. 1.
Wi-Fi Direct Guide
Page 23
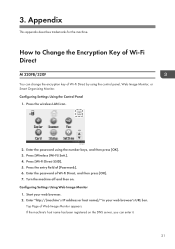
... 7. Start your web browser's URL bar. Press [Wi-Fi Direct SSID]. 5. How to Change the Encryption Key of Wi-Fi Direct M 320FB/320F You can enter it. 21 Configuring Settings Using the Control Panel 1. DYG611 2. Enter "http://(machine's IP address or host name)/" in your web browser.... 2. Top Page of [Password:]. 6. Press the entry field of Web Image Monitor appears. Appendix This appendix describes trademarks for the machine. If the machine's host name has ...
... 7. Start your web browser's URL bar. Press [Wi-Fi Direct SSID]. 5. How to Change the Encryption Key of Wi-Fi Direct M 320FB/320F You can enter it. 21 Configuring Settings Using the Control Panel 1. DYG611 2. Enter "http://(machine's IP address or host name)/" in your web browser.... 2. Top Page of [Password:]. 6. Press the entry field of Web Image Monitor appears. Appendix This appendix describes trademarks for the machine. If the machine's host name has ...

Wi-Fi Direct Guide
Page 24
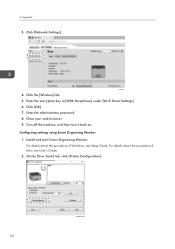
... Tools] tab, click [Printer Configuration]. 22 M0ESOC0061 3. Install and start Smart Organizing Monitor. Click [Network Settings]. Configuring Settings Using Smart Organizing Monitor 1. Enter the administrator password. 8. Close your web browser. 9. Click the [Wireless] tab. 5. Enter the encryption key in [WPA Passphrase] under [Wi-Fi Direct Settings]. 6. For details about the procedure...
... Tools] tab, click [Printer Configuration]. 22 M0ESOC0061 3. Install and start Smart Organizing Monitor. Click [Network Settings]. Configuring Settings Using Smart Organizing Monitor 1. Enter the administrator password. 8. Close your web browser. 9. Click the [Wireless] tab. 5. Enter the encryption key in [WPA Passphrase] under [Wi-Fi Direct Settings]. 6. For details about the procedure...
Wi-Fi Direct Guide
Page 25
...select [Wi-Fi Direct PWD], and then press the [OK] key. 6. Enter "http://(machine's IP address or host name)/" in [Wi-Fi Direct Password:]. 6. Top Page of Wi-Fi Direct by using the control panel 1. Configuring settings using the control panel, Web Image Monitor, or Smart Organizing Monitor. ...Press the [Menu] key to Change the Encryption Key of Wi-Fi Direct 3. How to enter the character-selection mode, and select a character of the password using Web Image Monitor 1. Configuring settings using the or [ ] key, and press the [OK] key. 4. Enter the access code, and then click...
...select [Wi-Fi Direct PWD], and then press the [OK] key. 6. Enter "http://(machine's IP address or host name)/" in [Wi-Fi Direct Password:]. 6. Top Page of Wi-Fi Direct by using the control panel 1. Configuring settings using the control panel, Web Image Monitor, or Smart Organizing Monitor. ...Press the [Menu] key to Change the Encryption Key of Wi-Fi Direct 3. How to enter the character-selection mode, and select a character of the password using Web Image Monitor 1. Configuring settings using the or [ ] key, and press the [OK] key. 4. Enter the access code, and then click...
Wi-Fi Direct Guide
Page 26
... 3. Click [OK]. 7. Close your web browser. 9. Configuring settings using Smart Organizing Monitor 1. For details about the procedure of Windows, see User's Guide. 2. Enter the administrator password. 8. Turn off the machine, and then turn it back on. Install and start Smart Organizing Monitor. Click [Network Settings]. DYG618 4. For details about the procedure...
... 3. Click [OK]. 7. Close your web browser. 9. Configuring settings using Smart Organizing Monitor 1. For details about the procedure of Windows, see User's Guide. 2. Enter the administrator password. 8. Turn off the machine, and then turn it back on. Install and start Smart Organizing Monitor. Click [Network Settings]. DYG618 4. For details about the procedure...
Wi-Fi Direct Guide
Page 27
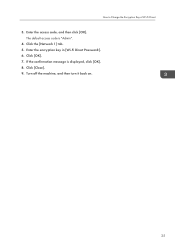
Click the [Network 1] tab. 5. Click [OK]. 7. Click [Close]. 9. Enter the encryption key in [Wi-Fi Direct Password:]. 6. Turn off the machine, and then turn it back on. 25 The default access code is displayed, click [OK]. 8. If the confirmation message is "Admin". 4. How to Change the Encryption Key of Wi-Fi Direct 3. Enter the access code, and then click [OK].
Click the [Network 1] tab. 5. Click [OK]. 7. Click [Close]. 9. Enter the encryption key in [Wi-Fi Direct Password:]. 6. Turn off the machine, and then turn it back on. 25 The default access code is displayed, click [OK]. 8. If the confirmation message is "Admin". 4. How to Change the Encryption Key of Wi-Fi Direct 3. Enter the access code, and then click [OK].
Users Guide
Page 17
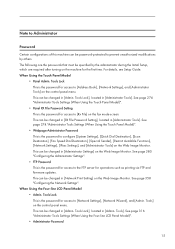
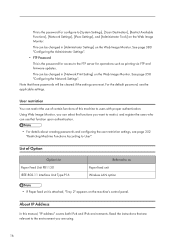
... on the Web Image Monitor. See page 274 "Administrator Tools Settings (When Using the Touch Panel Model)". • Webpage Administrator Password This is the password for access to [Address Book], [Network Settings], and [Administrator Tools] on the control panel menu. See page 380 "Configuring ...the Administrator Settings". • FTP Password This is the password for operations such as printing via FTP and firmware updates. When Using the Four-line LCD Panel Model • Admin. ...
... on the Web Image Monitor. See page 274 "Administrator Tools Settings (When Using the Touch Panel Model)". • Webpage Administrator Password This is the password for access to [Address Book], [Network Settings], and [Administrator Tools] on the control panel menu. See page 380 "Configuring ...the Administrator Settings". • FTP Password This is the password for operations such as printing via FTP and firmware updates. When Using the Four-line LCD Panel Model • Admin. ...
Users Guide
Page 18
...Settings], and [Administrator Tools] on the machine's control panel. Read the instructions that function upon authentication. • For details about creating passwords and configuring the user restriction settings, see the applicable settings. See page 358 "Configuring the Network Settings". See page 380 "Configuring the ...to the FTP server for operations such as Paper feed unit Wireless LAN option • If Paper feed unit is the password for access to User". List of this manual, "IP address" covers both IPv4 and IPv6 environments. This can restrict the...
...Settings], and [Administrator Tools] on the machine's control panel. Read the instructions that function upon authentication. • For details about creating passwords and configuring the user restriction settings, see the applicable settings. See page 358 "Configuring the Network Settings". See page 380 "Configuring the ...to the FTP server for operations such as Paper feed unit Wireless LAN option • If Paper feed unit is the password for access to User". List of this manual, "IP address" covers both IPv4 and IPv6 environments. This can restrict the...
Users Guide
Page 41
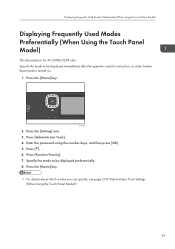
Enter the password using the number keys, and then press [OK]. 5. Press [ ]. 6. DYG322 2. Press the [Setting] icon. 3. Press [Administrator Tools]. 4. Press [Function Priority]. 7. Press the [Home] key. • ... Model) Displaying Frequently Used Modes Preferentially (When Using the Touch Panel Model) This description is turned on , or when System Reset mode is for M 320FB/320F only. Press the [Home] key. Specify the mode to be displayed preferentially. 8.
Enter the password using the number keys, and then press [OK]. 5. Press [ ]. 6. DYG322 2. Press the [Setting] icon. 3. Press [Administrator Tools]. 4. Press [Function Priority]. 7. Press the [Home] key. • ... Model) Displaying Frequently Used Modes Preferentially (When Using the Touch Panel Model) This description is turned on , or when System Reset mode is for M 320FB/320F only. Press the [Home] key. Specify the mode to be displayed preferentially. 8.
Users Guide
Page 49
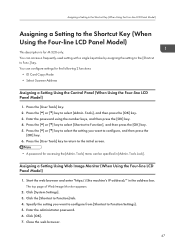
... the number keys, and then press the [OK] key. 4. The top page of Web Image Monitor appears. 2. Enter the administrator password. 6. Start the web browser and enter "https://(the machine's IP address)/" in [Admin. Click the [Shortcut to Function], and then press the [OK] key.... setting you want to configure, and then press the [OK] key. 6. Press the [User Tools] key to return to the initial screen. • A password for M 320 only. Specify the setting you want to configure from [Shortcut to Function Settings]. 5. Tools Lock]. Assigning a Setting to the Shortcut Key (When ...
... the number keys, and then press the [OK] key. 4. The top page of Web Image Monitor appears. 2. Enter the administrator password. 6. Start the web browser and enter "https://(the machine's IP address)/" in [Admin. Click the [Shortcut to Function], and then press the [OK] key.... setting you want to configure, and then press the [OK] key. 6. Press the [User Tools] key to return to the initial screen. • A password for M 320 only. Specify the setting you want to configure from [Shortcut to Function Settings]. 5. Tools Lock]. Assigning a Setting to the Shortcut Key (When ...
Users Guide
Page 50
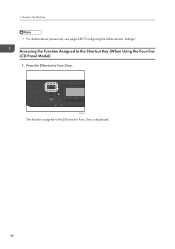
1. Press the [Shortcut to Func.] key is displayed. 48 DYG403 The function assigned to the [Shortcut to Func.] key. Accessing the Function Assigned to the Machine • For details about passwords, see page 380 "Configuring the Administrator Settings". Guide to the Shortcut Key (When Using the Four-line LCD Panel Model) 1.
1. Press the [Shortcut to Func.] key is displayed. 48 DYG403 The function assigned to the [Shortcut to Func.] key. Accessing the Function Assigned to the Machine • For details about passwords, see page 380 "Configuring the Administrator Settings". Guide to the Shortcut Key (When Using the Four-line LCD Panel Model) 1.
Users Guide
Page 75
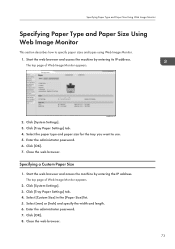
... and paper size for the tray you want to specify paper sizes and types using Web Image Monitor. 1. Close the web browser. Enter the administrator password. 7. Click [Tray Paper Settings] tab. 4. The top page of Web Image Monitor appears. Click [System Settings]. 3. Select [Custom Size] in the [Paper Size].... Click [Tray Paper Settings] tab. 4. Start the web browser and access the machine by entering the IP address. Enter the administrator password. 6. Specifying a Custom Paper Size 1. Select [mm] or [Inch] and specify the width and length. 6. Close the web browser. 73
... and paper size for the tray you want to specify paper sizes and types using Web Image Monitor. 1. Close the web browser. Enter the administrator password. 7. Click [Tray Paper Settings] tab. 4. The top page of Web Image Monitor appears. Click [System Settings]. 3. Select [Custom Size] in the [Paper Size].... Click [Tray Paper Settings] tab. 4. Start the web browser and access the machine by entering the IP address. Enter the administrator password. 6. Specifying a Custom Paper Size 1. Select [mm] or [Inch] and specify the width and length. 6. Close the web browser. 73


