
Operating Instructions
Page 6
...with the laser beam may cause serious eye damage. If the machine has laser systems, there is a strange smell or anything looks unusual, immediately turn off the power and disconnect the power plug (by pulling the plug, not the cable) if the power cable or plug becomes frayed or ...this machine. If the contents fall inside front cover of sight. Otherwise, an electric shock might ignite when exposed to be unplugged easily. • Turn off the operation and main power switches then unplug the power cord from the wall. When the machine needs to an open flame. • Disposal...
...with the laser beam may cause serious eye damage. If the machine has laser systems, there is a strange smell or anything looks unusual, immediately turn off the power and disconnect the power plug (by pulling the plug, not the cable) if the power cable or plug becomes frayed or ...this machine. If the contents fall inside front cover of sight. Otherwise, an electric shock might ignite when exposed to be unplugged easily. • Turn off the operation and main power switches then unplug the power cord from the wall. When the machine needs to an open flame. • Disposal...
Operating Instructions
Page 8
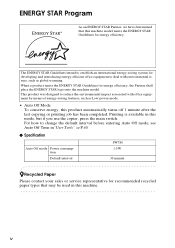
...entering Auto Off mode, see Auto Off Time in"User Tools" ⇒ P.40 ❖ Specification Auto Off mode Power consumption Default interval FW780 1.0 W 30 minute -Recycled Paper Please contact your sales or service representative for recommended recycled paper types that this machine model meets the ...the environmental impact associated with environmental issues, such as Low-power mode. • Auto Off Mode To conserve energy, this product automatically turns off 1 minute after the last copying or printing job has been completed. ENERGY STAR Program As an ENERGY STAR Partner, we have ...
...entering Auto Off mode, see Auto Off Time in"User Tools" ⇒ P.40 ❖ Specification Auto Off mode Power consumption Default interval FW780 1.0 W 30 minute -Recycled Paper Please contact your sales or service representative for recommended recycled paper types that this machine model meets the ...the environmental impact associated with environmental issues, such as Low-power mode. • Auto Off Mode To conserve energy, this product automatically turns off 1 minute after the last copying or printing job has been completed. ENERGY STAR Program As an ENERGY STAR Partner, we have ...
Operating Instructions
Page 10
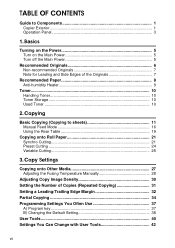
... Number of the Originals 7 Recommended Paper 8 Anti-humidity Heater 9 Toner...10 Handling Toner 10 Toner Storage 10 Used Toner 10 2. Basics Turning on the Power 5 Turn on the Main Power 5 Turn off the Main Power 5 Recommended Originals 6 Non-recommended Originals 7 Note for Leading and Side Edges of Copies (Repeated Copying 31 Setting a Leading...
... Number of the Originals 7 Recommended Paper 8 Anti-humidity Heater 9 Toner...10 Handling Toner 10 Toner Storage 10 Used Toner 10 2. Basics Turning on the Power 5 Turn on the Main Power 5 Turn off the Main Power 5 Recommended Originals 6 Non-recommended Originals 7 Note for Leading and Side Edges of Copies (Repeated Copying 31 Setting a Leading...
Operating Instructions
Page 14
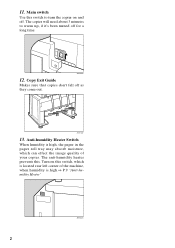
Copy Exit Guide Makes sure that copies don't fall off for a long time. 12. Anti-humidity Heater Switch When humidity is high, the paper in the paper roll tray may absorb moisture, which is high.⇒ P.9 "Anti-humidity Heater" 2 Turn on and off. 11. Main switch Use this . The anti-humidity heater prevents this switch to warm up, if it's been turned off as they come out. 13. The copier will need about 3 minutes to turn the copier on this switch, which can effect the image quality of the machine, when humidity is located rear left corner of your copies.
Copy Exit Guide Makes sure that copies don't fall off for a long time. 12. Anti-humidity Heater Switch When humidity is high, the paper in the paper roll tray may absorb moisture, which is high.⇒ P.9 "Anti-humidity Heater" 2 Turn on and off. 11. Main switch Use this . The anti-humidity heater prevents this switch to warm up, if it's been turned off as they come out. 13. The copier will need about 3 minutes to turn the copier on this switch, which can effect the image quality of the machine, when humidity is located rear left corner of your copies.
Operating Instructions
Page 15
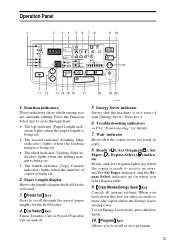
... or set a program. 3 Function indicators These indicators show which setting you to copy. 8. Troubleshooting indicators ⇒ P.61 "Troubleshooting" for the Roll Feeder. 4. {Cut Select} key Turns Synchro Cut or Preset/Variable Cut on when you hold down this key again. 10. {Program} key Allows you are currently editing. Ready (d), Set Original...
... or set a program. 3 Function indicators These indicators show which setting you to copy. 8. Troubleshooting indicators ⇒ P.61 "Troubleshooting" for the Roll Feeder. 4. {Cut Select} key Turns Synchro Cut or Preset/Variable Cut on when you hold down this key again. 10. {Program} key Allows you are currently editing. Ready (d), Set Original...

Operating Instructions
Page 17
B Turn on , press the main switch. Turning on the Power To turn the machine on the main switch. 1. Turn on the Main Power A Make sure that the power cord is firmly plugged into the wall outlet. Basics Turn off the Main Power A Turn off the main switch. 5
B Turn on , press the main switch. Turning on the Power To turn the machine on the main switch. 1. Turn on the Main Power A Make sure that the power cord is firmly plugged into the wall outlet. Basics Turn off the Main Power A Turn off the main switch. 5

Operating Instructions
Page 23
... tray or roll feeder) first. If you set A0 size (36"×48") paper, to feed manually, manual feed mode is warming up after being turned on . ❒ Do not use bypass teble, place one sheet of them, the copier starts copying automatically. Note ❒ For acceptable types of your original...
... tray or roll feeder) first. If you set A0 size (36"×48") paper, to feed manually, manual feed mode is warming up after being turned on . ❒ Do not use bypass teble, place one sheet of them, the copier starts copying automatically. Note ❒ For acceptable types of your original...
Operating Instructions
Page 24
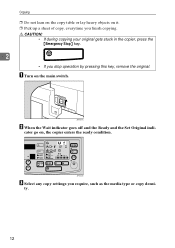
cator go on it. ❒ Pick up a sheet of copy, everytime you finish copying. R CAUTION: • If during copying your original gets stuck in the copier, press the {Emergency Stop} key. 2 • If you require, such as the media type or copy densi- B When the Wait indicator goes off and the Ready and the Set Original indi- C Select any copy settings you stop operation by pressing this key, remove the original. Copying ❒ Do not lean on the copy table or lay heavy objects on , the copier enters the ready condition. A Turn on the main switch. ty. 12
cator go on it. ❒ Pick up a sheet of copy, everytime you finish copying. R CAUTION: • If during copying your original gets stuck in the copier, press the {Emergency Stop} key. 2 • If you require, such as the media type or copy densi- B When the Wait indicator goes off and the Ready and the Set Original indi- C Select any copy settings you stop operation by pressing this key, remove the original. Copying ❒ Do not lean on the copy table or lay heavy objects on , the copier enters the ready condition. A Turn on the main switch. ty. 12

Operating Instructions
Page 28
If you do not insert the original in a certain interval after the original, the original will turn itself to the initial settings (Auto Reset). This function helps you to make larger sized paper, you can preset the initial settings of the copier &#...
If you do not insert the original in a certain interval after the original, the original will turn itself to the initial settings (Auto Reset). This function helps you to make larger sized paper, you can preset the initial settings of the copier &#...

Operating Instructions
Page 34
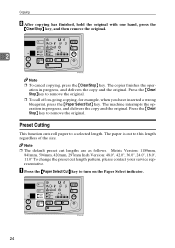
B Press the {Cut Select} key (1). Copying A Press the {Paper Select/Cut} key. 2 The Paper Select indicator lights up . D Select any copy settings you require. 22 C Press the {Paper Select/Cut} key to turn on the RF Select indicator. The Synchro indicator (2) lights up .
B Press the {Cut Select} key (1). Copying A Press the {Paper Select/Cut} key. 2 The Paper Select indicator lights up . D Select any copy settings you require. 22 C Press the {Paper Select/Cut} key to turn on the RF Select indicator. The Synchro indicator (2) lights up .
Operating Instructions
Page 36
... in progress, and delivers the copy and the original. A Press the {Paper Select/Cut} key to remove the original. Press the {Clear/ Stop} key to turn on -going copying, for example, when you have inserted a wrong blueprint, press the {Paper Select/Cut} key. Note ❒ The default preset cut length pattern...
... in progress, and delivers the copy and the original. A Press the {Paper Select/Cut} key to remove the original. Press the {Clear/ Stop} key to turn on -going copying, for example, when you have inserted a wrong blueprint, press the {Paper Select/Cut} key. Note ❒ The default preset cut length pattern...

Operating Instructions
Page 38
E Press the {Paper Select/Cut} key to specify the most appropriate length. 2 You can change the settings by 1mm (0.1") steps. F Continue from step E⇒ P.23 26 Copying C Press the {+} key or the {−} key to turn on the Paper Select indicator. D Choose any copy settings you require.
E Press the {Paper Select/Cut} key to specify the most appropriate length. 2 You can change the settings by 1mm (0.1") steps. F Continue from step E⇒ P.23 26 Copying C Press the {+} key or the {−} key to turn on the Paper Select indicator. D Choose any copy settings you require.
Operating Instructions
Page 40
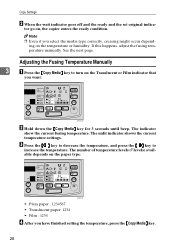
... if you have finished setting the temperature, press the {Copy Media} key. 28 C Press the {i} key to decrease the temperature, and press the {j} key to turn on , the copier enters the ready condition. The number of temperature levels (7 levels) available depends on the temperature or humidity. If this happens, adjust the...
... if you have finished setting the temperature, press the {Copy Media} key. 28 C Press the {i} key to decrease the temperature, and press the {j} key to turn on , the copier enters the ready condition. The number of temperature levels (7 levels) available depends on the temperature or humidity. If this happens, adjust the...

Operating Instructions
Page 41
Note ❒ The new fusing temperature for the selected paper type is cleared when you require, and then start copying. Copying onto Other Media E Choose any copy settings you press the {Clear Modes/Energy Saver} key or turn off the main switch. 3 29
Note ❒ The new fusing temperature for the selected paper type is cleared when you require, and then start copying. Copying onto Other Media E Choose any copy settings you press the {Clear Modes/Energy Saver} key or turn off the main switch. 3 29

Operating Instructions
Page 47
D Press the {Function Select} key when the leading edge of the original table cover. C Set the original. A "P" will stay on the Paper Select indicator. Partial Copying B Slide the paper straight into the copier until it stops, or press the {Paper Se- 3 lect/Cut} key to be cop- ied reaches the edge of the area to turn on , not blinking. 35 The "P" will blink in the copy counter display.
D Press the {Function Select} key when the leading edge of the original table cover. C Set the original. A "P" will stay on the Paper Select indicator. Partial Copying B Slide the paper straight into the copier until it stops, or press the {Paper Se- 3 lect/Cut} key to be cop- ied reaches the edge of the area to turn on , not blinking. 35 The "P" will blink in the copy counter display.

Operating Instructions
Page 48
G Hold down the {Function Select} key for three seconds to be cop- The "P" will disappear. 36 ied reaches the edge of the area to turn the function off. The "P" will start blinking again. F After the paper has been delivered, press the {Clear/Stop} key and remove the original. Copy Settings The copier starts copying. 3 E Press the {Function Select} key when the trailing edge of the original table cover.
G Hold down the {Function Select} key for three seconds to be cop- The "P" will disappear. 36 ied reaches the edge of the area to turn the function off. The "P" will start blinking again. F After the paper has been delivered, press the {Clear/Stop} key and remove the original. Copy Settings The copier starts copying. 3 E Press the {Function Select} key when the trailing edge of the original table cover.
Operating Instructions
Page 49
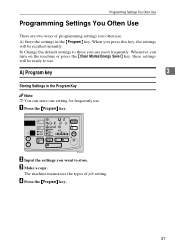
... Settings in the {Program} key. The machine memorizes the types of programming settings you often use most frequently. B) Change the default settings to those you turn on the machine or press the {Clear Modes/Energy Saver} key, these settings will be ready to store. C Make a copy. D Press the {Program} key. 37...
... Settings in the {Program} key. The machine memorizes the types of programming settings you often use most frequently. B) Change the default settings to those you turn on the machine or press the {Clear Modes/Energy Saver} key, these settings will be ready to store. C Make a copy. D Press the {Program} key. 37...

Operating Instructions
Page 50
C Make a copy. Copy Settings Recalling Settings Stored in the Program key A Press the {Program} key before copying. 3 B Enter the number of copies required with the {+} and {-} key. B) Changing the Default Setting A Turn off the main switch. 38
C Make a copy. Copy Settings Recalling Settings Stored in the Program key A Press the {Program} key before copying. 3 B Enter the number of copies required with the {+} and {-} key. B) Changing the Default Setting A Turn off the main switch. 38

Operating Instructions
Page 51
The jam and service indicators will take effect. 39 D Turn off the main switch. Programming Settings You Often Use B While holding down the {Emergency Stop} key, turn the copier back on , the settings you programmed in step C will blink. 3 C Input the settings you turn the copier on . Note ❒ The next time you want.
The jam and service indicators will take effect. 39 D Turn off the main switch. Programming Settings You Often Use B While holding down the {Emergency Stop} key, turn the copier back on , the settings you programmed in step C will blink. 3 C Input the settings you turn the copier on . Note ❒ The next time you want.
Operating Instructions
Page 55
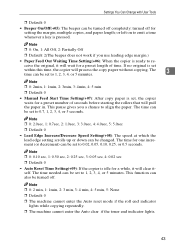
...one increment (or decrement) can be set , the copier waits for setting the margin, multiple copies, and paper length; This function can also be turned off completely; Settings You Can Change with User Tools ❒ Default: 0 • Beeper On/Off(+05): The beeper can be... ❒ 0: 0.10 sec, 1: 0.50 sec, 2: 0.25 sec, 3: 0.05 sec, 4: 0.02 sec ❒ Default: 0 • Auto Reset Time Setting(+09): If the copier is pressed. turned off for a preset number of time. Note ❒ 0: On, 1: All Off, 2: Partially Off ❒ Default: 2(The beeper does not work if you a chance to re...
...one increment (or decrement) can be set , the copier waits for setting the margin, multiple copies, and paper length; This function can also be turned off completely; Settings You Can Change with User Tools ❒ Default: 0 • Beeper On/Off(+05): The beeper can be... ❒ 0: 0.10 sec, 1: 0.50 sec, 2: 0.25 sec, 3: 0.05 sec, 4: 0.02 sec ❒ Default: 0 • Auto Reset Time Setting(+09): If the copier is pressed. turned off for a preset number of time. Note ❒ 0: On, 1: All Off, 2: Partially Off ❒ Default: 2(The beeper does not work if you a chance to re...