User Guide
Page 5
...Printer 21 Unpacking and Assembling the Stand 22 Unpacking the Printer and Mounting It on the Stand 25 Attaching the Paper Basket (Epson Stylus Pro 7700 27 Attaching the Paper Basket (Epson Stylus Pro 9700 34 Completing Setup and Connecting the Power Cord 42 Installing Ink 46 Connecting to Your System 48 Installing the Software... 55 Checking the Current Firmware Version 55 Downloading and Updating the Firmware 55 Configuring the Printer's Network Adapter 56 2 Handling Paper and Other Media Selecting Media for Your Printer 57 Available Epson Special Media 58 Guidelines for Using...
...Printer 21 Unpacking and Assembling the Stand 22 Unpacking the Printer and Mounting It on the Stand 25 Attaching the Paper Basket (Epson Stylus Pro 7700 27 Attaching the Paper Basket (Epson Stylus Pro 9700 34 Completing Setup and Connecting the Power Cord 42 Installing Ink 46 Connecting to Your System 48 Installing the Software... 55 Checking the Current Firmware Version 55 Downloading and Updating the Firmware 55 Configuring the Printer's Network Adapter 56 2 Handling Paper and Other Media Selecting Media for Your Printer 57 Available Epson Special Media 58 Guidelines for Using...
User Guide
Page 6
... Printer 77 Catching Printouts Under the Printer 79 Storing the Paper Basket 81 Optimizing the Settings for Your Paper 82 Creating Paper Configurations 82 Printing Your Paper Configurations 84 Selecting Paper Configurations 84 3 Printing With Epson Drivers for Windows Sizing Images for Borderless Printing on Roll Paper 86 Choosing Basic Print Options 87 Selecting the Correct Media...
... Printer 77 Catching Printouts Under the Printer 79 Storing the Paper Basket 81 Optimizing the Settings for Your Paper 82 Creating Paper Configurations 82 Printing Your Paper Configurations 84 Selecting Paper Configurations 84 3 Printing With Epson Drivers for Windows Sizing Images for Borderless Printing on Roll Paper 86 Choosing Basic Print Options 87 Selecting the Correct Media...

User Guide
Page 7
... 107 Using the Progress Meter 107 Optimizing Print Speed 108 Setting Monitoring Preferences 110 4 Printing With Epson Drivers for Macintosh Sizing Images for Borderless Printing on Roll Paper 112 Printing With Mac OS X 10.6 and 10.5 113 Choosing Page Setup and Basic Print Options...10.4 126 Choosing Page Setup Options 126 Choosing Basic Print Options 129 Choosing Color Management Options 132 Choosing Paper Configuration Options 133 Choosing Roll Paper Options 134 Controlling Borderless Image Expansion 136 Creating a Custom Preset and Printing 136 Managing Print Jobs 138 Selecting...
... 107 Using the Progress Meter 107 Optimizing Print Speed 108 Setting Monitoring Preferences 110 4 Printing With Epson Drivers for Macintosh Sizing Images for Borderless Printing on Roll Paper 112 Printing With Mac OS X 10.6 and 10.5 113 Choosing Page Setup and Basic Print Options...10.4 126 Choosing Page Setup Options 126 Choosing Basic Print Options 129 Choosing Color Management Options 132 Choosing Paper Configuration Options 133 Choosing Roll Paper Options 134 Controlling Borderless Image Expansion 136 Creating a Custom Preset and Printing 136 Managing Print Jobs 138 Selecting...
User Guide
Page 11
...use this book: WARNINGS must be followed carefully to avoid bodily injury. Notes contain important information about your printer, loading paper, using the Epson printer drivers, and replacing ink cartridges. 11 Introduction This User's Guide provides important information on setting up and using your...printer on a network. Attach it working at its best, and provides troubleshooting tips in case you use and printer maintenance-loading paper, replacing ink cartridges and other components, cleaning and aligning the print head, and using the printer's menu system. Cautions must ...
...use this book: WARNINGS must be followed carefully to avoid bodily injury. Notes contain important information about your printer, loading paper, using the Epson printer drivers, and replacing ink cartridges. 11 Introduction This User's Guide provides important information on setting up and using your...printer on a network. Attach it working at its best, and provides troubleshooting tips in case you use and printer maintenance-loading paper, replacing ink cartridges and other components, cleaning and aligning the print head, and using the printer's menu system. Cautions must ...
User Guide
Page 12
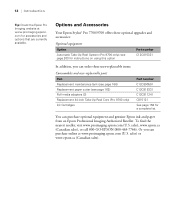
Options and Accessories Your Epson Stylus® Pro 7700/9700 offers these user-replaceable items: Consumables and user-replaceable parts Part Replacement maintenance tank (see page 166) Replacement paper cutter (see page 162) Roll media adapters (2) Replacement 44-inch Take-Up Reel Core (Pro 9700 only) Ink Cartridges Part number C12C890501 C12C815331 C12C811241 C815121 See page 158 for...
Options and Accessories Your Epson Stylus® Pro 7700/9700 offers these user-replaceable items: Consumables and user-replaceable parts Part Replacement maintenance tank (see page 166) Replacement paper cutter (see page 162) Roll media adapters (2) Replacement 44-inch Take-Up Reel Core (Pro 9700 only) Ink Cartridges Part number C12C890501 C12C815331 C12C811241 C815121 See page 158 for...
User Guide
Page 15
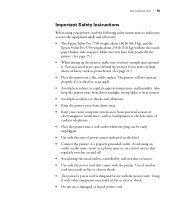
... or electric shock. • Do not use the equipment safely and effectively. • The Epson Stylus Pro 7700 weighs about 186 lb (84.5 kg) and the Epson Stylus Pro 9700 weighs about 256 lb (116 kg) without the stand, paper basket, ink, or paper. Using it with other equipment may need more space behind the printer if you have...
... or electric shock. • Do not use the equipment safely and effectively. • The Epson Stylus Pro 7700 weighs about 186 lb (84.5 kg) and the Epson Stylus Pro 9700 weighs about 256 lb (116 kg) without the stand, paper basket, ink, or paper. Using it with other equipment may need more space behind the printer if you have...
User Guide
Page 18
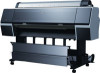
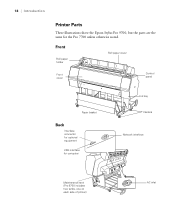
18 | Introduction Printer Parts These illustrations show the Epson Stylus Pro 9700, but the parts are the same for computer Ink bay Casters Network interface Maintenance tank (Pro 9700 includes two tanks, one on each side of printer) 18 AC inlet Front Roll paper holder Roll paper cover Front cover Control panel Paper basket Back Interface connector for optional equipment USB interface for the Pro 7700 unless otherwise noted.
18 | Introduction Printer Parts These illustrations show the Epson Stylus Pro 9700, but the parts are the same for computer Ink bay Casters Network interface Maintenance tank (Pro 9700 includes two tanks, one on each side of printer) 18 AC inlet Front Roll paper holder Roll paper cover Front cover Control panel Paper basket Back Interface connector for optional equipment USB interface for the Pro 7700 unless otherwise noted.
User Guide
Page 22
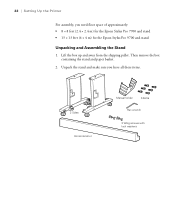
Lift the box up and away from the shipping pallet. Then remove the box containing the stand and paper basket. 2. 22 | Setting Up the Printer For assembly, you have all these items. 2 Sides Horizontal strut Manual holder 6 Bolts Hex wrench 2 Wing screws with lock washers 22 Unpack the stand and make sure you need floor space of approximately: • 8 × 8 feet (2.4 × 2.4 m) for the Epson Stylus Pro 7700 and stand • 13 × 13 feet (4 × 4 m) for the Epson Stylus Pro 9700 and stand Unpacking and Assembling the Stand 1.
Lift the box up and away from the shipping pallet. Then remove the box containing the stand and paper basket. 2. 22 | Setting Up the Printer For assembly, you have all these items. 2 Sides Horizontal strut Manual holder 6 Bolts Hex wrench 2 Wing screws with lock washers 22 Unpack the stand and make sure you need floor space of approximately: • 8 × 8 feet (2.4 × 2.4 m) for the Epson Stylus Pro 7700 and stand • 13 × 13 feet (4 × 4 m) for the Epson Stylus Pro 9700 and stand Unpacking and Assembling the Stand 1.
User Guide
Page 27
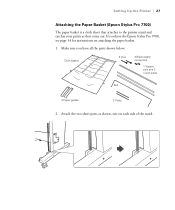
Setting Up the Printer | 27 Attaching the Paper Basket (Epson Stylus Pro 7700) The paper basket is a cloth sheet that attaches to the printer stand and catches your prints as shown, one on attaching the paper basket. 1. Make sure you have all the parts shown below: Cloth basket 2 Pins 2 Black plastic connectors 1 Square pole and 2 round poles Rod 2 Paper guides 2 Posts 2. If you have the Epson Stylus Pro 9700, see page 34 for instructions on each side of the stand. 27 Attach the two short posts as they come out.
Setting Up the Printer | 27 Attaching the Paper Basket (Epson Stylus Pro 7700) The paper basket is a cloth sheet that attaches to the printer stand and catches your prints as shown, one on attaching the paper basket. 1. Make sure you have all the parts shown below: Cloth basket 2 Pins 2 Black plastic connectors 1 Square pole and 2 round poles Rod 2 Paper guides 2 Posts 2. If you have the Epson Stylus Pro 9700, see page 34 for instructions on each side of the stand. 27 Attach the two short posts as they come out.
User Guide
Page 34
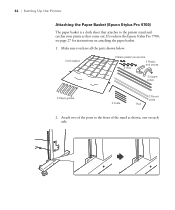
Make sure you have all the parts shown below. Cloth basket 2 Black plastic connectors 4 Pins 2 Plastic end pieces 3 Square poles 5 Paper guides 4 Posts 2 Round poles Rod 2. Attach two of the stand as they come out. If you have the Epson Stylus Pro 7700, see page 27 for instructions on each side. 34 34 | Setting Up the Printer Attaching the Paper Basket (Epson Stylus Pro 9700) The paper basket is a cloth sheet that attaches to the front of the posts to the printer stand and catches your prints as shown, one on attaching the paper basket. 1.
Make sure you have all the parts shown below. Cloth basket 2 Black plastic connectors 4 Pins 2 Plastic end pieces 3 Square poles 5 Paper guides 4 Posts 2 Round poles Rod 2. Attach two of the stand as they come out. If you have the Epson Stylus Pro 7700, see page 27 for instructions on each side. 34 34 | Setting Up the Printer Attaching the Paper Basket (Epson Stylus Pro 9700) The paper basket is a cloth sheet that attaches to the front of the posts to the printer stand and catches your prints as shown, one on attaching the paper basket. 1.
User Guide
Page 56
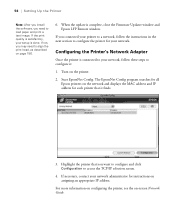
...network, follow the instructions in the next section to configure the printer for your network administrator for each printer that you may need to load paper and print a test image. For more information on configuring the printer, see the on the printer. 2. 56 | Setting Up the Printer...the printer that it : 1. If you connected your setup is complete, close the Firmware Updater window and Epson LFP Remote window. The EpsonNet Config program searches for all Epson printers on the network and displays the MAC address and IP address for instructions on assigning an appropriate IP...
...network, follow the instructions in the next section to configure the printer for your network administrator for each printer that you may need to load paper and print a test image. For more information on configuring the printer, see the on the printer. 2. 56 | Setting Up the Printer...the printer that it : 1. If you connected your setup is complete, close the Firmware Updater window and Epson LFP Remote window. The EpsonNet Config program searches for all Epson printers on the network and displays the MAC address and IP address for instructions on assigning an appropriate IP...
User Guide
Page 57
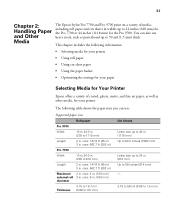
... Thickness (0.08 to 0.5 mm) Cut sheets Letter size up to 44 in . 57 Chapter 2: Handling Paper and Other Media The Epson Stylus Pro 7700 and Pro 9700 print on a variety of media, including roll paper and cut sheet paper • Using the paper basket • Optimizing the settings for your printer. This chapter includes the following table shows the...
... Thickness (0.08 to 0.5 mm) Cut sheets Letter size up to 44 in . 57 Chapter 2: Handling Paper and Other Media The Epson Stylus Pro 7700 and Pro 9700 print on a variety of media, including roll paper and cut sheet paper • Using the paper basket • Optimizing the settings for your printer. This chapter includes the following table shows the...

User Guide
Page 58
... maintain quality. Guidelines for instructions on the printer's control panel. Fingerprints may need to high temperature, humidity, or direct sunlight. • Store sheet media on Epson paper and other media, you send your printouts where they will be exposed to adjust various settings and create special...
... maintain quality. Guidelines for instructions on the printer's control panel. Fingerprints may need to high temperature, humidity, or direct sunlight. • Store sheet media on Epson paper and other media, you send your printouts where they will be exposed to adjust various settings and create special...
User Guide
Page 60
... experiment with different settings to experiment with the paper, or look on the Epson website (www.proimaging.epson.com). 60 | Handling Paper and Other Media If your paper does not appear on the control panel, check the instructions included with other paper types. 60 If you are using non-Epson paper, consult the manufacturer for the media you...
... experiment with different settings to experiment with the paper, or look on the Epson website (www.proimaging.epson.com). 60 | Handling Paper and Other Media If your paper does not appear on the control panel, check the instructions included with other paper types. 60 If you are using non-Epson paper, consult the manufacturer for the media you...
User Guide
Page 69
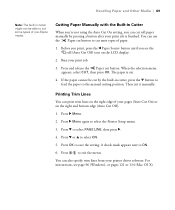
You can print trim lines on the right edge of your printer driver software. Printing Trim Lines You can use the Paper cut button to cut most types of non-Epson media. Press d to save the setting. Press OK to select PAGE LINE, then press r. 4. Run your print job is cut by pressing... a button after your print job. 3. Press and release the Paper cut it manually. When the selection menu appears, select CUT, then ...
You can print trim lines on the right edge of your printer driver software. Printing Trim Lines You can use the Paper cut button to cut most types of non-Epson media. Press d to save the setting. Press OK to select PAGE LINE, then press r. 4. Run your print job is cut by pressing... a button after your print job. 3. Press and release the Paper cut it manually. When the selection menu appears, select CUT, then ...

User Guide
Page 77
... in front of the basket, as they are 62 inches (157 cm) or longer (for the Pro 9700) or 36 inches (91 cm) or longer (for the Pro 7700). 1. You can set up either to catch the paper under the printer or in front of the printer. Catching Printouts in Front of the Printer... Follow the steps below . 77 If you are using the Epson driver, you switch media, don't forget to change the setting back to STANDARD. Handling Paper and Other Media | 77 If you've selected a non-standard platen gap, the following symbols appear in the...
... in front of the basket, as they are 62 inches (157 cm) or longer (for the Pro 9700) or 36 inches (91 cm) or longer (for the Pro 7700). 1. You can set up either to catch the paper under the printer or in front of the printer. Catching Printouts in Front of the Printer... Follow the steps below . 77 If you are using the Epson driver, you switch media, don't forget to change the setting back to STANDARD. Handling Paper and Other Media | 77 If you've selected a non-standard platen gap, the following symbols appear in the...
User Guide
Page 82
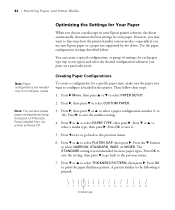
... printer handles various media-especially if you use non-Epson paper or a paper not supported by the driver. The STANDARD setting is loaded in your Epson printer software, the driver automatically determines the best settings for your paper. Press OK to save the setting, then press ...and select the desired configuration whenever you want to select PAPER TYPE, then press r. You can also create paper configurations using the Epson LFP Remote Panel installed from the printer software CD. Note: Paper configurations are needed only for most paper types. Press the d button to save it. ...
... printer handles various media-especially if you use non-Epson paper or a paper not supported by the driver. The STANDARD setting is loaded in your Epson printer software, the driver automatically determines the best settings for your paper. Press OK to save the setting, then press ...and select the desired configuration whenever you want to select PAPER TYPE, then press r. You can also create paper configurations using the Epson LFP Remote Panel installed from the printer software CD. Note: Paper configurations are needed only for most paper types. Press the d button to save it. ...
User Guide
Page 83
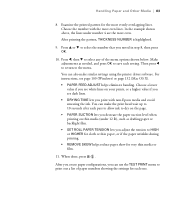
... above, the lines under 12 lb), such as needed, and press OK to print out a list of the menu options shown below. After you create paper configurations, you see white lines on thin media (under number 4 are the most evenly overlapping lines. Examine the printed pattern for each pass to allow... ink to the menu. Choose the number with non-Epson media and avoid smearing the ink. Choose a lower value if you can also make the print head wait up to select the number that you...
... above, the lines under 12 lb), such as needed, and press OK to print out a list of the menu options shown below. After you create paper configurations, you see white lines on thin media (under number 4 are the most evenly overlapping lines. Examine the printed pattern for each pass to allow... ink to the menu. Choose the number with non-Epson media and avoid smearing the ink. Choose a lower value if you can also make the print head wait up to select the number that you...

User Guide
Page 89
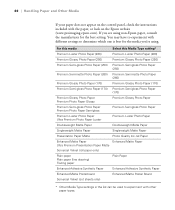
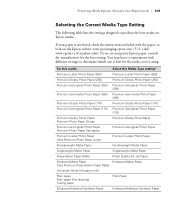
...settings in images. If your image or file and make the appropriate printing adjustments. If you 're using non-Epson paper, consult the manufacturer for presentation graphics. Printing With Epson Drivers for color photographs. • Click Custom, then follow the instructions on page 91 to select color management ...large files.) 6. Selecting the Correct Media Type Setting The table on the next page lists the settings designed to experiment with the paper, or look on Epson media. You can choose one is not recommended for the media you are using . 89 Set the Mode option as follows:...
...settings in images. If your image or file and make the appropriate printing adjustments. If you 're using non-Epson paper, consult the manufacturer for presentation graphics. Printing With Epson Drivers for color photographs. • Click Custom, then follow the instructions on page 91 to select color management ...large files.) 6. Selecting the Correct Media Type Setting The table on the next page lists the settings designed to experiment with the paper, or look on Epson media. You can choose one is not recommended for the media you are using . 89 Set the Mode option as follows:...
User Guide
Page 139
... Jet Paper Enhanced Matte Paper Enhanced Matte Paper Ultra Premium Presentation Paper Matte Somerset Velvet (roll paper only) Plain paper Plain paper (line drawing) Tracing paper Plain Paper Enhanced Adhesive Synthetic Paper Enhanced Adhesive Synthetic Paper 139 You may have to experiment with the paper, or look on Epson media. If your paper is best for the best setting. If you 're using non-Epson paper...
... Jet Paper Enhanced Matte Paper Enhanced Matte Paper Ultra Premium Presentation Paper Matte Somerset Velvet (roll paper only) Plain paper Plain paper (line drawing) Tracing paper Plain Paper Enhanced Adhesive Synthetic Paper Enhanced Adhesive Synthetic Paper 139 You may have to experiment with the paper, or look on Epson media. If your paper is best for the best setting. If you 're using non-Epson paper...


