User Guide
Page 20
...injury and prevent damage to the machine, be sure to read this. ❖ Quick Installation Guide Contains procedures for removing the printer from its box, connecting it to a computer, and installing its driver. ❖ Hardware Guide (This manual) Contains information... about paper and procedures such as installing options, replacing consumables, responding to error messages, and resolving jams. ❖ Software Guide Contain procedures for This Printer For particular functions, see the relevant parts of the manual. ❖ Safety Information Provides ...
...injury and prevent damage to the machine, be sure to read this. ❖ Quick Installation Guide Contains procedures for removing the printer from its box, connecting it to a computer, and installing its driver. ❖ Hardware Guide (This manual) Contains information... about paper and procedures such as installing options, replacing consumables, responding to error messages, and resolving jams. ❖ Software Guide Contain procedures for This Printer For particular functions, see the relevant parts of the manual. ❖ Safety Information Provides ...

User Guide
Page 21
... can find further relevant information. [ ] Indicates the names of keys that appear on the machine's display panel. { } Indicates the names of keys on resolving user errors. Be sure to read these notes could result in the "Safety Information". It indicates where you can be found in moderate or minor injury, or...
... can find further relevant information. [ ] Indicates the names of keys that appear on the machine's display panel. { } Indicates the names of keys on resolving user errors. Be sure to read these notes could result in the "Safety Information". It indicates where you can be found in moderate or minor injury, or...
User Guide
Page 25
...Feed Roller 102 Cleaning the Registration Roller and the Paper Tray 105 8. Troubleshooting Error & Status Messages on the Control Panel 109 Panel Indicator 112 Printer Does Not Print 113 When the Printer is Jammed 125 When "Remove Misfeed Internal Path" Appears 127 When "Remove ..."Remove Misfeed Bypass Tray" Appears 132 When "Remove Misfeed Paper Exit" Appears 133 10.Appendix Moving and Transporting the Printer 135 Moving the Printer 136 Consumables ...137 Print Cartridge ...137 Waste Toner Bottle 138 Intermediate Transfer Unit 138 Maintenance Kit ...138 Specifications...139 Main...
...Feed Roller 102 Cleaning the Registration Roller and the Paper Tray 105 8. Troubleshooting Error & Status Messages on the Control Panel 109 Panel Indicator 112 Printer Does Not Print 113 When the Printer is Jammed 125 When "Remove Misfeed Internal Path" Appears 127 When "Remove ..."Remove Misfeed Bypass Tray" Appears 132 When "Remove Misfeed Paper Exit" Appears 133 10.Appendix Moving and Transporting the Printer 135 Moving the Printer 136 Consumables ...137 Print Cartridge ...137 Waste Toner Bottle 138 Intermediate Transfer Unit 138 Maintenance Kit ...138 Specifications...139 Main...

User Guide
Page 29
Inside Inside 1 ASI002S 1. Print Cartridge Loads from the printer rear, in the order of cyan (C), magenta (M), yellow (Y),... wasted during printing. If the following message appears on the control panel, replace the print cartridge: "Replace (Color) Print Cartridge" 2. Intermediate Transfer Unit If the following message appears on the control panel, replace the intermediate ... transcription roller, which appear on the screen to prompt you to replace the units, see p.109 "Error & Status Messages on the control panel, replace the waste toner bottle: "Replace Waste Toner" 5. ...
Inside Inside 1 ASI002S 1. Print Cartridge Loads from the printer rear, in the order of cyan (C), magenta (M), yellow (Y),... wasted during printing. If the following message appears on the control panel, replace the print cartridge: "Replace (Color) Print Cartridge" 2. Intermediate Transfer Unit If the following message appears on the control panel, replace the intermediate ... transcription roller, which appear on the screen to prompt you to replace the units, see p.109 "Error & Status Messages on the control panel, replace the waste toner bottle: "Replace Waste Toner" 5. ...
User Guide
Page 30
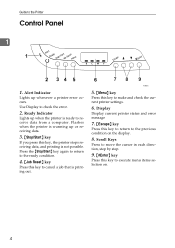
...Press this key to return to the previous condition on . 4 Display Display current printer status and error message 7. {Escape} key Press this key to cancel a job that is not possible. Guide to check the error. 2. Press the {Stop/Start} key again to return to the ready condition....printing is printing out. Use Display to the Printer Control Panel 1 1. Ready Indicator Lights up whenever a printer error occurs. Alert Indicator Lights up when the printer is ready to make and check the current printer settings. 6. Flashes when the printer is warming up or receiving data. 3. {...
...Press this key to return to the previous condition on . 4 Display Display current printer status and error message 7. {Escape} key Press this key to cancel a job that is not possible. Guide to check the error. 2. Press the {Stop/Start} key again to return to the ready condition....printing is printing out. Use Display to the Printer Control Panel 1 1. Ready Indicator Lights up whenever a printer error occurs. Alert Indicator Lights up when the printer is ready to make and check the current printer settings. 6. Flashes when the printer is warming up or receiving data. 3. {...

User Guide
Page 40
...Page The configuration page will be printed. trol Panel". 14 Note ❒ If printing is not normal, check to verify the printer is an error message, see if an error message appears on the Con- it does not test the connection to display [Config. Page], and then press the {#Enter} ...key. The initial screen appears. Menu: List/Test Print C Press the {T} or {U} key to the computer. 2 A Press the {Menu} key. Installing the Printer and Options ...
...Page The configuration page will be printed. trol Panel". 14 Note ❒ If printing is not normal, check to verify the printer is an error message, see if an error message appears on the Con- it does not test the connection to display [Config. Page], and then press the {#Enter} ...key. The initial screen appears. Menu: List/Test Print C Press the {T} or {U} key to the computer. 2 A Press the {Menu} key. Installing the Printer and Options ...
User Guide
Page 135
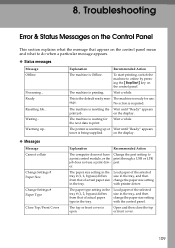
...for use a print driver. The paper type setting in the tray # (1, 2, bypass) differs from that of actual paper size in the tray. Troubleshooting Error & Status Messages on the Control Panel This section explains what the message that appear on the display. ❖ Messages Message Cannot collate Change Settings # Paper... ready mes- To start printing, switch the machine to print through a USB or LPR port. Wait a while. on the control panel. The printer is warming up ... Load paper of the selected size in the tray, and then change the paper size setting with...
...for use a print driver. The paper type setting in the tray # (1, 2, bypass) differs from that of actual paper size in the tray. Troubleshooting Error & Status Messages on the Control Panel This section explains what the message that appear on the display. ❖ Messages Message Cannot collate Change Settings # Paper... ready mes- To start printing, switch the machine to print through a USB or LPR port. Wait a while. on the control panel. The printer is warming up ... Load paper of the selected size in the tray, and then change the paper size setting with...

User Guide
Page 136
...tray. If the download fails again, contact your sales or service representative. Load paper into the indicat- See p.45 "Loading Paper". Memory full This error occurs when FW Add more memory. Print Overrun The print data could not be Print again. Turn off the main power, turn it back on... the control panel. Replace the toner to insufficient memory. Load Paper: # or Stop/Start The printer detected that the actual paper type and size are not the same as the paper tray # (1, 2, bypass) size setting and the paper type settings. ...
...tray. If the download fails again, contact your sales or service representative. Load paper into the indicat- See p.45 "Loading Paper". Memory full This error occurs when FW Add more memory. Print Overrun The print data could not be Print again. Turn off the main power, turn it back on... the control panel. Replace the toner to insufficient memory. Load Paper: # or Stop/Start The printer detected that the actual paper type and size are not the same as the paper tray # (1, 2, bypass) size setting and the paper type settings. ...

User Guide
Page 137
...Replace Transfer Belt It is time to repair it on again. Replace the transfer belt with the Call Service If error reoccurs printer's controller. The error message appears even though the print cartridge is set . Using a dry cloth, carefully wipe the interface area on ... Set the indicated print caris not set correctly, or not set correctly. stalled correctly. Error & Status Messages on the Control Panel Message Explanation Recommended Action Replace (color) Print Cartridge The printer is out of Prepare a new print car- Clean the toner density sensor. See,...
...Replace Transfer Belt It is time to repair it on again. Replace the transfer belt with the Call Service If error reoccurs printer's controller. The error message appears even though the print cartridge is set . Using a dry cloth, carefully wipe the interface area on ... Set the indicated print caris not set correctly, or not set correctly. stalled correctly. Error & Status Messages on the Control Panel Message Explanation Recommended Action Replace (color) Print Cartridge The printer is out of Prepare a new print car- Clean the toner density sensor. See,...

User Guide
Page 138
The Ready indicator is ready for use. 8 112 Check the error on the control panel. The printer is lit. Cause The printer cannot be used normally. The Ready indicator is lit. Troubleshooting Panel Indicator The following table explains the meaning of the various indicator patterns that the printer alerts to print. The printer is receiving print data or preparing to users about its conditions. Indicator patterns The Alert indicator is flashing.
The Ready indicator is ready for use. 8 112 Check the error on the control panel. The printer is lit. Cause The printer cannot be used normally. The Ready indicator is lit. Troubleshooting Panel Indicator The following table explains the meaning of the various indicator patterns that the printer alerts to print. The printer is receiving print data or preparing to users about its conditions. Indicator patterns The Alert indicator is flashing.
User Guide
Page 139
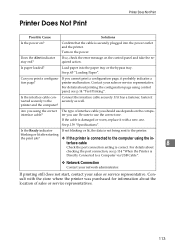
...? Be sure to use the correct one . Is the Ready indicator If not blinking or lit, the data is connected to the printer. Printer Does Not Print Printer Does Not Print Possible Cause Solutions Is the power on the power. Does the Alert indicator stay red? See p.45 "Loading Paper"....Consult with a new one . Confirm that the cable is correct. If so, check the error message on the computer you print a configura- Is paper loaded? Load paper into the power outlet and the printer. Can you use depends on the control panel and take the required action. Is the interface...
...? Be sure to use the correct one . Is the Ready indicator If not blinking or lit, the data is connected to the printer. Printer Does Not Print Printer Does Not Print Possible Cause Solutions Is the power on the power. Does the Alert indicator stay red? See p.45 "Loading Paper"....Consult with a new one . Confirm that the cable is correct. If so, check the error message on the computer you print a configura- Is paper loaded? Load paper into the power outlet and the printer. Can you use depends on the control panel and take the required action. Is the interface...
User Guide
Page 148
... paper that has been stored properly. White streaks or color streaks appear. • Toner is larger than paper size, e.g. The backs of printed sheets are blemished. • When removing a jammed sheet, the inside of the printer may have collected. If the following message appears on ...Replacing the Print Cartridge". • Condensation may be dirtied. 122 Color shift occurs. Press the {Menu} key on the control panel, replace the print cartridge of the next printed sheet may have become dirtied. If an error message appears on the control panel, select [System], and then...
... paper that has been stored properly. White streaks or color streaks appear. • Toner is larger than paper size, e.g. The backs of printed sheets are blemished. • When removing a jammed sheet, the inside of the printer may have collected. If the following message appears on ...Replacing the Print Cartridge". • Condensation may be dirtied. 122 Color shift occurs. Press the {Menu} key on the control panel, replace the print cartridge of the next printed sheet may have become dirtied. If an error message appears on the control panel, select [System], and then...
User Guide
Page 150
...Image Monitor Confirm that [On] is selected. Also check error mail information from , check the supply or option is still not operating satisfactorily, contact your sales or service representative. Note ❒ If the printer is properly attached. Make the setting for obtaining time ...or service representative. Control panel Press the {Menu} key, select [System], and then press the {#Enter} key. For details, see "Printer Status Notification by server has a malfunction. If a supply was set for information about the location of sales or service representatives. 124 Press ...
...Image Monitor Confirm that [On] is selected. Also check error mail information from , check the supply or option is still not operating satisfactorily, contact your sales or service representative. Note ❒ If the printer is properly attached. Make the setting for obtaining time ...or service representative. Control panel Press the {Menu} key, select [System], and then press the {#Enter} key. For details, see "Printer Status Notification by server has a malfunction. If a supply was set for information about the location of sales or service representatives. 124 Press ...

User Guide
Page 154
... after you cannot find the jammed paper, open will damage one or both hands carefully. 9 ASI072S Note ❒ When closing the cover, check that the error is still open the guide by lowering the guide's blue levers. Check inside it . If you have checked inside the guide for jammed paper. After...
... after you cannot find the jammed paper, open will damage one or both hands carefully. 9 ASI072S Note ❒ When closing the cover, check that the error is still open the guide by lowering the guide's blue levers. Check inside it . If you have checked inside the guide for jammed paper. After...
User Guide
Page 156
... cover and remove the paper following the same procedure as for Tray 1. After removing the paper, carefully push Tray 2 all the way back inside the printer. ❒ When closing the cover, check that the error is difficult to locate, pull out Tray 2 to remove it.
... cover and remove the paper following the same procedure as for Tray 1. After removing the paper, carefully push Tray 2 all the way back inside the printer. ❒ When closing the cover, check that the error is difficult to locate, pull out Tray 2 to remove it.

User Guide
Page 157
ASI072S Note ❒ When closing the cover, check that the error is Jammed B Carefully remove misfed paper under the transfer unit. After closing the front cover, push the upper side of the cover firmly. C Close the front cover with both hands carefully. When Paper is cleared. 9 131 ASI058S If you cannot find the misfed paper, look inside the printer.
ASI072S Note ❒ When closing the cover, check that the error is Jammed B Carefully remove misfed paper under the transfer unit. After closing the front cover, push the upper side of the cover firmly. C Close the front cover with both hands carefully. When Paper is cleared. 9 131 ASI058S If you cannot find the misfed paper, look inside the printer.

User Guide
Page 159
... cover with both hands carefully. When Paper is Jammed ASI072S Note ❒ Be sure the Tray 1 is cleared. After closing the cover, check that the error is inserted before you open the front cover. ❒ When closing the front cover, push the upper side of the cover firmly. Reference For details...
... cover with both hands carefully. When Paper is Jammed ASI072S Note ❒ Be sure the Tray 1 is cleared. After closing the cover, check that the error is inserted before you open the front cover. ❒ When closing the front cover, push the upper side of the cover firmly. Reference For details...

User Guide
Page 166
... is used during power off.) 15 W or less ❖ Warm-up Time Less than 30 seconds (23 °C, 71.6 F) *1 *1 When no error is occurred. ❖ Dimensions Width Depth Height Printer only (tray not 400 mm (15.8 inches) 480 mm (18.9 inches) 387 mm (15.2 inches) extended) ❖ Weight Approximately 28 kg (61...
... is used during power off.) 15 W or less ❖ Warm-up Time Less than 30 seconds (23 °C, 71.6 F) *1 *1 When no error is occurred. ❖ Dimensions Width Depth Height Printer only (tray not 400 mm (15.8 inches) 480 mm (18.9 inches) 387 mm (15.2 inches) extended) ❖ Weight Approximately 28 kg (61...
User Guide
Page 169
... Cleaning the registration roller, 105 Cleaning the toner density sensor, 100 Configuration, 25 Connecting the printer, 21, 23 Consumables, 137 Control panel, 1, 4 D DHCP, 27 Display, 4 E #Enter key, 4 Envelope, 60 Error messages, 109 Escape key, 4 Ethernet, 21, 25 Ethernet configuration, 25 Ethernet port, 2, 21 Ethernet speed, 32 F Friction pad, 102 Front cover, 1 Front...
... Cleaning the registration roller, 105 Cleaning the toner density sensor, 100 Configuration, 25 Connecting the printer, 21, 23 Consumables, 137 Control panel, 1, 4 D DHCP, 27 Display, 4 E #Enter key, 4 Envelope, 60 Error messages, 109 Escape key, 4 Ethernet, 21, 25 Ethernet configuration, 25 Ethernet port, 2, 21 Ethernet speed, 32 F Friction pad, 102 Front cover, 1 Front...

User Guide
Page 177
... Installation Guide Contains procedures for removing the printer from its box and connecting it to a computer. ❖ Hardware Guide Contains information about paper and procedures such as installing options, replacing consumables, responding to error messages, and resolving jams. ❖ Software... Guide (This manual) Contains procedures for This Printer For particular functions, see the relevant parts of the manual. ❖ Safety ...
... Installation Guide Contains procedures for removing the printer from its box and connecting it to a computer. ❖ Hardware Guide Contains information about paper and procedures such as installing options, replacing consumables, responding to error messages, and resolving jams. ❖ Software... Guide (This manual) Contains procedures for This Printer For particular functions, see the relevant parts of the manual. ❖ Safety ...


