User Guide
Page 5
If the cord is unplugged abruptly, it could become damaged. The printer will not be damaged under the machine. • Do not connect the Ethernet port of the toners, nor the waste toner bottle to prevent toner spill inside the machine. • When moving the machine, unplug the power cord from the wall ... trap your fingers when opening or closing the top cover. 5 While moving the machine, you move the machine. The printer will break or cause injury if dropped. • When moving the printer, use the inset grips on both sides, and lift slowly in fire or electric shock. • The...
If the cord is unplugged abruptly, it could become damaged. The printer will not be damaged under the machine. • Do not connect the Ethernet port of the toners, nor the waste toner bottle to prevent toner spill inside the machine. • When moving the machine, unplug the power cord from the wall ... trap your fingers when opening or closing the top cover. 5 While moving the machine, you move the machine. The printer will break or cause injury if dropped. • When moving the printer, use the inset grips on both sides, and lift slowly in fire or electric shock. • The...
User Guide
Page 25
...Problems 117 Additional Troubleshooting 124 9. Troubleshooting Error & Status Messages on the Control Panel 109 Panel Indicator 112 Printer Does Not Print 113 When the Printer is Jammed 125 When "Remove Misfeed Internal Path" Appears 127 When "Remove Misfeed Tray 1" Appears 129 When... Appears 132 When "Remove Misfeed Paper Exit" Appears 133 10.Appendix Moving and Transporting the Printer 135 Moving the Printer 136 Consumables ...137 Print Cartridge ...137 Waste Toner Bottle 138 Intermediate Transfer Unit 138 Maintenance Kit ...138 Specifications...139 Main Unit ...139 Options ...
...Problems 117 Additional Troubleshooting 124 9. Troubleshooting Error & Status Messages on the Control Panel 109 Panel Indicator 112 Printer Does Not Print 113 When the Printer is Jammed 125 When "Remove Misfeed Internal Path" Appears 127 When "Remove Misfeed Tray 1" Appears 129 When... Appears 132 When "Remove Misfeed Paper Exit" Appears 133 10.Appendix Moving and Transporting the Printer 135 Moving the Printer 136 Consumables ...137 Print Cartridge ...137 Waste Toner Bottle 138 Intermediate Transfer Unit 138 Maintenance Kit ...138 Specifications...139 Main Unit ...139 Options ...
User Guide
Page 27
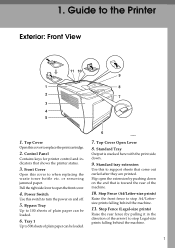
Top Cover Open this to when replacing the waste toner bottle etc. or removing jammed paper. Stop Fence (Legal-size prints) Raise the rear fence (by pushing down . 9. ASI001S 7. Standard tray extension Use this cover ... lever to 100 sheets of the arrow) to replace the print cartridge. 2. Tray 1 Up to the Printer Exterior: Front View 1. Top Cover Open Lever 8. Flip open the front cover. 4. 1. Control Panel Contains keys for printer control and indicators that is stacked here with the print side down on and off. 5. Guide to...
Top Cover Open this to when replacing the waste toner bottle etc. or removing jammed paper. Stop Fence (Legal-size prints) Raise the rear fence (by pushing down . 9. ASI001S 7. Standard tray extension Use this cover ... lever to 100 sheets of the arrow) to replace the print cartridge. 2. Tray 1 Up to the Printer Exterior: Front View 1. Top Cover Open Lever 8. Flip open the front cover. 4. 1. Control Panel Contains keys for printer control and indicators that is stacked here with the print side down on and off. 5. Guide to...

User Guide
Page 29
... appears on the control panel, replace the waste toner bottle: "Replace Waste Toner" 5. Transfer unit Remove this unit when replacing the waste toner bottle, intermediate transfer unit. If the following message appears on the control panel, replace the print cartridge: "Replace (Color) Print Cartridge" 2. Inside Inside 1 ASI002S 1. Waste Toner Bottle Collects toner that is included with the fusing unit: "Replace...
... appears on the control panel, replace the waste toner bottle: "Replace Waste Toner" 5. Transfer unit Remove this unit when replacing the waste toner bottle, intermediate transfer unit. If the following message appears on the control panel, replace the print cartridge: "Replace (Color) Print Cartridge" 2. Inside Inside 1 ASI002S 1. Waste Toner Bottle Collects toner that is included with the fusing unit: "Replace...

User Guide
Page 100
... the power plug before turning the power on. ❒ Cooperate with the waste toner bottle Recycling Program, whereby used toner containers in accordance with local regulations. If the transfer unit is installed. R CAUTION: • The inside of this printer becomes very hot. Toner dust might ignite when exposed to an open flame. • Wait for...
... the power plug before turning the power on. ❒ Cooperate with the waste toner bottle Recycling Program, whereby used toner containers in accordance with local regulations. If the transfer unit is installed. R CAUTION: • The inside of this printer becomes very hot. Toner dust might ignite when exposed to an open flame. • Wait for...

User Guide
Page 101
ASI027S 75 Replacing the Waste Toner Bottle A Pull Front Cover Open Lever, and then open the front cover with both ends of the transfer unit, and then lift it up. ASI025S B Slide both levers on the front cover outward. 6 ASI026S C Hold both hands carefully.
ASI027S 75 Replacing the Waste Toner Bottle A Pull Front Cover Open Lever, and then open the front cover with both ends of the transfer unit, and then lift it up. ASI025S B Slide both levers on the front cover outward. 6 ASI026S C Hold both hands carefully.

User Guide
Page 102
izontally. Replacing Consumables D Hold the center of the waste toner bottle, and then carefully pull it straight out. 6 ASI029S ASI030S 76 ASI028S E Pull the waste toner bottle halfway out, grab the bottle, and then pull it out hor-
izontally. Replacing Consumables D Hold the center of the waste toner bottle, and then carefully pull it straight out. 6 ASI029S ASI030S 76 ASI028S E Pull the waste toner bottle halfway out, grab the bottle, and then pull it out hor-
User Guide
Page 103
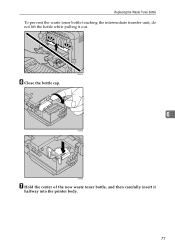
ASI031S F Close the bottle cap. 6 ASI089S ASI090S G Hold the center of the new waste toner bottle, and then carefully insert it out. Replacing the Waste Toner Bottle To prevent the waste toner bottle touching the intermediate transfer unit, do not lift the bottle while pulling it halfway into the printer body. 77
ASI031S F Close the bottle cap. 6 ASI089S ASI090S G Hold the center of the new waste toner bottle, and then carefully insert it out. Replacing the Waste Toner Bottle To prevent the waste toner bottle touching the intermediate transfer unit, do not lift the bottle while pulling it halfway into the printer body. 77

User Guide
Page 104
Push the green part all the way in the waste toner bottle until it . 6 ASI033S H Push in . ASI034S I Place the transfer unit down on the front cover. 78 Replacing Consumables Leave the cap open. ASI032S To prevent the waste toner bottle touching the intermediate transfer unit, do not lift the bottle while inserting it clicks into place.
Push the green part all the way in the waste toner bottle until it . 6 ASI033S H Push in . ASI034S I Place the transfer unit down on the front cover. 78 Replacing Consumables Leave the cap open. ASI032S To prevent the waste toner bottle touching the intermediate transfer unit, do not lift the bottle while inserting it clicks into place.
User Guide
Page 105
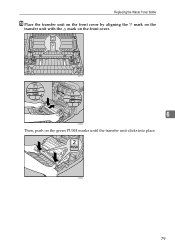
ASI036S 79 Replacing the Waste Toner Bottle J Place the transfer unit on the front cover by aligning the mark on the transfer unit with the mark on the green PUSH marks until the transfer unit clicks into place. ASI117S 6 ASI035S Then, push on the front cover.
ASI036S 79 Replacing the Waste Toner Bottle J Place the transfer unit on the front cover by aligning the mark on the transfer unit with the mark on the green PUSH marks until the transfer unit clicks into place. ASI117S 6 ASI035S Then, push on the front cover.
User Guide
Page 106
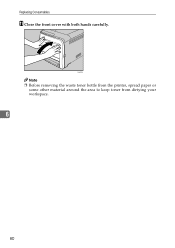
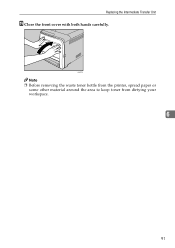
Replacing Consumables K Close the front cover with both hands carefully. ASI072S Note ❒ Before removing the waste toner bottle from the printer, spread paper or some other material around the area to keep toner from dirtying your workspace. 6 80
Replacing Consumables K Close the front cover with both hands carefully. ASI072S Note ❒ Before removing the waste toner bottle from the printer, spread paper or some other material around the area to keep toner from dirtying your workspace. 6 80
User Guide
Page 107
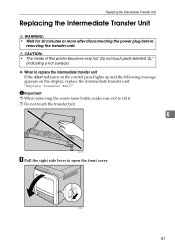
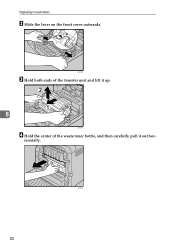
... control panel lights up and the following message appears on the display, replace the intermediate transfer unit: "Replace Transfer Belt" Important ❒ When removing the waste toner bottle, make sure not to tilt it. ❒ Do not touch the transfer belt. 6 ASI118S A Pull the right side lever to open the front cover...: • Wait for 30 minutes or more after disconnecting the power plug before removing the transfer unit. ASI025S 81 R CAUTION: • The inside of this printer becomes very hot.
... control panel lights up and the following message appears on the display, replace the intermediate transfer unit: "Replace Transfer Belt" Important ❒ When removing the waste toner bottle, make sure not to tilt it. ❒ Do not touch the transfer belt. 6 ASI118S A Pull the right side lever to open the front cover...: • Wait for 30 minutes or more after disconnecting the power plug before removing the transfer unit. ASI025S 81 R CAUTION: • The inside of this printer becomes very hot.
User Guide
Page 108
ASI028S 82 izontally. ASI026S C Hold both ends of the transfer unit and lift it up. 6 ASI027S D Hold the center of the waste toner bottle, and then carefully pull it out hor- Replacing Consumables B Slide the lever on the front cover outwards.
ASI028S 82 izontally. ASI026S C Hold both ends of the transfer unit and lift it up. 6 ASI027S D Hold the center of the waste toner bottle, and then carefully pull it out hor- Replacing Consumables B Slide the lever on the front cover outwards.
User Guide
Page 109
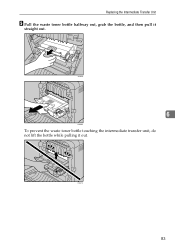
ASI029S 6 ASI030S To prevent the waste toner bottle touching the intermediate transfer unit, do not lift the bottle while pulling it straight out. Replacing the Intermediate Transfer Unit E Pull the waste toner bottle halfway out, grab the bottle, and then pull it out. ASI031S 83
ASI029S 6 ASI030S To prevent the waste toner bottle touching the intermediate transfer unit, do not lift the bottle while pulling it straight out. Replacing the Intermediate Transfer Unit E Pull the waste toner bottle halfway out, grab the bottle, and then pull it out. ASI031S 83
User Guide
Page 114
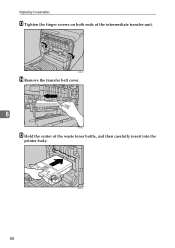
ASI032S 88 ASI042S N Remove the transfer belt cover. 6 ASI091S O Hold the center of the intermediate transfer unit. Replacing Consumables M Tighten the finger screws on both ends of the waste toner bottle, and then carefully insert into the printer body.
ASI032S 88 ASI042S N Remove the transfer belt cover. 6 ASI091S O Hold the center of the intermediate transfer unit. Replacing Consumables M Tighten the finger screws on both ends of the waste toner bottle, and then carefully insert into the printer body.

User Guide
Page 115
ASI033S P Push in . 6 ASI034S Q Place the transfer unit down on the front cover. 89 Replacing the Intermediate Transfer Unit To prevent the waste toner bottle touching the intermediate transfer unit, do not lift the bottle while inserting it clicks into place. Push the green part all the way in the waste toner bottle until it .
ASI033S P Push in . 6 ASI034S Q Place the transfer unit down on the front cover. 89 Replacing the Intermediate Transfer Unit To prevent the waste toner bottle touching the intermediate transfer unit, do not lift the bottle while inserting it clicks into place. Push the green part all the way in the waste toner bottle until it .
User Guide
Page 117
Replacing the Intermediate Transfer Unit S Close the front cover with both hands carefully. ASI072S Note ❒ Before removing the waste toner bottle from the printer, spread paper or some other material around the area to keep toner from dirtying your workspace. 6 91
Replacing the Intermediate Transfer Unit S Close the front cover with both hands carefully. ASI072S Note ❒ Before removing the waste toner bottle from the printer, spread paper or some other material around the area to keep toner from dirtying your workspace. 6 91

User Guide
Page 137
... not installed correctly. is not installed input tray correctly. req. toner. Replace Waste Toner It is no waste toner bot- Using a dry cloth, carefully wipe the interface area on again. Turn off on the Control Panel Message Explanation Recommended Action Replace (color) Print Cartridge The printer is out of Prepare a new print car- Replace the transfer belt...
... not installed correctly. is not installed input tray correctly. req. toner. Replace Waste Toner It is no waste toner bot- Using a dry cloth, carefully wipe the interface area on again. Turn off on the Control Panel Message Explanation Recommended Action Replace (color) Print Cartridge The printer is out of Prepare a new print car- Replace the transfer belt...
User Guide
Page 161
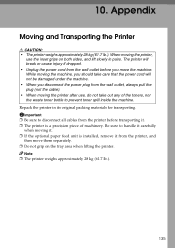
... unit is installed, remove it . ❒ The printer is a precision piece of the toners, nor the waste toner bottle to prevent toner spill inside the machine. Be sure to disconnect all cables from the printer, and then move the machine. Appendix Moving and Transporting the Printer R CAUTION: • The printer weighs approximately 28 kg (61.7 lb.). Important ❒...
... unit is installed, remove it . ❒ The printer is a precision piece of the toners, nor the waste toner bottle to prevent toner spill inside the machine. Be sure to disconnect all cables from the printer, and then move the machine. Appendix Moving and Transporting the Printer R CAUTION: • The printer weighs approximately 28 kg (61.7 lb.). Important ❒...
User Guide
Page 164
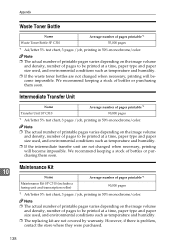
...Kit 10 Name Average number of pages printable *1 Maintenance Kit SP C310 (includes a fusing unit and transcription roller) 90,000 pages *1 A4/letter 5% test chart, 3 pages / job, printing in 50% monochrome/color. We recommend keeping a stock of bottles or purchasing them ... contact the store where they were purchased. 138 Appendix Waste Toner Bottle Name Average number of pages printable *1 Waste Toner Bottle SP C310 55,000 pages *1 A4/letter 5% test chart, 3 pages / job, printing in 50% monochrome/color. Intermediate Transfer Unit Name Average number of pages to ...
...Kit 10 Name Average number of pages printable *1 Maintenance Kit SP C310 (includes a fusing unit and transcription roller) 90,000 pages *1 A4/letter 5% test chart, 3 pages / job, printing in 50% monochrome/color. We recommend keeping a stock of bottles or purchasing them ... contact the store where they were purchased. 138 Appendix Waste Toner Bottle Name Average number of pages printable *1 Waste Toner Bottle SP C310 55,000 pages *1 A4/letter 5% test chart, 3 pages / job, printing in 50% monochrome/color. Intermediate Transfer Unit Name Average number of pages to ...


