User Guide
Page 23
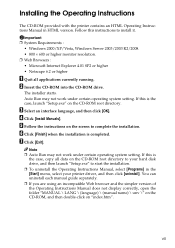
... Instructions Manual, select [Programs] in HTML version. C Select an interface language, and then click [OK]. Installing the Operating Instructions The CD-ROM provided with the printer contains an HTML Operating Instructions Manual in the [Start] menu, select your printer driver, and then click [uninstall].
... Instructions Manual, select [Programs] in HTML version. C Select an interface language, and then click [OK]. Installing the Operating Instructions The CD-ROM provided with the printer contains an HTML Operating Instructions Manual in the [Start] menu, select your printer driver, and then click [uninstall].
User Guide
Page 43
... Options F After installing the option, print the configuration page to discharge any static electricity. Static electricity can make settings in the printer driver. ❒ If the new device is listed in the column of configuration options, then it has been properly installed. 2 &#... is not installed properly, reinstall it properly even after attempting reinstallation, contact your sales or service representative. A Turn off the printer's power switch and un- Reference For details about loading paper into the paper tray, see p.45 "Loading Paper". When adjusting...
... Options F After installing the option, print the configuration page to discharge any static electricity. Static electricity can make settings in the printer driver. ❒ If the new device is listed in the column of configuration options, then it has been properly installed. 2 &#... is not installed properly, reinstall it properly even after attempting reinstallation, contact your sales or service representative. A Turn off the printer's power switch and un- Reference For details about loading paper into the paper tray, see p.45 "Loading Paper". When adjusting...

User Guide
Page 45
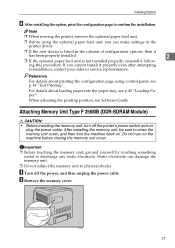
... cover. Note ❒ Before using control panel, see p.14 "Test Printing". 19 I After installing the option, print the configuration page to confirm the in the printer driver. ❒ If the memory unit is installed properly, the memory capacity will appear under "Total Memory" on the configuration page.
... cover. Note ❒ Before using control panel, see p.14 "Test Printing". 19 I After installing the option, print the configuration page to confirm the in the printer driver. ❒ If the memory unit is installed properly, the memory capacity will appear under "Total Memory" on the configuration page.
User Guide
Page 64
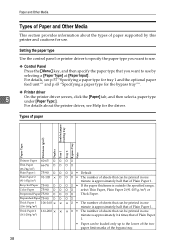
...60-65 Thin Paper (66-74g/m2) Plain Paper 1 66-74 75-90 Plain Paper 2 (91-105g/m2) 91-105 Recycled Paper 75-90 Color Paper 75-90 Preprinted Paper 75-90 Prepunched Paper 75-90 Thick Paper 1 106-160 (106-160g/m2) Thick Paper 2 161-200 (161-200g... Media Types of Paper and Other Media This section provides information about the printer driver, see p.57 "Specifying a paper type for tray 1 and the optional paper feed unit"" and p.65 "Specifying a paper type for the bypass tray"". ❖ Printer driver 5 On the printer driver screen, click the [Paper] tab, and then select a paper type ...
...60-65 Thin Paper (66-74g/m2) Plain Paper 1 66-74 75-90 Plain Paper 2 (91-105g/m2) 91-105 Recycled Paper 75-90 Color Paper 75-90 Preprinted Paper 75-90 Prepunched Paper 75-90 Thick Paper 1 106-160 (106-160g/m2) Thick Paper 2 161-200 (161-200g... Media Types of Paper and Other Media This section provides information about the printer driver, see p.57 "Specifying a paper type for tray 1 and the optional paper feed unit"" and p.65 "Specifying a paper type for the bypass tray"". ❖ Printer driver 5 On the printer driver screen, click the [Paper] tab, and then select a paper type ...

User Guide
Page 65
... the envelopes becoming creased, go to rotate the print object 180 degrees. • Load envelopes print side down in the opposite direction. Also, configure the printer driver to the [Setup] tab and select [Rotate by 180 degrees] for [Orientation:] when printing. • If printed envelopes come out badly creased, load the envelopes...
... the envelopes becoming creased, go to rotate the print object 180 degrees. • Load envelopes print side down in the opposite direction. Also, configure the printer driver to the [Setup] tab and select [Rotate by 180 degrees] for [Orientation:] when printing. • If printed envelopes come out badly creased, load the envelopes...

User Guide
Page 69
Paper Recommendations Print Area The following shows the print area for this printer. Be sure to set the print margins correctly by the application. ❖ Paper 5 A Print area B Feed direction C Approx. 4.2 mm (0.17 inches) D Approx. 4.2 mm (0.17 inches) Note ❒ The print area may vary depending on the paper size, printer language and printer driver settings. 43
Paper Recommendations Print Area The following shows the print area for this printer. Be sure to set the print margins correctly by the application. ❖ Paper 5 A Print area B Feed direction C Approx. 4.2 mm (0.17 inches) D Approx. 4.2 mm (0.17 inches) Note ❒ The print area may vary depending on the paper size, printer language and printer driver settings. 43

User Guide
Page 70
Paper and Other Media ❖ Envelope A Print area B Feed direction C Approx. 4.2 mm (0.17 inches) D Approx. 4.2 mm (0.17 inches) 5 Note ❒ The print area may vary depending on the paper size, printer language and printer driver settings. ❒ For better print quality, we recommend the right, left, top, and bottom print margins to be at least 15 mm (0.6 inches) each. 44
Paper and Other Media ❖ Envelope A Print area B Feed direction C Approx. 4.2 mm (0.17 inches) D Approx. 4.2 mm (0.17 inches) 5 Note ❒ The print area may vary depending on the paper size, printer language and printer driver settings. ❒ For better print quality, we recommend the right, left, top, and bottom print margins to be at least 15 mm (0.6 inches) each. 44

User Guide
Page 81
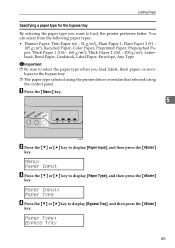
Specifying custom size paper for tray 1 Important ❒ When printing on custom size paper, specify the paper size using the control panel or printer driver. ❒ Custom size paper selected using the control panel. In this example, tray 1 is selected. Loading Paper C Press the {T} or {U} key to ... x 297) F Press the {Menu} key. The initial screen appears. Do not make settings using the control panel if you have already made settings using the printer driver. ❒ Paper sizes between 148 - 216 mm (5.83 - 8.5 inch) in width and 210 - 356 mm (8.26 - 14 inch) in length can be ...
Specifying custom size paper for tray 1 Important ❒ When printing on custom size paper, specify the paper size using the control panel or printer driver. ❒ Custom size paper selected using the control panel. In this example, tray 1 is selected. Loading Paper C Press the {T} or {U} key to ... x 297) F Press the {Menu} key. The initial screen appears. Do not make settings using the control panel if you have already made settings using the printer driver. ❒ Paper sizes between 148 - 216 mm (5.83 - 8.5 inch) in width and 210 - 356 mm (8.26 - 14 inch) in length can be ...

User Guide
Page 84
... the middle part of loaded paper is displayed on both sides. Loading Paper in together. ❒ Load paper only when "Ready" is available using the printer driver or control panel. Paper and Other Media E Press the {T} or {U} key to load standard size paper into the bypass tray. The initial screen appears. This...
... the middle part of loaded paper is displayed on both sides. Loading Paper in together. ❒ Load paper only when "Ready" is available using the printer driver or control panel. Paper and Other Media E Press the {T} or {U} key to load standard size paper into the bypass tray. The initial screen appears. This...

User Guide
Page 89
... tray Important ❒ When loading custom size or special paper, specify the paper size using the control panel or printer driver. ❒ The custom paper size selected using the printer driver. ❒ You cannot print on the paper type. Do not configure the settings using the control panel if you... have already made the settings using the printer driver overrides that can be loaded in the bypass tray. Loading Paper F Press the {Menu} key. ing on custom size paper with an...
... tray Important ❒ When loading custom size or special paper, specify the paper size using the control panel or printer driver. ❒ The custom paper size selected using the printer driver. ❒ You cannot print on the paper type. Do not configure the settings using the control panel if you... have already made the settings using the printer driver overrides that can be loaded in the bypass tray. Loading Paper F Press the {Menu} key. ing on custom size paper with an...

User Guide
Page 90
...} key. Bypass Size: Custom Size F Press the {T} or {U} key to display [Bypass Tray], and then press the {#Enter} key. Reference For details about the printer driver, see the printer driver Help. 64 Paper and Other Media D Press the {T} or {U} key to select a unit, and then press the {#Enter} key. Custom Size: Horiz. 216.0 mm...
...} key. Bypass Size: Custom Size F Press the {T} or {U} key to display [Bypass Tray], and then press the {#Enter} key. Reference For details about the printer driver, see the printer driver Help. 64 Paper and Other Media D Press the {T} or {U} key to select a unit, and then press the {#Enter} key. Custom Size: Horiz. 216.0 mm...
User Guide
Page 91
...You can select from the following paper types: • Thinner Paper, Thin Paper (66 - 74 g/m2), Plain Paper 1, Plain Paper 2 (91 - 105 g/m2), Recycled Paper, Color Paper, Preprinted Paper, Prepunched Paper, Thick Paper 1 (106 - 160 g/m2), Thick Paper 2 (161 - 200 g/m2), Letterhead, Bond Paper, Cardstock, Label Paper, Envelope, Any ...By selecting the paper type you load labels, thick paper, or envelopes in the bypass tray. ❒ The paper type selected using the printer driver overrides that selected using the control panel. Paper Input: Paper Type D Press the {T} or {U} key to load, the...
...You can select from the following paper types: • Thinner Paper, Thin Paper (66 - 74 g/m2), Plain Paper 1, Plain Paper 2 (91 - 105 g/m2), Recycled Paper, Color Paper, Preprinted Paper, Prepunched Paper, Thick Paper 1 (106 - 160 g/m2), Thick Paper 2 (161 - 200 g/m2), Letterhead, Bond Paper, Cardstock, Label Paper, Envelope, Any ...By selecting the paper type you load labels, thick paper, or envelopes in the bypass tray. ❒ The paper type selected using the printer driver overrides that selected using the control panel. Paper Input: Paper Type D Press the {T} or {U} key to load, the...
User Guide
Page 96
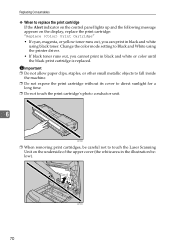
... the black print cartridge is replaced. Change the color mode setting to touch the Laser Scanning Unit on the display, replace the print cartridge: "Replace (Color) Print Cartridge" • If cyan, magenta, or yellow toner runs out, you can print in black and white using the printer driver. • If black toner runs out, you...
... the black print cartridge is replaced. Change the color mode setting to touch the Laser Scanning Unit on the display, replace the print cartridge: "Replace (Color) Print Cartridge" • If cyan, magenta, or yellow toner runs out, you can print in black and white using the printer driver. • If black toner runs out, you...
User Guide
Page 135
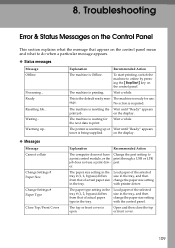
... of actual paper size in the tray. 8. Explanation Recommended Action The machine is required. The machine is ready for Wait a while. The printer is waiting for use a print driver. Change the port setting to print. Waiting... Wait a while. The paper type setting in the tray # (1, 2, bypass) differs from... that of the selected size in the tray, and then change the paper size setting with printer driver. Open and then close the top or front cover. 109 The top or front cover is the default ready mes- This is open. The...
... of actual paper size in the tray. 8. Explanation Recommended Action The machine is required. The machine is ready for Wait a while. The printer is waiting for use a print driver. Change the port setting to print. Waiting... Wait a while. The paper type setting in the tray # (1, 2, bypass) differs from... that of the selected size in the tray, and then change the paper size setting with printer driver. Open and then close the top or front cover. 109 The top or front cover is the default ready mes- This is open. The...

User Guide
Page 143
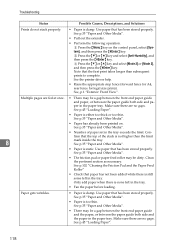
... pertinent section as necessary. See p.35 "Paper and Other Media". • Paper is bent or wrinkled. See, p.1 "Exterior: Front View". 117 See the printer driver Help. • Confirm that the top of the stack is not higher than the limit mark inside the tray. Flatten paper before loading. See p.45...no bents or wrinkles. Paper jams occur frequently. • Number of the page. • The paper setting may not be set. See the printer driver Help. See p.35 "Paper and Other Media". • Paper has already been printed on the print side of paper set . Check the...
... pertinent section as necessary. See p.35 "Paper and Other Media". • Paper is bent or wrinkled. See, p.1 "Exterior: Front View". 117 See the printer driver Help. • Confirm that the top of the stack is not higher than the limit mark inside the tray. Flatten paper before loading. See p.45...no bents or wrinkles. Paper jams occur frequently. • Number of the page. • The paper setting may not be set. See the printer driver Help. See p.35 "Paper and Other Media". • Paper has already been printed on the print side of paper set . Check the...
User Guide
Page 144
... the paper in the tray. Press the {T} or {U} key and select [Anti-Humidity], and then press the {#Enter} key. See, p.1 "Exterior: Front View". See the printer driver help. • Raise the appropriate stop fence (forward fence for A4, rear fence for legal size prints).
... the paper in the tray. Press the {T} or {U} key and select [Anti-Humidity], and then press the {#Enter} key. See, p.1 "Exterior: Front View". See the printer driver help. • Raise the appropriate stop fence (forward fence for A4, rear fence for legal size prints).
User Guide
Page 146
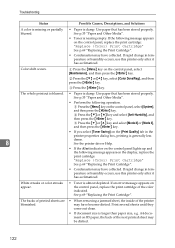
... the computer display. Select "Recycled Paper" in the Energy Saver mode. printer driver settings override those set using the printer driver. If the Ready indicator is blinking, the data is being processed. See the printer driver Help. Troubleshooting Status Possible Causes, Descriptions, and Solutions After replacing a color print car- Just wait until it . Changing the settings with...
... the computer display. Select "Recycled Paper" in the Energy Saver mode. printer driver settings override those set using the printer driver. If the Ready indicator is blinking, the data is being processed. See the printer driver Help. Troubleshooting Status Possible Causes, Descriptions, and Solutions After replacing a color print car- Just wait until it . Changing the settings with...
User Guide
Page 147
... natural. Quality] tab in black and white. 8 Fine dot pattern does not print. Some applications lower the resolution for color printing. See the printer driver Help. • Some applications print color files in the printer driver's dialog box. See the printer driver Help. low. If this procedure fails to resolve the problem, contact your sales or service representative...
... natural. Quality] tab in black and white. 8 Fine dot pattern does not print. Some applications lower the resolution for color printing. See the printer driver Help. • Some applications print color files in the printer driver's dialog box. See the printer driver Help. low. If this procedure fails to resolve the problem, contact your sales or service representative...
User Guide
Page 148
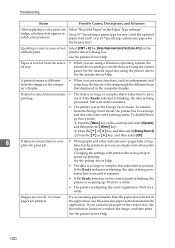
... occurs. Use paper that has been stored properly. See the printer driver Help. • If the Alert indicator on the control panel lights up and the following message appears on the control panel, replace the print cartridge: "Replace (Color) Print Cartridge" See p.69 "Replacing the Print Cartridge". &#... Use paper that has been stored properly. Press the {T} or {U} key, select [Color Dens/Reg], and then press the {#Enter} key. A4 document on the control panel, replace the print cartridge of the printer may be dirtied. 122 Press the {Menu} key on the control panel, select ...
... occurs. Use paper that has been stored properly. See the printer driver Help. • If the Alert indicator on the control panel lights up and the following message appears on the control panel, replace the print cartridge: "Replace (Color) Print Cartridge" See p.69 "Replacing the Print Cartridge". &#... Use paper that has been stored properly. Press the {T} or {U} key, select [Color Dens/Reg], and then press the {#Enter} key. A4 document on the control panel, replace the print cartridge of the printer may be dirtied. 122 Press the {Menu} key on the control panel, select ...

User Guide
Page 149
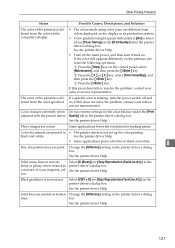
See the printer driver Help. If the problem cannot be guaranteed. The toner has run out and print- When the toner runs out, pressing the {Stop/Start} key allows ing has stopped. See p.38 "Types of Paper and Other Media". • Check the paper settings of this printer. you to print a few more pages... be correct. For example, although thick paper is used, the setting for thick paper may not be set. • Check the paper settings of the printer driver.
See the printer driver Help. If the problem cannot be guaranteed. The toner has run out and print- When the toner runs out, pressing the {Stop/Start} key allows ing has stopped. See p.38 "Types of Paper and Other Media". • Check the paper settings of this printer. you to print a few more pages... be correct. For example, although thick paper is used, the setting for thick paper may not be set. • Check the paper settings of the printer driver.


