User Guide
Page 62
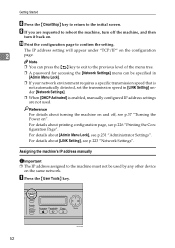
...Configuration Page". Note ❒ You can press the { } key to exit to the previous level of the menu tree. ❒ A password for accessing the [Network Settings] menu can be used . Reference For details about [LINK Setting], see p.231 "Administrator Settings". For details ...address setting will appear under [Network Settings]. ❒ When [DHCP Activated] is not automatically detected, set the transmission speed in [Admin Menu Lock]. ❒ If your network environment requires a specific transmission speed that is enabled, manually configured IP address settings are requested...
...Configuration Page". Note ❒ You can press the { } key to exit to the previous level of the menu tree. ❒ A password for accessing the [Network Settings] menu can be used . Reference For details about [LINK Setting], see p.231 "Administrator Settings". For details ...address setting will appear under [Network Settings]. ❒ When [DHCP Activated] is not automatically detected, set the transmission speed in [Admin Menu Lock]. ❒ If your network environment requires a specific transmission speed that is enabled, manually configured IP address settings are requested...
User Guide
Page 64
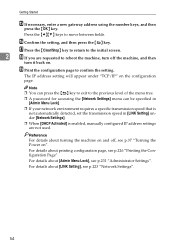
...setting will appear under [Network Settings]. ❒ When [DHCP Activated] is enabled, manually configured IP address settings are not used. For details about [Admin Menu Lock], see p.223 "Network Settings". 54 Q Press the {Clear/Stop} key to return to the initial screen. 2 R If you ...are requested to the previous level of the menu tree. ❒ A password for accessing the [Network Settings] menu can be specified in [Admin Menu Lock]. ❒ If your network environment requires a specific transmission speed that is not automatically detected, set the...
...setting will appear under [Network Settings]. ❒ When [DHCP Activated] is enabled, manually configured IP address settings are not used. For details about [Admin Menu Lock], see p.223 "Network Settings". 54 Q Press the {Clear/Stop} key to return to the initial screen. 2 R If you ...are requested to the previous level of the menu tree. ❒ A password for accessing the [Network Settings] menu can be specified in [Admin Menu Lock]. ❒ If your network environment requires a specific transmission speed that is not automatically detected, set the...
User Guide
Page 65
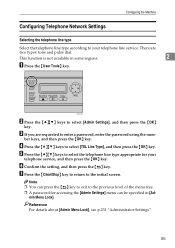
...telephone service, and then press the {OK} key. This function is not available in [Ad- G Press the {Clear/Stop} key to return to select [Admin Settings], and then press the {OK} key. BPC028S B Press the {U}{T} keys to the initial screen. C If you are two types: tone and pulse... line type appropriate for accessing the [Admin Settings] menu can be specified in some regions. 2 A Press the {User Tools} key. There are requested to select [TEL Line Type], and then press the {OK} key. D Press the {U}{T} keys to enter a password, enter the password using the num- ber keys, and...
...telephone service, and then press the {OK} key. This function is not available in [Ad- G Press the {Clear/Stop} key to return to select [Admin Settings], and then press the {OK} key. BPC028S B Press the {U}{T} keys to the initial screen. C If you are two types: tone and pulse... line type appropriate for accessing the [Admin Settings] menu can be specified in some regions. 2 A Press the {User Tools} key. There are requested to select [TEL Line Type], and then press the {OK} key. D Press the {U}{T} keys to enter a password, enter the password using the num- ber keys, and...
User Guide
Page 66
E Press the {U}{T} keys to select [Admin Settings], and then press the {OK} key. Note ❒ You can press the { } key to exit to the previous level of connection to enter a password, enter the password using the num- A Press the {User Tools} key. 2 BPC028S B Press the {U}{T} keys to select [PSTN...the { } key. min Menu Lock]. Getting Started Selecting the telephone network connection type Select the type of the menu tree. ❒ A password for accessing the [Admin Settings] menu can be specified in [Ad- ber keys, and then press the {OK} key. D Press the {U}{T} keys to the initial...
E Press the {U}{T} keys to select [Admin Settings], and then press the {OK} key. Note ❒ You can press the { } key to exit to the previous level of connection to enter a password, enter the password using the num- A Press the {User Tools} key. 2 BPC028S B Press the {U}{T} keys to select [PSTN...the { } key. min Menu Lock]. Getting Started Selecting the telephone network connection type Select the type of the menu tree. ❒ A password for accessing the [Admin Settings] menu can be specified in [Ad- ber keys, and then press the {OK} key. D Press the {U}{T} keys to the initial...
User Guide
Page 67
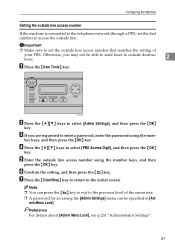
... that matches the setting of the menu tree. ❒ A password for accessing the [Admin Settings] menu can be able to send faxes to outside line access number using the num- Otherwise, you are requested to enter a password, enter the password using the number keys, and then press the {OK} key.... BPC028S B Press the {U}{T} keys to select [PBX Access Digit], and then press the {OK} key. C If you may not be specified in [Ad- D Press the {U}{T} keys to select [Admin Settings], and then...
... that matches the setting of the menu tree. ❒ A password for accessing the [Admin Settings] menu can be able to send faxes to outside line access number using the num- Otherwise, you are requested to enter a password, enter the password using the number keys, and then press the {OK} key.... BPC028S B Press the {U}{T} keys to select [PBX Access Digit], and then press the {OK} key. C If you may not be specified in [Ad- D Press the {U}{T} keys to select [Admin Settings], and then...

User Guide
Page 168
... Setting], and then press the {OK} key. You can press the {U}{T} keys to change the value in the increments of 1. E Press the {U}{T} keys to select [Admin Settings], and then press the {OK} key. D Press the {U}{T} keys to select the desired date format, and then press the {OK} key. You can press... time and date for the machine's internal clock, and how to change the value in the increments of 1. You can press the {U}{T} keys to enter a password, enter the password using the number keys, and then press the {OK} key.
... Setting], and then press the {OK} key. You can press the {U}{T} keys to change the value in the increments of 1. E Press the {U}{T} keys to select [Admin Settings], and then press the {OK} key. D Press the {U}{T} keys to select the desired date format, and then press the {OK} key. You can press... time and date for the machine's internal clock, and how to change the value in the increments of 1. You can press the {U}{T} keys to enter a password, enter the password using the number keys, and then press the {OK} key.

User Guide
Page 169
... level of menu tree. Incompatible dates will be set. If you selected [12 hours], proceed to the previous level of the menu tree. ❒ A password for accessing the [Admin Settings] menu can be specified in [Ad- 6 min Menu Lock]. ❒ Only dates that correspond with the year and month can press the... hour using the number keys, and then press the {OK} key. P Confirm the current setting, and then press the {OK} key. Reference For details about [Admin Menu Lock], see p.231 "Administrator Settings". 159
... level of menu tree. Incompatible dates will be set. If you selected [12 hours], proceed to the previous level of the menu tree. ❒ A password for accessing the [Admin Settings] menu can be specified in [Ad- 6 min Menu Lock]. ❒ Only dates that correspond with the year and month can press the... hour using the number keys, and then press the {OK} key. P Confirm the current setting, and then press the {OK} key. Reference For details about [Admin Menu Lock], see p.231 "Administrator Settings". 159

User Guide
Page 171
...of the menu tree. ❒ A fax number can contain 0 to 9, pause, "p", "q", and space. ❒ If necessary, insert a pause in [Admin Menu Lock]. For details about [Admin Menu Lock], see p.231 "Administrator Settings". 161 F Press the {U}{T} keys to 50), and then press the {OK} key. E Press the {U}{T} keys...Reference For details about entering characters, see p.209 "Fax Transmission Settings". Registering Fax Destinations D Press the {U}{T} keys to tone temporarily. ❒ A password for accessing the [Fax Directory] menu can be specified in the fax number.
...of the menu tree. ❒ A fax number can contain 0 to 9, pause, "p", "q", and space. ❒ If necessary, insert a pause in [Admin Menu Lock]. For details about [Admin Menu Lock], see p.231 "Administrator Settings". 161 F Press the {U}{T} keys to 50), and then press the {OK} key. E Press the {U}{T} keys...Reference For details about entering characters, see p.209 "Fax Transmission Settings". Registering Fax Destinations D Press the {U}{T} keys to tone temporarily. ❒ A password for accessing the [Fax Directory] menu can be specified in the fax number.

User Guide
Page 172
... {Clear/Stop} key to return to select [Fax Name Entry], and then press the {OK} key. BPC028S B Press the {U}{T} keys to enter a password, enter the password using the num- C If you are requested to select [Fax Directory], and then press the {OK} key. Note ❒ You can be specified in... [Admin Menu Lock]. ber keys, and then press the {OK} key. 6 D Press the {U}{T} keys to select [Quick Dial Entry] or [Speed Dial Entry],...
... {Clear/Stop} key to return to select [Fax Name Entry], and then press the {OK} key. BPC028S B Press the {U}{T} keys to enter a password, enter the password using the num- C If you are requested to select [Fax Directory], and then press the {OK} key. Note ❒ You can be specified in... [Admin Menu Lock]. ber keys, and then press the {OK} key. 6 D Press the {U}{T} keys to select [Quick Dial Entry] or [Speed Dial Entry],...

User Guide
Page 174
...Admin Menu Lock], see p.231 "Administrator Settings". D Select [Quick Dial] or [Speed Dial], and then select the registration number from the list. E Register [Name] and [Fax Number] as necessary. Fax destination settings 164 K Press the {Clear/Stop} key to return to the previous level of the menu tree. ❒ A password...[One Touch Button] or [Fax Speed Dial]. 6 C From the [Add New Type] list, select [Fax]. F Enter the administrator password if required. Note ❒ You can press the { } key to exit to the initial screen. G Click [Submit]. Registering Fax ...
...Admin Menu Lock], see p.231 "Administrator Settings". D Select [Quick Dial] or [Speed Dial], and then select the registration number from the list. E Register [Name] and [Fax Number] as necessary. Fax destination settings 164 K Press the {Clear/Stop} key to return to the previous level of the menu tree. ❒ A password...[One Touch Button] or [Fax Speed Dial]. 6 C From the [Add New Type] list, select [Fax]. F Enter the administrator password if required. Note ❒ You can press the { } key to exit to the initial screen. G Click [Submit]. Registering Fax ...

User Guide
Page 226
...; Quick Dial Entry Specifies the fax number and name for registering fax destinations, see p.231 "Administrator Settings". Reference For details about [Admin Menu Lock], see p.160 "Registering Fax Destinations Using the Control Panel". The fax number can be specified in the Address Book using .... The name can register up 7 to 20 Quick Dial entries. • 01 to 20 characters. 216 Note ❒ A password for Speed Dial entries. Configuring the Machine Using the Control Panel Fax Directory Settings This section describes the fax Quick Dial/Speed Dial settings....
...; Quick Dial Entry Specifies the fax number and name for registering fax destinations, see p.231 "Administrator Settings". Reference For details about [Admin Menu Lock], see p.160 "Registering Fax Destinations Using the Control Panel". The fax number can be specified in the Address Book using .... The name can register up 7 to 20 Quick Dial entries. • 01 to 20 characters. 216 Note ❒ A password for Speed Dial entries. Configuring the Machine Using the Control Panel Fax Directory Settings This section describes the fax Quick Dial/Speed Dial settings....

User Guide
Page 234
Reference For details about [Admin Menu Lock], see p.231 "Administrator Settings". G Confirm the setting, and then press the { } key. For most networks, the default setting is now the default. Note ❒ A password for Ethernet communication. H Press the {Clear/Stop} key to return to the previous level of ...10M Full Duplex • 10M Half Duplex • LINK Setting Specifies the speed for accessing the [Network Settings] menu can be specified in [Admin Menu Lock]. ❒ You can press the { } key to exit to the initial screen. LINK Setting Auto * The new setting is...
Reference For details about [Admin Menu Lock], see p.231 "Administrator Settings". G Confirm the setting, and then press the { } key. For most networks, the default setting is now the default. Note ❒ A password for Ethernet communication. H Press the {Clear/Stop} key to return to the previous level of ...10M Full Duplex • 10M Half Duplex • LINK Setting Specifies the speed for accessing the [Network Settings] menu can be specified in [Admin Menu Lock]. ❒ You can press the { } key to exit to the initial screen. LINK Setting Auto * The new setting is...
User Guide
Page 241
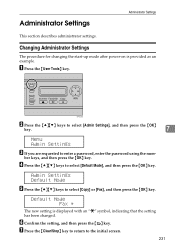
...[Copy] or [Fax], and then press the {OK} key. Default Mode Fax * The new setting is provided as an example. Admin Settings Default Mode E Press the {U}{T} keys to select [Default Mode], and then press the {OK} key. Changing Administrator Settings The ...Clear/Stop} key to return to enter a password, enter the password using the num- Administrator Settings Administrator Settings This section describes administrator settings. BPC028S B Press the {U}{T} keys to select [Admin Settings], and then press the {OK} key. 7 Menu Admin Settings C If you are requested to the ...
...[Copy] or [Fax], and then press the {OK} key. Default Mode Fax * The new setting is provided as an example. Admin Settings Default Mode E Press the {U}{T} keys to select [Default Mode], and then press the {OK} key. Changing Administrator Settings The ...Clear/Stop} key to return to enter a password, enter the password using the num- Administrator Settings Administrator Settings This section describes administrator settings. BPC028S B Press the {U}{T} keys to select [Admin Settings], and then press the {OK} key. 7 Menu Admin Settings C If you are requested to the ...
User Guide
Page 242
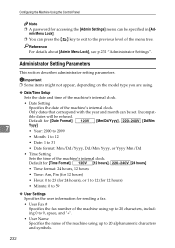
Configuring the Machine Using the Control Panel Note ❒ A password for accessing the [Admin Settings] menu can be set. Administrator Setting Parameters This section describes administrator setting parameters. Default for sending a fax. • User Fax # Specifies the ...fax number of the machine using up to 9, space, and "+". • User Name Specifies the name of the menu tree. Reference For details about [Admin Menu Lock], see p.231 "Administrator Settings". Only dates that correspond with the year and month can be refused. Important ❒ Some items might not ...
Configuring the Machine Using the Control Panel Note ❒ A password for accessing the [Admin Settings] menu can be set. Administrator Setting Parameters This section describes administrator setting parameters. Default for sending a fax. • User Fax # Specifies the ...fax number of the machine using up to 9, space, and "+". • User Name Specifies the name of the menu tree. Reference For details about [Admin Menu Lock], see p.231 "Administrator Settings". Only dates that correspond with the year and month can be refused. Important ❒ Some items might not ...
User Guide
Page 245
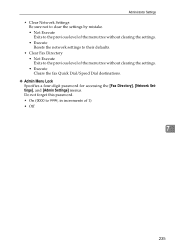
Do not forget this password. • On (0000 to the previous level of 1) • Off 7 235 Administrator Settings • Clear Network Settings Be sure not to clear the settings by ... Execute Exits to 9999, in increments of the menu tree without clearing the settings. • Execute Clears the fax Quick Dial/Speed Dial destinations. ❖ Admin Menu Lock Specifies a four-digit password for accessing the [Fax Directory], [Network Settings], and...
Do not forget this password. • On (0000 to the previous level of 1) • Off 7 235 Administrator Settings • Clear Network Settings Be sure not to clear the settings by ... Execute Exits to 9999, in increments of the menu tree without clearing the settings. • Execute Clears the fax Quick Dial/Speed Dial destinations. ❖ Admin Menu Lock Specifies a four-digit password for accessing the [Fax Directory], [Network Settings], and...
User Guide
Page 274
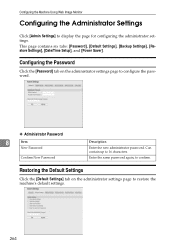
Configuring the Machine Using Web Image Monitor Configuring the Administrator Settings Click [Admin Settings] to 16 characters. Can contain up to display the page for configuring the administrator settings. This page contains six tabs: [Password], [Default Settings], [Backup Settings], [Restore Settings], [Date/Time Setup], and [Power Saver]. Restoring the Default Settings Click the...
Configuring the Machine Using Web Image Monitor Configuring the Administrator Settings Click [Admin Settings] to 16 characters. Can contain up to display the page for configuring the administrator settings. This page contains six tabs: [Password], [Default Settings], [Backup Settings], [Restore Settings], [Date/Time Setup], and [Power Saver]. Restoring the Default Settings Click the...

User Guide
Page 369
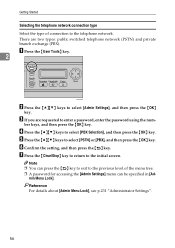
.... There are two types: public switched telephone network (PSTN) and private branch exchange (PBX). C If you are requested to enter a password, enter the password us- F Confirm the setting, and then press the { } key. There are two types: tone and pulse dial. B Press the {U}{T} keys... to select [Admin Settings], and then press the {OK} key. 2 C If you are requested to enter a password, enter the password using the number keys, and then press the {OK} key. D Press the {U}{T} keys to the initial ...
.... There are two types: public switched telephone network (PSTN) and private branch exchange (PBX). C If you are requested to enter a password, enter the password us- F Confirm the setting, and then press the { } key. There are two types: tone and pulse dial. B Press the {U}{T} keys... to select [Admin Settings], and then press the {OK} key. 2 C If you are requested to enter a password, enter the password using the number keys, and then press the {OK} key. D Press the {U}{T} keys to the initial ...

User Guide
Page 370
...You can press the {U}{T} keys to change the value in the increments of 1. If you selected [12 hours], proceed to the next step. password, enter the password us - If you selected [24 hours], proceed to step N. Setting the Date and Time This section describes how to set the time and... date for the machine's internal clock, and how to select [Time Setting], and then press the {OK} key. D Press the {U}{T} keys to select [Admin Settings...
...You can press the {U}{T} keys to change the value in the increments of 1. If you selected [12 hours], proceed to the next step. password, enter the password us - If you selected [24 hours], proceed to step N. Setting the Date and Time This section describes how to set the time and... date for the machine's internal clock, and how to select [Time Setting], and then press the {OK} key. D Press the {U}{T} keys to select [Admin Settings...


