Manuals
Page 6
......225 Paper Misfeed Message (A)...227 4 Removing Misfed Paper When Paper is Not Functioning Properly 219 Additional Troubleshooting...222 10. Maintaining the Printer Replacing the Print Cartridge...147 Replacing the Waste Toner Bottle...154 Replacing the Intermediate Transfer Unit...161 Replacing the Maintenance Kit...172 Cautions When Cleaning...179 Cleaning the Toner...
......225 Paper Misfeed Message (A)...227 4 Removing Misfed Paper When Paper is Not Functioning Properly 219 Additional Troubleshooting...222 10. Maintaining the Printer Replacing the Print Cartridge...147 Replacing the Waste Toner Bottle...154 Replacing the Intermediate Transfer Unit...161 Replacing the Maintenance Kit...172 Cautions When Cleaning...179 Cleaning the Toner...
Manuals
Page 7
Misfeed Tray 1...227 Misfeed Bypass Tray...229 Paper Misfeed Message (B)...231 Paper Misfeed Message (Y)...234 Paper Misfeed Message (Z)...235 11. Appendix Moving and Transporting the Printer...237 Moving the Printer in a Short Distance...238 Consumables...239 Print Cartridge...239 Waste Toner Bottle...240 Intermediate Transfer Unit...240 Maintenance Kit...241 Specifications...242 Mainframe...242 Options...245 Trademarks...249 INDEX...251 5
Misfeed Tray 1...227 Misfeed Bypass Tray...229 Paper Misfeed Message (B)...231 Paper Misfeed Message (Y)...234 Paper Misfeed Message (Z)...235 11. Appendix Moving and Transporting the Printer...237 Moving the Printer in a Short Distance...238 Consumables...239 Print Cartridge...239 Waste Toner Bottle...240 Intermediate Transfer Unit...240 Maintenance Kit...241 Specifications...242 Mainframe...242 Options...245 Trademarks...249 INDEX...251 5
Manuals
Page 18
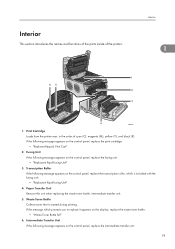
1. Power Switch 1 Use this switch to replace the print cartridge. 10. Standard Tray Extension Use this cover to turn the power on the end that come out curled after they are printed. Bypass Tray Up ...
1. Power Switch 1 Use this switch to replace the print cartridge. 10. Standard Tray Extension Use this cover to turn the power on the end that come out curled after they are printed. Bypass Tray Up ...
Manuals
Page 21
...panel, replace the fusing unit: • "Replacmnt Rqrd:Fusing Unit" 3. If the following message appears on the control panel, replace the print cartridge: • "Replcmnt Requrd: Print Cart" 2. Paper Transfer Unit Remove this unit when replacing the waste toner bottle, intermediate transfer unit. 5....Collects toner that is included with the fusing unit: • "Replacmnt Rqrd:Fusing Unit" 4. If the message which is wasted during printing. Print Cartridge Loads from the printer rear, in the order of the printer. 2 Interior 1 1 65 2 3 4 CBK014 1. Intermediate Transfer Unit If ...
...panel, replace the fusing unit: • "Replacmnt Rqrd:Fusing Unit" 3. If the following message appears on the control panel, replace the print cartridge: • "Replcmnt Requrd: Print Cart" 2. Paper Transfer Unit Remove this unit when replacing the waste toner bottle, intermediate transfer unit. 5....Collects toner that is included with the fusing unit: • "Replacmnt Rqrd:Fusing Unit" 4. If the message which is wasted during printing. Print Cartridge Loads from the printer rear, in the order of the printer. 2 Interior 1 1 65 2 3 4 CBK014 1. Intermediate Transfer Unit If ...
Manuals
Page 24
... in [Auto Reset Timer] elapses (default: 60 seconds). Data In Indicator Flashes when the printer is suspended. The indicator remains lit as long as print cartridge. Alert Indicator Lights up or receiving data. 1. For details about the [Auto Reset Timer] setting, see "Making Printer Settings Using the Control Panel", Software Guide...
... in [Auto Reset Timer] elapses (default: 60 seconds). Data In Indicator Flashes when the printer is suspended. The indicator remains lit as long as print cartridge. Alert Indicator Lights up or receiving data. 1. For details about the [Auto Reset Timer] setting, see "Making Printer Settings Using the Control Panel", Software Guide...
Manuals
Page 33
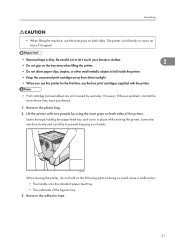
...tray. • The underside of the printer. Lower the machine slowly and carefully to fall inside the printer. • Keep the uncovered print cartridge away from direct sunlight. • When you use this printer for the first time, use the inset grips on the tray area when lifting the...or other small metallic objects to prevent trapping your hands. Remove the plastic bag. 2. Unpacking • When lifting the machine, use the four print cartridges supplied with two people by warranty. Be careful not to let it touch your hands or clothes. • Do not grip on both sides of...
...tray. • The underside of the printer. Lower the machine slowly and carefully to fall inside the printer. • Keep the uncovered print cartridge away from direct sunlight. • When you use this printer for the first time, use the inset grips on the tray area when lifting the...or other small metallic objects to prevent trapping your hands. Remove the plastic bag. 2. Unpacking • When lifting the machine, use the four print cartridges supplied with two people by warranty. Be careful not to let it touch your hands or clothes. • Do not grip on both sides of...
Manuals
Page 34
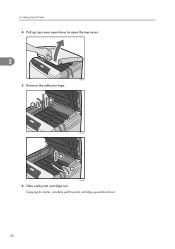
Remove the adhesive tape. 2 1 CBK029 2 1 CBK238 6. Gripping its center, carefully pull the print cartridge upward and out. 32 Setting Up the Printer 4. 2. Take each print cartridge out. Pull up top cover open lever to open the top cover. 2 CBK200 5.
Remove the adhesive tape. 2 1 CBK029 2 1 CBK238 6. Gripping its center, carefully pull the print cartridge upward and out. 32 Setting Up the Printer 4. 2. Take each print cartridge out. Pull up top cover open lever to open the top cover. 2 CBK200 5.

Manuals
Page 35
Unpacking C M Y K 2 CBK204 When taking out the black print cartridge, be sure to place it on at a flat surface, and then remove the protection sheet also. CBK031 Do not touch the print cartridge's photo conductor unit. CBK026 Do not touch a metal part. 33
Unpacking C M Y K 2 CBK204 When taking out the black print cartridge, be sure to place it on at a flat surface, and then remove the protection sheet also. CBK031 Do not touch the print cartridge's photo conductor unit. CBK026 Do not touch a metal part. 33
Manuals
Page 36
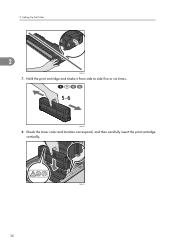
Hold the print cartridge and shake it from side to side five or six times. CBK033 34 CBK032 8. 2. Check the toner color and location correspond, and then carefully insert the print cartridge vertically. Setting Up the Printer 2 CBK250 7.
Hold the print cartridge and shake it from side to side five or six times. CBK033 34 CBK032 8. 2. Check the toner color and location correspond, and then carefully insert the print cartridge vertically. Setting Up the Printer 2 CBK250 7.
Manuals
Page 149
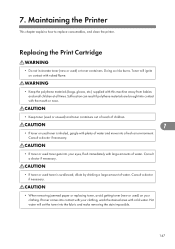
... removing jammed paper or replacing toner, avoid getting toner (new or used toner is swallowed, dilute by drinking a large amount of water. Replacing the Print Cartridge • Do not incinerate toner (new or used toner is inhaled, gargle with this machine away from babies and small children at all times. Consult...
... removing jammed paper or replacing toner, avoid getting toner (new or used toner is swallowed, dilute by drinking a large amount of water. Replacing the Print Cartridge • Do not incinerate toner (new or used toner is inhaled, gargle with this machine away from babies and small children at all times. Consult...
Manuals
Page 150
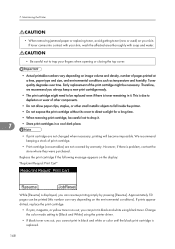
... a stock of pages printed at a time, paper type and size, and environmental conditions such as temperature and humidity. If prints appear dirtied, replace the print cartridge. • If cyan, magenta, or yellow toner runs out, you can print in black and white or color until the black print... cartridge is problem, contact the store where they were purchased. 7. Maintaining the Printer • When removing jammed paper or replacing toner, avoid getting toner (new or ...
... a stock of pages printed at a time, paper type and size, and environmental conditions such as temperature and humidity. If prints appear dirtied, replace the print cartridge. • If cyan, magenta, or yellow toner runs out, you can print in black and white or color until the black print... cartridge is problem, contact the store where they were purchased. 7. Maintaining the Printer • When removing jammed paper or replacing toner, avoid getting toner (new or ...

Manuals
Page 151
...dirtying your workspace. • Color is labeled on each print cartridge. "Repl Soon:Prt.Cart. :(color)" Repl Soon:Prt.Cart. :K,C,M,Y 1. Pull up top cover open the top cover. CBK028 From the rear, the print cartridges are installed in the order of the upper cover. 149 ...8226; Do not shake the removed print cartridge. Gripping its center, carefully pull the print cartridge upward and out. When removing print cartridges, be replaced soon. Replacing the Print Cartridge When the following message appears on the display, the print cartridge should be careful not to touch the Laser...
...dirtying your workspace. • Color is labeled on each print cartridge. "Repl Soon:Prt.Cart. :(color)" Repl Soon:Prt.Cart. :K,C,M,Y 1. Pull up top cover open the top cover. CBK028 From the rear, the print cartridges are installed in the order of the upper cover. 149 ...8226; Do not shake the removed print cartridge. Gripping its center, carefully pull the print cartridge upward and out. When removing print cartridges, be replaced soon. Replacing the Print Cartridge When the following message appears on the display, the print cartridge should be careful not to touch the Laser...
Manuals
Page 152
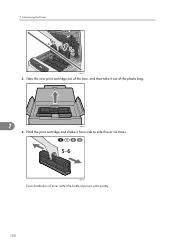
CBK251 Even distribution of the plastic bag. 7 CBK123 4. Maintaining the Printer CBK121 3. Take the new print cartridge out of the box, and then take it from side to side five or six times. Hold the print cartridge and shake it out of toner within the bottle improves print quality. 150 7.
CBK251 Even distribution of the plastic bag. 7 CBK123 4. Maintaining the Printer CBK121 3. Take the new print cartridge out of the box, and then take it from side to side five or six times. Hold the print cartridge and shake it out of toner within the bottle improves print quality. 150 7.
Manuals
Page 153
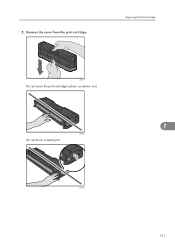
5. CBK250 151 Remove the cover from the print cartridge. Replacing the Print Cartridge CBK124 Do not touch the print cartridge's photo conductor unit. 7 CBK026 Do not touch a metal part.
5. CBK250 151 Remove the cover from the print cartridge. Replacing the Print Cartridge CBK124 Do not touch the print cartridge's photo conductor unit. 7 CBK026 Do not touch a metal part.
Manuals
Page 154
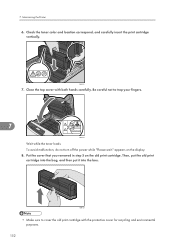
...and environmental purposes. 152 To avoid malfunction, do not turn off the power while "Please wait." Maintaining the Printer 6. appears on the old print cartridge. CBK125 • Make sure to trap your fingers. 7 CBK034 Wait while the toner loads. Put the cover that you removed in step 5 on... the display. 8. 7. Check the toner color and location correspond, and carefully insert the print cartridge vertically. Then, put the old print cartridge into the bag, and then put it into the box. CBK033 7. Be careful not to cover the old print...
...and environmental purposes. 152 To avoid malfunction, do not turn off the power while "Please wait." Maintaining the Printer 6. appears on the old print cartridge. CBK125 • Make sure to trap your fingers. 7 CBK034 Wait while the toner loads. Put the cover that you removed in step 5 on... the display. 8. 7. Check the toner color and location correspond, and carefully insert the print cartridge vertically. Then, put the old print cartridge into the bag, and then put it into the box. CBK033 7. Be careful not to cover the old print...

Manuals
Page 155
Replacing the Print Cartridge • Comply with the print cartridge Recycling Program, whereby used print cartridges are collected for processing. For details, ask your sales or service representative. 7 153
Replacing the Print Cartridge • Comply with the print cartridge Recycling Program, whereby used print cartridges are collected for processing. For details, ask your sales or service representative. 7 153
Manuals
Page 182
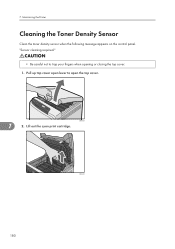
Pull up top cover open the top cover. CBK245 180 7. CBK028 7 2. Lift out the cyan print cartridge. "Sensor cleaning required." • Be careful not to open lever to trap your fingers when opening or closing the top cover. 1. Maintaining the Printer Cleaning the Toner Density Sensor Clean the toner density sensor when the following message appears on the control panel.
Pull up top cover open the top cover. CBK245 180 7. CBK028 7 2. Lift out the cyan print cartridge. "Sensor cleaning required." • Be careful not to open lever to trap your fingers when opening or closing the top cover. 1. Maintaining the Printer Cleaning the Toner Density Sensor Clean the toner density sensor when the following message appears on the control panel.
Manuals
Page 183
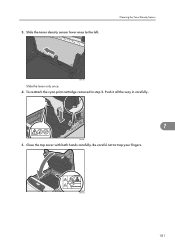
Push it all the way in step 2. Be careful not to the left. 3. Slide the toner density sensor lever once to trap your fingers. To reattach the cyan print cartridge removed in carefully. 7 CBK246 5. CBK034 181 Cleaning the Toner Density Sensor CBK180 Slide the lever only once. 4. Close the top cover with both hands carefully.
Push it all the way in step 2. Be careful not to the left. 3. Slide the toner density sensor lever once to trap your fingers. To reattach the cyan print cartridge removed in carefully. 7 CBK246 5. CBK034 181 Cleaning the Toner Density Sensor CBK180 Slide the lever only once. 4. Close the top cover with both hands carefully.
Manuals
Page 193
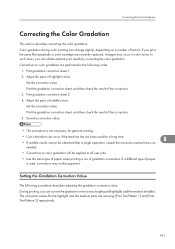
... correction. 5. Print the gradation correction sheet, and then check the result of middle colors. In such cases, you print the same file repeatedly or print cartridge was recently replaced, changes may not be applied to all user jobs. • Use the same type of paper when printing a run of paper is...
... correction. 5. Print the gradation correction sheet, and then check the result of middle colors. In such cases, you print the same file repeatedly or print cartridge was recently replaced, changes may not be applied to all user jobs. • Use the same type of paper when printing a run of paper is...

Manuals
Page 207
...see p.57 "Installing the Interface Units". Replacmnt Rqrd:Fusing Unit You need to replace the fusing unit. Obtain a new print cartridge. SD Card authenticatn.failed Error recurs, call service. Sensor cleaning required. See p.161 "Replacing the Intermediate Transfer Unit". For ...details, see p.180 "Cleaning the Toner Density Sensor". 205 For details, see p.147 "Replacing the Print Cartridge". It may be incorrectly installed. For details, see p.172 "Replacing the Maintenance Kit". For details, see p.161 "Replacing the ...
...see p.57 "Installing the Interface Units". Replacmnt Rqrd:Fusing Unit You need to replace the fusing unit. Obtain a new print cartridge. SD Card authenticatn.failed Error recurs, call service. Sensor cleaning required. See p.161 "Replacing the Intermediate Transfer Unit". For ...details, see p.180 "Cleaning the Toner Density Sensor". 205 For details, see p.147 "Replacing the Print Cartridge". It may be incorrectly installed. For details, see p.172 "Replacing the Maintenance Kit". For details, see p.161 "Replacing the ...


