User Manual
Page 10
...the instructions provided on the driver CDROM. 2. Install the scanner driver on the computer, install Presto! Specify the network settings, such as the machine's IP address. Register the destinations to the Address Book using Web Image Monitor. 1. Using the Scanner Function For details about installing the scanner driver, see p.9 "Configuring the IPv4...files via e-mail 1. For details, see the instructions provided on the computer, install Presto! 1 PageManager. Specify the network settings, such as the machine's IP address. For details, see p.9 "Configuring the IPv4...
...the instructions provided on the driver CDROM. 2. Install the scanner driver on the computer, install Presto! Specify the network settings, such as the machine's IP address. Register the destinations to the Address Book using Web Image Monitor. 1. Using the Scanner Function For details about installing the scanner driver, see p.9 "Configuring the IPv4...files via e-mail 1. For details, see the instructions provided on the computer, install Presto! 1 PageManager. Specify the network settings, such as the machine's IP address. For details, see p.9 "Configuring the IPv4...
User Manual
Page 11
... panel. CES190 Preparation for sending scanned files to a computer's shared folder 1. Specify the network settings, such as the machine's IP address. Guide to the Scanner Function 1 CES187 Preparation for sending scanned files to an FTP server 1. Specify the network settings, such as the ...machine's IP address. 7 Sending Scanned Files to a Computer's Shared Folder You can send scanned files to the Address Book using the control panel. Register the destinations to an FTP server using Web Image ...
... panel. CES190 Preparation for sending scanned files to a computer's shared folder 1. Specify the network settings, such as the machine's IP address. Guide to the Scanner Function 1 CES187 Preparation for sending scanned files to an FTP server 1. Specify the network settings, such as the ...machine's IP address. 7 Sending Scanned Files to a Computer's Shared Folder You can send scanned files to the Address Book using the control panel. Register the destinations to an FTP server using Web Image ...
User Manual
Page 13
... Configuration], and then press the [OK] key. 5. Press the [ ] [ ] keys to select [Network Settings], and then press the [OK] key. 3. Enter the machine's IPv4 address using the number keys, and then press the [OK] key. Press the [ ] [ ] keys to the initial screen. 14. Press the [User Tools] key to return... the password using the number keys, and then press the [OK] key. The current subnet mask is shown. 12. Press the [ ][ ] keys to select [IP Address], and then press the [OK] key. Press the [ ] [ ] keys to select [DHCP], and then press the [OK] key. 6. Configuring the IPv4...
... Configuration], and then press the [OK] key. 5. Press the [ ] [ ] keys to select [Network Settings], and then press the [OK] key. 3. Enter the machine's IPv4 address using the number keys, and then press the [OK] key. Press the [ ] [ ] keys to the initial screen. 14. Press the [User Tools] key to return... the password using the number keys, and then press the [OK] key. The current subnet mask is shown. 12. Press the [ ][ ] keys to select [IP Address], and then press the [OK] key. Press the [ ] [ ] keys to select [DHCP], and then press the [OK] key. 6. Configuring the IPv4...

User Manual
Page 14
The configuration page is printed. Using the Scanner Function 18. The IPv4 address setting will appear under "TCP/IP" on the configuration page. 1 10 1. Press [Yes] in the confirmation screen.
The configuration page is printed. Using the Scanner Function 18. The IPv4 address setting will appear under "TCP/IP" on the configuration page. 1 10 1. Press [Yes] in the confirmation screen.
User Manual
Page 15
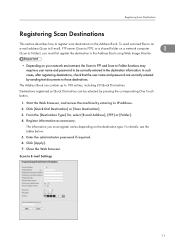
... destinations, check that the user name and password are correctly entered by entering its IP address. 2. The Address Book can be correctly entered in the destination information. From the [Destination Type] list, select [E-mail Address], [FTP] or [Folder]. 4. For details, see the tables below. 5. ...as necessary. Click [Quick Dial Destination] or [Scan Destination]. 3. Scan to those destinations. To send scanned files to an e-mail address (Scan to E-mail), FTP server (Scan to FTP), or a shared folder on the destination type. Register information as Quick Dial entries...
... destinations, check that the user name and password are correctly entered by entering its IP address. 2. The Address Book can be correctly entered in the destination information. From the [Destination Type] list, select [E-mail Address], [FTP] or [Folder]. 4. For details, see the tables below. 5. ...as necessary. Click [Quick Dial Destination] or [Scan Destination]. 3. Scan to those destinations. To send scanned files to an e-mail address (Scan to E-mail), FTP server (Scan to FTP), or a shared folder on the destination type. Register information as Quick Dial entries...
User Manual
Page 17
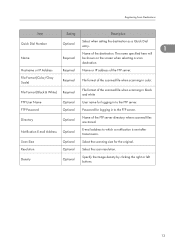
... directory where scanned files are stored. Directory Optional Name of the scanned file when scanning in to which a notification is sent after transmission. Hostname or IP Address Required Name or IP address of the FTP server. Resolution Optional Select the scan resolution. Notification E-mail...
... directory where scanned files are stored. Directory Optional Name of the scanned file when scanning in to which a notification is sent after transmission. Hostname or IP Address Required Name or IP address of the FTP server. Resolution Optional Select the scan resolution. Notification E-mail...
User Manual
Page 18
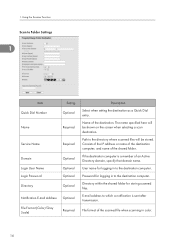
...on the screen when selecting a scan destination. User name for logging in to which a notification is a member of the destination. E-mail address to the destination computer. Name of an Active Directory domain, specify that domain name. If the destination computer is sent after transmission. 1. ...of the shared folder. Path to the directory where scanned files will be stored. Password for storing scanned files. Consists of the IP address or name of the destination computer, and name of the scanned file when scanning in to Folder Settings 1 Item Quick Dial Number ...
...on the screen when selecting a scan destination. User name for logging in to which a notification is a member of the destination. E-mail address to the destination computer. Name of an Active Directory domain, specify that domain name. If the destination computer is sent after transmission. 1. ...of the shared folder. Path to the directory where scanned files will be stored. Password for storing scanned files. Consists of the IP address or name of the destination computer, and name of the scanned file when scanning in to Folder Settings 1 Item Quick Dial Number ...

User Manual
Page 30
... using Web Image Monitor. 1. Start the Web browser and access the machine by pressing the [Address Book] key, and then selecting the desired entry using the [ ][ ] keys. The Address Book can be selected by entering its IP address. 2. Registering Fax Destinations Using Web Image Monitor This section describes how to 220 entries (20 Quick...
... using Web Image Monitor. 1. Start the Web browser and access the machine by pressing the [Address Book] key, and then selecting the desired entry using the [ ][ ] keys. The Address Book can be selected by entering its IP address. 2. Registering Fax Destinations Using Web Image Monitor This section describes how to 220 entries (20 Quick...


