
Hardware Guide
Page 4
...114 Cleaning the Friction Pad and the Paper Feed Roller 116 Cleaning the Registration Roller and the Paper Tray 119 8. Replacing Consumables Replacing the Print Cartridges...99 Replacing the Waste Toner Bottle...105 Replacing the Intermediate Transfer Unit (for Type 2 111 Replacing the Fusing Unit and Transfer Roller (...61 Types of Paper and Other Media...61 Specifications of Paper Types...62 Paper Not Supported by This Printer...68 Paper Storage Precautions...69 Print Area...69 Loading Paper...71 Loading Paper in Tray 1...71 Loading Paper in the Bypass Tray...84 Loading Paper in Tray 2...90 ...
...114 Cleaning the Friction Pad and the Paper Feed Roller 116 Cleaning the Registration Roller and the Paper Tray 119 8. Replacing Consumables Replacing the Print Cartridges...99 Replacing the Waste Toner Bottle...105 Replacing the Intermediate Transfer Unit (for Type 2 111 Replacing the Fusing Unit and Transfer Roller (...61 Types of Paper and Other Media...61 Specifications of Paper Types...62 Paper Not Supported by This Printer...68 Paper Storage Precautions...69 Print Area...69 Loading Paper...71 Loading Paper in Tray 1...71 Loading Paper in the Bypass Tray...84 Loading Paper in Tray 2...90 ...

Hardware Guide
Page 5
... Unit" Appears...148 When "Misfd: Stnd Tray" Appears...149 10. Appendix If the Printer is Not Going to a Computer via USB Cable 129 Other Printing Problems...132 Additional Troubleshooting...142 9. When the Printer is Directly Connected to Be Used for a Long Time 151 Preparing the Printer For a Long Period of...the Printer Again after it has been Inactive for a Long Period 152 Moving and Transporting the Printer...154 Moving the Printer...155 Consumables...156 Print Cartridge...156 Waste Toner Bottle...157 Specifications...158 Main Unit...158 Options...161 Trademarks...162 INDEX...165 3
... Unit" Appears...148 When "Misfd: Stnd Tray" Appears...149 10. Appendix If the Printer is Not Going to a Computer via USB Cable 129 Other Printing Problems...132 Additional Troubleshooting...142 9. When the Printer is Directly Connected to Be Used for a Long Time 151 Preparing the Printer For a Long Period of...the Printer Again after it has been Inactive for a Long Period 152 Moving and Transporting the Printer...154 Moving the Printer...155 Consumables...156 Print Cartridge...156 Waste Toner Bottle...157 Specifications...158 Main Unit...158 Options...161 Trademarks...162 INDEX...165 3

Hardware Guide
Page 17
... printer control and indicators that shows the printer status. 3. Front Cover Open this cover to 250 sheets of the printer. 4. Tray 1 Up to replace the print cartridge. 2. Top Cover Open this cover to the Printer This chapter explains the names and functions of the printer's components. To open this switch to turn...
... printer control and indicators that shows the printer status. 3. Front Cover Open this cover to 250 sheets of the printer. 4. Tray 1 Up to replace the print cartridge. 2. Top Cover Open this cover to the Printer This chapter explains the names and functions of the printer's components. To open this switch to turn...

Hardware Guide
Page 20
...1 CER022 1. Waste Toner Bottle Collects toner that is wasted during printing. If the following message appears on the control panel, contact your service representative to check for or remove jammed paper. Guide to the paper. Print Cartridge Loads from the printer rear, in the order of cyan (C), ...magenta (M), yellow (Y), and black (K). If the following message appears on the control panel, replace the print cartridge: "Replace Toner:" 2. You might have to handle this unit to replace the fusing unit: "Replace Fusing Unit" 3. Transfer unit Removes to...
...1 CER022 1. Waste Toner Bottle Collects toner that is wasted during printing. If the following message appears on the control panel, contact your service representative to check for or remove jammed paper. Guide to the paper. Print Cartridge Loads from the printer rear, in the order of cyan (C), ...magenta (M), yellow (Y), and black (K). If the following message appears on the control panel, replace the print cartridge: "Replace Toner:" 2. You might have to handle this unit to replace the fusing unit: "Replace Fusing Unit" 3. Transfer unit Removes to...

Hardware Guide
Page 30
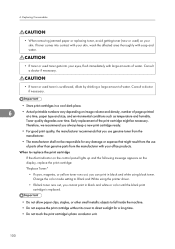
.... Consult a doctor if necessary. 2 • If toner or used toner is dirty. But take care not to fall inside the machine. • Keep the uncovered print cartridge away from direct sunlight. • Do not touch the...
.... Consult a doctor if necessary. 2 • If toner or used toner is dirty. But take care not to fall inside the machine. • Keep the uncovered print cartridge away from direct sunlight. • Do not touch the...

Hardware Guide
Page 31
Remove the plastic bag. 2. CER088 Do not touch the ID chip on both sides of the print cartridge. CER245 29 Installing the Printer 2 CES032 1. Lift the printer with two people by using the inset grips on the side of the printer.
Remove the plastic bag. 2. CER088 Do not touch the ID chip on both sides of the print cartridge. CER245 29 Installing the Printer 2 CES032 1. Lift the printer with two people by using the inset grips on the side of the printer.

Hardware Guide
Page 33
Close the front cover with a protection sheet that you must remove before shaking. Remove the protection tape. Carefully lift out the print cartridge vertically, holding its center. 31 6. CER099 7. Installing the Printer 2 CER100 8. CER098 9. Lift out print cartridges and shake them from side to open the top cover. The black print cartridge comes with both hands carefully. Pull up top cover open lever to side.
Close the front cover with a protection sheet that you must remove before shaking. Remove the protection tape. Carefully lift out the print cartridge vertically, holding its center. 31 6. CER099 7. Installing the Printer 2 CER100 8. CER098 9. Lift out print cartridges and shake them from side to open the top cover. The black print cartridge comes with both hands carefully. Pull up top cover open lever to side.
Hardware Guide
Page 34
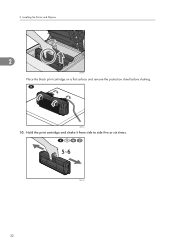
CES031 10. CER101 32 Installing the Printer and Options 2 CER240 Place the black print cartridge on a flat surface and remove the protection sheet before shaking. 2. Hold the print cartridge and shake it from side to side five or six times.
CES031 10. CER101 32 Installing the Printer and Options 2 CER240 Place the black print cartridge on a flat surface and remove the protection sheet before shaking. 2. Hold the print cartridge and shake it from side to side five or six times.
Hardware Guide
Page 35
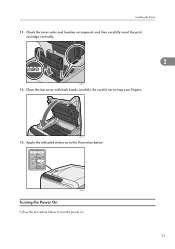
Be careful not to turn the power on. 33 CER012 13. CER243 Turning the Power On Follow the procedure below . Installing the Printer 11. Close the top cover with both hands carefully. Check the toner color and location correspond, and then carefully insert the print cartridge vertically. 2 CER011 12. Apply the indicated sticker as in the illustration below to trap your fingers.
Be careful not to turn the power on. 33 CER012 13. CER243 Turning the Power On Follow the procedure below . Installing the Printer 11. Close the top cover with both hands carefully. Check the toner color and location correspond, and then carefully insert the print cartridge vertically. 2 CER011 12. Apply the indicated sticker as in the illustration below to trap your fingers.

Hardware Guide
Page 68
...supported size None Notes 5 • The number of the print cartridge's photo conductor unit. When printing large, black-solid areas, striping can be printed onto. 5. Glue may cause machine malfunctions. • The number of envelopes that can be printed in one minute is approximately half that of the tray. ... Description • The number of sheets that of middle thick paper. • Paper can cause paper feed problems, deterioration in print quality, or premature wear of sheets that of the envelopes overlapping. 66 Envelope Item Supported paper tray Tray 1 and bypass tray ...
...supported size None Notes 5 • The number of the print cartridge's photo conductor unit. When printing large, black-solid areas, striping can be printed onto. 5. Glue may cause machine malfunctions. • The number of envelopes that can be printed in one minute is approximately half that of the tray. ... Description • The number of sheets that of middle thick paper. • Paper can cause paper feed problems, deterioration in print quality, or premature wear of sheets that of the envelopes overlapping. 66 Envelope Item Supported paper tray Tray 1 and bypass tray ...

Hardware Guide
Page 101
... or squeeze toner containers. Doing so can result if polythene materials are brought into the fabric and make removing the stain impossible. 99 Replacing the Print Cartridges • Do not incinerate toner (new or used ) on your clothing, wash the stained area with this machine away from babies and small children at...
... or squeeze toner containers. Doing so can result if polythene materials are brought into the fabric and make removing the stain impossible. 99 Replacing the Print Cartridges • Do not incinerate toner (new or used ) on your clothing, wash the stained area with this machine away from babies and small children at...
Hardware Guide
Page 102
...gets into your eyes, flush immediately with large amounts of water. Consult a doctor if necessary. • Store print cartridges in black and white or color until the black print cartridge is replaced. • Do not allow paper clips, staples, or other small metallic objects to fall inside ...the machine. • Do not expose the print cartridge without its cover to replace the print cartridge If the Alert indicator on the control panel lights up and the following message appears on your office products. When...
...gets into your eyes, flush immediately with large amounts of water. Consult a doctor if necessary. • Store print cartridges in black and white or color until the black print cartridge is replaced. • Do not allow paper clips, staples, or other small metallic objects to fall inside ...the machine. • Do not expose the print cartridge without its cover to replace the print cartridge If the Alert indicator on the control panel lights up and the following message appears on your office products. When...

Hardware Guide
Page 103
Change the color mode setting to touch the Laser Scanning Unit on the underside of the top cover. Replacing the Print Cartridges CER088 • Do not touch the ID chip on the side of the print cartridge. 6 CES032 • When removing print cartridges, be careful not to Black and White using the printer driver. • If black toner runs out, you can print in black and white or color until the black print cartridge is replaced. 101 CER094 • If cyan, magenta, or yellow toner runs out, you cannot print in black and white using just the black toner.
Change the color mode setting to touch the Laser Scanning Unit on the underside of the top cover. Replacing the Print Cartridges CER088 • Do not touch the ID chip on the side of the print cartridge. 6 CES032 • When removing print cartridges, be careful not to Black and White using the printer driver. • If black toner runs out, you can print in black and white or color until the black print cartridge is replaced. 101 CER094 • If cyan, magenta, or yellow toner runs out, you cannot print in black and white using just the black toner.
Hardware Guide
Page 104
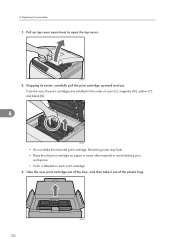
... or some other material to open lever to avoid dirtying your workspace. • Color is labeled on each print cartridge. 3. 6. CER006 2. Gripping its center, carefully pull the print cartridge upward and out. Replacing Consumables 1. Take the new print cartridge out of the box, and then take it out of cyan (C), magenta (M), yellow (Y), and black (K). 6 CER007 •...
... or some other material to open lever to avoid dirtying your workspace. • Color is labeled on each print cartridge. 3. 6. CER006 2. Gripping its center, carefully pull the print cartridge upward and out. Replacing Consumables 1. Take the new print cartridge out of the box, and then take it out of cyan (C), magenta (M), yellow (Y), and black (K). 6 CER007 •...

Hardware Guide
Page 105
Hold the print cartridge and shake it from the print cartridge. 6 CER010 6. CER236 Even distribution of toner within the bottle improves print quality. 5. CER241 103 Replacing the Print Cartridges 4. Remove the cover from side to side five or six times. Check the toner color and corresponding location, and then carefully insert the print cartridge vertically.
Hold the print cartridge and shake it from the print cartridge. 6 CER010 6. CER236 Even distribution of toner within the bottle improves print quality. 5. CER241 103 Replacing the Print Cartridges 4. Remove the cover from side to side five or six times. Check the toner color and corresponding location, and then carefully insert the print cartridge vertically.

Hardware Guide
Page 106
Replacing Consumables 7. Be careful not to cover the old print cartridge with the protective cover for recycling and environmental purposes. • Comply with the print cartridge Recycling Program, whereby used print cartridges are collected for processing. CER012 Wait while the toner loads. For details, ask your fingers. ...the cover carefully. To avoid malfunction, do not turn off the power while "Replace Toner:" appears on the old print cartridge. Then, put the old print cartridge into the bag, and then put it into the box. 6 CER055 • Make sure to trap your sales ...
Replacing Consumables 7. Be careful not to cover the old print cartridge with the protective cover for recycling and environmental purposes. • Comply with the print cartridge Recycling Program, whereby used print cartridges are collected for processing. CER012 Wait while the toner loads. For details, ask your fingers. ...the cover carefully. To avoid malfunction, do not turn off the power while "Replace Toner:" appears on the old print cartridge. Then, put the old print cartridge into the bag, and then put it into the box. 6 CER055 • Make sure to trap your sales ...

Hardware Guide
Page 116
7. Lift out the cyan print cartridge. "Density Sensor Require Cleaning" • The inside of this printer becomes very hot. Do not touch parts labelled " " (indicating a hot surface). 1. Cleaning the Printer Cleaning the Toner Density Sensor Clean the toner density sensor when the following message appears on the control panel. CER093 114 Pull up top cover open lever to open the top cover. 7 CER006 2.
7. Lift out the cyan print cartridge. "Density Sensor Require Cleaning" • The inside of this printer becomes very hot. Do not touch parts labelled " " (indicating a hot surface). 1. Cleaning the Printer Cleaning the Toner Density Sensor Clean the toner density sensor when the following message appears on the control panel. CER093 114 Pull up top cover open lever to open the top cover. 7 CER006 2.

Hardware Guide
Page 117
Slide the toner density sensor lever once to trap your fingers. CER012 115 3. Using both hands, hold the center of the top cover and close the cover carefully. Be careful not to the left. Cleaning the Toner Density Sensor CER056 Slide the lever only once. 4. Carefully insert the print cartridge removed in step 2 vertically. 7 CER057 5.
Slide the toner density sensor lever once to trap your fingers. CER012 115 3. Using both hands, hold the center of the top cover and close the cover carefully. Be careful not to the left. Cleaning the Toner Density Sensor CER056 Slide the lever only once. 4. Carefully insert the print cartridge removed in step 2 vertically. 7 CER057 5.

Hardware Guide
Page 127
..., because tray 1 or tray 2 was specified as the input tray but paper was set in the fusing unit. See, p.99 "Replacing the Print Cartridges". 8 Repl Tnr soon: # The printer is time to replace the Fusing unit. representative. Misfeed: Tray 2 There is a paper jam in ...Tray 2. Contact your sales or service roller. Replace Waste Toner Bottle It is almost out of toner # Replace the print cartridge. (Black, Magenta, Cyan or Yellow). Misfeed: PprTray There is a paper jam in Tray 1 or Tray 2. Remove the misfed paper. Replace Toner: #...
..., because tray 1 or tray 2 was specified as the input tray but paper was set in the fusing unit. See, p.99 "Replacing the Print Cartridges". 8 Repl Tnr soon: # The printer is time to replace the Fusing unit. representative. Misfeed: Tray 2 There is a paper jam in ...Tray 2. Contact your sales or service roller. Replace Waste Toner Bottle It is almost out of toner # Replace the print cartridge. (Black, Magenta, Cyan or Yellow). Misfeed: PprTray There is a paper jam in Tray 1 or Tray 2. Remove the misfed paper. Replace Toner: #...

Hardware Guide
Page 128
...If the error occurs again, contact your sales or service representative. Set the indicated print cartridge correctly. Clean the toner density sensor. The error message appears even though the print cartridge is set . See p.114 "Cleaning the Toner Density Sensor". 126 Reset Tray .... Troubleshooting Message Explanation Recommended Action Setting Error Toner: # The indicated print cartridge is a problem with the printer's controller. Turn off the main power, and then turn it on the print cartridge surface. installed. Service call SCXXX There is not set correctly, or...
...If the error occurs again, contact your sales or service representative. Set the indicated print cartridge correctly. Clean the toner density sensor. The error message appears even though the print cartridge is set . See p.114 "Cleaning the Toner Density Sensor". 126 Reset Tray .... Troubleshooting Message Explanation Recommended Action Setting Error Toner: # The indicated print cartridge is a problem with the printer's controller. Turn off the main power, and then turn it on the print cartridge surface. installed. Service call SCXXX There is not set correctly, or...


