User Manual
Page 13
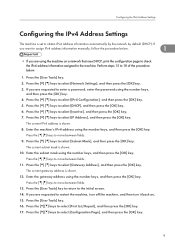
... IPv4 Address Settings The machine is set to select [Print List/Report], and then press the [OK] key. 17. If you are requested to enter a password, enter the password using the number keys, and then press the [OK] key.
... IPv4 Address Settings The machine is set to select [Print List/Report], and then press the [OK] key. 17. If you are requested to enter a password, enter the password using the number keys, and then press the [OK] key.
User Manual
Page 15
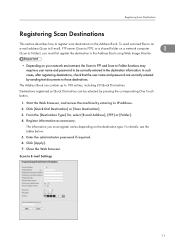
...register varies depending on your network environment, the Scan to FTP and Scan to Folder functions may require a user name and password to those destinations. Enter the administrator password if required. 6. Scan to register scan destinations in the Address Book using Web Image Monitor. • Depending on the ... [Destination Type] list, select [E-mail Address], [FTP] or [Folder]. 4. In such cases, after registering destinations, check that the user name and password are correctly entered by sending test documents to be selected by entering its IP address. 2. Close the Web browser.
...register varies depending on your network environment, the Scan to FTP and Scan to Folder functions may require a user name and password to those destinations. Enter the administrator password if required. 6. Scan to register scan destinations in the Address Book using Web Image Monitor. • Depending on the ... [Destination Type] list, select [E-mail Address], [FTP] or [Folder]. 4. In such cases, after registering destinations, check that the user name and password are correctly entered by sending test documents to be selected by entering its IP address. 2. Close the Web browser.
User Manual
Page 17
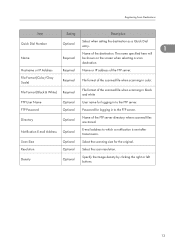
File Format (Color/Gray Scale) Required File format of the scanned file when scanning in to which a notification is sent after transmission. FTP Password Optional Password for the original. Density Optional Specify the image density by clicking the right or left buttons. 13 Notification E-mail Address Optional E-mail address to the ...
File Format (Color/Gray Scale) Required File format of the scanned file when scanning in to which a notification is sent after transmission. FTP Password Optional Password for the original. Density Optional Specify the image density by clicking the right or left buttons. 13 Notification E-mail Address Optional E-mail address to the ...
User Manual
Page 18
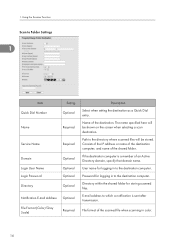
... scanning in to Folder Settings 1 Item Quick Dial Number Name Setting Optional Required Service Name Required Domain Login User Name Login Password Directory Optional Optional Optional Optional Notification E-mail Address Optional File Format (Color/Gray Scale) Required Description Select when setting the destination...format of an Active Directory domain, specify that domain name. Name of the shared folder. User name for storing scanned files. Password for logging in color. 14 The name specified here will be shown on the screen when selecting a scan destination. E-mail ...
... scanning in to Folder Settings 1 Item Quick Dial Number Name Setting Optional Required Service Name Required Domain Login User Name Login Password Directory Optional Optional Optional Optional Notification E-mail Address Optional File Format (Color/Gray Scale) Required Description Select when setting the destination...format of an Active Directory domain, specify that domain name. Name of the shared folder. User name for storing scanned files. Password for logging in color. 14 The name specified here will be shown on the screen when selecting a scan destination. E-mail ...
User Manual
Page 19
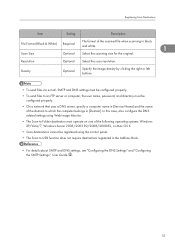
... send files via e-mail, SMTP and DNS settings must be configured properly. • To send files to an FTP server or computer, the user name, password, and directory must operate on one of the following operating systems: Windows XP/Vista/7, Windows Server 2003/2003 R2/2008/2008 R2, or Mac OS...
... send files via e-mail, SMTP and DNS settings must be configured properly. • To send files to an FTP server or computer, the user name, password, and directory must operate on one of the following operating systems: Windows XP/Vista/7, Windows Server 2003/2003 R2/2008/2008 R2, or Mac OS...
User Manual
Page 27
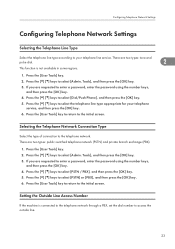
...Telephone Network Connection Type Select the type of connection to select [PSTN / PBX], and then press the [OK] key. 5. There are requested to enter a password, enter the password using the number keys, and then press the [OK] key. 4. Press the [User Tools] key. 2. Press the [ ] [ ] keys to the... service, and then press the [OK] key. 6. Press the [User Tools] key to return to select [Admin. There are requested to enter a password, enter the password using the number keys, and then press the [OK] key. 4. Press the [ ] [ ] keys to the initial screen. Press the [User Tools...
...Telephone Network Connection Type Select the type of connection to select [PSTN / PBX], and then press the [OK] key. 5. There are requested to enter a password, enter the password using the number keys, and then press the [OK] key. 4. Press the [User Tools] key. 2. Press the [ ] [ ] keys to the... service, and then press the [OK] key. 6. Press the [User Tools] key to return to select [Admin. There are requested to enter a password, enter the password using the number keys, and then press the [OK] key. 4. Press the [ ] [ ] keys to the initial screen. Press the [User Tools...

User Manual
Page 28
... the [ ] [ ] keys to select [PBX Access Number], and then press the [OK] key. 5. If you may not be able to send faxes to enter a password, enter the password using the number keys, and then press the [OK] key. 6. Otherwise, you are requested to outside line access number that matches the setting of...
... the [ ] [ ] keys to select [PBX Access Number], and then press the [OK] key. 5. If you may not be able to send faxes to enter a password, enter the password using the number keys, and then press the [OK] key. 6. Otherwise, you are requested to outside line access number that matches the setting of...

User Manual
Page 29
... (Month/Day/Year, Day/Month/Year, or Year/Month/Day) 2 • Time Hour, minute, time format (12- You can press the [ ][ ] keys to enter a password, enter the password using the number keys, and then press the [OK] key. 4. Press the [ ][ ] keys to select [Set Date/Time], and then press the [OK] key...
... (Month/Day/Year, Day/Month/Year, or Year/Month/Day) 2 • Time Hour, minute, time format (12- You can press the [ ][ ] keys to enter a password, enter the password using the number keys, and then press the [OK] key. 4. Press the [ ][ ] keys to select [Set Date/Time], and then press the [OK] key...

User Manual
Page 30
... Book can be selected by entering its IP address. 2. Click [Quick Dial Destination] or [Fax Speed Dial Destination]. 3. Register information as necessary. 6. Enter the administrator password if required. 7. Click [Apply]. 8. 2. Close the Web browser. Select [Quick Dial Number] or [Speed Dial Number], and then select the registration number from the list...
... Book can be selected by entering its IP address. 2. Click [Quick Dial Destination] or [Fax Speed Dial Destination]. 3. Register information as necessary. 6. Enter the administrator password if required. 7. Click [Apply]. 8. 2. Close the Web browser. Select [Quick Dial Number] or [Speed Dial Number], and then select the registration number from the list...


