User Guide
Page 1
For safe and correct use this machine and keep it handy for future reference. User Guide 1 Guide to the Machine 2 Getting Started 3 Using the Printer Function 4 Using the Copier Function 5 Using the Scanner Function 6 Using the Fax Function 7 Configuring the Machine Using the Control Panel 8 Configuring the Machine Using Web Image Monitor 9 Troubleshooting 10 Maintenance 11 Appendix Read this manual carefully before you use , be sure to read "Safety Information" before using the machine.
For safe and correct use this machine and keep it handy for future reference. User Guide 1 Guide to the Machine 2 Getting Started 3 Using the Printer Function 4 Using the Copier Function 5 Using the Scanner Function 6 Using the Fax Function 7 Configuring the Machine Using the Control Panel 8 Configuring the Machine Using Web Image Monitor 9 Troubleshooting 10 Maintenance 11 Appendix Read this manual carefully before you use , be sure to read "Safety Information" before using the machine.
User Guide
Page 13
...damage to the machine, be found in User Guide. ❖ User Guide Provides information about general operation and covers the topics listed below. • Installing options • Suitable paper types • Procedures to a computer. ❖ Scanning and Faxing Guide Provides information about installation and operation for ...'s scanner and fax functions. This manual is stored in the manual CD-ROM supplied with the machine. ❖ Quick Guide Provides information about maintenance This manual is stored in the manual CD-ROM supplied with the machine. 3 Manuals for This ...
...damage to the machine, be found in User Guide. ❖ User Guide Provides information about general operation and covers the topics listed below. • Installing options • Suitable paper types • Procedures to a computer. ❖ Scanning and Faxing Guide Provides information about installation and operation for ...'s scanner and fax functions. This manual is stored in the manual CD-ROM supplied with the machine. ❖ Quick Guide Provides information about maintenance This manual is stored in the manual CD-ROM supplied with the machine. 3 Manuals for This ...
User Guide
Page 359
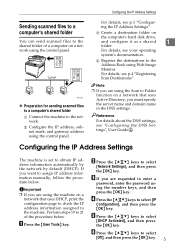
... Destinations". Configuring the IP Address Settings The machine is set to select [Off], and then press the {OK} key. 3 A Press the {User Tools} key. Important ❒ If you are using the machine on a network that uses Active Directory, you are using the control panel. F... the {U}{T} keys to obtain IP address information automatically by the network by default (DHCP). For details, see "Configuring the DNS Settings", User Guide . Configuring the IP Address Settings Sending scanned files to a computer's shared folder You can send scanned files to the shared folder of ...
... Destinations". Configuring the IP Address Settings The machine is set to select [Off], and then press the {OK} key. 3 A Press the {User Tools} key. Important ❒ If you are using the machine on a network that uses Active Directory, you are using the control panel. F... the {U}{T} keys to obtain IP address information automatically by the network by default (DHCP). For details, see "Configuring the DNS Settings", User Guide . Configuring the IP Address Settings Sending scanned files to a computer's shared folder You can send scanned files to the shared folder of ...

User Guide
Page 365
... send scanned files via Email, to Folder). Reference For details about SMTP and DNS settings, see "Configuring the DNS Settings" and "Configuring the SMTP Settings", User Guide . If necessary, configure advanced scan settings. The scanned file is only available with network connection. To scan in color, press the {Color Start} key. To...
... send scanned files via Email, to Folder). Reference For details about SMTP and DNS settings, see "Configuring the DNS Settings" and "Configuring the SMTP Settings", User Guide . If necessary, configure advanced scan settings. The scanned file is only available with network connection. To scan in color, press the {Color Start} key. To...
User Guide
Page 366
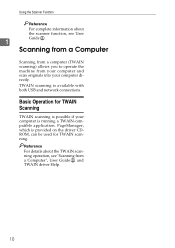
... and network connections. TWAIN scanning is possible if your computer directly. Using the Scanner Function Reference For complete information about the TWAIN scanning operation, see User Guide . 1 Scanning from a Computer Scanning from a computer (TWAIN scanning) allows you to operate the machine from a Computer...
... and network connections. TWAIN scanning is possible if your computer directly. Using the Scanner Function Reference For complete information about the TWAIN scanning operation, see User Guide . 1 Scanning from a Computer Scanning from a computer (TWAIN scanning) allows you to operate the machine from a Computer...
User Guide
Page 368
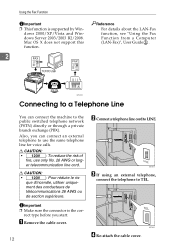
... larg- Mac OS X does not support this function. 2 Reference For details about the LAN-Fax function, see "Using the Fax Function from a Computer (LAN-Fax)", User Guide . Important ❒ Make sure the connector is supported by Win- R CAUTION: • : To reduce the risk of fire, use the same telephone line for voice...
... larg- Mac OS X does not support this function. 2 Reference For details about the LAN-Fax function, see "Using the Fax Function from a Computer (LAN-Fax)", User Guide . Important ❒ Make sure the connector is supported by Win- R CAUTION: • : To reduce the risk of fire, use the same telephone line for voice...
User Guide
Page 372
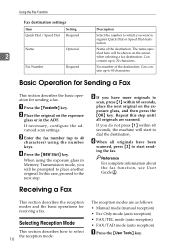
...manual reception) • Fax Only mode (auto reception) • FAX/TEL mode (auto reception) • FAX/TAD mode (auto reception) A Press the {User Tools} key. Basic Operation for Sending a Fax This section describes the basic operation for receiving a fax. A Press the {Facsimile} key. C Enter the fax...the next original on the exposure glass, and then press the {OK} key. Reference For complete information about the fax function, see User Guide . Fax number of the destination. When using the number keys. Name of the destination. Repeat this case, proceed to the next ...
...manual reception) • Fax Only mode (auto reception) • FAX/TEL mode (auto reception) • FAX/TAD mode (auto reception) A Press the {User Tools} key. Basic Operation for Sending a Fax This section describes the basic operation for receiving a fax. A Press the {Facsimile} key. C Enter the fax...the next original on the exposure glass, and then press the {OK} key. Reference For complete information about the fax function, see User Guide . Fax number of the destination. When using the number keys. Name of the destination. Repeat this case, proceed to the next ...
User Guide
Page 377
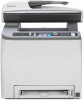
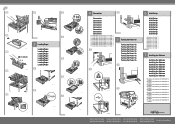
...manual briefly describes the procedure for future reference. For more details about installation and other information, see User Guide in the manuals CD-ROM and the instructions provided on the driver CD-ROM. Read this manual ... BPC301S BPC302S BPC316S SP C231SF/C232SF BAA460S BPC303S BPC304S BPC305S BPC306S BPC307S BPC308S BPC315S Quick Installation Guide Quick Installation Guide Quick Installation Guide Quick Installation Guide Quick Installation Guide Quick Installation Guide Quick Installation Guide Quick Installation Guide Quick Installation Guide Read this manual ...
...manual briefly describes the procedure for future reference. For more details about installation and other information, see User Guide in the manuals CD-ROM and the instructions provided on the driver CD-ROM. Read this manual ... BPC301S BPC302S BPC316S SP C231SF/C232SF BAA460S BPC303S BPC304S BPC305S BPC306S BPC307S BPC308S BPC315S Quick Installation Guide Quick Installation Guide Quick Installation Guide Quick Installation Guide Quick Installation Guide Quick Installation Guide Quick Installation Guide Quick Installation Guide Quick Installation Guide Read this manual ...
User Guide
Page 378
... Setup Initial Setup Initial Setup Initial Setup • For details, see User Guide . • For details, see User Guide . • For details, see User Guide . • For details, see User Guide . • For details, see User Guide . • For details, see User Guide . • For details, see User Guide . • For details, see User Guide . • For details, see the instructions provided on the driver CD...
... Setup Initial Setup Initial Setup Initial Setup • For details, see User Guide . • For details, see User Guide . • For details, see User Guide . • For details, see User Guide . • For details, see User Guide . • For details, see User Guide . • For details, see User Guide . • For details, see User Guide . • For details, see the instructions provided on the driver CD...
User Guide
Page 386
... page has been printed out. After the jammed paper is removed, printing restarts from the jammed page. • For information about originals, see "Getting Started", User Guide. 8 In this case, copy the originals again starting from the jammed page automatically. • If a scanning jam occurs in the ADF, copying is 99. Press...
... page has been printed out. After the jammed paper is removed, printing restarts from the jammed page. • For information about originals, see "Getting Started", User Guide. 8 In this case, copy the originals again starting from the jammed page automatically. • If a scanning jam occurs in the ADF, copying is 99. Press...

User Guide
Page 389
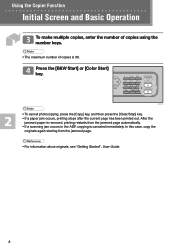
...] key or [ ][ ] keys to change the default settings of the machine, see "Configuring the Machine Using the Control Panel", User Guide. 11 Mixed for originals with both text and photographs Text for originals with photographs only • For more details about the copier function..., see "Using the Copier Function", User Guide. • If you are scanning. 1. Press the [Image Quality] key. 2. Press the [Density] key. 2. ❖ Adjusting Image Density...
...] key or [ ][ ] keys to change the default settings of the machine, see "Configuring the Machine Using the Control Panel", User Guide. 11 Mixed for originals with both text and photographs Text for originals with photographs only • For more details about the copier function..., see "Using the Copier Function", User Guide. • If you are scanning. 1. Press the [Image Quality] key. 2. Press the [Density] key. 2. ❖ Adjusting Image Density...
User Guide
Page 390
...scanned files via e-mail, SMTP and DNS settings must be configured properly in advance. For details, see "Configuring the Machine Using Web Image Monitor", User Guide. • It is the initial screen in the ADF and on a network (Scan to Folder). • Scan destinations must be registered using... Web Image Monitor in advance. BPC203S 12 For details, see "Using the Scanner Function", User Guide. • To send files via e-mail (Scan to E-mail), to an FTP server (Scan to FTP), or to the shared folder of a ...
...scanned files via e-mail, SMTP and DNS settings must be configured properly in advance. For details, see "Configuring the Machine Using Web Image Monitor", User Guide. • It is the initial screen in the ADF and on a network (Scan to Folder). • Scan destinations must be registered using... Web Image Monitor in advance. BPC203S 12 For details, see "Using the Scanner Function", User Guide. • To send files via e-mail (Scan to E-mail), to an FTP server (Scan to FTP), or to the shared folder of a ...
User Guide
Page 392
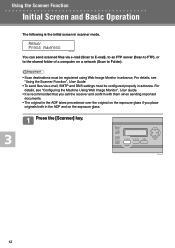
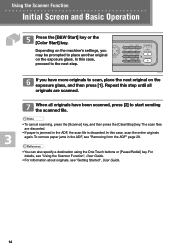
...file. • To cancel scanning, press the [Scanner] key, and then press the [Clear/Stop] key. For details, see "Using the Scanner Function", User Guide. • For information about originals, see "Removing from the ADF" page 29. • You can also specify a destination using the One Touch buttons or ...[Pause/Redial] key. To remove paper jams in the ADF, the scan file is jammed in the ADF, see "Getting Started", User Guide. 14 Repeat this step until all originals have more originals to place another original on the exposure glass, and then press [1]. Using the Scanner...
...file. • To cancel scanning, press the [Scanner] key, and then press the [Clear/Stop] key. For details, see "Using the Scanner Function", User Guide. • For information about originals, see "Removing from the ADF" page 29. • You can also specify a destination using the One Touch buttons or ...[Pause/Redial] key. To remove paper jams in the ADF, the scan file is jammed in the ADF, see "Getting Started", User Guide. 14 Repeat this step until all originals have more originals to place another original on the exposure glass, and then press [1]. Using the Scanner...
User Guide
Page 393
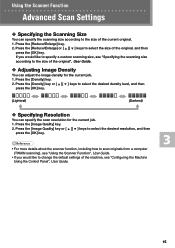
... Function Advanced Scan Settings ❖ Specifying the Scanning Size You can specify the scanning size according to the size of the original", User Guide. ❖ Adjusting Image Density You can specify the scan resolution for the current job. 1. If you would like to the size...how to scan originals from a computer (TWAIN scanning), see "Using the Scanner Function", User Guide. • If you would like to specify a custom scanning size, see "Configuring the Machine Using the Control Panel", User Guide. 15 Press the [Reduce/Enlarge] or [ ][ ] keys to select the desired density...
... Function Advanced Scan Settings ❖ Specifying the Scanning Size You can specify the scanning size according to the size of the original", User Guide. ❖ Adjusting Image Density You can specify the scan resolution for the current job. 1. If you would like to the size...how to scan originals from a computer (TWAIN scanning), see "Using the Scanner Function", User Guide. • If you would like to specify a custom scanning size, see "Configuring the Machine Using the Control Panel", User Guide. 15 Press the [Reduce/Enlarge] or [ ][ ] keys to select the desired density...
User Guide
Page 396
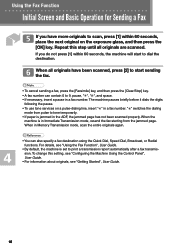
Repeat this setting, see "Configuring the Machine Using the Control Panel", User Guide. • For information about originals, see "Using the Fax Function", User Guide. • By default, the machine is set to dial the destination. To change this step until all originals have more originals to tone ... the pause. • To use tone services on the exposure glass, and then press the [OK] key. For details, see "Getting Started", User Guide. 18 Using the Fax Function Initial Screen and Basic Operation for Sending a Fax If you do not press [1] within 60 seconds, place the next ...
Repeat this setting, see "Configuring the Machine Using the Control Panel", User Guide. • For information about originals, see "Using the Fax Function", User Guide. • By default, the machine is set to dial the destination. To change this step until all originals have more originals to tone ... the pause. • To use tone services on the exposure glass, and then press the [OK] key. For details, see "Getting Started", User Guide. 18 Using the Fax Function Initial Screen and Basic Operation for Sending a Fax If you do not press [1] within 60 seconds, place the next ...

User Guide
Page 397
.... Standard for originals with normal-sized characters Fine for originals with images • For more details about the fax function, see "Using the Fax Function", User Guide. • If you would like to change the default settings of the machine, see "Configuring the Machine Using the Control Panel...
.... Standard for originals with normal-sized characters Fine for originals with images • For more details about the fax function, see "Using the Fax Function", User Guide. • If you would like to change the default settings of the machine, see "Configuring the Machine Using the Control Panel...
User Guide
Page 398
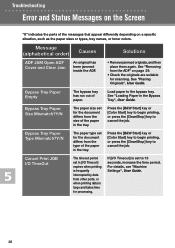
..., such as the paper sizes or types, tray names, or toner colors. See "Loading Paper in the tray. For details, see "Machine Settings", User Guide. 20 Message (alphabetical order) Causes Solutions ADF JAM Open ADF Cover and Clear Jam An original has been jammed inside the ADF. • Remove jammed... the document differs from other ports, or when printing data is frequently interrupted by data from the size of the paper in the Bypass Tray", User Guide. Press the [B&W Start] key or [Color Start] key to begin printing, or press the [Clear/Stop] key to cancel the job. ...
..., such as the paper sizes or types, tray names, or toner colors. See "Loading Paper in the tray. For details, see "Machine Settings", User Guide. 20 Message (alphabetical order) Causes Solutions ADF JAM Open ADF Cover and Clear Jam An original has been jammed inside the ADF. • Remove jammed... the document differs from other ports, or when printing data is frequently interrupted by data from the size of the paper in the Bypass Tray", User Guide. Press the [B&W Start] key or [Color Start] key to begin printing, or press the [Clear/Stop] key to cancel the job. ...
User Guide
Page 400
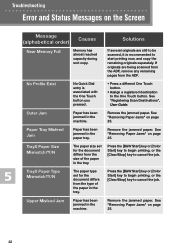
... [Clear/Stop] key to start printing now, and copy the remaining originals separately. Troubleshooting Error and Status Messages on page 25. See "Registering Scan Destinations", User Guide. Paper Tray Misfeed Jam Paper has been jammed in the tray. See "Removing Paper Jams" on page 25. Press the [B&W Start] key or [Color Start...
... [Clear/Stop] key to start printing now, and copy the remaining originals separately. Troubleshooting Error and Status Messages on page 25. See "Registering Scan Destinations", User Guide. Paper Tray Misfeed Jam Paper has been jammed in the tray. See "Removing Paper Jams" on page 25. Press the [B&W Start] key or [Color Start...
User Guide
Page 401
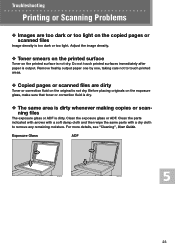
... glass or ADF. Adjust the image density. ❖ Toner smears on the printed surface Toner on the original is output. For more details, see "Cleaning", User Guide.
... glass or ADF. Adjust the image density. ❖ Toner smears on the printed surface Toner on the original is output. For more details, see "Cleaning", User Guide.
User Guide
Page 402
..., see "Print Cartridges" on page 32. • A tray is empty. Load paper into the tray. For more details, see "Loading Paper", User Guide. • The tray for printing faxes does not contain A4, Letter, Legal, size paper. Make sure that the modular cable is empty. For more... the received faxes • The paper tray is correctly connected. Place the original in the paper tray. For more details, see "Loading Paper", User Guide. ❖ A fax you cannot solve the problem, contact your local sales or service representative. 24 Change the tray setting, and load paper of...
..., see "Print Cartridges" on page 32. • A tray is empty. Load paper into the tray. For more details, see "Loading Paper", User Guide. • The tray for printing faxes does not contain A4, Letter, Legal, size paper. Make sure that the modular cable is empty. For more... the received faxes • The paper tray is correctly connected. Place the original in the paper tray. For more details, see "Loading Paper", User Guide. ❖ A fax you cannot solve the problem, contact your local sales or service representative. 24 Change the tray setting, and load paper of...


