Hardware Guide
Page 1
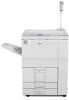
For safe and correct use this manual carefully before you use , be sure to read the Safety Information before using the machine. Operating Instructions Hardware Guide 1 Guide to the Printer 2 Setting Up 3 Connecting the Printer 4 Configuration 5 Installing the Printer Driver 6 Paper and Other Media 7 Replacing Consumables 8 Cleaning and Adjusting the Printer 9 Troubleshooting 10 Removing Misfed Paper 11 Appendix Read this machine and keep it handy for future reference.
For safe and correct use this manual carefully before you use , be sure to read the Safety Information before using the machine. Operating Instructions Hardware Guide 1 Guide to the Printer 2 Setting Up 3 Connecting the Printer 4 Configuration 5 Installing the Printer Driver 6 Paper and Other Media 7 Replacing Consumables 8 Cleaning and Adjusting the Printer 9 Troubleshooting 10 Removing Misfed Paper 11 Appendix Read this machine and keep it handy for future reference.
Hardware Guide
Page 4
......92 9. Replacing Consumables Replacing the Toner bottle...77 Adding Staples...81 Finisher SR841...81 Finisher SR4000...83 Finisher SR4000 (Saddle Stitch)...86 8. Installing the Printer Driver Quick Install...53 Install the Operating Instructions...55 6. Setting the Ethernet Speed...44 IEEE 802.11b (Wireless LAN) Configuration 47 Setting SSID...49 Setting a WEP...
......92 9. Replacing Consumables Replacing the Toner bottle...77 Adding Staples...81 Finisher SR841...81 Finisher SR4000...83 Finisher SR4000 (Saddle Stitch)...86 8. Installing the Printer Driver Quick Install...53 Install the Operating Instructions...55 6. Setting the Ethernet Speed...44 IEEE 802.11b (Wireless LAN) Configuration 47 Setting SSID...49 Setting a WEP...
Hardware Guide
Page 55
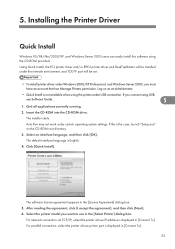
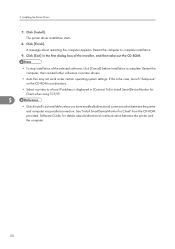
... DeskTopBinder will be installed under the network environment, and TCP/IP port will be set. • To install printer driver under Windows 2000/XP Professional, and Windows Server 2003, you want to use in [Connect To]. 53 For network connection via TCP/IP, select the ... into the CD-ROM drive. If this is the case, launch "Setup.exe" on as an Administrator. • Quick Install is English. 4. Installing the Printer Driver Quick Install Windows 95/98/Me/2000/XP, and Windows Server 2003 users can easily install this printer under certain operating system settings. If you...
... DeskTopBinder will be installed under the network environment, and TCP/IP port will be set. • To install printer driver under Windows 2000/XP Professional, and Windows Server 2003, you want to use in [Connect To]. 53 For network connection via TCP/IP, select the ... into the CD-ROM drive. If this is the case, launch "Setup.exe" on as an Administrator. • Quick Install is English. 4. Installing the Printer Driver Quick Install Windows 95/98/Me/2000/XP, and Windows Server 2003 users can easily install this printer under certain operating system settings. If you...
Hardware Guide
Page 56
... for Client when using TCP/IP. 5 • Quick Install is complete. Click [Exit] in [Connect To] to complete installation. 9. The printer driver installation starts. 8. If this is the case, launch "Setup.exe" on the CD-ROM root directory. • Select a printer to whose IP address... Click [Install]. Restart the computer to install SmartDeviceMonitor for details about restarting the computer appears. 5. Installing the Printer Driver 7. Restart the computer, then reinstall other softwares or printer drivers. • Auto Run may not work under certain operating system settings.
... for Client when using TCP/IP. 5 • Quick Install is complete. Click [Exit] in [Connect To] to complete installation. 9. The printer driver installation starts. 8. If this is the case, launch "Setup.exe" on the CD-ROM root directory. • Select a printer to whose IP address... Click [Install]. Restart the computer to install SmartDeviceMonitor for details about restarting the computer appears. 5. Installing the Printer Driver 7. Restart the computer, then reinstall other softwares or printer drivers. • Auto Run may not work under certain operating system settings.

Hardware Guide
Page 57
... can uninstall each Manual Guide separately. • If you are using Internet Explorer 3.02 or earlier, or Netscape Navigator 4.05 or earlier as your printer driver, and then click Uninstall. Follow the procedure below to complete the installation. 6. Follow the instructions on the CD-ROM root directory to your hard disk...
... can uninstall each Manual Guide separately. • If you are using Internet Explorer 3.02 or earlier, or Netscape Navigator 4.05 or earlier as your printer driver, and then click Uninstall. Follow the procedure below to complete the installation. 6. Follow the instructions on the CD-ROM root directory to your hard disk...

Hardware Guide
Page 58
5. Installing the Printer Driver 5 56
5. Installing the Printer Driver 5 56
Hardware Guide
Page 62
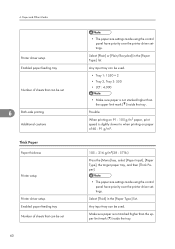
.... Select [Thick] in the [Paper Type:] list. Any input tray can be set 6 Both-side printing Additional cautions Thick Paper Paper thickness Printer setup Printer driver setup Enabled paper feeding tray Number of 60 - 91 g/m2. 105 - 216 g/m2(28 - 57 lb.) Press the [Menu] key, select [Paper Input... the target paper tray, and then [Thick Paper]. • The paper size settings made using the control panel have priority over the printer driver settings. Make sure paper is not stacked higher than the upper limit mark ( ) inside the tray. 6. Paper and Other Media Printer...
.... Select [Thick] in the [Paper Type:] list. Any input tray can be set 6 Both-side printing Additional cautions Thick Paper Paper thickness Printer setup Printer driver setup Enabled paper feeding tray Number of 60 - 91 g/m2. 105 - 216 g/m2(28 - 57 lb.) Press the [Menu] key, select [Paper Input... the target paper tray, and then [Thick Paper]. • The paper size settings made using the control panel have priority over the printer driver settings. Make sure paper is not stacked higher than the upper limit mark ( ) inside the tray. 6. Paper and Other Media Printer...
Hardware Guide
Page 64
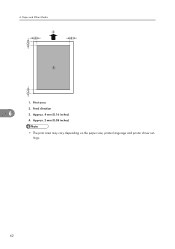
Feed direction 6 3. Approx. 4 mm (0.16 inches) 4. Print area 2. Paper and Other Media 1. Approx. 2 mm (0.08 inches) • The print area may vary depending on the paper size, printer language and printer driver settings. 62 6.
Feed direction 6 3. Approx. 4 mm (0.16 inches) 4. Print area 2. Paper and Other Media 1. Approx. 2 mm (0.08 inches) • The print area may vary depending on the paper size, printer language and printer driver settings. 62 6.

Hardware Guide
Page 67
... Paper type setting can also be set using the printer driver. • The paper size settings made using the control panel. 65 Loading Paper AST008S The menu appears on the display. 2. Press the [ ] or [ ] key to use the printer driver, make the setting using the control panel have priority over... the printer driver settings. • When you do not wish to display the target paper tray, and then press the [ Enter] key...
... Paper type setting can also be set using the printer driver. • The paper size settings made using the control panel. 65 Loading Paper AST008S The menu appears on the display. 2. Press the [ ] or [ ] key to use the printer driver, make the setting using the control panel have priority over... the printer driver settings. • When you do not wish to display the target paper tray, and then press the [ Enter] key...
Hardware Guide
Page 68
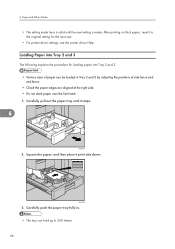
Loading Paper into Tray 2 and 3 The following explains the procedure for the next user. • For printer driver settings, see the printer driver Help. Carefully push the paper tray fully in. • The tray can hold up to the original setting for loading paper into Tray 2 and 3. • ...
Loading Paper into Tray 2 and 3 The following explains the procedure for the next user. • For printer driver settings, see the printer driver Help. Carefully push the paper tray fully in. • The tray can hold up to the original setting for loading paper into Tray 2 and 3. • ...
Hardware Guide
Page 71
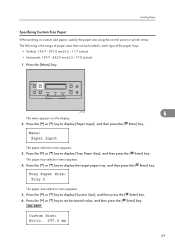
... Size], and then press the [ Enter] key. 6. AST008S 6 The menu appears on custom size paper, specify the paper size using the control panel or printer driver. Press the [ ] or [ ] key to display [Tray Paper Size], and then press the [ Enter] key. Loading Paper Specifying Custom Size Paper When printing on the...
... Size], and then press the [ Enter] key. 6. AST008S 6 The menu appears on custom size paper, specify the paper size using the control panel or printer driver. Press the [ ] or [ ] key to display [Tray Paper Size], and then press the [ Enter] key. Loading Paper Specifying Custom Size Paper When printing on the...

Hardware Guide
Page 72
... entering the length appears. 7. The display returns to set to Tray #, the paper size settings made using the control panel have priority over the printer driver settings. The initial screen appears. • If the Paper Tray is set the paper type. 6. By pressing and holding the key, the value varies by... load translucent paper or thick paper, set to [Auto Tray SW], the paper size settings made using the control panel have priority over the printer driver settings.
... entering the length appears. 7. The display returns to set to Tray #, the paper size settings made using the control panel have priority over the printer driver settings. The initial screen appears. • If the Paper Tray is set the paper type. 6. By pressing and holding the key, the value varies by... load translucent paper or thick paper, set to [Auto Tray SW], the paper size settings made using the control panel have priority over the printer driver settings.

Hardware Guide
Page 110
.... • The paper setting may differ to that selected in the application. See p.63 "Loading Paper". • Check the printer driver's paper settings. The printed image differs from the computer's instructions, check the following: Toner smears appear on the computer's display. •...17 sized paper curls easily. To enable [Change User Settings...], select the [User Settings] check box. Images are using the printer driver: On the RPCS printer driver's [Print Quality] tab, open the [Change User Settings] dialog box, and then on the [Image Adjustments] tab, change the...
.... • The paper setting may differ to that selected in the application. See p.63 "Loading Paper". • Check the printer driver's paper settings. The printed image differs from the computer's instructions, check the following: Toner smears appear on the computer's display. •...17 sized paper curls easily. To enable [Change User Settings...], select the [User Settings] check box. Images are using the printer driver: On the RPCS printer driver's [Print Quality] tab, open the [Change User Settings] dialog box, and then on the [Image Adjustments] tab, change the...
Hardware Guide
Page 111
... appears on the display panel, replace the toner bottle. Print several sheets until it acclimatizes. Check the printer driver's paper settings. See printer driver Help. • Toner is damp. Replace the unit. See the printer driver Help. • The fusing unit is damp. The backs of printed sheets are blemished. • When removing...
... appears on the display panel, replace the toner bottle. Print several sheets until it acclimatizes. Check the printer driver's paper settings. See printer driver Help. • Toner is damp. Replace the unit. See the printer driver Help. • The fusing unit is damp. The backs of printed sheets are blemished. • When removing...

Hardware Guide
Page 113
... for speed)]. [PostScript Output Option] is too thin. Make sure there are using a Windows operating system, the settings made using the printer driver. Contact your operating system is not fed from the selected tray. • If you use Windows, select [PostScript (optimize for [Resolution]....PostScript] tab, [PostScript output format:]. • Windows 2000/XP, Windows Server 2003 111 Set the desired input tray using the printer driver have priority over the display panel. If the Data In indicator is blinking, data is given below. Replace the unit. The location ...
... for speed)]. [PostScript Output Option] is too thin. Make sure there are using a Windows operating system, the settings made using the printer driver. Contact your operating system is not fed from the selected tray. • If you use Windows, select [PostScript (optimize for [Resolution]....PostScript] tab, [PostScript output format:]. • Windows 2000/XP, Windows Server 2003 111 Set the desired input tray using the printer driver have priority over the display panel. If the Data In indicator is blinking, data is given below. Replace the unit. The location ...
Hardware Guide
Page 114
... or complex that it takes time to process. If the problem cannot be resolved, contact your sales or service representative. 9 112 In the printer driver's dialog box, on the [Print Quality] tab, in the [Print Priority] list, select [Speed]. 9. Simply wait until printing resumes. To ... In the printer properties dialog box, on the [Print Quality] tab, in the [Document type] list, select [Fast]. • See the printer driver Help. • The data is being processed. Troubleshooting In the printer properties dialog box, on the [Print Quality] tab, click the [Change User Settings...
... or complex that it takes time to process. If the problem cannot be resolved, contact your sales or service representative. 9 112 In the printer driver's dialog box, on the [Print Quality] tab, in the [Print Priority] list, select [Speed]. 9. Simply wait until printing resumes. To ... In the printer properties dialog box, on the [Print Quality] tab, in the [Document type] list, select [Fast]. • See the printer driver Help. • The data is being processed. Troubleshooting In the printer properties dialog box, on the [Print Quality] tab, click the [Change User Settings...
Software Guide
Page 1
Operating Instructions Software Guide 1 Preparing for Printing 2 Setting Up the Printer Driver 3 Other Print Operations 4 Making Printer Settings Using the Control Panel 5 Monitoring and Configuring the Printer 6 Using a Printer Server 7 Special Operations under Windows 8 Mac OS Configuration 9 Appendix Read this manual carefully before using the machine. For safe and correct use, be sure to read the Safety Information before you use this machine and keep it handy for future reference.
Operating Instructions Software Guide 1 Preparing for Printing 2 Setting Up the Printer Driver 3 Other Print Operations 4 Making Printer Settings Using the Control Panel 5 Monitoring and Configuring the Printer 6 Using a Printer Server 7 Special Operations under Windows 8 Mac OS Configuration 9 Appendix Read this manual carefully before using the machine. For safe and correct use, be sure to read the Safety Information before you use this machine and keep it handy for future reference.
Software Guide
Page 2
... in this manual. Pentium is prohibited by local law: bank notes, revenue stamps, bonds, stock certificates, bank drafts, checks, passports, driver's licenses. in a handy place for direct, indirect, special, incidental, or consequential damages as a guide only and is a registered trademark...responsibility for identification purposes only and might not be trademarks of their respective companies. and/or other than genuine Ricoh parts with your Ricoh office products. Keep this manual carefully before using the machine. Microsoft, Windows, Windows NT are either registered ...
... in this manual. Pentium is prohibited by local law: bank notes, revenue stamps, bonds, stock certificates, bank drafts, checks, passports, driver's licenses. in a handy place for direct, indirect, special, incidental, or consequential damages as a guide only and is a registered trademark...responsibility for identification purposes only and might not be trademarks of their respective companies. and/or other than genuine Ricoh parts with your Ricoh office products. Keep this manual carefully before using the machine. Microsoft, Windows, Windows NT are either registered ...
Software Guide
Page 6
... Client 31 Using the Standard TCP/IP Port...33 Installing the PCL or RPCS Printer Driver...33 Installing the PostScript 3 Printer Driver (Windows 2000 34 Installing the PostScript 3 Printer Driver (Windows XP, Windows Server 2003 35 Using the LPR Port...37 Installing the PCL or...as the Windows Network Printer...41 Installing the PCL or RPCS Printer Driver...41 Installing the PostScript 3 Printer Driver (Windows 95/98/Me 42 Installing the PostScript 3 Printer Driver (Windows 2000 43 Installing the PostScript 3 Printer Driver (Windows XP, Windows Server 2003 44 4 IPP 27 Installing the ...
... Client 31 Using the Standard TCP/IP Port...33 Installing the PCL or RPCS Printer Driver...33 Installing the PostScript 3 Printer Driver (Windows 2000 34 Installing the PostScript 3 Printer Driver (Windows XP, Windows Server 2003 35 Using the LPR Port...37 Installing the PCL or...as the Windows Network Printer...41 Installing the PCL or RPCS Printer Driver...41 Installing the PostScript 3 Printer Driver (Windows 95/98/Me 42 Installing the PostScript 3 Printer Driver (Windows 2000 43 Installing the PostScript 3 Printer Driver (Windows XP, Windows Server 2003 44 4 IPP 27 Installing the ...
Software Guide
Page 7
...Printing with Parallel Connection...54 Installing the PCL or RPCS Printer Driver...54 Installing the PostScript 3 Printer Driver (Windows 95/98/Me 55 Installing the PostScript 3 Printer Driver (Windows 2000 56 Installing the PostScript 3 Printer Driver (Windows XP, Windows Server 2003 56 If a Message ... as the NetWare Print Server/Remote Printer 46 When using the PostScript 3 Printer Driver 47 Form Feed...48 Banner Page...48 Printing after Resetting the Printer...48 Installing the Printer Driver Using USB...49 Windows Me - Setting Up for Bidirectional Communication 59 If Bidirectional...
...Printing with Parallel Connection...54 Installing the PCL or RPCS Printer Driver...54 Installing the PostScript 3 Printer Driver (Windows 95/98/Me 55 Installing the PostScript 3 Printer Driver (Windows 2000 56 Installing the PostScript 3 Printer Driver (Windows XP, Windows Server 2003 56 If a Message ... as the NetWare Print Server/Remote Printer 46 When using the PostScript 3 Printer Driver 47 Form Feed...48 Banner Page...48 Printing after Resetting the Printer...48 Installing the Printer Driver Using USB...49 Windows Me - Setting Up for Bidirectional Communication 59 If Bidirectional...


