Manuals
Page 3
...Options...6 Model-Specific Information...7 Guide to Names and Functions of Components 9 Guide to Components...9 Guide to the Names and Functions of the Printer's Control Panel 11 Using the Screen on the Control Panel...14 How to Use the [Home] Screen...14 How to Use the Screens ... Power...25 Turning On the Power...25 Turning Off the Power...25 Saving Energy...26 Displaying the Printer Configuration Screens 28 Displaying the Printer Driver Properties with Windows 28 Displaying the Printer Driver Properties with Mac OS X 30 2. Printing Paper Specification...31 Supported Paper for Each Input...
...Options...6 Model-Specific Information...7 Guide to Names and Functions of Components 9 Guide to Components...9 Guide to the Names and Functions of the Printer's Control Panel 11 Using the Screen on the Control Panel...14 How to Use the [Home] Screen...14 How to Use the Screens ... Power...25 Turning On the Power...25 Turning Off the Power...25 Saving Energy...26 Displaying the Printer Configuration Screens 28 Displaying the Printer Driver Properties with Windows 28 Displaying the Printer Driver Properties with Mac OS X 30 2. Printing Paper Specification...31 Supported Paper for Each Input...
Manuals
Page 4
... Density Changes...80 If USB Connection Fails...81 When Messages Are Displayed...82 2 Troubleshooting When Indicators Are Displayed...69 When a Panel Tone Beeps...70 Checking Printer Status and Settings...71 When an Indicator for Loading Paper...46 Unusable Paper...46 Paper Storage...47 Loading Paper into Paper Trays...48 Loading Paper...
... Density Changes...80 If USB Connection Fails...81 When Messages Are Displayed...82 2 Troubleshooting When Indicators Are Displayed...69 When a Panel Tone Beeps...70 Checking Printer Status and Settings...71 When an Indicator for Loading Paper...46 Unusable Paper...46 Paper Storage...47 Loading Paper into Paper Trays...48 Loading Paper...
Manuals
Page 7
1. Indicates supplementary explanations of this product and operation manuals provided with the printer, available options, names and functions of data. To the maximum extent permitted by applicable laws, in the functions of the model you are subject to ...
1. Indicates supplementary explanations of this product and operation manuals provided with the printer, available options, names and functions of data. To the maximum extent permitted by applicable laws, in the functions of the model you are subject to ...
Manuals
Page 8
... using this manual might be slightly different from the manufacturer. About IP address In this manual. Read the instructions that might be responsible for this printer and the names commonly used in this machine. List of Options This section provides a list of options for any results from the manufacturer with your...
... using this manual might be slightly different from the manufacturer. About IP address In this manual. Read the instructions that might be responsible for this printer and the names commonly used in this machine. List of Options This section provides a list of options for any results from the manufacturer with your...
Manuals
Page 9
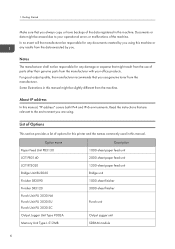
... in the position shown below. Read the label. There is region-specific. The label contains details that corresponds to which your printer. (mainly Europe and Asia) 7 Before You Start Option name Hard Disk Drive Option Type 8300 Hard disk Description Gigabit Ethernet Board Type A Giabit Ethernet Board ... N VM Card Type U IEEE 1284 interface board NetWare card VM card Model-Specific Information This section explains how to identify the region to which your printer belongs.
... in the position shown below. Read the label. There is region-specific. The label contains details that corresponds to which your printer. (mainly Europe and Asia) 7 Before You Start Option name Hard Disk Drive Option Type 8300 Hard disk Description Gigabit Ethernet Board Type A Giabit Ethernet Board ... N VM Card Type U IEEE 1284 interface board NetWare card VM card Model-Specific Information This section explains how to identify the region to which your printer belongs.
Manuals
Page 10
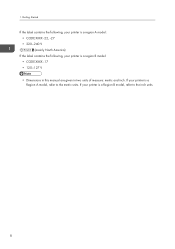
Getting Started If the label contains the following, your printer is a region A model: • CODE XXXX -22, -27 • 220-240 V (mainly North America) If the label contains the following, your printer is a Region B model, refer to the metric units. If your printer is a Region A model, refer to the inch units. 8 If your printer is a region B model: • CODE XXXX -17 • 120-127 V • Dimensions in this manual are given in two units of measure: metric and inch. 1.
Getting Started If the label contains the following, your printer is a region A model: • CODE XXXX -22, -27 • 220-240 V (mainly North America) If the label contains the following, your printer is a Region B model, refer to the metric units. If your printer is a Region A model, refer to the inch units. 8 If your printer is a region B model: • CODE XXXX -17 • 120-127 V • Dimensions in this manual are given in two units of measure: metric and inch. 1.
Manuals
Page 11
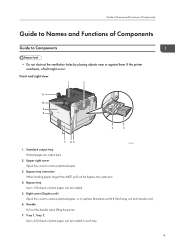
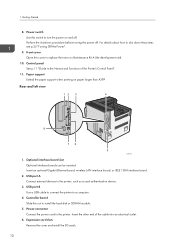
... Names and Functions of Components Guide to replace Maintenance Kit B (the fusing unit and transfer unit). 6. Upper right cover Open this handle when lifting the printer. 7. If the printer overheats, a fault might occur. Bypass tray Up to remove jammed paper. 3.
... Names and Functions of Components Guide to replace Maintenance Kit B (the fusing unit and transfer unit). 6. Upper right cover Open this handle when lifting the printer. 7. If the printer overheats, a fault might occur. Bypass tray Up to remove jammed paper. 3.
Manuals
Page 12
... as a card authentication device. 3. USB port A Connect external devices to shut down the printer, see p.25 "Turning Off the Power". 9. Power connector Connect the power cord to a computer. 4. Expansion card.... 10 Rear and left view 12 3 4 8 76 5 CQT302 1. USB port B Use a USB cable to connect the printer to the printer. Front cover Open this cover to install the hard disk or SDRAM module. 5. Paper support Extend the paper support when printing on... Optional interface board slot Optional interface boards can be inserted. Insert the other end of the Printer's Control Panel". 11.
... as a card authentication device. 3. USB port A Connect external devices to shut down the printer, see p.25 "Turning Off the Power". 9. Power connector Connect the power cord to a computer. 4. Expansion card.... 10 Rear and left view 12 3 4 8 76 5 CQT302 1. USB port B Use a USB cable to connect the printer to the printer. Front cover Open this cover to install the hard disk or SDRAM module. 5. Paper support Extend the paper support when printing on... Optional interface board slot Optional interface boards can be inserted. Insert the other end of the Printer's Control Panel". 11.
Manuals
Page 13
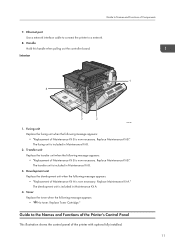
..."Replacement of Components 7. Handle Hold this handle when pulling out the controller board. Guide to the Names and Functions of the Printer's Control Panel This illustration shows the control panel of Maintenance Kit B is now necessary. Guide to Names and Functions of Maintenance... Kit B is now necessary. Fusing unit Replace the fusing unit when the following message appears: • "Replacement of the printer with options fully installed. 11 Replace Maintenance Kit B." Replace Toner Cartridge." Interior 1 4 3 2 CQT301 1. The fusing unit is included in...
..."Replacement of Components 7. Handle Hold this handle when pulling out the controller board. Guide to the Names and Functions of the Printer's Control Panel This illustration shows the control panel of Maintenance Kit B is now necessary. Guide to Names and Functions of Maintenance... Kit B is now necessary. Fusing unit Replace the fusing unit when the following message appears: • "Replacement of the printer with options fully installed. 11 Replace Maintenance Kit B." Replace Toner Cartridge." Interior 1 4 3 2 CQT301 1. The fusing unit is included in...
Manuals
Page 14
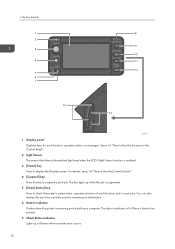
...Press this key to Use the Screens on the Control Panel". 2. See p.16 "How to suspend a print job. The key lights up or flashes when a printer error occurs. 12 Check Status indicator Lights up while the job is receiving print jobs from a computer. Getting Started 1 8 2 9 3 10 4 11 ... the ambient light level when the ECO Night Sensor function is data to check the printer's system status, operational status of each function, operation status, or messages. Data In indicator Flashes when the printer is suspended. 5. [Check Status] key Press to be printed. 7. 1. Display ...
...Press this key to Use the Screens on the Control Panel". 2. See p.16 "How to suspend a print job. The key lights up or flashes when a printer error occurs. 12 Check Status indicator Lights up while the job is receiving print jobs from a computer. Getting Started 1 8 2 9 3 10 4 11 ... the ambient light level when the ECO Night Sensor function is data to check the printer's system status, operational status of each function, operation status, or messages. Data In indicator Flashes when the printer is suspended. 5. [Check Status] key Press to be printed. 7. 1. Display ...
Manuals
Page 15
... to log in or log out. 11. [User Tools] key Press to change the default settings to meet your requirements. When the printer is not possible. See "Displaying the Printer Configuration Screens Using the Control Panel", Operating Instructions. 12. [Simple Screen] key Press to switch to insert an SD card or a USB.... 14. Media slots Use to the simple screen. See p.18 "Switching Screen Patterns". 13. It is unlit when the power is off or while the printer is inserted in energy saver mode. 9. [Energy Saver] key Press to switch to and from Sleep mode. Flashing yellow: the...
... to log in or log out. 11. [User Tools] key Press to change the default settings to meet your requirements. When the printer is not possible. See "Displaying the Printer Configuration Screens Using the Control Panel", Operating Instructions. 12. [Simple Screen] key Press to switch to insert an SD card or a USB.... 14. Media slots Use to the simple screen. See p.18 "Switching Screen Patterns". 13. It is unlit when the power is off or while the printer is inserted in energy saver mode. 9. [Energy Saver] key Press to switch to and from Sleep mode. Flashing yellow: the...
Manuals
Page 16
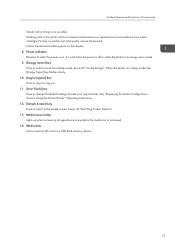
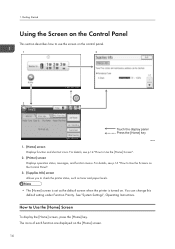
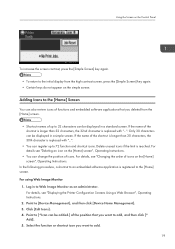
... and shortcut icons. 1. The icons of each function are displayed on the Control Panel". 3. [Supplies Info] screen Allows you to Use the [Home] Screen". 2. [Printer] screen Displays operation status, messages, and function menus. Getting Started Using the Screen on . You can change this default setting under Function Priority. For details..., such as toner and paper levels. • The [Home] screen is set as the default screen when the printer is turned on the Control Panel This section describes how to Use the [Home] Screen To display the [Home] screen, press the [Home] key. ...
... and shortcut icons. 1. The icons of each function are displayed on the Control Panel". 3. [Supplies Info] screen Allows you to Use the [Home] Screen". 2. [Printer] screen Displays operation status, messages, and function menus. Getting Started Using the Screen on . You can change this default setting under Function Priority. For details..., such as toner and paper levels. • The [Home] screen is set as the default screen when the printer is turned on the Control Panel This section describes how to Use the [Home] Screen To display the [Home] screen, press the [Home] key. ...
Manuals
Page 17
...pressing the shortcut icons. • Do not apply strong impact or force to the [Home] screen. System Reset After finishing a job, the printer waits a specified length of added shortcuts appear on the [Home] screen. Shortcut icon area You can change the image, see "System Settings", Operating... "Changing the order of icons. Supply Information icon Press to display the [Supplies Info] screen to check toner and paper levels. 2. [Printer] Press to the [Home] screen. For the procedure for specifying default settings under Function Priority. Home screen image You can display an image...
...pressing the shortcut icons. • Do not apply strong impact or force to the [Home] screen. System Reset After finishing a job, the printer waits a specified length of added shortcuts appear on the [Home] screen. Shortcut icon area You can change the image, see "System Settings", Operating... "Changing the order of icons. Supply Information icon Press to display the [Supplies Info] screen to check toner and paper levels. 2. [Printer] Press to the [Home] screen. For the procedure for specifying default settings under Function Priority. Home screen image You can display an image...
Manuals
Page 18
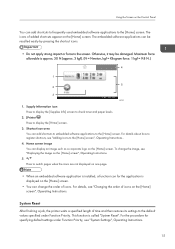
...Dump is set as cannot be damaged. See "System Settings", Operating Instructions. Getting Started To change the length of time that the printer waits before restoring its settings to Use the Screens on memory storage devices directly. 5. [Job Reset] Press to display print jobs ... 3. Keys • Do not apply strong impact or force to display the [Supplies Info] screen. 4. [Prt. Operational status or messages Displays current printer status, such as selector keys. Press to the screen. When you press it may be used. . Maximum force allowable is approx. 30N (approx....
...Dump is set as cannot be damaged. See "System Settings", Operating Instructions. Getting Started To change the length of time that the printer waits before restoring its settings to Use the Screens on memory storage devices directly. 5. [Job Reset] Press to display print jobs ... 3. Keys • Do not apply strong impact or force to display the [Supplies Info] screen. 4. [Prt. Operational status or messages Displays current printer status, such as selector keys. Press to the screen. When you press it may be used. . Maximum force allowable is approx. 30N (approx....
Manuals
Page 19
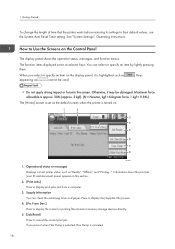
... Paper Reduction: Shows the amount of paper saved by utilizing various paper conserving function of 2-sided prints to the printer. When the ratio is displayed when you can configure the printer to display the error logs and status of prints is turned on the Control Panel 6. [Job Operation] Press ... is 76% or more, the flower starts to bloom. • 2 sided Utilization: The ratio of the printer. As the percentage increases, the stack of all the data left in the printer's input buffer. 8. [Other Functns.] Press to notify users how much they have conserved paper usage by using the...
... Paper Reduction: Shows the amount of paper saved by utilizing various paper conserving function of 2-sided prints to the printer. When the ratio is displayed when you can configure the printer to display the error logs and status of prints is turned on the Control Panel 6. [Job Operation] Press ... is 76% or more, the flower starts to bloom. • 2 sided Utilization: The ratio of the printer. As the percentage increases, the stack of all the data left in the printer's input buffer. 8. [Other Functns.] Press to notify users how much they have conserved paper usage by using the...

Manuals
Page 20
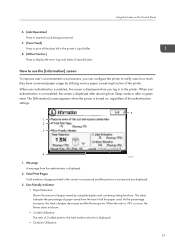
... the simple screen and the keys that are displayed. 5. [Exit] Press this to close the [Information] screen and return to the total number of the [Printer] screen. 18 CQT663 This illustration shows the simple display of prints is displayed. 4. Count periods The current and previous count periods are displayed. For details... the usage status. Only the administrator can check "Count Period", "Administrator Message", "Display Information Screen", and "Display Time". Letters and keys are presented on the printer settings, the [Information] screen may not be displayed.
... the simple screen and the keys that are displayed. 5. [Exit] Press this to close the [Information] screen and return to the total number of the [Printer] screen. 18 CQT663 This illustration shows the simple display of prints is displayed. 4. Count periods The current and previous count periods are displayed. For details... the usage status. Only the administrator can check "Count Period", "Administrator Message", "Display Information Screen", and "Display Time". Letters and keys are presented on the printer settings, the [Information] screen may not be displayed.
Manuals
Page 21
... contrast screen, press the [Simple Screen] key again. • Certain keys do not appear on the [Home] screen", Operating Instructions. For details, see "Displaying the Printer Configuration Screens Using a Web Browser", Operating Instructions. 2. Point to add. 19 Click [Edit Icons]. 4. Delete unused icons if the limit is registered to Web Image...
... contrast screen, press the [Simple Screen] key again. • Certain keys do not appear on the [Home] screen", Operating Instructions. For details, see "Displaying the Printer Configuration Screens Using a Web Browser", Operating Instructions. 2. Point to add. 19 Click [Edit Icons]. 4. Delete unused icons if the limit is registered to Web Image...
Manuals
Page 22
... position on the upper-right corner of the [Select Destination] screen to add. 5. Press [Select Icon to access the [Edit Home] screen, see "Displaying the Printer Configuration Screens Using the Control Panel", Operating Instructions. 2. Getting Started 6. For details about how to Add]. 3. Press [Exit]. 8.
... position on the upper-right corner of the [Select Destination] screen to add. 5. Press [Select Icon to access the [Edit Home] screen, see "Displaying the Printer Configuration Screens Using the Control Panel", Operating Instructions. 2. Getting Started 6. For details about how to Add]. 3. Press [Exit]. 8.
Manuals
Page 23
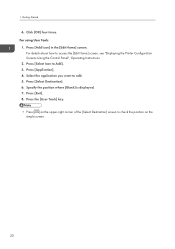
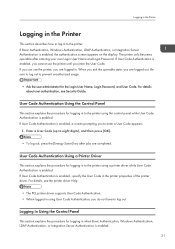
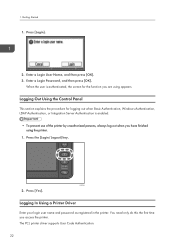
... you are completed. Enter a User Code (up to log out. For details, see Security Guide. Logging in the Printer Logging in the Printer This section describes how to log in to prevent unauthorized usage. • Ask the user administrator for the Login User Name..., LDAP Authentication, or Integration Server Authentication is enabled. 21 User Code Authentication Using a Printer Driver This section explains the procedure for logging in the printer properties of the printer driver. User Code Authentication Using the Control Panel This section explains the procedure for logging in...
... you are completed. Enter a User Code (up to log out. For details, see Security Guide. Logging in the Printer Logging in the Printer This section describes how to log in to prevent unauthorized usage. • Ask the user administrator for the Login User Name..., LDAP Authentication, or Integration Server Authentication is enabled. 21 User Code Authentication Using a Printer Driver This section explains the procedure for logging in the printer properties of the printer driver. User Code Authentication Using the Control Panel This section explains the procedure for logging in...
Manuals
Page 24
..., LDAP Authentication, or Integration Server Authentication is authenticated, the screen for the function you are using the printer. 1. CQT599 2. Logging In Using a Printer Driver Enter your login user name and password as registered in the printer. Enter a Login Password, and then press [OK]. 1. When the user is enabled. • To prevent use of...
..., LDAP Authentication, or Integration Server Authentication is authenticated, the screen for the function you are using the printer. 1. CQT599 2. Logging In Using a Printer Driver Enter your login user name and password as registered in the printer. Enter a Login Password, and then press [OK]. 1. When the user is enabled. • To prevent use of...


