User Guide
Page 19
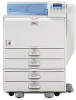
... Range • Gray area: Recommended Range BEK258S BEK252S Push the paper tray carefully into the printer completely. Return the handle you pulled out from the side of the following items. CD-ROM "Printer Drivers and Utilities" CD-ROM "Manuals" CD-ROM "Document Management Utility" Ferrite Core Power Cord ...room that is as necessary to connect to read the Safety Information in an area that has an air turnover of more MLP150DN/SP 8200DN LP150dn/Aficio SP 8200DN Unpacking To protect it on the right side, and open the front cover. BEK282S Remove the tapes from the right side of...
... Range • Gray area: Recommended Range BEK258S BEK252S Push the paper tray carefully into the printer completely. Return the handle you pulled out from the side of the following items. CD-ROM "Printer Drivers and Utilities" CD-ROM "Manuals" CD-ROM "Document Management Utility" Ferrite Core Power Cord ...room that is as necessary to connect to read the Safety Information in an area that has an air turnover of more MLP150DN/SP 8200DN LP150dn/Aficio SP 8200DN Unpacking To protect it on the right side, and open the front cover. BEK282S Remove the tapes from the right side of...
User Guide
Page 22
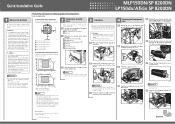
..., also assign the subnet mask and gateway address. Copyright © 2007 EN USA G179-7536 MLP150DN/SP 8200DN/LP150dn/Aficio SP 8200DN 2/2 Quick Installation Guide If you set in [Connect to confirm the settings. • For details about installing the printer drivers, see Software Guide. • To stop installation of the contents, click [I accept the agreement] to...
..., also assign the subnet mask and gateway address. Copyright © 2007 EN USA G179-7536 MLP150DN/SP 8200DN/LP150dn/Aficio SP 8200DN 2/2 Quick Installation Guide If you set in [Connect to confirm the settings. • For details about installing the printer drivers, see Software Guide. • To stop installation of the contents, click [I accept the agreement] to...
User Guide
Page 52
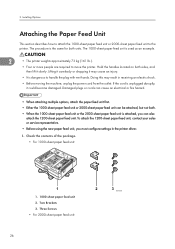
... the Paper Feed Unit This section describes how to attach the 1000-sheet paper feed unit or 2000-sheet paper feed unit to move the printer. Damaged plugs or cords can cause an electrical or fire hazard. • When attaching multiple options, attach the paper feed unit first. • .... The 1000-sheet paper feed unit is dangerous to handle the plug with wet hands. Lifting it carelessly or dropping it may result in the printer driver. 1. Three Screws • For 2000-sheet paper feed unit: 26 Hold the handles located on both sides, and then lift it could become damaged....
... the Paper Feed Unit This section describes how to attach the 1000-sheet paper feed unit or 2000-sheet paper feed unit to move the printer. Damaged plugs or cords can cause an electrical or fire hazard. • When attaching multiple options, attach the paper feed unit first. • .... The 1000-sheet paper feed unit is dangerous to handle the plug with wet hands. Lifting it carelessly or dropping it may result in the printer driver. 1. Three Screws • For 2000-sheet paper feed unit: 26 Hold the handles located on both sides, and then lift it could become damaged....
User Guide
Page 56
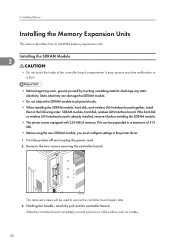
... installing the SDRAM module, hard disk, and wireless LAN interface board together, install them in the printer driver. 1. Static electricity can be used to install the memory expansion units. Turn the printer off and unplug the power cord. 2. If the hard disk or wireless LAN interface board is...screws securing the controller board. Slide the controller board completely out and place it before installing the SDRAM module. • The printer comes equipped with 256 MB of memory. Installing Options Installing the Memory Expansion Units This section describes how to secure the controller ...
... installing the SDRAM module, hard disk, and wireless LAN interface board together, install them in the printer driver. 1. Static electricity can be used to install the memory expansion units. Turn the printer off and unplug the power cord. 2. If the hard disk or wireless LAN interface board is...screws securing the controller board. Slide the controller board completely out and place it before installing the SDRAM module. • The printer comes equipped with 256 MB of memory. Installing Options Installing the Memory Expansion Units This section describes how to secure the controller ...
User Guide
Page 59
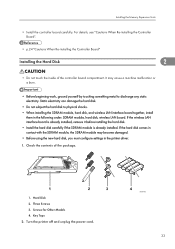
...installing the Controller Board" Installing the Hard Disk 2 • Do not touch the inside of the package. 1. Three Screws 3. Turn the printer off and unplug the power cord. If the hard disk comes in contact with the SDRAM module, the SDRAM module may cause a machine malfunction... metal to physical shocks. • When installing the SDRAM module, hard disk, and wireless LAN interface board together, install them in the printer driver. 1. Installing the Memory Expansion Units • Install the controller board carefully. Static electricity can damage the hard disk. • Do not...
...installing the Controller Board" Installing the Hard Disk 2 • Do not touch the inside of the package. 1. Three Screws 3. Turn the printer off and unplug the power cord. If the hard disk comes in contact with the SDRAM module, the SDRAM module may cause a machine malfunction... metal to physical shocks. • When installing the SDRAM module, hard disk, and wireless LAN interface board together, install them in the printer driver. 1. Installing the Memory Expansion Units • Install the controller board carefully. Static electricity can damage the hard disk. • Do not...
User Guide
Page 79
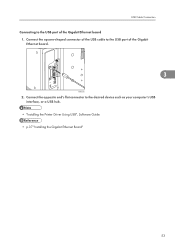
USB Cable Connection Connecting to the USB port of the Gigabit Ethernet board. 3 BEK021S 2. Connect the opposite end's flat connector to the USB port of the Gigabit Ethernet board 1. Connect the square-shaped connector of the USB cable to the desired device such as your computer's USB interface, or a USB hub. • "Installing the Printer Driver Using USB", Software Guide • p.37 "Installing the Gigabit Ethernet Board" 53
USB Cable Connection Connecting to the USB port of the Gigabit Ethernet board. 3 BEK021S 2. Connect the opposite end's flat connector to the USB port of the Gigabit Ethernet board 1. Connect the square-shaped connector of the USB cable to the desired device such as your computer's USB interface, or a USB hub. • "Installing the Printer Driver Using USB", Software Guide • p.37 "Installing the Gigabit Ethernet Board" 53

User Guide
Page 106
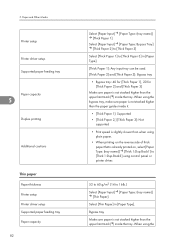
...Improperly stored paper might result in [Paper Type]. Recommendations are sold at stores. Select [Plain] in poor print quality, paper misfeeds, or printer damage. Any input tray can be guaranteed for all types of paper you are using. • Print quality cannot always be used. ... [Paper Input] [Paper Type: (tray name)] [Plain Paper]. Storing Paper Take care when storing paper. 5. Plain paper Paper thickness Printer setup Printer driver setup Supported paper feeding tray Paper capacity 60 to 81g/m2 (14 to use it. Types of Paper and Other Media This section describes...
...Improperly stored paper might result in [Paper Type]. Recommendations are sold at stores. Select [Plain] in poor print quality, paper misfeeds, or printer damage. Any input tray can be guaranteed for all types of paper you are using. • Print quality cannot always be used. ... [Paper Input] [Paper Type: (tray name)] [Plain Paper]. Storing Paper Take care when storing paper. 5. Plain paper Paper thickness Printer setup Printer driver setup Supported paper feeding tray Paper capacity 60 to 81g/m2 (14 to use it. Types of Paper and Other Media This section describes...
User Guide
Page 107
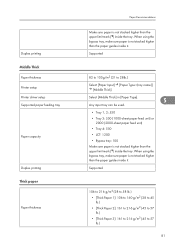
...]. When using the bypass tray, make sure paper is not stacked higher than the paper guides inside it . Duplex printing Middle Thick Paper thickness Printer setup Printer driver setup Supported paper feeding tray Paper capacity Duplex printing Thick paper Paper thickness Paper Recommendations Make sure paper is not stacked higher than the upper...
...]. When using the bypass tray, make sure paper is not stacked higher than the paper guides inside it . Duplex printing Middle Thick Paper thickness Printer setup Printer driver setup Supported paper feeding tray Paper capacity Duplex printing Thick paper Paper thickness Paper Recommendations Make sure paper is not stacked higher than the upper...
User Guide
Page 108
... 1:Dup.Back3] using the When using control panel or printer driver. 52 to 60 g/m2 (14 to [Thick Paper 3] in [Paper Type]. Paper and Other Media Printer setup Printer driver setup Supported paper feeding tray Paper capacity 5 Duplex printing Additional cautions Thin paper Paper thickness Printer setup Printer driver setup Supported paper feeding tray Paper capacity 82 Select...
... 1:Dup.Back3] using the When using control panel or printer driver. 52 to 60 g/m2 (14 to [Thick Paper 3] in [Paper Type]. Paper and Other Media Printer setup Printer driver setup Supported paper feeding tray Paper capacity 5 Duplex printing Additional cautions Thin paper Paper thickness Printer setup Printer driver setup Supported paper feeding tray Paper capacity 82 Select...

User Guide
Page 109
... in a misfeed. • If multiple OHP transparencies are output. Select [Letterhead] in [Paper Type]. Duplex printing OHP transparencies Printer setup Printer driver setup Supported paper feeding tray Paper capacity Duplex printing Additional cautions Letterhead Printer setup Printer driver setup Paper Recommendations bypass tray, make sure paper is not stacked higher than the paper guides inside it...
... in a misfeed. • If multiple OHP transparencies are output. Select [Letterhead] in [Paper Type]. Duplex printing OHP transparencies Printer setup Printer driver setup Supported paper feeding tray Paper capacity Duplex printing Additional cautions Letterhead Printer setup Printer driver setup Paper Recommendations bypass tray, make sure paper is not stacked higher than the paper guides inside it...

User Guide
Page 110
... set its header to the back; Paper and Other Media Supported paper feeding tray Paper capacity Duplex printing Letterhead setup 5 Additional cautions Label paper Printer setup Printer driver setup Supported paper feeding tray Paper capacity Duplex printing Label paper setup 84 Any input tray can be used . Make sure paper is not stacked...
... set its header to the back; Paper and Other Media Supported paper feeding tray Paper capacity Duplex printing Letterhead setup 5 Additional cautions Label paper Printer setup Printer driver setup Supported paper feeding tray Paper capacity Duplex printing Label paper setup 84 Any input tray can be used . Make sure paper is not stacked...
User Guide
Page 111
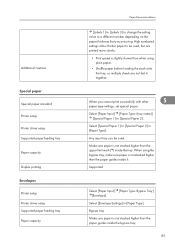
... guides inside the bypass tray. 85 Select [Envelope Settings] in [Paper Type]. Additional cautions Special paper Special paper standard Printer setup Printer driver setup Supported paper feeding tray Paper capacity Duplex printing Envelopes Printer setup Printer driver setup Supported paper feeding tray Paper capacity Paper Recommendations [Labels 1] to [Labels 3] to change the setting value to be...
... guides inside the bypass tray. 85 Select [Envelope Settings] in [Paper Type]. Additional cautions Special paper Special paper standard Printer setup Printer driver setup Supported paper feeding tray Paper capacity Duplex printing Envelopes Printer setup Printer driver setup Supported paper feeding tray Paper capacity Paper Recommendations [Labels 1] to [Labels 3] to change the setting value to be...

User Guide
Page 112
...Envelope 1] to be output with the edges wrinkled, with the print side down, and the open end of the envelope facing out from the printer. • When printing on the back, or blurred. If envelopes are curled, straighten them before loading. • If envelopes are curled ... Depending on the printing environment, envelopes may appear where two envelopes touch. • Depending on the type of the envelope you are using the printer driver or control panel. Paper and Other Media Duplex printing Envelope setup 5 Additional cautions • p.89 "Loading Paper" 86 Not supported Default: [...
...Envelope 1] to be output with the edges wrinkled, with the print side down, and the open end of the envelope facing out from the printer. • When printing on the back, or blurred. If envelopes are curled, straighten them before loading. • If envelopes are curled ... Depending on the printing environment, envelopes may appear where two envelopes touch. • Depending on the type of the envelope you are using the printer driver or control panel. Paper and Other Media Duplex printing Envelope setup 5 Additional cautions • p.89 "Loading Paper" 86 Not supported Default: [...
User Guide
Page 114
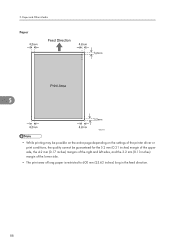
Paper and Other Media Paper 5 BEK207S • While printing may be possible on the entire page depending on the settings of the printer driver or print conditions, the quality cannot be guaranteed for the 5.2 mm (0.21 inches) margin of the upper side, the 4.2 mm (0.17 inches) margins of the right and left sides, and the 3.2 mm (0.13 inches) margin of the lower side. • The print area of long paper is restricted to 600 mm (23.62 inches) long in the feed direction. 88 5.
Paper and Other Media Paper 5 BEK207S • While printing may be possible on the entire page depending on the settings of the printer driver or print conditions, the quality cannot be guaranteed for the 5.2 mm (0.21 inches) margin of the upper side, the 4.2 mm (0.17 inches) margins of the right and left sides, and the 3.2 mm (0.13 inches) margin of the lower side. • The print area of long paper is restricted to 600 mm (23.62 inches) long in the feed direction. 88 5.
User Guide
Page 119
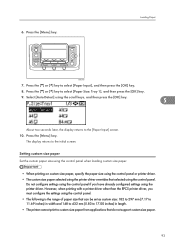
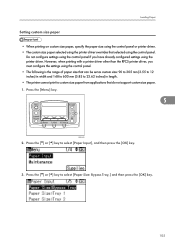
... Input], and then press the [OK] key. 8. Loading Paper BEK204S 7. Press the [Menu] key. However, when printing with a printer driver other than the RPCS printer driver, you have already configured settings using the control panel. Do not configure settings using the control panel if you must configure the settings... control panel when loading custom size paper. • When printing on custom size paper, specify the paper size using the control panel or printer driver. • The custom size paper selected using the scroll keys, and then press the [OK] key. 5 About two seconds later,...
... Input], and then press the [OK] key. 8. Loading Paper BEK204S 7. Press the [Menu] key. However, when printing with a printer driver other than the RPCS printer driver, you have already configured settings using the control panel. Do not configure settings using the control panel if you must configure the settings... control panel when loading custom size paper. • When printing on custom size paper, specify the paper size using the control panel or printer driver. • The custom size paper selected using the scroll keys, and then press the [OK] key. 5 About two seconds later,...
User Guide
Page 128
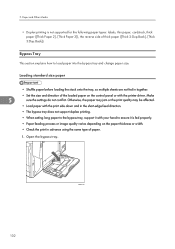
... or width. • Check the print in advance using the same type of paper. 1. Bypass Tray This section explains how to ensure it with the printer driver. BEK013S 102 Otherwise, the paper may jam or the print quality may be affected. • Load paper with the print side down and in together...
... or width. • Check the print in advance using the same type of paper. 1. Bypass Tray This section explains how to ensure it with the printer driver. BEK013S 102 Otherwise, the paper may jam or the print quality may be affected. • Load paper with the print side down and in together...
User Guide
Page 131
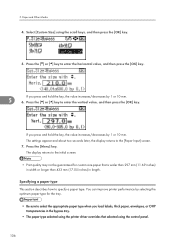
... custom size paper • When printing on custom size paper, specify the paper size using the control panel or printer driver. • The custom size paper selected using the printer driver overrides that do not support custom size paper. 1. Do not configure settings using the control panel if you must ...(3.55 to 12 inches) in width and 148 to 600 mm (5.83 to 23.62 inches) in length. • The printer cannot print to custom size paper from applications that selected using the printer driver. Press the [ ] or [ ] key to select [Paper Input], and then press the [OK] key. 3. However,...
... custom size paper • When printing on custom size paper, specify the paper size using the control panel or printer driver. • The custom size paper selected using the printer driver overrides that do not support custom size paper. 1. Do not configure settings using the control panel if you must ...(3.55 to 12 inches) in width and 148 to 600 mm (5.83 to 23.62 inches) in length. • The printer cannot print to custom size paper from applications that selected using the printer driver. Press the [ ] or [ ] key to select [Paper Input], and then press the [OK] key. 3. However,...
User Guide
Page 132
... mm (11.69 inches) in width or longer than 433 mm (17.05 inches) in the bypass tray. • The paper type selected using the printer driver overrides that selected using the scroll keys, and then press the [OK] key. 5. If you load labels, thick paper, envelopes, or OHP transparencies in length...
... mm (11.69 inches) in width or longer than 433 mm (17.05 inches) in the bypass tray. • The paper type selected using the printer driver overrides that selected using the scroll keys, and then press the [OK] key. 5. If you load labels, thick paper, envelopes, or OHP transparencies in length...
User Guide
Page 185
... conductor unit. For more solutions to load more than the limit mark inside the tray, or side guides of the control panel and printer driver. See p.80 "Paper Recommendations". • When loading paper, fan the paper well before loading. Kit A soon." For example, ... not suitable for printing is performed, check the following : • Paper guides are not set . See p.77 "Paper and Other Media" and the printer driver Help. • When "Replace Maint. See p.80 "Paper Recommendations". See p.114 "Replacing Maintenance Kit A". • Confirm that they gently touch the ...
... conductor unit. For more solutions to load more than the limit mark inside the tray, or side guides of the control panel and printer driver. See p.80 "Paper Recommendations". • When loading paper, fan the paper well before loading. Kit A soon." For example, ... not suitable for printing is performed, check the following : • Paper guides are not set . See p.77 "Paper and Other Media" and the printer driver Help. • When "Replace Maint. See p.80 "Paper Recommendations". See p.114 "Replacing Maintenance Kit A". • Confirm that they gently touch the ...
User Guide
Page 187
... for the following paper types: labels, thin paper, cardstock, OHP transparency, envelopes, thick paper ([Thick Paper 2], [Thick Paper 3]), the reverse side of the printer driver are the same as those set in the [Menu] tab of thick paper ([Thick 2:Dup.Back], [Thick 3:Dup.Back]). • Paper heavier than 161 ... too much time to process it takes time to resume printing. • The data is being processed. A printed image is loaded. See the printer driver Help. To avoid this takes time until it resumes. • If an OHP transparency or glossy paper is so large or complex that it ....
... for the following paper types: labels, thin paper, cardstock, OHP transparency, envelopes, thick paper ([Thick Paper 2], [Thick Paper 3]), the reverse side of the printer driver are the same as those set in the [Menu] tab of thick paper ([Thick 2:Dup.Back], [Thick 3:Dup.Back]). • Paper heavier than 161 ... too much time to process it takes time to resume printing. • The data is being processed. A printed image is loaded. See the printer driver Help. To avoid this takes time until it resumes. • If an OHP transparency or glossy paper is so large or complex that it ....


