

Network Guide
Page 51
... e-mail address, user name and password for receiving Internet faxes. Enter the text, and then press [OK]. Press [Exit]. 10. Enter up to delete. The confirmation message about deleting appears. 8. Press [System Settings]. 3. Press [Yes]. 9. Default: [Off] • On If you cannot send e-mail if the specified sender's e-mail address is...
... e-mail address, user name and password for receiving Internet faxes. Enter the text, and then press [OK]. Press [Exit]. 10. Enter up to delete. The confirmation message about deleting appears. 8. Press [System Settings]. 3. Press [Yes]. 9. Default: [Off] • On If you cannot send e-mail if the specified sender's e-mail address is...

Network Guide
Page 61
...; Server Name • Search Base • Port Number • Use Secure Connection (SSL) • Authentication • User Name 59 To delete all documents are deleted. 1 A confirmation message appears. For details about this function, consult your administrator. For details about this function, consult your administrator.
...; Server Name • Search Base • Port Number • Use Secure Connection (SSL) • Authentication • User Name 59 To delete all documents are deleted. 1 A confirmation message appears. For details about this function, consult your administrator. For details about this function, consult your administrator.

Network Guide
Page 70
A realm is the network area in which Kerberos authentication is selected. 7. After confirming the network environment, specify the necessary items. You can register up to 5 realms. Programming the Realm This section describes how to be used . Press [Program / ...
A realm is the network area in which Kerberos authentication is selected. 7. After confirming the network environment, specify the necessary items. You can register up to 5 realms. Programming the Realm This section describes how to be used . Press [Program / ...
Network Guide
Page 82
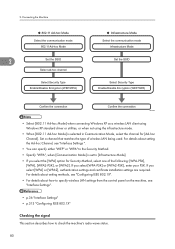
... Security Type Enable/Disable Encryption (WEP/WPA) Select the communication mode Infrastructure Mode Set the SSID Select Security Type Enable/Disable Encryption (WEP/WPA) Confirm the connection Confirm the connection BZU020 • Select [802.11 Ad-hoc Mode] when connecting Windows XP as a wireless LAN client using Windows XP standard driver or...
... Security Type Enable/Disable Encryption (WEP/WPA) Select the communication mode Infrastructure Mode Set the SSID Select Security Type Enable/Disable Encryption (WEP/WPA) Confirm the connection Confirm the connection BZU020 • Select [802.11 Ad-hoc Mode] when connecting Windows XP as a wireless LAN client using Windows XP standard driver or...
Network Guide
Page 123
... Tree: To enable NDS mode, enter the name of the NDS tree you want to log in the list, match the frame types of time). Confirm the settings, and then click [OK]. Use up to 127 characters. • Operation Mode: Specify whether to use the interface board as a print server or...
... Tree: To enable NDS mode, enter the name of the NDS tree you want to log in the list, match the frame types of time). Confirm the settings, and then click [OK]. Use up to 127 characters. • Operation Mode: Specify whether to use the interface board as a print server or...
Network Guide
Page 124
.... • If you cannot identify the printer you want to auto complete login dialog boxes by retaining user names and passwords. This function reduces security. Confirm the settings, and then click [OK]. Wait several minutes before restarting Web Image Monitor. 7. Configuration is correct, enter the following from the command prompt: F:> USERLIST...
.... • If you cannot identify the printer you want to auto complete login dialog boxes by retaining user names and passwords. This function reduces security. Confirm the settings, and then click [OK]. Wait several minutes before restarting Web Image Monitor. 7. Configuration is correct, enter the following from the command prompt: F:> USERLIST...

Network Guide
Page 126
...: load pserver [print server name] Setting up using Web Image Monitor 3 1. If the print server is now complete. A dialog box for the computer and printer. Confirm the settings, and then click [OK]. 3. In the menu area, click [Configuration]. 5. Under "Network", click [NetWare]. 6. Quit Web Image Monitor. • If you cannot identify...
...: load pserver [print server name] Setting up using Web Image Monitor 3 1. If the print server is now complete. A dialog box for the computer and printer. Confirm the settings, and then click [OK]. 3. In the menu area, click [Configuration]. 5. Under "Network", click [NetWare]. 6. Quit Web Image Monitor. • If you cannot identify...

Network Guide
Page 127
... for creating a printer. 3. Press the [Esc] key to return to a printer. 7. Press the [Insert] key to the [Available Options] menu. 6. Follow the instructions on the confirmation message. 15. Press the [Esc] key until "Exit?" Press [Insert] key, and then enter a print queue name. 3 5. To create a new print server, press the [Insert...
... for creating a printer. 3. Press the [Esc] key to return to a printer. 7. Press the [Insert] key to the [Available Options] menu. 6. Follow the instructions on the confirmation message. 15. Press the [Esc] key until "Exit?" Press [Insert] key, and then enter a print queue name. 3 5. To create a new print server, press the [Insert...

Network Guide
Page 128
... entering the following from the printer. • If no printer names appear in operation, quit and restart it. If the print server is now complete. Confirm the settings, and then click [OK]. To quit CAREE: unload pserver To start CAREE: load pserver [print server name] If the printer works as configured...
... entering the following from the printer. • If no printer names appear in operation, quit and restart it. If the print server is now complete. Confirm the settings, and then click [OK]. To quit CAREE: unload pserver To start CAREE: load pserver [print server name] If the printer works as configured...

Network Guide
Page 130
... then click [Add] in the list, match the frame types of IPX/SPXs for entering the login user name and login password appears. 3. Click [Login]. Confirm the settings, and then click [OK]. Quit Web Image Monitor. • If you cannot identify the printer you want to the created print server. Start...
... then click [Add] in the list, match the frame types of IPX/SPXs for entering the login user name and login password appears. 3. Click [Login]. Confirm the settings, and then click [OK]. Quit Web Image Monitor. • If you cannot identify the printer you want to the created print server. Start...

Network Guide
Page 155
Enter "yes" to confirm saving the changes appears. 5. If you to save the changes, enter "no", and then press the [Enter] key. To make further changes, enter "return" at a ...
Enter "yes" to confirm saving the changes appears. 5. If you to save the changes, enter "no", and then press the [Enter] key. To make further changes, enter "return" at a ...
Network Guide
Page 170
... Use the "lpr" command to quit telnet. Printer Error Detection Function msh> lpr prnerrchk {on ". 4. To continue making changes, enter [return]. Quit telnet msh> logout A confirmation message appears. 4 {yes|no|return} Enter [yes], [no ]. To save the changes and quit telnet, enter [yes]. View Setting msh> lpr Checking host name when...
... Use the "lpr" command to quit telnet. Printer Error Detection Function msh> lpr prnerrchk {on ". 4. To continue making changes, enter [return]. Quit telnet msh> logout A confirmation message appears. 4 {yes|no|return} Enter [yes], [no ]. To save the changes and quit telnet, enter [yes]. View Setting msh> lpr Checking host name when...

Network Guide
Page 172
...password. • Renter the new password to display and configure the PathMTU Discovery service function. 170 4. pathmtu Use the "pathmtu" command to confirm it . • Be sure not to forget or lose the password. • The password can be entered using up to change the ...the password of the administrators using the Supervisor msh> passwd {Administrator ID} • Enter the new password. • Renter the new password to confirm it . For example, "R" is displayed. Monitoring and Configuring the Machine Setting login mode for NDS tree name msh> netware tree "NDS tree ...
...password. • Renter the new password to display and configure the PathMTU Discovery service function. 170 4. pathmtu Use the "pathmtu" command to confirm it . • Be sure not to forget or lose the password. • The password can be entered using up to change the ...the password of the administrators using the Supervisor msh> passwd {Administrator ID} • Enter the new password. • Renter the new password to confirm it . For example, "R" is displayed. Monitoring and Configuring the Machine Setting login mode for NDS tree name msh> netware tree "NDS tree ...

Network Guide
Page 259
... scanner or fax function by e-mail. • It is easy to select the e-mail destination if you want to do not need to register. See "Confirming Transmission Results by e-mail whenever a transmission is selected. 6. Press [System Settings]. 3. Check that [Program / Change] is sent. Select the name whose e-mail address you register...
... scanner or fax function by e-mail. • It is easy to select the e-mail destination if you want to do not need to register. See "Confirming Transmission Results by e-mail whenever a transmission is selected. 6. Press [System Settings]. 3. Check that [Program / Change] is sent. Select the name whose e-mail address you register...

Network Guide
Page 265
.... Press [Change] under "Login User Name". 10. Press [Change] or [Browse Network], and then specify the folder. Press [Folder]. 15. For details about how to confirm, and then press [OK]. 14. Check that you have specified in "Default User Name / Password (Send)" of the destination computer, and then press [OK]. 13...
.... Press [Change] under "Login User Name". 10. Press [Change] or [Browse Network], and then specify the folder. Press [Folder]. 15. For details about how to confirm, and then press [OK]. 14. Check that you have specified in "Default User Name / Password (Send)" of the destination computer, and then press [OK]. 13...

Network Guide
Page 269
... Folder This section describes how to change the protocol. 1. Press the [User Tools/Counter] key. 267 Press [Exit]. 13. Press [FTP] or [NCP]. Registering Folders 5 A confirmation message appears. 2. Press [Exit]. 11. Press [OK]. 12. Changing the protocol will clear all settings made under the previous protocol. 3. Press [Yes]. Press the [User...
... Folder This section describes how to change the protocol. 1. Press the [User Tools/Counter] key. 267 Press [Exit]. 13. Press [FTP] or [NCP]. Registering Folders 5 A confirmation message appears. 2. Press [Exit]. 11. Press [OK]. 12. Changing the protocol will clear all settings made under the previous protocol. 3. Press [Yes]. Press the [User...

Network Guide
Page 270
... is selected. 5 6. Press [Yes]. 10. Press the [User Tools/Counter] key. 268 Press the name key, or enter the registered number using the number keys. A confirmation message appears. 9. Press [Exit]. 12. Press [System Settings]. 3. Registering Addresses and Users for Facsimile/Scanner Functions 2. 5. Check that [Program / Change] is not currently selected. Select...
... is selected. 5 6. Press [Yes]. 10. Press the [User Tools/Counter] key. 268 Press the name key, or enter the registered number using the number keys. A confirmation message appears. 9. Press [Exit]. 12. Press [System Settings]. 3. Registering Addresses and Users for Facsimile/Scanner Functions 2. 5. Check that [Program / Change] is not currently selected. Select...

Network Guide
Page 272
... connection test fails, check the settings, and then try again. 17. Info] on the right side of File Transfer settings applies. Press [Connection Test] to confirm, and then press [OK]. 24. Press [Exit]. Press [Exit]. 26. For details, see "Registering Names". • You can enter up to 64 characters for the...
... connection test fails, check the settings, and then try again. 17. Info] on the right side of File Transfer settings applies. Press [Connection Test] to confirm, and then press [OK]. 24. Press [Exit]. Press [Exit]. 26. For details, see "Registering Names". • You can enter up to 64 characters for the...

Network Guide
Page 274
... for Facsimile/Scanner Functions Changing the protocol This section describes how to delete the registered FTP folder. 1. Press [Change] under "Path". 6. Press [SMB] or [NCP]. 5 A confirmation message appears. 2. Press [Change] under "Server Name". 4.
... for Facsimile/Scanner Functions Changing the protocol This section describes how to delete the registered FTP folder. 1. Press [Change] under "Path". 6. Press [SMB] or [NCP]. 5 A confirmation message appears. 2. Press [Change] under "Server Name". 4.

Network Guide
Page 275
Press [System Settings]. A confirmation message appears. 9. Press the [User Tools/Counter] key. • To delete a name entirely, see "Registering Names". • p.229 "Registering Names" Registering an NCP Folder This ...
Press [System Settings]. A confirmation message appears. 9. Press the [User Tools/Counter] key. • To delete a name entirely, see "Registering Names". • p.229 "Registering Names" Registering an NCP Folder This ...


