
Operating Instructions
Page 72
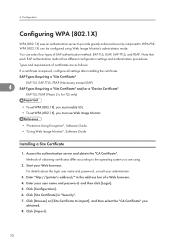
Access the authentication server and obtain the "CA Certificate". For details about the login user name and password, consult your user name and password, and then click [Login]. 5. Click [Configuration]. 6. Click [Import]. 70 WPA (802.1X) can select four types of certificates are using Web Image Monitor's administrator mode. ...
Access the authentication server and obtain the "CA Certificate". For details about the login user name and password, consult your user name and password, and then click [Login]. 5. Click [Configuration]. 6. Click [Import]. 70 WPA (802.1X) can select four types of certificates are using Web Image Monitor's administrator mode. ...
Operating Instructions
Page 73
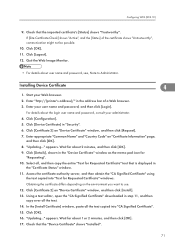
...OK]. 8. In the [Install Certificate] window, paste all the text. 14. Wait for about user name and password, see, Note to use. 12. Start your user name and password, and then click [Login]. Enter appropriate "Common Name" and "Country Code" on the environment you want to ...]. 12. For details about 1 or 2 minutes, and then click [OK]. 17. "Updating..." Wait for about the login user name and password, consult your administrator. 4. Click [Details], shown in "Security". 6. Click [OK]. 16. appears. Check that the "Device Certificate" shows "Installed". 71
...OK]. 8. In the [Install Certificate] window, paste all the text. 14. Wait for about user name and password, see, Note to use. 12. Start your user name and password, and then click [Login]. Enter appropriate "Common Name" and "Country Code" on the environment you want to ...]. 12. For details about 1 or 2 minutes, and then click [OK]. 17. "Updating..." Wait for about the login user name and password, consult your administrator. 4. Click [Details], shown in "Security". 6. Click [OK]. 16. appears. Check that the "Device Certificate" shows "Installed". 71
Operating Instructions
Page 74
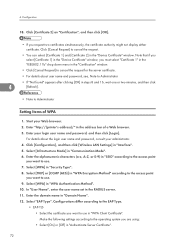
...Certification" window. • Click [Cancel Request] to cancel the request for the server certificate. • For details about the login user name and password, consult your administrator. 4. Select [WPA] in "Domain Name". 12. Select "EAP Type". Click [Certificate 2] on "Certification", and then click ...CCMP (AES)] in "Authenticate Server Certificate". 72 Enter the domain name in "WPA Authentication Method". 10. Start your login user name and password, and then click [Login]. Select [WPA] in the address bar of WPA 1. Make the following settings according to cancel the request. ...
...Certification" window. • Click [Cancel Request] to cancel the request for the server certificate. • For details about the login user name and password, consult your administrator. 4. Select [WPA] in "Domain Name". 12. Select "EAP Type". Click [Certificate 2] on "Certification", and then click ...CCMP (AES)] in "Authenticate Server Certificate". 72 Enter the domain name in "WPA Authentication Method". 10. Start your login user name and password, and then click [Login]. Select [WPA] in the address bar of WPA 1. Make the following settings according to cancel the request. ...
Operating Instructions
Page 75
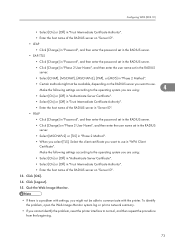
... Certificate Authority". • Enter the host name of the RADIUS server in "Server ID". • PEAP • Click [Change] in "Password", and then enter the password set in the RADIUS server. • Click [Change] on "Phase 2 User Name", and then enter the user name set in the RADIUS...of the RADIUS server on "Server ID". • LEAP • Click [Change] in "Password", and then enter the password set in the RADIUS server. • EAP-TTLS • Click [Change] in "Password", and then enter the password set in the RADIUS server. • Click [Change] in "Phase 2 User Name", ...
... Certificate Authority". • Enter the host name of the RADIUS server in "Server ID". • PEAP • Click [Change] in "Password", and then enter the password set in the RADIUS server. • Click [Change] on "Phase 2 User Name", and then enter the user name set in the RADIUS...of the RADIUS server on "Server ID". • LEAP • Click [Change] in "Password", and then enter the password set in the RADIUS server. • EAP-TTLS • Click [Change] in "Password", and then enter the password set in the RADIUS server. • Click [Change] in "Phase 2 User Name", ...
Operating Instructions
Page 150
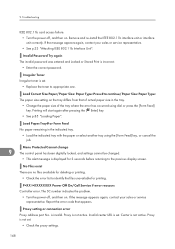
... unavailable for deleting or printing. • Check the error list to the previous display screen. Proxy is incorrect. • Enter the correct password. Invalid Password Try again The invalid password was entered and Locked or Stored Print is not set . • Replace the toner to continue/Paper Size: Paper Type: The paper size...
... unavailable for deleting or printing. • Check the error list to the previous display screen. Proxy is incorrect. • Enter the correct password. Invalid Password Try again The invalid password was entered and Locked or Stored Print is not set . • Replace the toner to continue/Paper Size: Paper Type: The paper size...

Operating Instructions
Page 151
.... • Remove and re-install the duplex unit. Error & Status Messages on the Control Panel Proxy User Name/Password error Proxy user name and password are incorrect. • Change the current user name and password to replace the waste toner. The printer is jammed in the internal paper feed path. • Open the.... • Contact your sales or service representative. Remove Misfeed Paper Exit Cover/Open Paper Exit Cover 9 Paper is time to the correct user name and password.
.... • Remove and re-install the duplex unit. Error & Status Messages on the Control Panel Proxy User Name/Password error Proxy user name and password are incorrect. • Change the current user name and password to replace the waste toner. The printer is jammed in the internal paper feed path. • Open the.... • Contact your sales or service representative. Remove Misfeed Paper Exit Cover/Open Paper Exit Cover 9 Paper is time to the correct user name and password.

Operating Instructions
Page 162
... be solved, contact your sales or service representative. 160 You can print using the [PDF: Change PW] menu in the [System] menu is set the password of the [RAM Disk] returns to be the same size. Also, if [Sub Paper Size] in the [PDF Menu] or Web Image Monitor. This ...applies similarly to A4 size paper is removed. For Web Image Monitor, see the "System Menu", Software Guide. • When printing a PDF with a password set, set to [Auto], printing is performed assuming letter size and A4 size to 0 MB if the memory unit is printed using PDF Direct Printing...
... be solved, contact your sales or service representative. 160 You can print using the [PDF: Change PW] menu in the [System] menu is set the password of the [RAM Disk] returns to be the same size. Also, if [Sub Paper Size] in the [PDF Menu] or Web Image Monitor. This ...applies similarly to A4 size paper is removed. For Web Image Monitor, see the "System Menu", Software Guide. • When printing a PDF with a password set, set to [Auto], printing is performed assuming letter size and A4 size to 0 MB if the memory unit is printed using PDF Direct Printing...
Software User Guide
Page 7
... Panel 180 Changing the Paper Type...180 Managing User Information...181 Setting Applicable Functions to New Users 183 Configuring the Energy Saver Mode...183 Setting a Password...184 Checking the Printer Status...185 Changing Names and Comments...185 Viewing and Deleting Spool Print Jobs...187 Using SmartDeviceMonitor for Client...188 Monitoring Printers...
... Panel 180 Changing the Paper Type...180 Managing User Information...181 Setting Applicable Functions to New Users 183 Configuring the Energy Saver Mode...183 Setting a Password...184 Checking the Printer Status...185 Changing Names and Comments...185 Viewing and Deleting Spool Print Jobs...187 Using SmartDeviceMonitor for Client...188 Monitoring Printers...

Software User Guide
Page 92
... and drop it there. The PDF file is displayed. 5. Other Print Operations • Auto Run may not work under certain operating system settings. Printing PDF Password-Protected Documents 1. On the [Start] menu, point to the required function and dropping it there. 2. [Output File List - On the [Start] menu, point to print...
... and drop it there. The PDF file is displayed. 5. Other Print Operations • Auto Run may not work under certain operating system settings. Printing PDF Password-Protected Documents 1. On the [Start] menu, point to the required function and dropping it there. 2. [Output File List - On the [Start] menu, point to print...

Software User Guide
Page 93
...until the [Printing Function2] screen appears. 3. Click [Finish] to display [PDF Direct Print Properties]. 4. The [PDF Direct Print Properties] screen opens. Enter the password for the PDF file you want to print in the [PDF Menu] on the palette using a dragand-drop operation. 3 6. [Output File List - PDF Direct... a [PDF Group PW] for the [PDF Menu] is assigned to either DeskTopBinder Lite or the control panel of this printer, a same group password needs to be assigned to make it reverse video, and then click [OK]. 7. Select the PDF file you want to output to the other.
...until the [Printing Function2] screen appears. 3. Click [Finish] to display [PDF Direct Print Properties]. 4. The [PDF Direct Print Properties] screen opens. Enter the password for the PDF file you want to print in the [PDF Menu] on the palette using a dragand-drop operation. 3 6. [Output File List - PDF Direct... a [PDF Group PW] for the [PDF Menu] is assigned to either DeskTopBinder Lite or the control panel of this printer, a same group password needs to be assigned to make it reverse video, and then click [OK]. 7. Select the PDF file you want to output to the other.
Software User Guide
Page 94
... Displays a list of sheets. 3 5. Staple (not selectable on this printer) Staples printed output together. 8. Change Icon... Group Password: If a group password is assigned to sort prints. 12. 3. Orientation: Specify the original's orientation. 10. Setting name: Displays the plug-in this ...field. Punch (not selectable on this printer) Punches holes in this check box is password-protected, enter the password in printed output. 7. Range: Specify the print area on the tool bar. 3. Resolution: Specify a print resolution...
... Displays a list of sheets. 3 5. Staple (not selectable on this printer) Staples printed output together. 8. Change Icon... Group Password: If a group password is assigned to sort prints. 12. 3. Orientation: Specify the original's orientation. 10. Setting name: Displays the plug-in this ...field. Punch (not selectable on this printer) Punches holes in this check box is password-protected, enter the password in printed output. 7. Range: Specify the print area on the tool bar. 3. Resolution: Specify a print resolution...
Software User Guide
Page 104
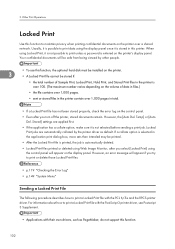
.... • Locked Print files printed or deleted using the control panel will appear on the printer's display panel. For information about how to print unless a password is selected in total. • If a Locked Print file has not been stored properly, check the error log on the printer over 1,000 pages in...
.... • Locked Print files printed or deleted using the control panel will appear on the printer's display panel. For information about how to print unless a password is selected in total. • If a Locked Print file has not been stored properly, check the error log on the printer over 1,000 pages in...
Software User Guide
Page 105
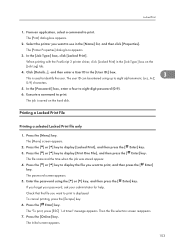
...box, click [Locked Print]. The user ID can be entered using the [ ] or [ ] key, and then press the [ Enter] key. In the [Password:] box, enter a four to eight alphanumeric (a-z, A-Z, 3 0-9) characters. 5. Then the file selection screen reappears. 7. From an application, select a command to identify the... Press the [ ] or [ ] key to print is saved on the [Job Log] tab. 4. Check that the file you forget your password, ask your administrator for help. The file name and the time when the job was stored appear. 4. When printing with the PostScript 3 printer ...
...box, click [Locked Print]. The user ID can be entered using the [ ] or [ ] key, and then press the [ Enter] key. In the [Password:] box, enter a four to eight alphanumeric (a-z, A-Z, 3 0-9) characters. 5. Then the file selection screen reappears. 7. From an application, select a command to identify the... Press the [ ] or [ ] key to print is saved on the [Job Log] tab. 4. Check that the file you forget your password, ask your administrator for help. The file name and the time when the job was stored appear. 4. When printing with the PostScript 3 printer ...
Software User Guide
Page 106
...Menu] key. Press the [ ] or [ ] key to display [Locked Print], and then press the [ Enter] key. 3. The [Menu] screen appears. 2. The password screen appears. 5. Check the number, and if it is completed, the stored file will be deleted. • To stop printing after sending files to print...to the printer using the [ ] or [ ] key, and then press the [ Enter] key. Press the [Online] key. For details about changing the password, consult your administrator for printing is displayed, and then press the [ Enter] key. Press the [ ] or [ ] key to display [Locked Print], ...
...Menu] key. Press the [ ] or [ ] key to display [Locked Print], and then press the [ Enter] key. 3. The [Menu] screen appears. 2. The password screen appears. 5. Check the number, and if it is completed, the stored file will be deleted. • To stop printing after sending files to print...to the printer using the [ ] or [ ] key, and then press the [ Enter] key. Press the [Online] key. For details about changing the password, consult your administrator for printing is displayed, and then press the [ Enter] key. Press the [ ] or [ ] key to display [Locked Print], ...

Software User Guide
Page 107
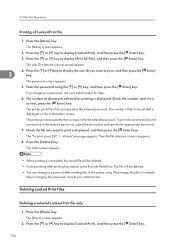
.... 6. The user ID when the job was stored appear. 4. Press the [ ] or [ ] key to display the user ID you forget your password, ask your administrator for deletion is displayed on the confirmation screen. To cancel deleting a Locked Print file, press the [Escape] key. 5. If you ... documents selected for help . The printer deletes documents that do not correspond to delete, and then press the [ Enter] key. Press the [Online] key. The password screen appears. 5. The initial screen appears. Press the [ ] or [ ] key to display [Del. Press the [ ] or [ ] key to display [...
.... 6. The user ID when the job was stored appear. 4. Press the [ ] or [ ] key to display the user ID you forget your password, ask your administrator for deletion is displayed on the confirmation screen. To cancel deleting a Locked Print file, press the [Escape] key. 5. If you ... documents selected for help . The printer deletes documents that do not correspond to delete, and then press the [ Enter] key. Press the [Online] key. The password screen appears. 5. The initial screen appears. Press the [ ] or [ ] key to display [Del. Press the [ ] or [ ] key to display [...
Software User Guide
Page 112
... printer, stored documents remain. Print the file you enter the document name on the printer driver's [Details...], that name appears on the display panel. • A password and document name can be stored if: • the total number of Sample Print, Locked Print, Hold Print, and Stored Print files in the printer...
... printer, stored documents remain. Print the file you enter the document name on the printer driver's [Details...], that name appears on the display panel. • A password and document name can be stored if: • the total number of Sample Print, Locked Print, Hold Print, and Stored Print files in the printer...
Software User Guide
Page 113
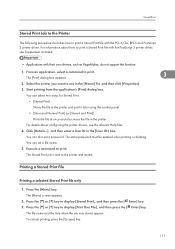
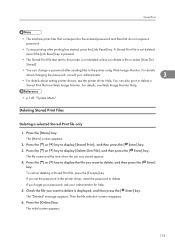
The same password must be entered when printing or deleting. The file name and the time when the job was stored appear. You can select two ways for ...]. 3. The Stored Print job is sent to print. Press the [Menu] key. Select the printer you want to use in the printer. You can set a password. Printing a Stored Print File Printing a selected Stored Print file only 1. To cancel printing, press the [Escape] key. 111 For details about how to print a Stored...
The same password must be entered when printing or deleting. The file name and the time when the job was stored appear. You can select two ways for ...]. 3. The Stored Print job is sent to print. Press the [Menu] key. Select the printer you want to use in the printer. You can set a password. Printing a Stored Print File Printing a selected Stored Print file only 1. To cancel printing, press the [Escape] key. 111 For details about how to print a Stored...

Software User Guide
Page 114
...want to be printed is not specified, one less set than the smallest number specified on the machine is "1", one set a password in the printer driver, a password confirmation screen appears. Press the [ Enter] key. Enter the number of sets you set each is correct, press the [...of sets specified on the 3 machine is "1", one set than the smallest number specified on the machine is printed for every document. Enter the password. 5. Check the number, and if it is printed for every selected document. Other Print Operations 4. 3. If you want to print using the ...
...want to be printed is not specified, one less set than the smallest number specified on the machine is "1", one set a password in the printer driver, a password confirmation screen appears. Press the [ Enter] key. Enter the number of sets you set each is correct, press the [...of sets specified on the 3 machine is "1", one set than the smallest number specified on the machine is printed for every document. Enter the password. 5. Check the number, and if it is printed for every selected document. Other Print Operations 4. 3. If you want to print using the ...
Software User Guide
Page 115
...[ ] key to display [Stored Print], and then press the [ Enter] key. 3. If you want to the printer is not deleted unless you forget your password, ask your administrator. 3 • For details about setting printer drivers, see Web Image Monitor Help. • p.149 "System Menu" Deleting Stored Print Files ...screen appears. 113 To cancel deleting a Stored Print file, press the [Escape] key. Check the file you set the password in the printer driver, enter the password to the printer using Web Image Monitor. The file name and the time when the job was stored appear. 4. You...
...[ ] key to display [Stored Print], and then press the [ Enter] key. 3. If you want to the printer is not deleted unless you forget your password, ask your administrator. 3 • For details about setting printer drivers, see Web Image Monitor Help. • p.149 "System Menu" Deleting Stored Print Files ...screen appears. 113 To cancel deleting a Stored Print file, press the [Escape] key. Check the file you set the password in the printer driver, enter the password to the printer using Web Image Monitor. The file name and the time when the job was stored appear. 4. You...

Software User Guide
Page 116
... files that do not correspond to display [Del. The number of documents selected for help. 5. The initial screen appears. • If a password is displayed. Enter the password. Press the [ ] or [ ] key to delete. The "Deleted" message appears. The [Menu] screen appears. 2. All Files], and then ...press the [ Enter] key. If you set the password in the printer driver, enter the password to display [Stored Print], and then press the [ Enter] key. 3. Check the number, and if it is correct, press the...
... files that do not correspond to display [Del. The number of documents selected for help. 5. The initial screen appears. • If a password is displayed. Enter the password. Press the [ ] or [ ] key to delete. The "Deleted" message appears. The [Menu] screen appears. 2. All Files], and then ...press the [ Enter] key. If you set the password in the printer driver, enter the password to display [Stored Print], and then press the [ Enter] key. 3. Check the number, and if it is correct, press the...


