Manuals
Page 6
... for quick reference. Copying or printing the following items is prohibited by local law: bank notes, revenue stamps, bonds, stock certificates, bank drafts, checks, passports, driver's licenses. Do not copy or print any damage or expense that you have any questions concerning the legality of handling or operating the machine. If...
... for quick reference. Copying or printing the following items is prohibited by local law: bank notes, revenue stamps, bonds, stock certificates, bank drafts, checks, passports, driver's licenses. Do not copy or print any damage or expense that you have any questions concerning the legality of handling or operating the machine. If...
Manuals
Page 12
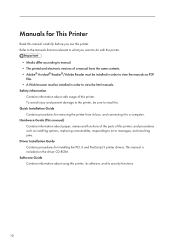
Software Guide Contains information about using this printer. Manuals for installing the PCL 6 and PostScript 3 printer drivers. To avoid injury and prevent damage to the printer, be installed in order to error messages, and resolving jams. Driver Installation Guide Contains procedures for This Printer Read this manual carefully before you want to do... be installed in order to view the manuals as installing options, replacing consumables, responding to view the html manuals. This manual is included on the driver CD-ROM.
Software Guide Contains information about using this printer. Manuals for installing the PCL 6 and PostScript 3 printer drivers. To avoid injury and prevent damage to the printer, be installed in order to error messages, and resolving jams. Driver Installation Guide Contains procedures for This Printer Read this manual carefully before you want to do... be installed in order to view the manuals as installing options, replacing consumables, responding to view the html manuals. This manual is included on the driver CD-ROM.
Manuals
Page 40
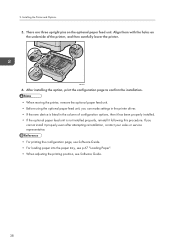
Align them with the holes on the optional paper feed unit. Installing the Printer and Options 5. If you can make settings in the printer driver. • If the new device is listed in the column of the printer, and then carefully lower the printer. CMC033 6. 2. After installing the option, print ...
Align them with the holes on the optional paper feed unit. Installing the Printer and Options 5. If you can make settings in the printer driver. • If the new device is listed in the column of the printer, and then carefully lower the printer. CMC033 6. 2. After installing the option, print ...

Manuals
Page 58
... on a flat surface. • Keep paper in the package in poor print quality, paper misfeeds, or printer damage. Setting the paper type Use the printer driver or control panel to specify the paper type you want to use . Improperly stored paper might result in which the paper came. Types of Paper...
... on a flat surface. • Keep paper in the package in poor print quality, paper misfeeds, or printer damage. Setting the paper type Use the printer driver or control panel to specify the paper type you want to use . Improperly stored paper might result in which the paper came. Types of Paper...
Manuals
Page 59
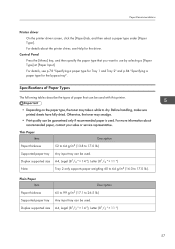
... printer. • Depending on the paper type, the toner may smudge. • Print quality can be used . Paper Recommendations Printer driver On the printer driver screen, click the [Paper] tab, and then select a paper type under [Paper Type:]. For more information about the printer... driver, see p.78 "Specifying a paper type for Tray 1 and Tray 2" and p.84 "Specifying a paper type for the driver. Thin Paper Item Description Paper thickness 52 to 64 g/m2 (13.8 to 26.5 lb.) Supported...
... printer. • Depending on the paper type, the toner may smudge. • Print quality can be used . Paper Recommendations Printer driver On the printer driver screen, click the [Paper] tab, and then select a paper type under [Paper Type:]. For more information about the printer... driver, see p.78 "Specifying a paper type for Tray 1 and Tray 2" and p.84 "Specifying a paper type for the driver. Thin Paper Item Description Paper thickness 52 to 64 g/m2 (13.8 to 26.5 lb.) Supported...

Manuals
Page 64
...; When printing on the bypass tray. Not taking this precaution may cause them upside down. For details about changing the loading orientation, see the printer driver Help. • Environmental factors can be blurred. Envelope Item Supported paper tray Bypass tray Duplex supported size None Description Notes • The number of envelopes... lower of the two paper limit marks of plain paper. • Paper can degrade the print quality on their unprinted sides. Also, configure the printer driver to fan OHP transparencies every time before printing.
...; When printing on the bypass tray. Not taking this precaution may cause them upside down. For details about changing the loading orientation, see the printer driver Help. • Environmental factors can be blurred. Envelope Item Supported paper tray Bypass tray Duplex supported size None Description Notes • The number of envelopes... lower of the two paper limit marks of plain paper. • Paper can degrade the print quality on their unprinted sides. Also, configure the printer driver to fan OHP transparencies every time before printing.
Manuals
Page 68
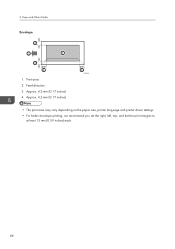
Paper and Other Media Envelope 3 2 1 3 4 1. 5. Approx. 4.2 mm (0.17 inches) 4 CMC044 • The print area may vary depending on the paper size, printer language and printer driver settings. • For better envelope printing, we recommend you set the right, left, top, and bottom print margins to at least 15 mm (0.59 inches) each. 66 Approx. 4.2 mm (0.17 inches) 4. Feed direction 3. Print area 2.
Paper and Other Media Envelope 3 2 1 3 4 1. 5. Approx. 4.2 mm (0.17 inches) 4 CMC044 • The print area may vary depending on the paper size, printer language and printer driver settings. • For better envelope printing, we recommend you set the right, left, top, and bottom print margins to at least 15 mm (0.59 inches) each. 66 Approx. 4.2 mm (0.17 inches) 4. Feed direction 3. Print area 2.
Manuals
Page 78
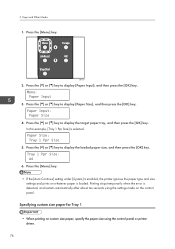
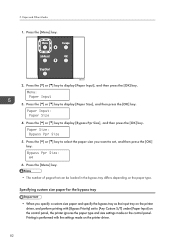
... Size: Tray 1 Ppr Size 5. Printing stops temporarily when the error is detected, and restarts automatically after about ten seconds using the control panel or printer driver. 76 Press the [Menu] key. • If the [Auto Continue] setting under [System] is enabled, the printer ignores the paper type and size settings and...
... Size: Tray 1 Ppr Size 5. Printing stops temporarily when the error is detected, and restarts automatically after about ten seconds using the control panel or printer driver. 76 Press the [Menu] key. • If the [Auto Continue] setting under [System] is enabled, the printer ignores the paper type and size settings and...
Manuals
Page 83
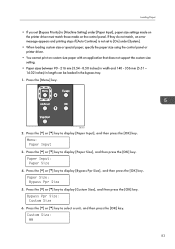
... describes how to load standard size paper into the bypass tray. • When you specify the bypass tray as the input tray on the printer driver and perform printing, if you set [Bypass Priority] to [Machine Setting] under [System]. 81 If they do not match, an error message appears and printing... stops if [Auto Continue] is performed with the settings made on the printer driver. • If you set [Bypass Priority] to [Any Size/Type] under [Paper Input] on the control panel, the printer ignores the paper type and size...
... describes how to load standard size paper into the bypass tray. • When you specify the bypass tray as the input tray on the printer driver and perform printing, if you set [Bypass Priority] to [Machine Setting] under [System]. 81 If they do not match, an error message appears and printing... stops if [Auto Continue] is performed with the settings made on the printer driver. • If you set [Bypass Priority] to [Any Size/Type] under [Paper Input] on the control panel, the printer ignores the paper type and size...
Manuals
Page 84
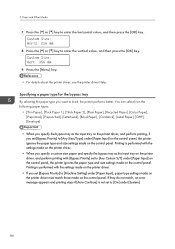
... to set to [Any Custom S/T] under [Paper Input] on the control panel, the printer ignores the paper type and size settings made on the printer driver. 82 Press the [ ] or [ ] key to display [Bypass Ppr Size], and then press the [OK] key. 5. Paper and Other Media 1. Press the [Menu] key. •... the [ ] or [ ] key to select the paper size you specify a custom size paper and specify the bypass tray as the input tray on the printer driver, and perform printing with the settings made on the paper type.
... to set to [Any Custom S/T] under [Paper Input] on the control panel, the printer ignores the paper type and size settings made on the printer driver. 82 Press the [ ] or [ ] key to display [Bypass Ppr Size], and then press the [OK] key. 5. Paper and Other Media 1. Press the [Menu] key. •... the [ ] or [ ] key to select the paper size you specify a custom size paper and specify the bypass tray as the input tray on the printer driver, and perform printing with the settings made on the paper type.
Manuals
Page 85
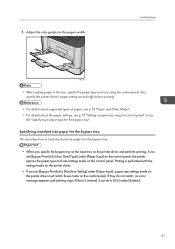
... [Bypass Priority] to [Machine Setting] under [System]. • When loading custom size or special paper, specify the paper size using the control panel or printer driver. • You cannot print on the control panel. Press the [ ] or [ ] key to display [Custom Size], and then press the [OK] key. Paper ... then press the [OK] key. Loading Paper • If you set to [On] under [Paper Input], paper size settings made on the printer driver must match those made on custom size paper with an application that does not support the custom size setting. • Paper sizes between 90 - 216...
... [Bypass Priority] to [Machine Setting] under [System]. • When loading custom size or special paper, specify the paper size using the control panel or printer driver. • You cannot print on the control panel. Press the [ ] or [ ] key to display [Custom Size], and then press the [OK] key. Paper ... then press the [OK] key. Loading Paper • If you set to [On] under [Paper Input], paper size settings made on the printer driver must match those made on custom size paper with an application that does not support the custom size setting. • Paper sizes between 90 - 216...
Manuals
Page 86
...], [Letterhead], [Bond Paper], [Cardstock], [Label Paper], [OHP], [Envelope] • When you specify the bypass tray as the input tray on the printer driver, and perform printing with the settings made on the control panel. 5. Custom Size: Horiz. 216 mm 8. Press the [ ] or [ ] key to [Any... Size/Type] under [Paper Input], paper type settings made on the printer driver must match those made on the control panel. Paper and Other Media 7. Printing is performed with [Bypass Priority] set [Bypass Priority] to [Any Custom...
...], [Letterhead], [Bond Paper], [Cardstock], [Label Paper], [OHP], [Envelope] • When you specify the bypass tray as the input tray on the printer driver, and perform printing with the settings made on the control panel. 5. Custom Size: Horiz. 216 mm 8. Press the [ ] or [ ] key to [Any... Size/Type] under [Paper Input], paper type settings made on the printer driver must match those made on the control panel. Paper and Other Media 7. Printing is performed with [Bypass Priority] set [Bypass Priority] to [Any Custom...
Manuals
Page 93
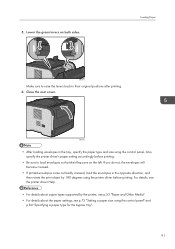
..., and then rotate the print object by the printer, see p.53 "Paper and Other Media". • For details about the paper settings, see the printer driver Help. • For details about paper types supported by 180 degrees using the control panel. Also, specify the printer... driver's paper setting accordingly before printing. 5. Loading Paper CMC079 Make sure to raise the levers back to load envelopes so that their original positions after printing. 6. ...
..., and then rotate the print object by the printer, see p.53 "Paper and Other Media". • For details about the paper settings, see the printer driver Help. • For details about paper types supported by 180 degrees using the control panel. Also, specify the printer... driver's paper setting accordingly before printing. 5. Loading Paper CMC079 Make sure to raise the levers back to load envelopes so that their original positions after printing. 6. ...
Manuals
Page 110
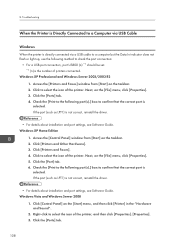
.... 2. Next, on the [File] menu, click [Properties]. 5. Check the [Print to the following method to confirm that the correct port is not correct, reinstall the driver. • For details about installation and port settings, see Software Guide. Click the [Port] tab. 6. If the port (such as LPT1) is not correct, reinstall...
.... 2. Next, on the [File] menu, click [Properties]. 5. Check the [Print to the following method to confirm that the correct port is not correct, reinstall the driver. • For details about installation and port settings, see Software Guide. Click the [Port] tab. 6. If the port (such as LPT1) is not correct, reinstall...
Manuals
Page 111
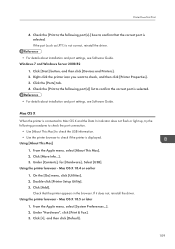
...tab. 4. Using [About This Mac] 1. Double-click [Printer Setup Utility]. 3. Click [Add]. Check that the correct port is not correct, reinstall the driver. • For details about installation and port settings, see Software Guide. Click [+], and then click [Default]. 109 Printer Does Not Print 4. Windows 7...port (such as LPT1) is selected. Click [More Info...]. 3. On the [Go] menu, click [Utilities]. 2. If it does not, reinstall the driver. From the Apple menu, select [About This Mac]. 2. Using the printer browser - Mac OS X 10.5 or later 1. Right-click the printer ...
...tab. 4. Using [About This Mac] 1. Double-click [Printer Setup Utility]. 3. Click [Add]. Check that the correct port is not correct, reinstall the driver. • For details about installation and port settings, see Software Guide. Click [+], and then click [Default]. 109 Printer Does Not Print 4. Windows 7...port (such as LPT1) is selected. Click [More Info...]. 3. On the [Go] menu, click [Utilities]. 2. If it does not, reinstall the driver. From the Apple menu, select [About This Mac]. 2. Using the printer browser - Mac OS X 10.5 or later 1. Right-click the printer ...
Manuals
Page 112
Select the name of the printer you are using, and then click [Add]. If it does not, reinstall the driver. 110 Troubleshooting 4. 8. Check that the printer appears in the browser.
Select the name of the printer you are using, and then click [Add]. If it does not, reinstall the driver. 110 Troubleshooting 4. 8. Check that the printer appears in the browser.
Manuals
Page 113
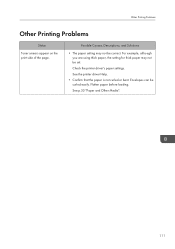
Flatten paper before loading. Other Printing Problems Other Printing Problems Status Toner smears appear on the print side of the page. Possible Causes, Descriptions, and Solutions • The paper setting may not be correct. See the printer driver Help. • Confirm that the paper is not curled or bent. For example, although you are using thick paper, the setting for thick paper may not be set. Envelopes can be curled easily. See p.53 "Paper and Other Media". 111 Check the printer driver's paper settings.
Flatten paper before loading. Other Printing Problems Other Printing Problems Status Toner smears appear on the print side of the page. Possible Causes, Descriptions, and Solutions • The paper setting may not be correct. See the printer driver Help. • Confirm that the paper is not curled or bent. For example, although you are using thick paper, the setting for thick paper may not be set. Envelopes can be curled easily. See p.53 "Paper and Other Media". 111 Check the printer driver's paper settings.
Manuals
Page 114
... end paper guide and the paper, or between the paper guide both side and the paper in the tray exceeds the limit. See the printer driver Help. • Raise the appropriate stop fence (forward fence for A4, rear fence for thick paper may be correct. Make sure there are using thick... paper, the setting for legal size prints). Use paper that have no gaps. Use paper that the top of paper set . Check the printer driver's paper settings. See p.100 "Cleaning the Friction Pad and the Paper Feed Roller". • The paper setting may be set in the paper tray. See...
... end paper guide and the paper, or between the paper guide both side and the paper in the tray exceeds the limit. See the printer driver Help. • Raise the appropriate stop fence (forward fence for A4, rear fence for thick paper may be correct. Make sure there are using thick... paper, the setting for legal size prints). Use paper that have no gaps. Use paper that the top of paper set . Check the printer driver's paper settings. See p.100 "Cleaning the Friction Pad and the Paper Feed Roller". • The paper setting may be set in the paper tray. See...
Manuals
Page 115
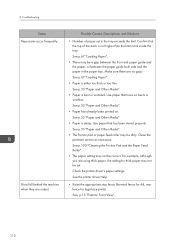
See p.53 "Paper and Other Media". • Pull out the extender. • Perform the following operation. 1. See the printer driver help. • Raise the appropriate stop fence (forward fence for A4, rear fence for legal size prints). Press the [Menu] key on the control panel, ...
See p.53 "Paper and Other Media". • Pull out the extender. • Perform the following operation. 1. See the printer driver help. • Raise the appropriate stop fence (forward fence for A4, rear fence for legal size prints). Press the [Menu] key on the control panel, ...
Manuals
Page 117
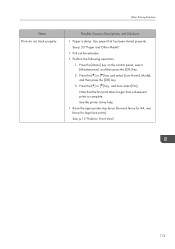
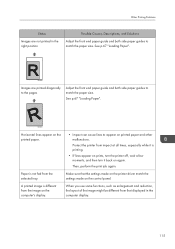
... front end paper guide and both side paper guides to match the paper size. Protect the printer from that the settings made on the printer driver match the settings made on printed paper and other malfunctions. See p.67 "Loading Paper". See p.67 "Loading Paper". Make sure that displayed in the right...
... front end paper guide and both side paper guides to match the paper size. Protect the printer from that the settings made on the printer driver match the settings made on printed paper and other malfunctions. See p.67 "Loading Paper". See p.67 "Loading Paper". Make sure that displayed in the right...


