User Guide
Page 9
...290 Copier Problems 293 Scanner Problems 295 Fax Problems ...296 Error and Status Messages on the Screen 299 Replacing the Print Cartridge 307 10.Maintenance Cleaning...313 Cautions to Take When Cleaning 313 Cleaning the Friction Pad and Paper Feed Roller 314 Cleaning...317 Moving over a Short Distance 317 Moving over a Long Distance 318 Disposal ...319 Where to Inquire 320 Consumables ...321 Print Cartridges ...321 11.Appendix Specifications of the Machine 323 General Function Specifications 323 Printer Function Specifications 325 Copier Function Specifications 325 Scanner Function ...
...290 Copier Problems 293 Scanner Problems 295 Fax Problems ...296 Error and Status Messages on the Screen 299 Replacing the Print Cartridge 307 10.Maintenance Cleaning...313 Cautions to Take When Cleaning 313 Cleaning the Friction Pad and Paper Feed Roller 314 Cleaning...317 Moving over a Short Distance 317 Moving over a Long Distance 318 Disposal ...319 Where to Inquire 320 Consumables ...321 Print Cartridges ...321 11.Appendix Specifications of the Machine 323 General Function Specifications 323 Printer Function Specifications 325 Copier Function Specifications 325 Scanner Function ...
User Guide
Page 31
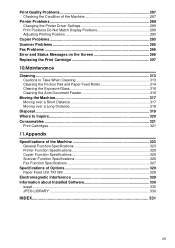
... this cover to USB function. 21 USB Flash Disk Port Insert a USB flash disk to store scanned files using the Scan to replace the print cartridge or remove jammed paper. 7. ADF (Auto document feeder) Cover Open this machine. 1 Exterior: Front View 1. BSP016S 6. Up to remove originals jammed in the ADF. 2. Guide...
... this cover to USB function. 21 USB Flash Disk Port Insert a USB flash disk to store scanned files using the Scan to replace the print cartridge or remove jammed paper. 7. ADF (Auto document feeder) Cover Open this machine. 1 Exterior: Front View 1. BSP016S 6. Up to remove originals jammed in the ADF. 2. Guide...
User Guide
Page 33
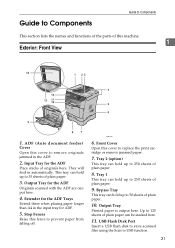
Interior Guide to be prepared. Print Cartridge Messages appear on the screen when the print cartridge needs to be replaced, or a new cartridge needs to be replaced, see p.299 "Error and Status Messages on the screen when consumables need to Components 1 BSP019S 1. Reference For details about the messages that appear on the Screen". 23
Interior Guide to be prepared. Print Cartridge Messages appear on the screen when the print cartridge needs to be replaced, or a new cartridge needs to be replaced, see p.299 "Error and Status Messages on the screen when consumables need to Components 1 BSP019S 1. Reference For details about the messages that appear on the Screen". 23

User Guide
Page 40
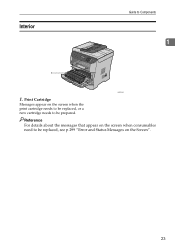
Getting Started Unpacking To protect it will break or cause injury if dropped. Dispose of water. chine. ❒ Keep uncovered print cartridges away from shock and vibration during transit, this machine comes packaged in cushioning foam and secured with plenty of a fire. R WARNING: 2 ...; Do not allow paper clips, staples, or other small objects to where it from direct sunlight. ❒ Do not touch the print cartridge's photo conductor unit. 30 BSP024S The toner might ignite when exposed to let it touch your eyes, flush immediately with large amounts of used...
Getting Started Unpacking To protect it will break or cause injury if dropped. Dispose of water. chine. ❒ Keep uncovered print cartridges away from shock and vibration during transit, this machine comes packaged in cushioning foam and secured with plenty of a fire. R WARNING: 2 ...; Do not allow paper clips, staples, or other small objects to where it from direct sunlight. ❒ Do not touch the print cartridge's photo conductor unit. 30 BSP024S The toner might ignite when exposed to let it touch your eyes, flush immediately with large amounts of used...
User Guide
Page 43
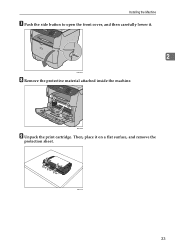
BSP037S 33 BSP255S I Unpack the print cartridge. Then, place it . 2 BSP252S H Remove the protective material attached inside the machine. Installing the Machine G Push the side button to open the front cover, and then carefully lower it on a flat surface, and remove the protection sheet.
BSP037S 33 BSP255S I Unpack the print cartridge. Then, place it . 2 BSP252S H Remove the protective material attached inside the machine. Installing the Machine G Push the side button to open the front cover, and then carefully lower it on a flat surface, and remove the protection sheet.
User Guide
Page 44
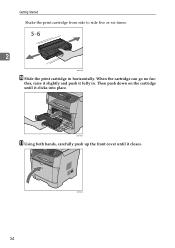
When the cartridge can go no fur- Getting Started Shake the print cartridge from side to side five or six times. 2 BSP038S J Slide the print cartridge in . BSP250S K Using both hands, carefully push up the front cover until it clicks into place. ther, raise it slightly and push it closes. 34 BSP033S Then push down on the cartridge until it fully in horizontally.
When the cartridge can go no fur- Getting Started Shake the print cartridge from side to side five or six times. 2 BSP038S J Slide the print cartridge in . BSP250S K Using both hands, carefully push up the front cover until it clicks into place. ther, raise it slightly and push it closes. 34 BSP033S Then push down on the cartridge until it fully in horizontally.
User Guide
Page 71
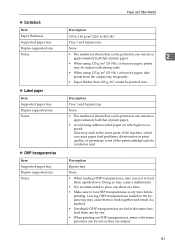
... the transparencies one by one. • When printing on which can cause paper feed problems, deterioration in print quality, or premature wear of the print cartridge's photo conductor unit.
... the transparencies one by one. • When printing on which can cause paper feed problems, deterioration in print quality, or premature wear of the print cartridge's photo conductor unit.
User Guide
Page 210
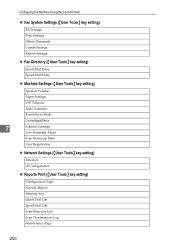
...} key setting) Quick Dial Entry Speed Dial Entry ❖ Machine Settings ({User Tools} key setting) Speaker Volume Paper Settings I/O Timeout Auto Continue Toner Saver Mode Cartridge&Parts 7 Scanner Carriage Low Humidity Mode Scan Warm-up Time User Registration ❖ Network Settings ({User Tools} key setting) Ethernet IP Configuration ❖ Reports Print...
...} key setting) Quick Dial Entry Speed Dial Entry ❖ Machine Settings ({User Tools} key setting) Speaker Volume Paper Settings I/O Timeout Auto Continue Toner Saver Mode Cartridge&Parts 7 Scanner Carriage Low Humidity Mode Scan Warm-up Time User Registration ❖ Network Settings ({User Tools} key setting) Ethernet IP Configuration ❖ Reports Print...
User Guide
Page 232
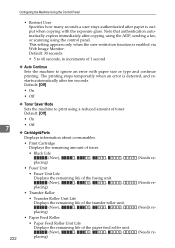
... increments of 1 second ❖ Auto Continue Sets the machine to print using the control panel. Default: [Off] • On 7 • Off ❖ Cartridge&Parts Displays information about consumables. • Print Cartridge Displays the remaining amount of toner. • Black Life (New), , , , , placing) • Fuser Unit • Fuser Unit Life Displays the remaining...
... increments of 1 second ❖ Auto Continue Sets the machine to print using the control panel. Default: [Off] • On 7 • Off ❖ Cartridge&Parts Displays information about consumables. • Print Cartridge Displays the remaining amount of toner. • Black Life (New), , , , , placing) • Fuser Unit • Fuser Unit Life Displays the remaining...
User Guide
Page 239
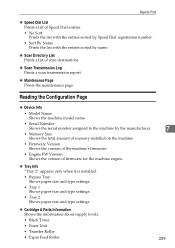
...; Bypass Tray Shows paper size and type settings. • Tray 1 Shows paper size and type settings. • Tray 2 Shows paper size and type settings. ❖ Cartridge & Parts Information Shows the information about supply levels. • Black Toner • Fuser Unit • Transfer Roller • Paper Feed Roller 7 229 Reports Print ❖...
...; Bypass Tray Shows paper size and type settings. • Tray 1 Shows paper size and type settings. • Tray 2 Shows paper size and type settings. ❖ Cartridge & Parts Information Shows the information about supply levels. • Black Toner • Fuser Unit • Transfer Roller • Paper Feed Roller 7 229 Reports Print ❖...
User Guide
Page 256
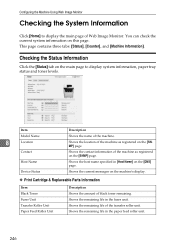
... the [Status] tab on this page. Shows the host name specified in the fuser unit. Shows the current messages on the machine's display. ❖ Print Cartridge & Replaceable Parts Information Item Black Toner Fuser Unit Transfer Roller Unit Paper Feed Roller Unit Description Shows the amount of the machine as registered on...
... the [Status] tab on this page. Shows the host name specified in the fuser unit. Shows the current messages on the machine's display. ❖ Print Cartridge & Replaceable Parts Information Item Black Toner Fuser Unit Transfer Roller Unit Paper Feed Roller Unit Description Shows the amount of the machine as registered on...
User Guide
Page 257
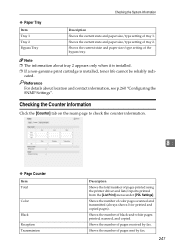
... of black-and-white pages printed, scanned, and copied. Reference For details about tray 2 appears only when it is installed. ❒ If a non-genuine print cartridge is installed, toner life cannot be reliably indi- Checking the Counter Information Click the [Counter] tab on the main page to check the counter information...
... of black-and-white pages printed, scanned, and copied. Reference For details about tray 2 appears only when it is installed. ❒ If a non-genuine print cartridge is installed, toner life cannot be reliably indi- Checking the Counter Information Click the [Counter] tab on the main page to check the counter information...
User Guide
Page 269
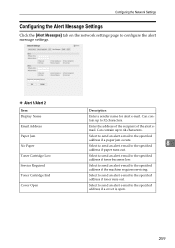
... servicing. Can contain up to configure the alert message settings. ❖ Alert 1/Alert 2 Item Display Name Email Address Paper Jam No Paper Toner Cartridge Low Service Required Toner Cartridge End Cover Open Description Enter a sender name for alert e-mail. Configuring the Network Settings Configuring the Alert Message Settings Click the [Alert Messages...
... servicing. Can contain up to configure the alert message settings. ❖ Alert 1/Alert 2 Item Display Name Email Address Paper Jam No Paper Toner Cartridge Low Service Required Toner Cartridge End Cover Open Description Enter a sender name for alert e-mail. Configuring the Network Settings Configuring the Alert Message Settings Click the [Alert Messages...

User Guide
Page 279
Overview Troubleshooting is divided into the following sections: • p.270 "Common Problems" • p.271 "Paper Feed Problems" • p.287 "Print Quality Problems" • p.288 "Printer Problems" • p.293 "Copier Problems" • p.295 "Scanner Problems" • p.296 "Fax Problems" • p.299 "Error and Status Messages on the Screen" • p.307 "Replacing the Print Cartridge" 269 Troubleshooting This chapter provides a guide for solving problems in operating the machine. 9.
Overview Troubleshooting is divided into the following sections: • p.270 "Common Problems" • p.271 "Paper Feed Problems" • p.287 "Print Quality Problems" • p.288 "Printer Problems" • p.293 "Copier Problems" • p.295 "Scanner Problems" • p.296 "Fax Problems" • p.299 "Error and Status Messages on the Screen" • p.307 "Replacing the Print Cartridge" 269 Troubleshooting This chapter provides a guide for solving problems in operating the machine. 9.
User Guide
Page 284
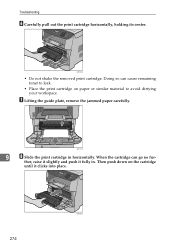
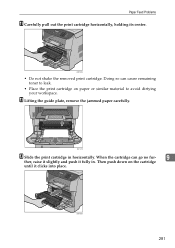
BSP121S 9 H Slide the print cartridge in . When the cartridge can cause remaining toner to avoid dirtying your workspace. Then push down on paper or similar material to leak. • Place the print cartridge on the cartridge until it fully in horizontally. Troubleshooting F Carefully pull out the print cartridge horizontally, holding its center. Doing so can go no fur- BSP036S • Do not shake the removed print cartridge. ther, raise it slightly and push it clicks into place. 274 BSP039S G Lifting the guide plate, remove the jammed paper carefully.
BSP121S 9 H Slide the print cartridge in . When the cartridge can cause remaining toner to avoid dirtying your workspace. Then push down on paper or similar material to leak. • Place the print cartridge on the cartridge until it fully in horizontally. Troubleshooting F Carefully pull out the print cartridge horizontally, holding its center. Doing so can go no fur- BSP036S • Do not shake the removed print cartridge. ther, raise it slightly and push it clicks into place. 274 BSP039S G Lifting the guide plate, remove the jammed paper carefully.
User Guide
Page 286
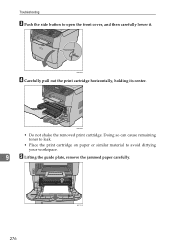
BSP036S • Do not shake the removed print cartridge. Doing so can cause remaining toner to leak. • Place the print cartridge on paper or similar material to open the front cover, and then carefully lower it. Troubleshooting C Push the side button to avoid dirtying your workspace. 9 E Lifting the guide plate, remove the jammed paper carefully. 276 BSP121S BSP032S D Carefully pull out the print cartridge horizontally, holding its center.
BSP036S • Do not shake the removed print cartridge. Doing so can cause remaining toner to leak. • Place the print cartridge on paper or similar material to open the front cover, and then carefully lower it. Troubleshooting C Push the side button to avoid dirtying your workspace. 9 E Lifting the guide plate, remove the jammed paper carefully. 276 BSP121S BSP032S D Carefully pull out the print cartridge horizontally, holding its center.
User Guide
Page 287
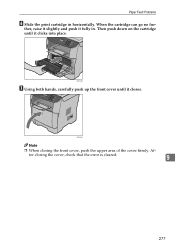
BSP039S G Using both hands, carefully push up the front cover until it clicks into place. ter closing the front cover, push the upper area of the cover firmly. When the cartridge can go no fur- Then push down on the cartridge until it fully in horizontally. Af- ther, raise it slightly and push it closes. Paper Feed Problems F Slide the print cartridge in . BSP253S Note ❒ When closing the cover, check that the error is cleared. 9 277
BSP039S G Using both hands, carefully push up the front cover until it clicks into place. ter closing the front cover, push the upper area of the cover firmly. When the cartridge can go no fur- Then push down on the cartridge until it fully in horizontally. Af- ther, raise it slightly and push it closes. Paper Feed Problems F Slide the print cartridge in . BSP253S Note ❒ When closing the cover, check that the error is cleared. 9 277
User Guide
Page 291
When the cartridge can cause remaining toner to leak. • Place the print cartridge on the cartridge until it fully in horizontally. BSP121S M Slide the print cartridge in . L Lifting the guide plate, remove the jammed paper carefully. BSP039S 281 Paper Feed Problems K Carefully pull out the print cartridge horizontally, holding its center. Doing so can go no fur- 9 ther, raise it slightly and push it clicks into place. Then push down on paper or similar material to avoid dirtying your workspace. BSP036S • Do not shake the removed print cartridge.
When the cartridge can cause remaining toner to leak. • Place the print cartridge on the cartridge until it fully in horizontally. BSP121S M Slide the print cartridge in . L Lifting the guide plate, remove the jammed paper carefully. BSP039S 281 Paper Feed Problems K Carefully pull out the print cartridge horizontally, holding its center. Doing so can go no fur- 9 ther, raise it slightly and push it clicks into place. Then push down on paper or similar material to avoid dirtying your workspace. BSP036S • Do not shake the removed print cartridge.
User Guide
Page 297
... types of paper is Make sure that the paper being used . A non-genuine print cartridge is dirty. Use genuine print cartridges only. The machine is Refilled or non-genuine print cartridges reduce print quality being used is a problem with the quality of printing, first check the... The paper type setting is on printouts with print quality. An old print cartridge is being opened before their expiration used . ing on a level surface. used within six months of being Print cartridges should be subject to prevent these lines from appearing. See p.313 "Cleaning",...
... types of paper is Make sure that the paper being used . A non-genuine print cartridge is dirty. Use genuine print cartridges only. The machine is Refilled or non-genuine print cartridges reduce print quality being used is a problem with the quality of printing, first check the... The paper type setting is on printouts with print quality. An old print cartridge is being opened before their expiration used . ing on a level surface. used within six months of being Print cartridges should be subject to prevent these lines from appearing. See p.313 "Cleaning",...
User Guide
Page 299
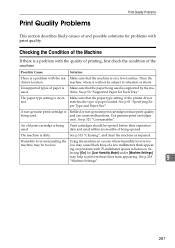
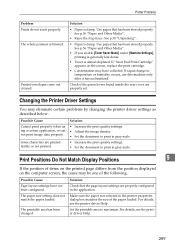
...Display Positions 9 If the position of items on the printed page differs from the position displayed on the screen, replace the print cartridge. • Condensation may have not been configured. Possible Cause Page layout settings have collected. Solution Check that has been stored properly....driver Help. The whole printout is damp. The paper size setting does not match the paper loaded. If "Near End Print Cartridge" appears on the computer screen, the cause may eliminate certain problems by changing the printer driver settings as described below. Printer ...
...Display Positions 9 If the position of items on the printed page differs from the position displayed on the screen, replace the print cartridge. • Condensation may have not been configured. Possible Cause Page layout settings have collected. Solution Check that has been stored properly....driver Help. The whole printout is damp. The paper size setting does not match the paper loaded. If "Near End Print Cartridge" appears on the computer screen, the cause may eliminate certain problems by changing the printer driver settings as described below. Printer ...


