User Guide
Page 6
... Checking the Status Information...141 Configuring the Machine Settings...142 Printing the Configuration Page...143 Updating the Firmware...143 9. Maintaining the Machine Replacing the Print Cartridge...145 Cautions When Cleaning...147 Cleaning the Inside of Report...123 Printer Features Settings...125 Network Settings...126 8. 7. Troubleshooting Common Problems...151 Paper Feed Problems...
... Checking the Status Information...141 Configuring the Machine Settings...142 Printing the Configuration Page...143 Updating the Firmware...143 9. Maintaining the Machine Replacing the Print Cartridge...145 Cautions When Cleaning...147 Cleaning the Inside of Report...123 Printer Features Settings...125 Network Settings...126 8. 7. Troubleshooting Common Problems...151 Paper Feed Problems...
User Guide
Page 7
... Trademarks...187 INDEX...189 5 Appendix Notes About the Toner...179 Moving and Transporting the Machine...180 Disposal...180 Where to Inquire...180 Consumables...181 Print Cartridge...181 Specifications of the Machine 160 Printer Problems...161 Print Positions Do Not Match Display Positions 162 Copier Problems...163 Scanner Problems...164 Fax Problems...
... Trademarks...187 INDEX...189 5 Appendix Notes About the Toner...179 Moving and Transporting the Machine...180 Disposal...180 Where to Inquire...180 Consumables...181 Print Cartridge...181 Specifications of the Machine 160 Printer Problems...161 Print Positions Do Not Match Display Positions 162 Copier Problems...163 Scanner Problems...164 Fax Problems...
User Guide
Page 12
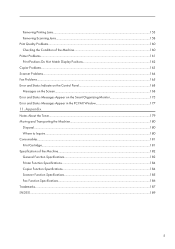
...from users in the European Union, used batteries and accumulators should be used . This symbol means that comply with local regulations. https://www.ricoh-return.com/ Energy efficiency The amount of charge from this feature is to print again, it prints the last page. Products that in... accordance with the Energy Star requirement are used . Toner and ink cartridge return program Toner and ink cartridge for end-users Annex II, the above symbol is designed to allow you print. Duplex printing (if applicable) Duplex printing ...
...from users in the European Union, used batteries and accumulators should be used . This symbol means that comply with local regulations. https://www.ricoh-return.com/ Energy efficiency The amount of charge from this feature is to print again, it prints the last page. Products that in... accordance with the Energy Star requirement are used . Toner and ink cartridge return program Toner and ink cartridge for end-users Annex II, the above symbol is designed to allow you print. Duplex printing (if applicable) Duplex printing ...
User Guide
Page 19
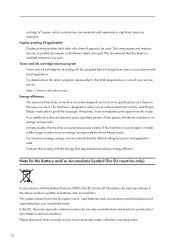
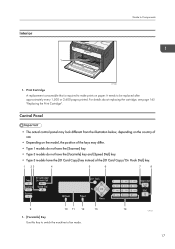
It needs to Components 1 CTT065 1. Print Cartridge A replacement consumable that is required to make prints on the model, the position of the keys may look different from the illustration below, depending on ... instead of use. • Depending on paper. Interior Guide to be replaced after approximately every 1,500 or 2,600 pages printed. For details about replacing the cartridge, see page 145 "Replacing the Print...
It needs to Components 1 CTT065 1. Print Cartridge A replacement consumable that is required to make prints on the model, the position of the keys may look different from the illustration below, depending on ... instead of use. • Depending on paper. Interior Guide to be replaced after approximately every 1,500 or 2,600 pages printed. For details about replacing the cartridge, see page 145 "Replacing the Print...

User Guide
Page 46
Open the front cover, remove the print cartridge, and then remove the jammed paper. After making any additional settings, click [OK]. 4. Portrait 44 CTT009 Printing will resume automatically once the cover is closed. ...
Open the front cover, remove the print cartridge, and then remove the jammed paper. After making any additional settings, click [OK]. 4. Portrait 44 CTT009 Printing will resume automatically once the cover is closed. ...
User Guide
Page 52
... the fusing cover. Place the original on paper fed from Tray 1, remove the paper loaded in the ADF. 3. Open the front cover, remove the print cartridge, and then remove the jammed paper. CTT124 2. To make multiple copies, enter the number of a multi-page document, you place originals both in the ADF...
... the fusing cover. Place the original on paper fed from Tray 1, remove the paper loaded in the ADF. 3. Open the front cover, remove the print cartridge, and then remove the jammed paper. CTT124 2. To make multiple copies, enter the number of a multi-page document, you place originals both in the ADF...
User Guide
Page 122
Make sure to [Stop Printing]. • (New) • • 120 Print Cartridge Displays information about consumables. Configuring the Machine Using the Control Panel Mode 1, but it takes longer to recover from Energy Saver Mode 2 than from 1 to ...
Make sure to [Stop Printing]. • (New) • • 120 Print Cartridge Displays information about consumables. Configuring the Machine Using the Control Panel Mode 1, but it takes longer to recover from Energy Saver Mode 2 than from 1 to ...
User Guide
Page 124
... the Control Panel • (Darkest) Toner End Option This setting is used to the factory default, except for Type 3 models. • For details about print cartridge and toner, see page 179 "Notes About the Toner". The remaining toner level can be checked in the control panel and on the Smart Organizing...
... the Control Panel • (Darkest) Toner End Option This setting is used to the factory default, except for Type 3 models. • For details about print cartridge and toner, see page 179 "Notes About the Toner". The remaining toner level can be checked in the control panel and on the Smart Organizing...
User Guide
Page 147
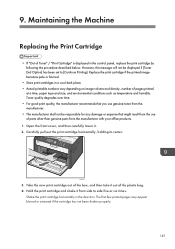
... on image volume and density, number of the plastic bag. 4. The first few printed pages may appear blurred or smeared if the cartridge has not been shaken properly. 145 However, this message will not be responsible for any damage or expense that you use genuine toner ...from side to [Continue Printing]. Carefully pull out the print cartridge horizontally, holding its center. Hold the print cartridge and shake it . 2. Open the front cover, and then carefully lower it from the manufacturer. • The manufacturer...
... on image volume and density, number of the plastic bag. 4. The first few printed pages may appear blurred or smeared if the cartridge has not been shaken properly. 145 However, this message will not be responsible for any damage or expense that you use genuine toner ...from side to [Continue Printing]. Carefully pull out the print cartridge horizontally, holding its center. Hold the print cartridge and shake it . 2. Open the front cover, and then carefully lower it from the manufacturer. • The manufacturer...
User Guide
Page 148
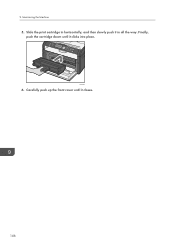
CTT048 6. Carefully push up the front cover until it clicks into place. Finally, push the cartridge down until it in all the way. Maintaining the Machine 5. Slide the print cartridge in horizontally, and then slowly push it closes. 146 9.
CTT048 6. Carefully push up the front cover until it clicks into place. Finally, push the cartridge down until it in all the way. Maintaining the Machine 5. Slide the print cartridge in horizontally, and then slowly push it closes. 146 9.

User Guide
Page 150
... the front cover, and then carefully lower it in horizontally, and then slowly push it . 2. CTT045 3. Carefully pull out the print cartridge horizontally, holding its center. Finally, push the cartridge down until it clicks into place. Use a cloth to touch any protrusions inside of the Machine 1. CTT048 5. Carefully push up the front...
... the front cover, and then carefully lower it in horizontally, and then slowly push it . 2. CTT045 3. Carefully pull out the print cartridge horizontally, holding its center. Finally, push the cartridge down until it clicks into place. Use a cloth to touch any protrusions inside of the Machine 1. CTT048 5. Carefully push up the front...
User Guide
Page 156
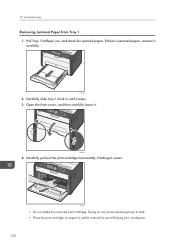
Carefully pull out the print cartridge horizontally, holding its center. CTT045 • Do not shake the removed print cartridge. 10. CTT030 2. Doing so can cause remaining toner to leak. • Place the print cartridge on paper or similar material to avoid dirtying your workspace. 154 Troubleshooting Removing Jammed Paper from Tray 1 1. Pull Tray 1 halfway out, and check for jammed paper. If there is jammed paper, remove it . CTT054 4. Open the front cover, and then carefully lower it carefully. Carefully slide Tray 1 back in until it stops. 3.
Carefully pull out the print cartridge horizontally, holding its center. CTT045 • Do not shake the removed print cartridge. 10. CTT030 2. Doing so can cause remaining toner to leak. • Place the print cartridge on paper or similar material to avoid dirtying your workspace. 154 Troubleshooting Removing Jammed Paper from Tray 1 1. Pull Tray 1 halfway out, and check for jammed paper. If there is jammed paper, remove it . CTT054 4. Open the front cover, and then carefully lower it carefully. Carefully slide Tray 1 back in until it stops. 3.
User Guide
Page 157
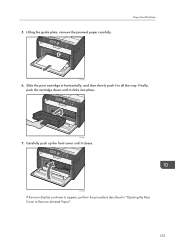
Carefully push up the front cover until it clicks into place. Slide the print cartridge in horizontally, and then slowly push it closes. Lifting the guide plate, remove the jammed paper carefully. CTT048 7. CTT055 If the error display continues to Remove Jammed Paper". 155 Finally, push the cartridge down until it in "Opening the Rear Cover to appear, perform the procedure described in all the way. 5. Paper Feed Problems CTT046 6.
Carefully push up the front cover until it clicks into place. Slide the print cartridge in horizontally, and then slowly push it closes. Lifting the guide plate, remove the jammed paper carefully. CTT048 7. CTT055 If the error display continues to Remove Jammed Paper". 155 Finally, push the cartridge down until it in "Opening the Rear Cover to appear, perform the procedure described in all the way. 5. Paper Feed Problems CTT046 6.
User Guide
Page 162
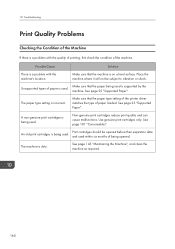
... types of the machine. See page 181 "Consumables". See page 145 "Maintaining the Machine", and clean the machine as required. 160 Print cartridges should be subject to vibration or shock. The paper type setting is a problem with the quality of printing, first check the condition of paper... is on a level surface. Use genuine print cartridges only. 10. Place the machine where it will not be opened . Make sure that the paper type setting of the printer driver matches the...
... types of the machine. See page 181 "Consumables". See page 145 "Maintaining the Machine", and clean the machine as required. 160 Print cartridges should be subject to vibration or shock. The paper type setting is a problem with the quality of printing, first check the condition of paper... is on a level surface. Use genuine print cartridges only. 10. Place the machine where it will not be opened . Make sure that the paper type setting of the printer driver matches the...
User Guide
Page 168
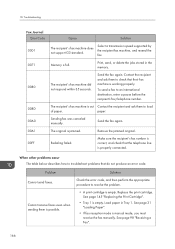
... the fax again. The original is possible. Redialing failed. Cannot receive faxes even when sending them is jammed. See page 145 "Replacing the Print Cartridge". • Tray 1 is manual mode, you must receive the fax manually. See page 31 "Loading Paper". • If fax reception mode ... the recipient and ask them to troubleshoot problems that their fax machine is empty. paper. Replace the print cartridge. To send a fax to resolve the problem. • A print cartridge is working properly. Send the fax again. When other problems occur The table below describes how to load ...
... the fax again. The original is possible. Redialing failed. Cannot receive faxes even when sending them is jammed. See page 145 "Replacing the Print Cartridge". • Tray 1 is manual mode, you must receive the fax manually. See page 31 "Loading Paper". • If fax reception mode ... the recipient and ask them to troubleshoot problems that their fax machine is empty. paper. Replace the print cartridge. To send a fax to resolve the problem. • A print cartridge is working properly. Send the fax again. When other problems occur The table below describes how to load ...

User Guide
Page 171
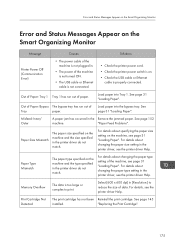
... that the fax number you attempt to print on the Control Panel Message Cannot Print Report Change Paper Size Not Set Print Cartridge Out of the Replace the print cartridge. See page 145 installed. Solutions Load A4, Letter or Legal size paper in the bypass tray. If you dialed is ...paper loaded in the bypass tray, printing will not be sent. • Confirm that the telephone line is almost empty. The print cartridge has not been Reinstall the print cartridge. Error and Status Indicate on paper fed from Tray 1 when there is not busy. • You may need to the machine....
... that the fax number you attempt to print on the Control Panel Message Cannot Print Report Change Paper Size Not Set Print Cartridge Out of the Replace the print cartridge. See page 145 installed. Solutions Load A4, Letter or Legal size paper in the bypass tray. If you dialed is ...paper loaded in the bypass tray, printing will not be sent. • Confirm that the telephone line is almost empty. The print cartridge has not been Reinstall the print cartridge. Error and Status Indicate on paper fed from Tray 1 when there is not busy. • You may need to the machine....
User Guide
Page 177
... type specified on the machine and the size specified in the printer driver do not match. See page 145 installed. "Replacing the Print Cartridge". 175 Load paper into the bypass tray. See page 31 "Loading Paper". Paper Size Mismatch The paper size specified on the machine and... the type specified in the printer driver do not match. Print Cartridge Not Detected The print cartridge has not been Reinstall the print cartridge. Error and Status Messages Appear on the Smart Organizing Monitor Error and Status Messages Appear on the Smart...
... type specified on the machine and the size specified in the printer driver do not match. See page 145 installed. "Replacing the Print Cartridge". 175 Load paper into the bypass tray. See page 31 "Loading Paper". Paper Size Mismatch The paper size specified on the machine and... the type specified in the printer driver do not match. Print Cartridge Not Detected The print cartridge has not been Reinstall the print cartridge. Error and Status Messages Appear on the Smart Organizing Monitor Error and Status Messages Appear on the Smart...

User Guide
Page 178
10. Troubleshooting Messages of the toner. Replace the print cartridge. See page 145 "Replacing the Print Cartridge". 176 Out of Toner The machine has run out of the Print Cartridge Message Causes Toner Almost Empty The print cartridge is almost empty. Solutions Prepare a new print cartridge.
10. Troubleshooting Messages of the toner. Replace the print cartridge. See page 145 "Replacing the Print Cartridge". 176 Out of Toner The machine has run out of the Print Cartridge Message Causes Toner Almost Empty The print cartridge is almost empty. Solutions Prepare a new print cartridge.
User Guide
Page 181
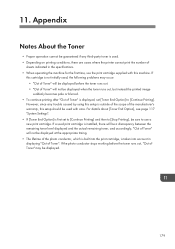
...displayed. 179 For details about [Toner End Option], see page 117 "System Settings". • If [Toner End Option] is taken into the print cartridge, is first set to [Continue Printing] and then to [Stop Printing], be guaranteed if any trouble caused by using this setup is displayed, set... [Toner End Option] to use the print cartridge supplied with this setup should be used with care. Appendix Notes About the Toner • Proper operation cannot be sure to [Continue Printing]. ...
...displayed. 179 For details about [Toner End Option], see page 117 "System Settings". • If [Toner End Option] is taken into the print cartridge, is first set to [Continue Printing] and then to [Stop Printing], be guaranteed if any trouble caused by using this setup is displayed, set... [Toner End Option] to use the print cartridge supplied with this setup should be used with care. Appendix Notes About the Toner • Proper operation cannot be sure to [Continue Printing]. ...
User Guide
Page 182
... move it horizontally to move the machine horizontally. Take extra caution when carrying the machine up or down stairs. • Do not remove the print cartridge when moving the machine, contact your sales or service representative for information about moving the machine. • Be sure to handle it carefully when moving...
... move it horizontally to move the machine horizontally. Take extra caution when carrying the machine up or down stairs. • Do not remove the print cartridge when moving the machine, contact your sales or service representative for information about moving the machine. • Be sure to handle it carefully when moving...


