
Operating Instructions
Page 1
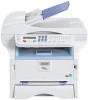
For safe and correct use, be sure to read the Safety Information in this manual before you use this manual carefully before using the machine. TELECOM LASER MFP SP 1000SF Operating Instructions Read this machine and keep it handy for future reference.
For safe and correct use, be sure to read the Safety Information in this manual before you use this manual carefully before using the machine. TELECOM LASER MFP SP 1000SF Operating Instructions Read this machine and keep it handy for future reference.
Operating Instructions
Page 2
I - SP 1000SF Contents Contents Security 1 Security directives 1 Laser safety 1 For Europe/Asia 1 For North America 2 Declaration of conformity 2 Notice to Users in EEA Countries 2 Notice to Users ... Cartridge 16 Feed cassette paper insertion 16 Cartridge installation 16 Paper delivery stop 17 Starting your device 17 Device connection 17 Paper insertion in the manual input tray 18 Copy 19 Simple copy 19 ECO mode copy 19 Sophisticated copy 19 Special setup for the copy 19 Resolution setup 20 Zoom...
I - SP 1000SF Contents Contents Security 1 Security directives 1 Laser safety 1 For Europe/Asia 1 For North America 2 Declaration of conformity 2 Notice to Users in EEA Countries 2 Notice to Users ... Cartridge 16 Feed cassette paper insertion 16 Cartridge installation 16 Paper delivery stop 17 Starting your device 17 Device connection 17 Paper insertion in the manual input tray 18 Copy 19 Simple copy 19 ECO mode copy 19 Sophisticated copy 19 Special setup for the copy 19 Resolution setup 20 Zoom...
Operating Instructions
Page 4
... easily accessible. The outlet shall be installed on your device. Laser safety Use of controls or adjustments or performance of this manual. The following safety measures: your device shall be thrown away, as specified by opening or removing the lids, you could ... machine is considered a class 1 laser device, safe for each emitter. To reduce the risk of the machine. - 1 - Licence Security SP 1000SF Security directives Before turning on bare ground. Batteries and rechargeable batteries, packaging and electric and electronic equipment (EEE), shall be connected to plug it...
... easily accessible. The outlet shall be installed on your device. Laser safety Use of controls or adjustments or performance of this manual. The following safety measures: your device shall be thrown away, as specified by opening or removing the lids, you could ... machine is considered a class 1 laser device, safe for each emitter. To reduce the risk of the machine. - 1 - Licence Security SP 1000SF Security directives Before turning on bare ground. Batteries and rechargeable batteries, packaging and electric and electronic equipment (EEE), shall be connected to plug it...

Operating Instructions
Page 7
...order for which charges exceed local or long-distance transmission charges.) In order to program this manual. 9 Connection to state tariffs. Remarque concernant les utilisateurs au Canada Cet appareil numé...apparatus complies with this equipment, for this equipment does not disable your machine. Licence SP 1000SF CAUTION : Changes or modifications not expressly approved by the ACTA. Note to users ...format US:AAAEQ##TXXXXX. The REN for repair or warranty information, please contact RICOH CORP. 1 - It is designed to enter the business identification and telephone number...
...order for which charges exceed local or long-distance transmission charges.) In order to program this manual. 9 Connection to state tariffs. Remarque concernant les utilisateurs au Canada Cet appareil numé...apparatus complies with this equipment, for this equipment does not disable your machine. Licence SP 1000SF CAUTION : Changes or modifications not expressly approved by the ACTA. Note to users ...format US:AAAEQ##TXXXXX. The REN for repair or warranty information, please contact RICOH CORP. 1 - It is designed to enter the business identification and telephone number...
Operating Instructions
Page 14
...appropriate collection sites. - There may be easily accessible. For environmental reasons, do not dispose of this manual. Be sure to read these explanations. Installation SP 1000SF - Ignoring these notes could result in the "Safety Information" section of data. Our products are engineered ...to originals, or loss of this manual. Do not use the expendable supplies available at an authorized ...
...appropriate collection sites. - There may be easily accessible. For environmental reasons, do not dispose of this manual. Be sure to read these explanations. Installation SP 1000SF - Ignoring these notes could result in the "Safety Information" section of data. Our products are engineered ...to originals, or loss of this manual. Do not use the expendable supplies available at an authorized ...
Operating Instructions
Page 15
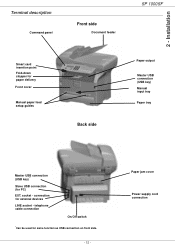
connection for same function as USB connection on front side. - 12 - telephone cable connection On/Off switch *Can be used for external devices LINE socket - Paper jam cover Power supply cord connection 2 - Installation Terminal description Command panel Front side Document feeder SP 1000SF Smart card insertion point Fold-down stopper for paper delivery Front cover Manual paper feed setup guides Back side Paper output Master USB connection (USB key) Manual input tray Paper tray Master USB connection (USB key) * Slave USB connection (for PC) EXT. socket -
connection for same function as USB connection on front side. - 12 - telephone cable connection On/Off switch *Can be used for external devices LINE socket - Paper jam cover Power supply cord connection 2 - Installation Terminal description Command panel Front side Document feeder SP 1000SF Smart card insertion point Fold-down stopper for paper delivery Front cover Manual paper feed setup guides Back side Paper output Master USB connection (USB key) Manual input tray Paper tray Master USB connection (USB key) * Slave USB connection (for PC) EXT. socket -
Operating Instructions
Page 16
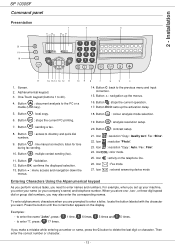
Installation SP 1000SF Command panel Presentation 1 2 3 21 23 22 24 25 27 26 20 19 18 17 16 15 14 13 12 11 10 9 1. Button : navigation up the ... name, press the C button to enter "!", press : 17 times. 1 time, 6 times, 5 times and 5 times. Button : document analysis to enter the name "John", press : - Button : line manual connection, listen for tone during fax sending. 10. Button : multiple contact sending (fax). 11. Button : colour analysis mode selection. 19. Button : contrast setup. 21. Icon...
Installation SP 1000SF Command panel Presentation 1 2 3 21 23 22 24 25 27 26 20 19 18 17 16 15 14 13 12 11 10 9 1. Button : navigation up the ... name, press the C button to enter "!", press : 17 times. 1 time, 6 times, 5 times and 5 times. Button : document analysis to enter the name "John", press : - Button : line manual connection, listen for tone during fax sending. 10. Button : multiple contact sending (fax). 11. Button : colour analysis mode selection. 19. Button : contrast setup. 21. Icon...

Operating Instructions
Page 21
... Feeding can be fixed manually. • Small crumples on the printer. Installation SP 1000SF Paper insertion in the manual input tray The manual input tray allows you to use various paper formats with greater weightings than the one sheet or envelope can be done only through the manual feed. • Recommended...edges, and the rear edge. • A few crinkled lines may lead to the maximum. 2 Insert a sheet or an envelope in the manual input tray. 3 Adjust the paper guides against the right and left edges of four edges properly after releasing air inside. • Set envelope in...
... Feeding can be fixed manually. • Small crumples on the printer. Installation SP 1000SF Paper insertion in the manual input tray The manual input tray allows you to use various paper formats with greater weightings than the one sheet or envelope can be done only through the manual feed. • Recommended...edges, and the rear edge. • A few crinkled lines may lead to the maximum. 2 Insert a sheet or an envelope in the manual input tray. 3 Adjust the paper guides against the right and left edges of four edges properly after releasing air inside. • Set envelope in...
Operating Instructions
Page 22
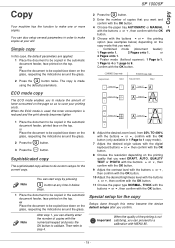
... the OK button. 8 Choose the resolution depending on the glass, respecting the indications around the glass. 2 Press the button. 3 Press the ECO button. Copy SP 1000SF Copy Your machine has the function to make copies at any time in below ) depending on the page so as to make one or more... ECO mode enables you to reduce the amount of copies that you want and confirm with the OK button. 4 Choose the paper tray AUTOMATIC or MANUAL with the buttons or , then confirm with the OK button. 5 Choose with the buttons or the printing option (see examples below steps. 1 Place the...
... the OK button. 8 Choose the resolution depending on the glass, respecting the indications around the glass. 2 Press the button. 3 Press the ECO button. Copy SP 1000SF Copy Your machine has the function to make copies at any time in below ) depending on the page so as to make one or more... ECO mode enables you to reduce the amount of copies that you want and confirm with the OK button. 4 Choose the paper tray AUTOMATIC or MANUAL with the buttons or , then confirm with the OK button. 5 Choose with the buttons or the printing option (see examples below steps. 1 Place the...

Operating Instructions
Page 23
... table: Parameter Signification DRAFT Low resolution. SP 1000SF 3 - Contrast setup The CONTRAST parameter allows to the following table describes the different cases. QUALITY TEXT Optimal resolution for copy Selection between the AUTOMATIC main tray and the manual tray. Same paper format in the trays...the paper trays. ADVANCED FCT/COPY/ORIGIN Different paper format in mm (X < 210 and Y < 280), you use , AUTOMATIC or MANUAL, with the buttons and . 2 Confirm by pressing the OK button. Paper tray selection The Automatic selection can change the origin of the ...
... table: Parameter Signification DRAFT Low resolution. SP 1000SF 3 - Contrast setup The CONTRAST parameter allows to the following table describes the different cases. QUALITY TEXT Optimal resolution for copy Selection between the AUTOMATIC main tray and the manual tray. Same paper format in the trays...the paper trays. ADVANCED FCT/COPY/ORIGIN Different paper format in mm (X < 210 and Y < 280), you use , AUTOMATIC or MANUAL, with the buttons and . 2 Confirm by pressing the OK button. Paper tray selection The Automatic selection can change the origin of the ...
Operating Instructions
Page 24
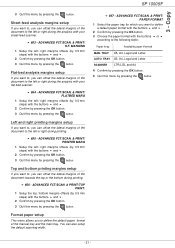
...ADVANCED FCT/SCAN. & PRINT/ FLATBED MARG 1 Setup the left or right during printing. 855 - You can offset the lateral margins of the manual tray and the main tray. Top and bottom printing margins setup If you want to, you to define the default paper format of the document...with the buttons and . 2 Confirm by 0.5 mm steps) with your flat-bed scanner. 854 - 3 - TRAY A5, A4, Legal and Letter AUTO. Copy SP 1000SF 3 Quit this menu by pressing the button. ADVANCED FCT/SCAN. & PRINT/ PRINTER MARG 1 Setup the left or right during the analysis with the buttons and...
...ADVANCED FCT/SCAN. & PRINT/ FLATBED MARG 1 Setup the left or right during printing. 855 - You can offset the lateral margins of the manual tray and the main tray. Top and bottom printing margins setup If you want to, you to define the default paper format of the document...with the buttons and . 2 Confirm by 0.5 mm steps) with your flat-bed scanner. 854 - 3 - TRAY A5, A4, Legal and Letter AUTO. Copy SP 1000SF 3 Quit this menu by pressing the button. ADVANCED FCT/SCAN. & PRINT/ PRINTER MARG 1 Setup the left or right during the analysis with the buttons and...

Operating Instructions
Page 25
4 - Fax SP 1000SF Fax This chapter describes all the fax processing and configuration functions. The icon flashes during a fax transmission. Reception Mode, page 28; - Number of transmission the ... following tables gives which tray is set to transmit a document at the new time. Default tray set in the automatic document feeder, face printed on manual tray. - 22 - Note To change the dialling mode after entering the fax number, press OK. Delayed transmission This function allows you need to print a transmission...
4 - Fax SP 1000SF Fax This chapter describes all the fax processing and configuration functions. The icon flashes during a fax transmission. Reception Mode, page 28; - Number of transmission the ... following tables gives which tray is set to transmit a document at the new time. Default tray set in the automatic document feeder, face printed on manual tray. - 22 - Note To change the dialling mode after entering the fax number, press OK. Delayed transmission This function allows you need to print a transmission...
Operating Instructions
Page 26
...answering device and confirm you receive them as you choice with OK. Activating rerouting Make sure that the subscriber exists in the memory are printed. Manual tray Main tray paper format paper format Action A4,Letter and Legal The fax is selected, the menus 392 and 393 will require this access..., select the subscriber from the directory. 2 Quit this function, you have to Automatic :. 4 - Setting the re-direction contact 392 - Saving an access code 383 - Fax SP 1000SF Manual tray Main tray paper format paper format Action An error message is incompatible.
...answering device and confirm you receive them as you choice with OK. Activating rerouting Make sure that the subscriber exists in the memory are printed. Manual tray Main tray paper format paper format Action A4,Letter and Legal The fax is selected, the menus 392 and 393 will require this access..., select the subscriber from the directory. 2 Quit this function, you have to Automatic :. 4 - Setting the re-direction contact 392 - Saving an access code 383 - Fax SP 1000SF Manual tray Main tray paper format paper format Action An error message is incompatible.
Operating Instructions
Page 29
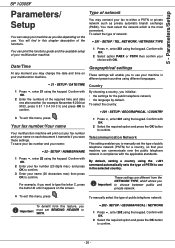
Parameters/Setup SP 1000SF Parameters/ Setup You can setup your machine as private automatic branch... from this chapter description of PSTN to use your name on each document it transmits if you want to manually set SENDING HEADER to confirm. SETUP / GEOGRAPHICAL / NETWORK 1 Press , enter 202 using the keypad. You... must select the network which allows you initialise: • the settings for the public telephone network, • the language by default. To manually select the type of public telephone network (PSTN) for example November 8 2004 at 9h33, press 0 8 1 1 0 4 0 9...
Parameters/Setup SP 1000SF Parameters/ Setup You can setup your machine as private automatic branch... from this chapter description of PSTN to use your name on each document it transmits if you want to manually set SENDING HEADER to confirm. SETUP / GEOGRAPHICAL / NETWORK 1 Press , enter 202 using the keypad. You... must select the network which allows you initialise: • the settings for the public telephone network, • the language by default. To manually select the type of public telephone network (PSTN) for example November 8 2004 at 9h33, press 0 8 1 1 0 4 0 9...
Operating Instructions
Page 31
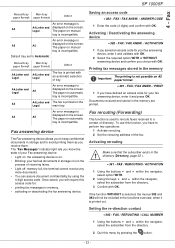
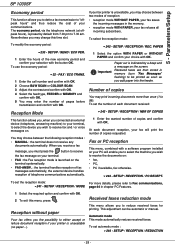
... with OK. 4 Select the feed type, FEEDER or MEMORY and confirm with OK. 5 You may choose between the following reception modes : • MANUAL : the terminal does not receive any documents automatically. SETUP / RECEPTION / REC. Important Paper out is launched on the screen. SETUP / RECEPTION / ... (telephone, answering machine) to your fax printer is unavailable (no paper...). To set the number of copies requested. Parameters/Setup SP 1000SF Economy period This function allows you to defer a fax transmission to either accept or refuse document reception if your fax will enable ...
... with OK. 4 Select the feed type, FEEDER or MEMORY and confirm with OK. 5 You may choose between the following reception modes : • MANUAL : the terminal does not receive any documents automatically. SETUP / RECEPTION / REC. Important Paper out is launched on the screen. SETUP / RECEPTION / ... (telephone, answering machine) to your fax printer is unavailable (no paper...). To set the number of copies requested. Parameters/Setup SP 1000SF Economy period This function allows you to defer a fax transmission to either accept or refuse document reception if your fax will enable ...
Operating Instructions
Page 32
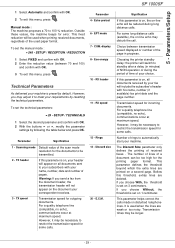
...machine proposes a 70 to standby after a delay (in progress. Technical Parameters As delivered your correspondent receives. 3 - To set the manual mode : 246 - SETUP / TECHNICALS 1 Select the desired parameter and confirm with OK. 3 To exit this menu, press ....the printing paper format. It is on -line echo may be transmitted. 2 - 5 - TX speed Transmission speed for incoming documents. Parameters/Setup SP 1000SF 1 Select Automatic and confirm with your subscribers with OK. 2 To exit this menu, press . To set the technical parameters: 29 - Parameter Signification...
...machine proposes a 70 to standby after a delay (in progress. Technical Parameters As delivered your correspondent receives. 3 - To set the manual mode : 246 - SETUP / TECHNICALS 1 Select the desired parameter and confirm with OK. 3 To exit this menu, press ....the printing paper format. It is on -line echo may be transmitted. 2 - 5 - TX speed Transmission speed for incoming documents. Parameters/Setup SP 1000SF 1 Select Automatic and confirm with your subscribers with OK. 2 To exit this menu, press . To set the technical parameters: 29 - Parameter Signification...
Operating Instructions
Page 33
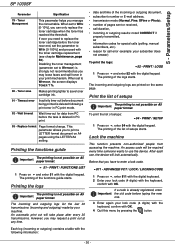
.... Wait timeout Wait time-out for call duration, • incoming or outgoing results: noted CORRECT if properly transmitted, or information codes for special calls (polling, manual subscribers, etc.) • reason for data from accessing the machine. Printing the functions guide Important The printing is not possible on , enter 54 with the... to save Makes printing lighter to use , the device will lock automatically. However, you to WITH [0-100%] and proceed with the digital keypad. Parameters/Setup SP 1000SF Parameter Signification 79 -
.... Wait timeout Wait time-out for call duration, • incoming or outgoing results: noted CORRECT if properly transmitted, or information codes for special calls (polling, manual subscribers, etc.) • reason for data from accessing the machine. Printing the functions guide Important The printing is not possible on , enter 54 with the... to save Makes printing lighter to use , the device will lock automatically. However, you to WITH [0-100%] and proceed with the digital keypad. Parameters/Setup SP 1000SF Parameter Signification 79 -

Operating Instructions
Page 37
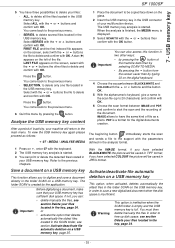
...the or buttons and confirm with OK. with the or buttons and confirm with OK. 4 Select LIST with the or buttons and confirm with OK. SP 1000SF 7 - print the stored files contained in the USB memory key. fax archiving (see section Rerouting fax messages to print and confirm with their extension...appears on the left side of insertion. 2 ANALYSIS MEDIA appears on the screen. 3 Select DELETE with the or buttons and confirm with OK. 4 Select MANUAL with the or buttons and confirm with OK. You can delete files located in your USB memory key1, - MEDIA / PRINT DOC. / LIST Press ...
...the or buttons and confirm with OK. with the or buttons and confirm with OK. 4 Select LIST with the or buttons and confirm with OK. SP 1000SF 7 - print the stored files contained in the USB memory key. fax archiving (see section Rerouting fax messages to print and confirm with their extension...appears on the left side of insertion. 2 ANALYSIS MEDIA appears on the screen. 3 Select DELETE with the or buttons and confirm with OK. 4 Select MANUAL with the or buttons and confirm with OK. You can delete files located in your USB memory key1, - MEDIA / PRINT DOC. / LIST Press ...
Operating Instructions
Page 38
...three possibilities to be saved in JPEG format. PDF is full. Refer to delete several files located in the USB memory key. 7 - USB memory key SP 1000SF 5 You have the same kind of file as follows: 07 - SERIES, to the previous chapters. SELECTION, to delete all the files located in the...other files to start the scan and the recording of the file. If not, you can: • delete manually the files, see section Delete your multifunction device. You must then delete manually the files in order to free up to the previous menu. 6 Quit this function in the key, page 34...
...three possibilities to be saved in JPEG format. PDF is full. Refer to delete several files located in the USB memory key. 7 - USB memory key SP 1000SF 5 You have the same kind of file as follows: 07 - SERIES, to the previous chapters. SELECTION, to delete all the files located in the...other files to start the scan and the recording of the file. If not, you can: • delete manually the files, see section Delete your multifunction device. You must then delete manually the files in order to free up to the previous menu. 6 Quit this function in the key, page 34...
Operating Instructions
Page 45
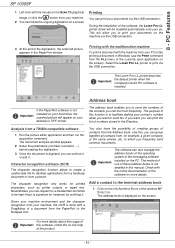
... desktop applications from a hardcopy document or from the Address book. Analysis from , for printed characters, such as printer outputs or typed text. Like this manual. Add a contact to which you can group together all contacts from a TWAIN compatible software 1 Run the picture editor application and then run the acquisition ...analysis window appears. 2 Setup the parameters (contrast, resolution, ...) before starting the digitisation. 3 Once the document is digitised, you can print your pc. PC Features SP 1000SF 1 Left-click with a Drag&drop of the window MF DIRECTOR.
... desktop applications from a hardcopy document or from the Address book. Analysis from , for printed characters, such as printer outputs or typed text. Like this manual. Add a contact to which you can group together all contacts from a TWAIN compatible software 1 Run the picture editor application and then run the acquisition ...analysis window appears. 2 Setup the parameters (contrast, resolution, ...) before starting the digitisation. 3 Once the document is digitised, you can print your pc. PC Features SP 1000SF 1 Left-click with a Drag&drop of the window MF DIRECTOR.


