Network Guide
Page 23
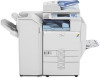
... Domain Name IPv4 Gateway Address DNS Configuration Effective Protocol NCP Delivery Protocol Default User Name / Password (Send) Scanner Resend Interval Time Number of Scanner Resends 15
... Domain Name IPv4 Gateway Address DNS Configuration Effective Protocol NCP Delivery Protocol Default User Name / Password (Send) Scanner Resend Interval Time Number of Scanner Resends 15

Network Guide
Page 34
... [NetWare]. • Print Server Name: Enter the NetWare print server name. Specify here this period of time). figure, and then click [Next]. This item is 15 (seconds). • Frame Type: Select the frame type from the drop-down menu. • Print Server Protocol: Select the protocol for NetWare from the [Start...
... [NetWare]. • Print Server Name: Enter the NetWare print server name. Specify here this period of time). figure, and then click [Next]. This item is 15 (seconds). • Frame Type: Select the frame type from the drop-down menu. • Print Server Protocol: Select the protocol for NetWare from the [Start...

Network Guide
Page 73
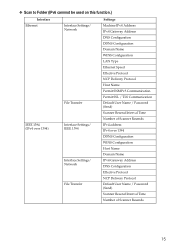
... direct printing port settings: msh> diprint Example output: port 9100 timeout=300(sec) bidirect on a DNS 1 server: msh> dns 1 server 192.168. 15.16 • You can register IPv4 DNS Server address. • You can register up to three IPv6 DNS server numbers. 65 dns Use the "dns...or disables the IPv4 DNS server address: msh> dns "number" server "server address" The following command displays a configuration using the IP address 192.168.15.16 on con multi apl async • The "port" specifies the port number of concurrent diprint connections. Use the "diprint" command to change direct...
... direct printing port settings: msh> diprint Example output: port 9100 timeout=300(sec) bidirect on a DNS 1 server: msh> dns 1 server 192.168. 15.16 • You can register IPv4 DNS Server address. • You can register up to three IPv6 DNS server numbers. 65 dns Use the "dns...or disables the IPv4 DNS server address: msh> dns "number" server "server address" The following command displays a configuration using the IP address 192.168.15.16 on con multi apl async • The "port" specifies the port number of concurrent diprint connections. Use the "diprint" command to change direct...
Network Guide
Page 76
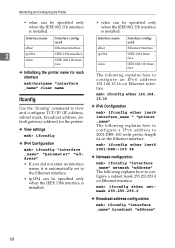
..."parameter" "address" • If you did not enter an interface name, it is automatically set to configure an IPv4 address 192.168.15.16 on the Ethernet interface. Monitoring and Configuring the Printer • wlan can be specified only when the IEEE 802.11b interface is installed... netmask 255.255.255.0 ❖ Broadcast address configuration msh> ifconfig "interface _name" broadcast "address" 68 ifconfig msh> ifconfig ether 192.168. 15.16 Use the "ifconfig" command to view and configure TCP/IP (IP address, subnet mask, broadcast address, default gateway address) for each interface...
..."parameter" "address" • If you did not enter an interface name, it is automatically set to configure an IPv4 address 192.168.15.16 on the Ethernet interface. Monitoring and Configuring the Printer • wlan can be specified only when the IEEE 802.11b interface is installed... netmask 255.255.255.0 ❖ Broadcast address configuration msh> ifconfig "interface _name" broadcast "address" 68 ifconfig msh> ifconfig ether 192.168. 15.16 Use the "ifconfig" command to view and configure TCP/IP (IP address, subnet mask, broadcast address, default gateway address) for each interface...

Network Guide
Page 82
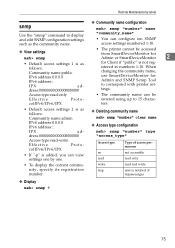
... slp msh> smb group "work group name" Use "slp" command to view and configure SLP settings. • Set workgroup name using up to 15 characters msh> slp ttl "ttl_val" • You can view name" settings one by one. • Set computer name using up to Reference p.98... "Configuring the Network Interface Board" 15 characters. A search is added, you can configure the value of TTL is between 1 and 255. ❖ Comment settings msh> smb comment "comment" •...
... slp msh> smb group "work group name" Use "slp" command to view and configure SLP settings. • Set workgroup name using up to 15 characters msh> slp ttl "ttl_val" • You can view name" settings one by one. • Set computer name using up to Reference p.98... "Configuring the Network Interface Board" 15 characters. A search is added, you can configure the value of TTL is between 1 and 255. ❖ Comment settings msh> smb comment "comment" •...
Network Guide
Page 83
...- istered in numbers 1-10. tings. • The community name can be accessed from SmartDeviceMonitor for Admin or SmartDeviceMonitor 2 for Admin and SNMP Setup Tool to 15 characters. • Default access settings 2 is added, you can configure ten SNMP access settings numbered 1-10. • The printer cannot be entered using up to...
...- istered in numbers 1-10. tings. • The community name can be accessed from SmartDeviceMonitor for Admin or SmartDeviceMonitor 2 for Admin and SNMP Setup Tool to 15 characters. • Default access settings 2 is added, you can configure ten SNMP access settings numbered 1-10. • The printer cannot be entered using up to...
Network Guide
Page 122
... A Copy \WINDOWS\HOSTS.SAM the following format: to the hosts file using memo pad files, for this format. Insert a space or tab between "192.168.15.16" and "host", between "host" and "#NP" respectively, using one line for instance. Windows 2000/XP, Windows Server 2003, Windows NT 4.0 A Open ...# NP "HOSTS" with IPv6 protocol, perform host name resolution using one line for Windows 2000/XP, Windows Server 2003, and Windows NT 4.0. 114 "192.168.15.16" is replaced by comments. D Save the file. C Save the file. "host" is the printer's host name, and "#NP" is the directory of...
... A Copy \WINDOWS\HOSTS.SAM the following format: to the hosts file using memo pad files, for this format. Insert a space or tab between "192.168.15.16" and "host", between "host" and "#NP" respectively, using one line for instance. Windows 2000/XP, Windows Server 2003, Windows NT 4.0 A Open ...# NP "HOSTS" with IPv6 protocol, perform host name resolution using one line for Windows 2000/XP, Windows Server 2003, and Windows NT 4.0. 114 "192.168.15.16" is replaced by comments. D Save the file. C Save the file. "host" is the printer's host name, and "#NP" is the directory of...
PostScript Supplement
Page 5
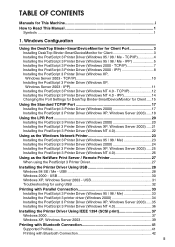
... / Me - TCP/IP 7 Installing the PostScript 3 Printer Driver (Windows 2000 - TCP/IP 12 Installing the PostScript 3 Printer Driver (Windows NT 4.0 - USB 31 Troubleshooting for Client .....15 Using the Standard TCP/IP Port 17 Installing the PostScript 3 Printer Driver (Windows 2000 17 Installing the PostScript 3 Printer Driver (Windows XP, Windows Server 2003...
... / Me - TCP/IP 7 Installing the PostScript 3 Printer Driver (Windows 2000 - TCP/IP 12 Installing the PostScript 3 Printer Driver (Windows NT 4.0 - USB 31 Troubleshooting for Client .....15 Using the Standard TCP/IP Port 17 Installing the PostScript 3 Printer Driver (Windows 2000 17 Installing the PostScript 3 Printer Driver (Windows XP, Windows Server 2003...
PostScript Supplement
Page 14
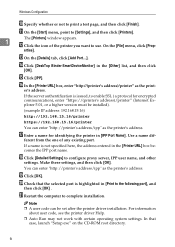
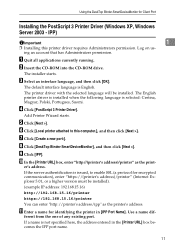
... "Setup.exe" on the CD-ROM root directory. 6 Note ❒ A user code can be installed). (example IP address: 192.168.15.16) http://192.168.15.16/printer https://192.168.15.16/printer You can enter "http://printer's address/ipp" as the printer's address. The [Printers] window appears. 1 L Click the icon of...
... "Setup.exe" on the CD-ROM root directory. 6 Note ❒ A user code can be installed). (example IP address: 192.168.15.16) http://192.168.15.16/printer https://192.168.15.16/printer You can enter "http://printer's address/ipp" as the printer's address. The [Printers] window appears. 1 L Click the icon of...
PostScript Supplement
Page 16
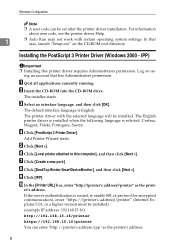
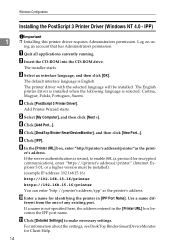
... encrypted communication), enter "https://(printer's address)/printer" (Internet Explorer 5.01, or a higher version must be installed). (example IP address: 192.168.15.16) http://192.168.15.16/printer https://192.168.15.16/printer You can be installed. J In the [Printer URL] box, enter "http://(printer's address)/printer" as the printer's address...
... encrypted communication), enter "https://(printer's address)/printer" (Internet Explorer 5.01, or a higher version must be installed). (example IP address: 192.168.15.16) http://192.168.15.16/printer https://192.168.15.16/printer You can be installed. J In the [Printer URL] box, enter "http://(printer's address)/printer" as the printer's address...
PostScript Supplement
Page 19
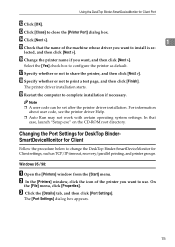
... address entered in [IPP Port Name]. The printer driver with the selected language will be installed). (example IP address: 192.168.15.16) http://192.168.15.16/printer https://192.168.15.16/printer You can enter "http://printer's address/ipp" as the print- H Click [DeskTop Binder-SmartDeviceMonitor], and then click [Next...
... address entered in [IPP Port Name]. The printer driver with the selected language will be installed). (example IP address: 192.168.15.16) http://192.168.15.16/printer https://192.168.15.16/printer You can enter "http://printer's address/ipp" as the print- H Click [DeskTop Binder-SmartDeviceMonitor], and then click [Next...
PostScript Supplement
Page 22
...-ROM into the CD-ROM drive. The printer driver with the selected language will be installed). (example IP address: 192.168.15.16) http://192.168.15.16/printer https://192.168.15.16/printer You can enter "http://printer's address/ipp" as the print- E Select [My Computer], and then click [Next >]. If...
...-ROM into the CD-ROM drive. The printer driver with the selected language will be installed). (example IP address: 192.168.15.16) http://192.168.15.16/printer https://192.168.15.16/printer You can enter "http://printer's address/ipp" as the print- E Select [My Computer], and then click [Next >]. If...
PostScript Supplement
Page 23
... about user code, see the printer driver Help. ❒ Auto Run may not work with certain operating system settings. The [Port Settings] dialog box appears. 15 Using the DeskTop Binder-SmartDeviceMonitor for Client settings, such as default. lected, and then click [Next >]. R Specify whether or not to complete installation if necessary...
... about user code, see the printer driver Help. ❒ Auto Run may not work with certain operating system settings. The [Port Settings] dialog box appears. 15 Using the DeskTop Binder-SmartDeviceMonitor for Client settings, such as default. lected, and then click [Next >]. R Specify whether or not to complete installation if necessary...

Copy/Document Server Reference
Page 21
... 2. Placing Originals Originals ...11 Sizes and Weights of Recommended Originals 11 Sizes Detectable by the Auto Paper Select 13 Missing Image Area 14 Placing Originals 15 Original Orientation 16 Placing Originals on Copies v Adjusting Colors ...vi Adjusting Images...vii What You Can Do with This Machine ix Types of Jobs 30...
... 2. Placing Originals Originals ...11 Sizes and Weights of Recommended Originals 11 Sizes Detectable by the Auto Paper Select 13 Missing Image Area 14 Placing Originals 15 Original Orientation 16 Placing Originals on Copies v Adjusting Colors ...vi Adjusting Images...vii What You Can Do with This Machine ix Types of Jobs 30...

Copy/Document Server Reference
Page 37
...User Tools (System Settings). *4 You can select from 81/2" × 14" to 81/2" × 13", from 11" × 17" to 11" × 15", from 81/2" × 11"L to 8" × 10", from 81/2" × 11" to 16K with User Tools (System Settings). ❖ Exposure glass CP01AEE ...; 17" L Expo- × × sure ADF 81/2" 81/2" 51/2" 81/2" 11" 10" × × × × × × 14" L 11" 81/2" 13" KL KL L 15" L 14" L *1 × × × *2 *2 8" 71/4" × × 10" L 101/2" LK × × *2 *2 : Detectable size × : Undetectable size *1 If you ...
...User Tools (System Settings). *4 You can select from 81/2" × 14" to 81/2" × 13", from 11" × 17" to 11" × 15", from 81/2" × 11"L to 8" × 10", from 81/2" × 11" to 16K with User Tools (System Settings). ❖ Exposure glass CP01AEE ...; 17" L Expo- × × sure ADF 81/2" 81/2" 51/2" 81/2" 11" 10" × × × × × × 14" L 11" 81/2" 13" KL KL L 15" L 14" L *1 × × × *2 *2 8" 71/4" × × 10" L 101/2" LK × × *2 *2 : Detectable size × : Undetectable size *1 If you ...

Copy/Document Server Reference
Page 39
Note ❒ For original sizes you can set, see "Originals". Reference See p.11 "Originals". 15 Placing Originals Placing Originals This section describes the procedure for placing originals on the exposure glass that will be copied onto paper. Not taking this precaution could cause marks on the exposure glass and in the ADF. 1 Take care to place originals after any correction fluid and ink has completely dried.
Note ❒ For original sizes you can set, see "Originals". Reference See p.11 "Originals". 15 Placing Originals Placing Originals This section describes the procedure for placing originals on the exposure glass that will be copied onto paper. Not taking this precaution could cause marks on the exposure glass and in the ADF. 1 Take care to place originals after any correction fluid and ink has completely dried.

Copy/Document Server Reference
Page 77
... density of each color using the best suitable values. Reference See p.iii "What You Can Do with This Machine ". You can also give a name to 15 colors can be registered. ❒ Sample prints of user colors can register User Colors made by adjusting the density of yellow, magenta, cyan, and black...
... density of each color using the best suitable values. Reference See p.iii "What You Can Do with This Machine ". You can also give a name to 15 colors can be registered. ❒ Sample prints of user colors can register User Colors made by adjusting the density of yellow, magenta, cyan, and black...

Copy/Document Server Reference
Page 78
The density of each color based on selected color Creates colors by adjusting the density of a chosen basic color. A Press [Edit / Color]. 2 B Press [Color], and then press [User Color]. D Select the color to register. Copying Adjusting colors based on the density of each color for registration from the basic and user colors. To select User Color, press [User Color], and then select the color. 54 C Make sure that [Program] is selected, and then select the number ([01]-[15]) for the color you want to be used as a base for the selected color is displayed.
The density of each color based on selected color Creates colors by adjusting the density of a chosen basic color. A Press [Edit / Color]. 2 B Press [Color], and then press [User Color]. D Select the color to register. Copying Adjusting colors based on the density of each color for registration from the basic and user colors. To select User Color, press [User Color], and then select the color. 54 C Make sure that [Program] is selected, and then select the number ([01]-[15]) for the color you want to be used as a base for the selected color is displayed.

Copy/Document Server Reference
Page 79
... specify density by pressing [Adjust with number keys Creates colors by directly specifying the density of that is selected, and then select the number ([01]-[15]) for the color you want to specify density by pressing [Adjust with Number Keys] in step F. ❒ Selecting a user color key that color. 55 C Make...
... specify density by pressing [Adjust with number keys Creates colors by directly specifying the density of that is selected, and then select the number ([01]-[15]) for the color you want to specify density by pressing [Adjust with Number Keys] in step F. ❒ Selecting a user color key that color. 55 C Make...
Copy/Document Server Reference
Page 80
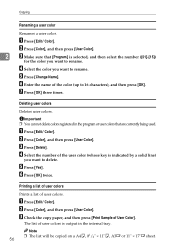
... press [OK]. F Enter the name of the color (up to rename. D Select the number of user colors is selected, and then select the number ([01]-[15]) for the color you want to delete. F Press [OK] twice. Printing a list of user colors Prints a list of User Color]. C Check the copy paper, and...
... press [OK]. F Enter the name of the color (up to rename. D Select the number of user colors is selected, and then select the number ([01]-[15]) for the color you want to delete. F Press [OK] twice. Printing a list of user colors Prints a list of User Color]. C Check the copy paper, and...

