Quick Start Guide
Page 10
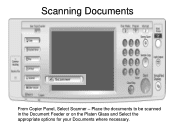
Scanning Documents From Copier Panel, Select Scanner - Place the documents to be scanned in the Document Feeder or on the Platen Glass and Select the appropriate options for your Documents where necessary.
Scanning Documents From Copier Panel, Select Scanner - Place the documents to be scanned in the Document Feeder or on the Platen Glass and Select the appropriate options for your Documents where necessary.
Quick Start Guide
Page 11
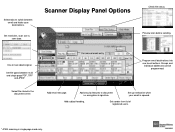
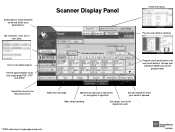
Scanner Display Panel Options Check file status. One or two sided original. Add email message. Preview scan before sending. For manual email entry Program email destinations ...
Scanner Display Panel Options Check file status. One or two sided original. Add email message. Preview scan before sending. For manual email entry Program email destinations ...

Quick Start Guide
Page 12
At copier Screen Press [Scanner] 2. Select [E-mail] or [Folder] Tab 3. Press [Start] (Note: Screenshots are provided for reference purposes only. Place Originals in Feeder or on your operating system and device.) Basic Scanning 1. Your display may vary depending on Glass 5. Select destination [email address or folder location 4.
At copier Screen Press [Scanner] 2. Select [E-mail] or [Folder] Tab 3. Press [Start] (Note: Screenshots are provided for reference purposes only. Place Originals in Feeder or on your operating system and device.) Basic Scanning 1. Your display may vary depending on Glass 5. Select destination [email address or folder location 4.
User Guide
Page 33
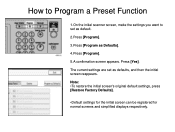
The current settings are set as default. 2.Press [Program]. 3.Press [Program as defaults, and then the initial screen reappears. Note: •To restore the initial screen's original default settings, press [Restore Factory Defaults]. •Default settings for the initial screen can be registered for normal screens and simplified displays respectively. Press [Yes]. How to Program a Preset Function 1.On the initial scanner screen, make the settings you want to set as Defaults]. 4.Press [Program]. 5.A confirmation screen appears.
The current settings are set as default. 2.Press [Program]. 3.Press [Program as defaults, and then the initial screen reappears. Note: •To restore the initial screen's original default settings, press [Restore Factory Defaults]. •Default settings for the initial screen can be registered for normal screens and simplified displays respectively. Press [Yes]. How to Program a Preset Function 1.On the initial scanner screen, make the settings you want to set as Defaults]. 4.Press [Program]. 5.A confirmation screen appears.

User Guide
Page 51
Place the documents to be scanned in the Document Feeder or on the Platen Glass and Select the appropriate options for your Documents where necessary. Scanning Documents From Copier Panel, Select Scanner -
Place the documents to be scanned in the Document Feeder or on the Platen Glass and Select the appropriate options for your Documents where necessary. Scanning Documents From Copier Panel, Select Scanner -
User Guide
Page 52
Scanner Display Panel Check file status. Add email message. Add subject heading. Set file types between email and folder scan destinations. For manual email entry Program ...
Scanner Display Panel Check file status. Add email message. Add subject heading. Set file types between email and folder scan destinations. For manual email entry Program ...
User Guide
Page 60
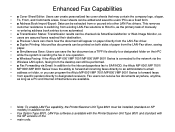
This removes • customer resistance to switching from existing LAN-Fax solutions to Ricoh's, as the primary task of manually • re-entering address book entries is now automated. • ■ Transmission Status: Transmission results can be extracted ...document as a TIFF file directly to a designated folder on SP models) in one operation. • ■ Wireless Faxing: If the Aficio MP 6001/MP 7001/MP 8001/MP 9001 Series is available with the Printer/Scanner Unit Type 9001 and standard with the SP versions of paper from specific senders directly to the • Fax Option...
This removes • customer resistance to switching from existing LAN-Fax solutions to Ricoh's, as the primary task of manually • re-entering address book entries is now automated. • ■ Transmission Status: Transmission results can be extracted ...document as a TIFF file directly to a designated folder on SP models) in one operation. • ■ Wireless Faxing: If the Aficio MP 6001/MP 7001/MP 8001/MP 9001 Series is available with the Printer/Scanner Unit Type 9001 and standard with the SP versions of paper from specific senders directly to the • Fax Option...
Reference Guide
Page 3
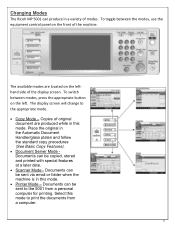
...Place the original in a variety of the machine. The display screen will change to the 5001 from a computer. 3 Select this mode. • Printer Mode - Changing Modes The Ricoh MP 5001 can produce in the Automatic Document Handler/glass platen and follow the standard copy procedures (See ...Basic Copy Features). • Document Server Mode Documents can be copied, stored and printed with special features at a later date. • Scanner Mode - To...
...Place the original in a variety of the machine. The display screen will change to the 5001 from a computer. 3 Select this mode. • Printer Mode - Changing Modes The Ricoh MP 5001 can produce in the Automatic Document Handler/glass platen and follow the standard copy procedures (See ...Basic Copy Features). • Document Server Mode Documents can be copied, stored and printed with special features at a later date. • Scanner Mode - To...

Reference Guide
Page 9
... to Auto Select Color which means if the document has color on it, it is scanned has a color document. Set your originals and press the [Scanner] key on the Platen Glass 1. Scan Settings are defaulted to . 3. Please see Scan Settings below for steps to a 4MB file size. Scanning to email is...
... to Auto Select Color which means if the document has color on it, it is scanned has a color document. Set your originals and press the [Scanner] key on the Platen Glass 1. Scan Settings are defaulted to . 3. Please see Scan Settings below for steps to a 4MB file size. Scanning to email is...


