Ricoh Aficio MP 5001 Support Question
Ricoh Aficio MP 5001 Support Question
Find answers below for this question about Ricoh Aficio MP 5001.Need a Ricoh Aficio MP 5001 manual? We have 4 online manuals for this item!
Question posted by joesv on September 11th, 2014
How To Set Scanner To Email On Aficio Mp 5001
The person who posted this question about this Ricoh product did not include a detailed explanation. Please use the "Request More Information" button to the right if more details would help you to answer this question.
Current Answers
Answer #1: Posted by freginold on September 12th, 2014 8:52 AM
freginold

Member since:
December 20th, 2011 Points: 23,253,895

Member since:
December 20th, 2011 Points: 23,253,895
This article will walk you through setting up scanning to email:
- How to set up scan to email on a Ricoh Aficio MP series copier
This article will show you how to save email addresses to the address book, once you have scanning to email set up:
- How to add an email address to a Ricoh Aficio MP series copier
Here are instructions for how to scan to email once you have it all set up:
- Press the Scanner button
- Place your original(s) in the document feeder or on the glass
- Select the Email tab, if it isn't already selected
- Select a destination from the list of programmed destinations, or enter a new one using the Manual Entry button
- Press the Start button
If this answer helped you to solve your problem and/or answer your question, please let us know by clicking on the “Helpful” icon below. If your question wasn’t answered to your satisfaction, feel free to resubmit your question with more information. Thank you for using HelpOwl!
Related Ricoh Aficio MP 5001 Manual Pages
Quick Start Guide - Page 1
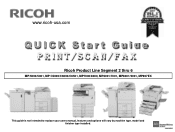
www.ricoh-usa.com
Ricoh Product Line Segment 2 thru 6
MP/5000/5001, MP C5000/C6000/C6501, MP7000/8000, MP6001/7001, MP8001/9001, MP907EX
This guide is not intended to replace your users manual, features and options will vary by machine type, model and finisher type installed.
Quick Start Guide - Page 4
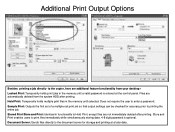
... user to print files immediately while simultaneously storing data. 4-8 digit password is entered at a later date. Sample Print: Outputs the first set of a multiple-set print job so that output settings can be checked for storage and printing at the control panel. Files are automatically deleted from your desktop:Locked Print: Temporarily holds...
Quick Start Guide - Page 5
Sample Print: Outputs the first set of a multiple-set print job so that output settings can be checked for storage and printing at the control panel. Does not require the user to printing the entire job. Document Server: Sends files ...
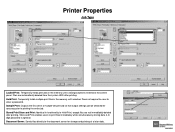
Quick Start Guide - Page 9
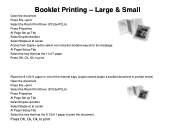
...the document Press File >print Select the Ricoh Print Driver (PCL5e/PCL6) Press Properties At Page Set up Tab Select Duplex>booklet Select Staple>2 at center Across from Duplex option select non reduction ... Press File >print Select the Ricoh Print Driver (PCL5e/PCL6) Press Properties At Page Set up Tab Select Duplex>booklet Select Staple>2 at center At Paper Setup Tab Select the tray that...
Quick Start Guide - Page 10
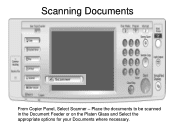
Scanning Documents
From Copier Panel, Select Scanner - Place the documents to be scanned in the Document Feeder or on the Platen Glass and Select the appropriate options for your Documents where necessary.
Quick Start Guide - Page 11
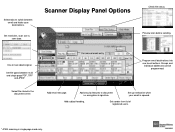
... in the document server. Select tabs to document i.e. One or two sided original.
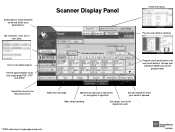
Set up notification when your email is opened. Groups and
individual addresses can be programmed. encryption & signature. Scanner Display Panel Options
Check file status.
Add email message.
For manual email entry
Program email destinations into one touch buttons. Preview scan before sending.
Quick Start Guide - Page 12

Select destination [email address or folder location
4. Place Originals in Feeder or on your operating system and device.) At copier Screen Press [Scanner]
2. Your display may vary depending on Glass 5. Basic Scanning
1. Press [Start]
(Note: Screenshots are provided for reference purposes only. Select [E-mail] or [Folder] Tab 3.
Quick Start Guide - Page 16
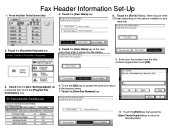
... Information] key
6. Touch the [Own Name] key at the next menu then enter a name from the blue numeric keypad then touch [OK]
3. Fax Header Information Set-Up
1. Press the [User Tools/Counter] key
4. Touch the [Own Name] key
8. Touch the [For G3-1] key ( there may be other G3 keys depending on...
Quick Start Guide - Page 19

... fax 2. You can select more than one destination to the document, you can customize your fax cover.
8. Select [File], then [Print]
Faxing From Desktop
3. Press [Set as if you wish to confirm Recipient's destination. Press [Send] or [Print] 1. Press [OK] or [Print].
5. Open the document you were manually dialing the number...
User Guide - Page 3
...Display
Batch & Mixed Originals. Short cut keys. Key color is only available in user tools "General
Settings"
Paper tray status.
Register keys in simplified
display mode. These can be added to suit users
...be adjusted to this screen.
Simplified Display
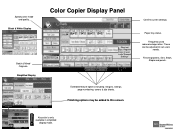
Color Copier Display Panel
Confirm current settings. Extended feature options including;
Specify color mode and quality.
User Guide - Page 6
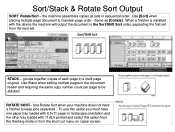
... - To use this option from the finishing mode or from the next set from the short cut menu on copier screen. Same as sets in the document feeder and requiring the same copy number count per page to... paper in landscape orientation and the other tray loaded with the device the machine will output the document in a multi-page original. the machine assembles copies as [Collate]. ROTATE ...
User Guide - Page 33
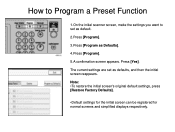
... initial screen reappears. How to Program a Preset Function
1.On the initial scanner screen, make the settings you want to set as Defaults].
4.Press [Program].
5.A confirmation screen appears. Note: •To restore the initial screen's original default settings, press [Restore Factory Defaults].
•Default settings for the initial screen can be registered for normal screens and...
User Guide - Page 52
...registered users.
* JPEG scanning in the document server.
Set resolution, scan size & scan type. Groups and
individual addresses can be programmed.
Add subject heading.
Preview scan before sending. Scanner Display Panel
Check file status. Set file types between email and folder scan destinations. For manual email entry
Program email destinations into one touch buttons.
User Guide - Page 60
...Scanner Unit Type 9001 must be installed (standard on both sides of the
• main units. Cover sheets can be edited and saved to users' PCs as a fixed form. • ■ Address Book Import/Export: Data can be checked via Email: In addition to the inbound paperless fax to SAF/HDD, the Aficio MP... Aficio MP 6001/MP 7001/MP 8001/MP 9001 Series is available with the Printer/Scanner Unit...
Troubleshooting Guide - Page 2
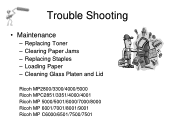
Trouble Shooting
• Maintenance
- Replacing Toner - Loading Paper - Clearing Paper Jams - Replacing Staples - Cleaning Glass Platen and Lid
Ricoh MP2800/3300/4000/5000 Ricoh MPC2851/3351/4000/4001 Ricoh MP 5000/5001/6000/7000/8000 Ricoh MP 6001/7001/8001/9001 Ricoh MP C6000/6501/7500/7501
Troubleshooting Guide - Page 17
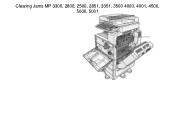
Clearing Jams MP 3300, 2800, 2500, 2851, 3351, 3500 4000, 4001, 4500, 5000, 5001
Reference Guide - Page 3
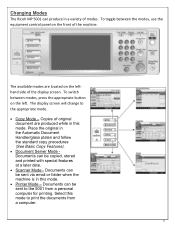
... document are located on the left ‐ hand side of modes.
Changing Modes
The Ricoh MP 5001 can be sent via email or folder when the machine is in this mode.
• Printer Mode - Documents can be... stored and printed with special features at a later date.
• Scanner Mode - To toggle between modes, press the appropriate button on the left . Copies of the machine.
Reference Guide - Page 7
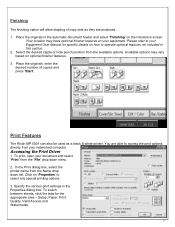
... 2.
Available options may have optional finisher features on optional finisher features. 3. Specify the various print settings in the automatic document feeder and select 'Finishing' on how to select any special printing options. ... position from your equipment. Print Features
The Ricoh MP 5001 can also be used as they are able to access the print options directly from the ...
Reference Guide - Page 8
... the printing properties for the document. 2. Copies are collated and stapled. Once the print settings are grouped by page. Collate - To access the available duplex options for printing, select ...the 'Print' option from the display list. Enter the number of the Ricoh 5001.
1. Copies are established, click 'OK' to open the printing properties for the document.
...
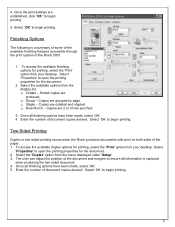
Reference Guide - Page 9

Set your device.
2. Scanning to email is limited to .
3. Notes
1. a. 4MB= Approximately 40 Black and White pages b. 4MB= Approximately 10 Color pages 2. Press [E-mail], and then select the recipient you want to send the scan to a 4MB file size. Basic Scanning to Email...and press the [Scanner] key on the Platen Glass
1.
Press the [Start] key.
Please see Scan Settings below for steps...
Similar Questions


How Do I Edit An Already Saved Email Address That Is Set In My Aficio Mp 5001?
My user name and email address are already saved into my printer. My email address has changed. Is t...
My user name and email address are already saved into my printer. My email address has changed. Is t...
(Posted by alanfugitt 10 years ago)


How To Configure Scanner Ricoh Aficio Mp 2851 For Email
(Posted by mgsfada 10 years ago)