

User Guide
Page 3
... Hardware...37 Checking the Computer and Installation Area 37 Checking the Supplied Items and Unpacking the Printer 40 Attaching the Options...41 Installing the Print Cartridges...42 Plugging in the Power Cord and Turning the Power On 44 Loading Paper...45 Printing a Configuration Page...51 Connecting the Computer and Installing the...
... Hardware...37 Checking the Computer and Installation Area 37 Checking the Supplied Items and Unpacking the Printer 40 Attaching the Options...41 Installing the Print Cartridges...42 Plugging in the Power Cord and Turning the Power On 44 Loading Paper...45 Printing a Configuration Page...51 Connecting the Computer and Installing the...
User Guide
Page 7
Selecting the Control Panel Language...191 Restricting Printer Functions...193 Locking the Keys...193 Unlocking the Keys...193 Replacing a Print Cartridge...195 Checking the Remaining Ink...195 Replacing a Print Cartridge...197 Handling Print Cartridges...199 Replacing an Ink Collector Unit...201 Cleaning...204 Cleaning the Power Cable Plug...204 Moving...205 Moving a Short Distance...
Selecting the Control Panel Language...191 Restricting Printer Functions...193 Locking the Keys...193 Unlocking the Keys...193 Replacing a Print Cartridge...195 Checking the Remaining Ink...195 Replacing a Print Cartridge...197 Handling Print Cartridges...199 Replacing an Ink Collector Unit...201 Cleaning...204 Cleaning the Power Cable Plug...204 Moving...205 Moving a Short Distance...
User Guide
Page 8
... Tray 260 Paper Size Mismatch/Paper Type Mismatch (Auto Tray Select 262 Cover Open...264 Cover Open / Print Cartridge(s) Not Detected 266 Duplex Unit Not Detected...268 Cartridge Almost Empty...269 Cartridge Empty...270 Used Cartridge...271 Ink Collector Unit Not Detected...272 Ink Collector Unit Almost Full...274 Ink Collector Unit Full...274...
... Tray 260 Paper Size Mismatch/Paper Type Mismatch (Auto Tray Select 262 Cover Open...264 Cover Open / Print Cartridge(s) Not Detected 266 Duplex Unit Not Detected...268 Cartridge Almost Empty...269 Cartridge Empty...270 Used Cartridge...271 Ink Collector Unit Not Detected...272 Ink Collector Unit Almost Full...274 Ink Collector Unit Full...274...

User Guide
Page 13
... move the printer or open its covers. • Do not open . If you do, dust or other matter might result from the use genuine print cartridges from the supplier with your office products. If you use of parts other than genuine parts from the supplier. User's Notes • High temperatures inside...
... move the printer or open its covers. • Do not open . If you do, dust or other matter might result from the use genuine print cartridges from the supplier with your office products. If you use of parts other than genuine parts from the supplier. User's Notes • High temperatures inside...
User Guide
Page 14
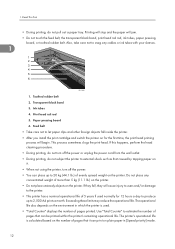
... can print on plain paper in [Speed priority] mode. 12 Transparent black band 3. If they fall inside the printer. • After you install the print cartridge and switch the printer on the printer. Printing will stop and the paper will cause injury to users and/or damage to the printer. •...
... can print on plain paper in [Speed priority] mode. 12 Transparent black band 3. If they fall inside the printer. • After you install the print cartridge and switch the printer on the printer. Printing will stop and the paper will cause injury to users and/or damage to the printer. •...
User Guide
Page 15
...-black text or if you want to ensure consistent print quality. An "Ink Collector almost full" message appears shortly before their packaging. • Cartridges that are done to maintain printer performance. • If the printer will still be used for a long time, turn its power off , ... disuse. • Color ink may fill up before the ink collector unit is full. Because the printer consumes a lot of the print cartridges becomes empty. Manuals for maintenance and print head cleaning when switched on a level surface and safe from shock and vibration. • Do ...
...-black text or if you want to ensure consistent print quality. An "Ink Collector almost full" message appears shortly before their packaging. • Cartridges that are done to maintain printer performance. • If the printer will still be used for a long time, turn its power off , ... disuse. • Color ink may fill up before the ink collector unit is full. Because the printer consumes a lot of the print cartridges becomes empty. Manuals for maintenance and print head cleaning when switched on a level surface and safe from shock and vibration. • Do ...
User Guide
Page 23
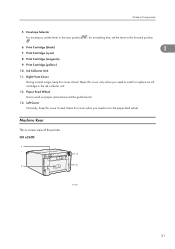
Print Cartridge (black) 1 7. GX e2600 1 4 7 5 BYJ260S 21 for everything else, set the lever to the forward position 6. Right Front Cover During normal usage, keep this cover when you need to install or replace an ink cartridge or the ink collector unit. 12. Print Cartridge (magenta) 9. Print Cartridge (yellow) 10. Envelope Selector For envelopes,... cover only when you need to turn the paper feed wheel. Open this cover closed . Paper Feed Wheel Use to Components 5. Print Cartridge (cyan) 8. Guide to wind out paper jammed around the guide board. 13.
Print Cartridge (black) 1 7. GX e2600 1 4 7 5 BYJ260S 21 for everything else, set the lever to the forward position 6. Right Front Cover During normal usage, keep this cover when you need to install or replace an ink cartridge or the ink collector unit. 12. Print Cartridge (magenta) 9. Print Cartridge (yellow) 10. Envelope Selector For envelopes,... cover only when you need to turn the paper feed wheel. Open this cover closed . Paper Feed Wheel Use to Components 5. Print Cartridge (cyan) 8. Guide to wind out paper jammed around the guide board. 13.

User Guide
Page 26
...red light is on, follow the instructions that makes printing impossible; You can use this function: under [Maintenance], set size or type. Cartridge replacement indicator Each color corresponds to indicate a possible error during printing. Press this to print all data left , the colors show the ...status of the black (K), cyan (C), magenta (M), and yellow (Y) cartridges. 3. [Menu] key Press this key to increase or decrease values on the display in the online status when the paper size or type ...
...red light is on, follow the instructions that makes printing impossible; You can use this function: under [Maintenance], set size or type. Cartridge replacement indicator Each color corresponds to indicate a possible error during printing. Press this to print all data left , the colors show the ...status of the black (K), cyan (C), magenta (M), and yellow (Y) cartridges. 3. [Menu] key Press this key to increase or decrease values on the display in the online status when the paper size or type ...

User Guide
Page 40
Preparing for Printing 2 BPR172S BPR173S • White area: Permissible Range • Blue area: Recommended Range • The diagram below shows the ideal clearance for loading paper, replacing print cartridges, and removing jammed paper BPR205S a. If you attach the bypass tray (option), provide additional clearance of 29 cm (11.5 inches). 38 2.
Preparing for Printing 2 BPR172S BPR173S • White area: Permissible Range • Blue area: Recommended Range • The diagram below shows the ideal clearance for loading paper, replacing print cartridges, and removing jammed paper BPR205S a. If you attach the bypass tray (option), provide additional clearance of 29 cm (11.5 inches). 38 2.

User Guide
Page 42
Cyan • Starter cartridge - Magenta • Starter cartridge - Remove the plastic bag. 3. Preparing for Printing Checking the Supplied Items and Unpacking the Printer • The machine weighs around 13.6 kg (30.0 lb) (16.1 ... printer slowly and carefully. 40 2. Lift the printer and move it . Black • Quick Installation Guide • Safety information • CD-ROM; Yellow • Starter cartridge - Grip the indented area at the base of the printer's sides, as shown. BPR111S Open the box and take out all supplied items. Check that...
Cyan • Starter cartridge - Magenta • Starter cartridge - Remove the plastic bag. 3. Preparing for Printing Checking the Supplied Items and Unpacking the Printer • The machine weighs around 13.6 kg (30.0 lb) (16.1 ... printer slowly and carefully. 40 2. Lift the printer and move it . Black • Quick Installation Guide • Safety information • CD-ROM; Yellow • Starter cartridge - Grip the indented area at the base of the printer's sides, as shown. BPR111S Open the box and take out all supplied items. Check that...
User Guide
Page 44
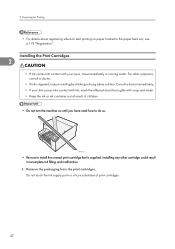
...skin comes into contact with soap and water. • Keep the ink or ink container out of reach of print cartridges. 42 Remove the packaging from the print cartridges. Consult a doctor immediately. • If your eyes, rinse immediately in running water. Do not touch the ink ... malfunction. 1. Preparing for Printing • For details about registering where to start printing on until you have read how to install the unused print cartridge that is ingested, induce vomiting by drinking a strong saline solution. BPR111S • Be sure to do so. Installing any other symptoms, consult ...
...skin comes into contact with soap and water. • Keep the ink or ink container out of reach of print cartridges. 42 Remove the packaging from the print cartridges. Consult a doctor immediately. • If your eyes, rinse immediately in running water. Do not touch the ink ... malfunction. 1. Preparing for Printing • For details about registering where to start printing on until you have read how to install the unused print cartridge that is ingested, induce vomiting by drinking a strong saline solution. BPR111S • Be sure to do so. Installing any other symptoms, consult ...

User Guide
Page 45
Setting Up the Hardware 2. Push in the following order from the left: black, cyan, magenta, and yellow. 4. Check the orientation of the right front cover, open the cover ( ). 2 BPR113S 3. BPR115S 43 BPR114S Install in each cartridge, and then install them gently. Repeat steps 3 to 4 for all four cartridges. 6. While pressing the recessed area ( ) of each cartridge. 5. Close the right front cover.
Setting Up the Hardware 2. Push in the following order from the left: black, cyan, magenta, and yellow. 4. Check the orientation of the right front cover, open the cover ( ). 2 BPR113S 3. BPR115S 43 BPR114S Install in each cartridge, and then install them gently. Repeat steps 3 to 4 for all four cartridges. 6. While pressing the recessed area ( ) of each cartridge. 5. Close the right front cover.
User Guide
Page 46
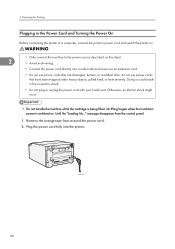
... have been trapped under heavy objects, pulled hard, or bent severely. Otherwise, an electric shock might occur. • Do not handle the machine while the cartridge is switched on this sheet. 2 • Avoid multi-wiring. • Connect the power cord directly into the printer. message disappears from around the power cord...
... have been trapped under heavy objects, pulled hard, or bent severely. Otherwise, an electric shock might occur. • Do not handle the machine while the cartridge is switched on this sheet. 2 • Avoid multi-wiring. • Connect the power cord directly into the printer. message disappears from around the power cord...
User Guide
Page 109
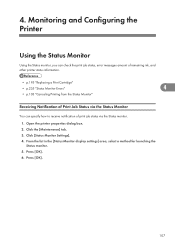
... the Status monitor, you can check the print job status, error messages amount of remaining ink, and other printer status information. • p.195 "Replacing a Print Cartridge" • p.255 "Status Monitor Errors" 4 • p.103 "Canceling Printing from the Status Monitor" Receiving Notification of Print Job Status via the Status Monitor You can...
... the Status monitor, you can check the print job status, error messages amount of remaining ink, and other printer status information. • p.195 "Replacing a Print Cartridge" • p.255 "Status Monitor Errors" 4 • p.103 "Canceling Printing from the Status Monitor" Receiving Notification of Print Job Status via the Status Monitor You can...

User Guide
Page 122
Functions Selectable value Printer Error ON 4 OFF Cartridge Empty ON OFF Cartridge Almost Empty ON OFF Replace Ink Collector Unit ON OFF Ink Collector Unit Near Full ON OFF No Paper ON OFF Paper Misfeed ON OFF ...
Functions Selectable value Printer Error ON 4 OFF Cartridge Empty ON OFF Cartridge Almost Empty ON OFF Replace Ink Collector Unit ON OFF Ink Collector Unit Near Full ON OFF No Paper ON OFF Paper Misfeed ON OFF ...

User Guide
Page 123
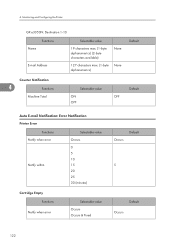
Using Web Browser Functions Unit/Cartridge Not Set Out of Printable Temperature Range Selectable value ON OFF ON OFF Default OFF OFF Auto E-mail Notification: Counter Notification Group Group to Notify Functions E-mail Language E-mail Language Subject Selectable value English Japanese German French Italian Spanish Dutch Swedish Danish Norwegian Portuguese Finnish Polish Czech Hungarian Russian 31 characters max. (1-byte alphanumerics) (2-byte characters available) English Default English None Destination GX e3300N: Destination 1-5 4 121
Using Web Browser Functions Unit/Cartridge Not Set Out of Printable Temperature Range Selectable value ON OFF ON OFF Default OFF OFF Auto E-mail Notification: Counter Notification Group Group to Notify Functions E-mail Language E-mail Language Subject Selectable value English Japanese German French Italian Spanish Dutch Swedish Danish Norwegian Portuguese Finnish Polish Czech Hungarian Russian 31 characters max. (1-byte alphanumerics) (2-byte characters available) English Default English None Destination GX e3300N: Destination 1-5 4 121
User Guide
Page 124
4. Monitoring and Configuring the Printer GX e3350N: Destination 1-10 Name Functions E-mail Address Selectable value 19 characters max. (1-byte alphanumerics) (2-byte characters available) 127 characters max. (1-byte alphanumerics) None None Default ... OFF Default OFF Auto E-mail Notification: Error Notification Printer Error Functions Notify when error Notify within Selectable value Occurs 0 5 10 15 20 25 30 (minutes) Cartridge Empty Functions Notify when error Selectable value Occurs Occurs & Fixed Occurs Default 5 Default Occurs 122
4. Monitoring and Configuring the Printer GX e3350N: Destination 1-10 Name Functions E-mail Address Selectable value 19 characters max. (1-byte alphanumerics) (2-byte characters available) 127 characters max. (1-byte alphanumerics) None None Default ... OFF Default OFF Auto E-mail Notification: Error Notification Printer Error Functions Notify when error Notify within Selectable value Occurs 0 5 10 15 20 25 30 (minutes) Cartridge Empty Functions Notify when error Selectable value Occurs Occurs & Fixed Occurs Default 5 Default Occurs 122

User Guide
Page 125
Functions Notify within Cartridge Almost Empty Functions Notify when error Notify within Replace Ink Collector Unit Functions Notify when error Notify within Using Web Browser Selectable value 0 5 10 15 5 20 25 30 (minutes) Default 4 Selectable value Default Occurs Occurs & Fixed Occurs 10 20 10 30 (%) Selectable value Occurs 0 5 10 15 20 25 30 (minutes) Occurs Default 5 123
Functions Notify within Cartridge Almost Empty Functions Notify when error Notify within Replace Ink Collector Unit Functions Notify when error Notify within Using Web Browser Selectable value 0 5 10 15 5 20 25 30 (minutes) Default 4 Selectable value Default Occurs Occurs & Fixed Occurs 10 20 10 30 (%) Selectable value Occurs 0 5 10 15 20 25 30 (minutes) Occurs Default 5 123

User Guide
Page 129
Using Web Browser Functions Notify within Selectable value 0 5 10 15 20 25 30 (minutes) Unit/Cartridge Not Set Functions Notify when error Notify within Selectable value Occurs Occurs & Fixed 0 5 10 15 20 25 30 (minutes) Out of Printable Temperature Range Functions Notify when error Notify within Selectable value Occurs 0 5 10 15 20 25 30 (minutes) Default 5 Default Occurs 5 Occurs Default 5 4 127
Using Web Browser Functions Notify within Selectable value 0 5 10 15 20 25 30 (minutes) Unit/Cartridge Not Set Functions Notify when error Notify within Selectable value Occurs Occurs & Fixed 0 5 10 15 20 25 30 (minutes) Out of Printable Temperature Range Functions Notify when error Notify within Selectable value Occurs 0 5 10 15 20 25 30 (minutes) Default 5 Default Occurs 5 Occurs Default 5 4 127
User Guide
Page 156
... Menu)" Selecting the control panel language See p.191 "Selecting the Control Panel Language" 5 Restricting printer functions See p.193 "Restricting Printer Functions" Replacing a print cartridge See p.195 "Replacing a Print Cartridge" Replacing an ink collector unit See p.201 "Replacing an Ink Collector Unit" Cleaning See p.204 "Cleaning" Moving See p.205 "Moving" Disposing See p.207...
... Menu)" Selecting the control panel language See p.191 "Selecting the Control Panel Language" 5 Restricting printer functions See p.193 "Restricting Printer Functions" Replacing a print cartridge See p.195 "Replacing a Print Cartridge" Replacing an ink collector unit See p.201 "Replacing an Ink Collector Unit" Cleaning See p.204 "Cleaning" Moving See p.205 "Moving" Disposing See p.207...

