

User Guide
Page 3
......42 Plugging in the Power Cord and Turning the Power On 44 Loading Paper...45 Printing a Configuration Page...51 Connecting the Computer and Installing the Software (USB Connection 53 Before Installing the...
......42 Plugging in the Power Cord and Turning the Power On 44 Loading Paper...45 Printing a Configuration Page...51 Connecting the Computer and Installing the Software (USB Connection 53 Before Installing the...
User Guide
Page 4
... PCL or RPCS Raster Printer Driver (Network 75 Installing the DeskTopBinder - Quick Install for USB...54 Connecting the Computer and Installing the Software (Network Connection 57 Before Installing the Software (Network Connection 57 Quick Install for Network...61 Checking the Printer Status and Settings using the Printer's Control Panel (List/Test Print...
... PCL or RPCS Raster Printer Driver (Network 75 Installing the DeskTopBinder - Quick Install for USB...54 Connecting the Computer and Installing the Software (Network Connection 57 Before Installing the Software (Network Connection 57 Quick Install for Network...61 Checking the Printer Status and Settings using the Printer's Control Panel (List/Test Print...
User Guide
Page 6
... whether Bidirectional Communication is Working on a Macintosh 151 Displaying the Status Monitor on a Macintosh 151 Opening Help on a Macintosh...153 Displaying Help from a Macintosh 156 Software on the CD-ROM for Macintosh...158 Files for Macintosh...158 RPCS Raster Printer Drivers for Macintosh 158 Manuals (HTML files) for Macintosh)...155 Updating...
... whether Bidirectional Communication is Working on a Macintosh 151 Displaying the Status Monitor on a Macintosh 151 Opening Help on a Macintosh...153 Displaying Help from a Macintosh 156 Software on the CD-ROM for Macintosh...158 Files for Macintosh...158 RPCS Raster Printer Drivers for Macintosh 158 Manuals (HTML files) for Macintosh)...155 Updating...
User Guide
Page 7
Troubleshooting Software Cannot Be Installed...209 Confirming Installation...209 Checking Your Computer Environment...209 Printer Driver Cannot Be Installed...212 USB Connection is not Automatically Detected 212 ...
Troubleshooting Software Cannot Be Installed...209 Confirming Installation...209 Checking Your Computer Environment...209 Printer Driver Cannot Be Installed...212 USB Connection is not Automatically Detected 212 ...
User Guide
Page 9
......315 Option and Consumables...316 7 Appendix Updating the Firmware...283 Checking the Current Printer Driver Version 284 Software on the CD-ROM...285 Files...285 RPCS Raster Printer Drivers...285 PCL Printer Drivers (GX e3350N only 286 SmartDeviceMonitor for Client...286 Manuals (HTML files)...287 Cautions to Take When Using in a Network...
......315 Option and Consumables...316 7 Appendix Updating the Firmware...283 Checking the Current Printer Driver Version 284 Software on the CD-ROM...285 Files...285 RPCS Raster Printer Drivers...285 PCL Printer Drivers (GX e3350N only 286 SmartDeviceMonitor for Client...286 Manuals (HTML files)...287 Cautions to Take When Using in a Network...
User Guide
Page 18
... again here. • The following explanation uses Windows XP as an example. Be sure to the operating environment. 16 It indicates where you installed the software when performing [Quick Install for USB] or [Quick Install for Network], there is used in this manual. Indicates supplementary explanations of data. If you can...
... again here. • The following explanation uses Windows XP as an example. Be sure to the operating environment. 16 It indicates where you installed the software when performing [Quick Install for USB] or [Quick Install for Network], there is used in this manual. Indicates supplementary explanations of data. If you can...
User Guide
Page 20
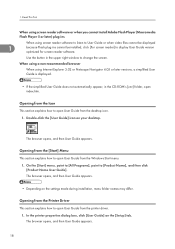
... 1 because Flash plug-ins cannot be installed, click [For screen reader] to change the screen. Read This First When using screen reader software or when you cannot install Adobe Flash Player (Macromedia Flash Player 5 or later) plug-ins When using Internet Explorer 3.02 or Netscape Navigator.... • If the simplified User Guide does not automatically appear, in the upper right window to display User Guide version optimized for screen reader software. Double-click the [User Guide] icon on the [Setup] tab. The browser opens, and then User Guide appears. On the [Start] ...
... 1 because Flash plug-ins cannot be installed, click [For screen reader] to change the screen. Read This First When using screen reader software or when you cannot install Adobe Flash Player (Macromedia Flash Player 5 or later) plug-ins When using Internet Explorer 3.02 or Netscape Navigator.... • If the simplified User Guide does not automatically appear, in the upper right window to display User Guide version optimized for screen reader software. Double-click the [User Guide] icon on the [Setup] tab. The browser opens, and then User Guide appears. On the [Start] ...

User Guide
Page 54
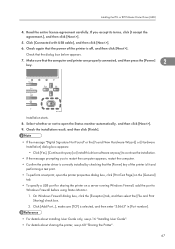
Press the [ ] or [ ] key to p.57 "Connecting the Computer and Installing the Software (Network Connection)". • For details about the items on completion of printing. Check whether the print head nozzles are connecting the printer to a network, proceed ... printer to a computer via USB, proceed to display [Config. 2. List/Test Print: Config. Press the [ ] or [ ] key to p.53 "Connecting the Computer and Installing the Software (USB Connection)". Page], and then press the [#Enter] key. Page The configuration page is printed. Hold the [Power] key down until the printer shuts down...
Press the [ ] or [ ] key to p.57 "Connecting the Computer and Installing the Software (Network Connection)". • For details about the items on completion of printing. Check whether the print head nozzles are connecting the printer to a network, proceed ... printer to a computer via USB, proceed to display [Config. 2. List/Test Print: Config. Press the [ ] or [ ] key to p.53 "Connecting the Computer and Installing the Software (USB Connection)". Page], and then press the [#Enter] key. Page The configuration page is printed. Hold the [Power] key down until the printer shuts down...
User Guide
Page 55
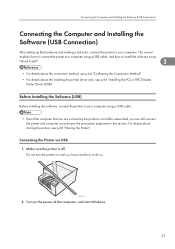
...cable. • Even if the computer that you are connecting the printer to via USB 1. BPR111S 2. Before Installing the Software (USB) Before installing the software, connect the printer to your computer. Do not turn the printer on the power of the computer, and start Windows.... "Sharing the Printer". Turn on until you have read how to do so. Connecting the Computer and Installing the Software (USB Connection) Connecting the Computer and Installing the Software (USB Connection) After setting up the hardware and making a test print, connect the printer to your computer using ...
...cable. • Even if the computer that you are connecting the printer to via USB 1. BPR111S 2. Before Installing the Software (USB) Before installing the software, connect the printer to your computer. Do not turn the printer on the power of the computer, and start Windows.... "Sharing the Printer". Turn on until you have read how to do so. Connecting the Computer and Installing the Software (USB Connection) Connecting the Computer and Installing the Software (USB Connection) After setting up the hardware and making a test print, connect the printer to your computer using ...

User Guide
Page 57
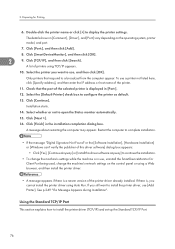
... clear the [Search remove media (floppy, CD-ROM...)] check box. Click [Yes], [Continue Anyway] or [Install this driver software anyway] to open the printer status monitor automatically, and then click [Next >]. 55 Read the entire license agreement carefully. Select whether...1. Check that the computer and printer are properly connected, and then press the [Power] key. If the [Software Installation] or [Windows can 't verify the publisher of this driver software] dialog box appears: 1. If this location in the search], and then click [Browse]. 3. Browse to "...
... clear the [Search remove media (floppy, CD-ROM...)] check box. Click [Yes], [Continue Anyway] or [Install this driver software anyway] to open the printer status monitor automatically, and then click [Next >]. 55 Read the entire license agreement carefully. Select whether...1. Check that the computer and printer are properly connected, and then press the [Power] key. If the [Software Installation] or [Windows can 't verify the publisher of this driver software] dialog box appears: 1. If this location in the search], and then click [Browse]. 3. Browse to "...
User Guide
Page 59
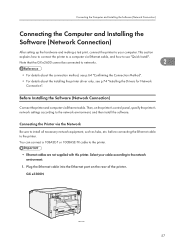
... • For details about the installing the printer driver only, see p.74 "Installing the Drivers for Network Connection". Note that the GX e2600 cannot be connected to the printer. • Ethernet cables are not supplied with this printer. before connecting the Ethernet cable to ...all necessary network equipment, such as hubs, etc. Before Installing the Software (Network Connection) Connect the printer and computer via the Network Be sure to the network environment, and then install the software. GX e3300N BPR129S 57 This section explains how to connect the printer to a ...
... • For details about the installing the printer driver only, see p.74 "Installing the Drivers for Network Connection". Note that the GX e2600 cannot be connected to the printer. • Ethernet cables are not supplied with this printer. before connecting the Ethernet cable to ...all necessary network equipment, such as hubs, etc. Before Installing the Software (Network Connection) Connect the printer and computer via the Network Be sure to the network environment, and then install the software. GX e3300N BPR129S 57 This section explains how to connect the printer to a ...
User Guide
Page 61
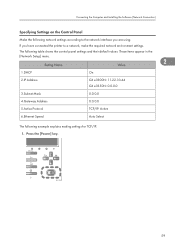
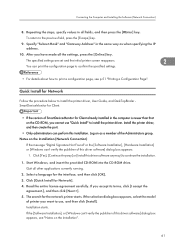
...Software (Network Connection) Specifying Settings on the Control Panel Make the following network settings according to the network interface you have connected the printer to a network, make the required network environment settings. Press the [Power] key. Setting Name Value 2 1.DHCP On 2.IP Address GX e3300N...: 11.22.33.44 GX e3350N: 0.0.0.0 3.Subnet Mask 0.0.0.0 4.Gateway Address 0.0.0.0 5.Active Protocol TCP/IP: Active 6.Ethernet Speed Auto Select ...
...Software (Network Connection) Specifying Settings on the Control Panel Make the following network settings according to the network interface you have connected the printer to a network, make the required network environment settings. Press the [Power] key. Setting Name Value 2 1.DHCP On 2.IP Address GX e3300N...: 11.22.33.44 GX e3350N: 0.0.0.0 3.Subnet Mask 0.0.0.0 4.Gateway Address 0.0.0.0 5.Active Protocol TCP/IP: Active 6.Ethernet Speed Auto Select ...
User Guide
Page 63
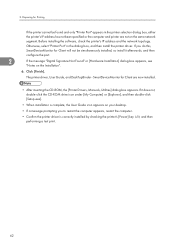
...printer screen reappears. 2 You can 't verify the publisher of the Administrators group. Click [Yes], [Continue Anyway] or [Install this driver software] dialog box appears, see p.51 "Printing a Configuration Page". Click [Quick Install for the network printer starts. If the selection dialog box ...appears, select the model of this installation. If the [Software Installation], or [Windows can print the configuration page to confirm the specified settings. • For details about how to install the printer...
...printer screen reappears. 2 You can 't verify the publisher of the Administrators group. Click [Yes], [Continue Anyway] or [Install this driver software] dialog box appears, see p.51 "Printing a Configuration Page". Click [Quick Install for the network printer starts. If the selection dialog box ...appears, select the model of this installation. If the [Software Installation], or [Windows can print the configuration page to confirm the specified settings. • For details about how to install the printer...
User Guide
Page 64
.... 2 If the message "Digital Signature Not Found" or [Hardware Installation] dialog box appears, see "Notes on the same network segment. Click [Finish]. Before installing the software, check the printer's IP address and the network topology. The printer driver, User Guide, and DeskTopBinder - 2. If you to restart the computer appears, restart the...
.... 2 If the message "Digital Signature Not Found" or [Hardware Installation] dialog box appears, see "Notes on the same network segment. Click [Finish]. Before installing the software, check the printer's IP address and the network topology. The printer driver, User Guide, and DeskTopBinder - 2. If you to restart the computer appears, restart the...
User Guide
Page 66
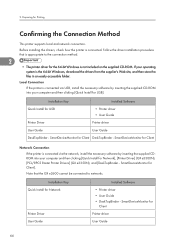
...files in an easily accessible folder. Local Connection If the printer is connected via the network, install the necessary software by inserting the supplied CD-ROM into your operating system is not included on the supplied CD-ROM. 2. ...Software • Printer driver • User Guide • DeskTopBinder - Installation Key Quick Install for USB • Printer driver • User Guide Printer Driver Printer driver User Guide User Guide DeskTopBinder - Note that is connected. SmartDeviceMonitor for Network], [Printer Driver] (GX e3300N), [PCL/RPCS Raster Printer Drivers] (GX...
...files in an easily accessible folder. Local Connection If the printer is connected via the network, install the necessary software by inserting the supplied CD-ROM into your operating system is not included on the supplied CD-ROM. 2. ...Software • Printer driver • User Guide • DeskTopBinder - Installation Key Quick Install for USB • Printer driver • User Guide Printer Driver Printer driver User Guide User Guide DeskTopBinder - Note that is connected. SmartDeviceMonitor for Network], [Printer Driver] (GX e3300N), [PCL/RPCS Raster Printer Drivers] (GX...

User Guide
Page 67
... the DeskTopBinder - SmartDeviceMonitor for Client" • p.61 "Quick Install for Network" • p.54 "Quick Install for USB" 65 Confirming the Connection Method Installation Key Installed Software DeskTopBinder -
... the DeskTopBinder - SmartDeviceMonitor for Client" • p.61 "Quick Install for Network" • p.54 "Quick Install for USB" 65 Confirming the Connection Method Installation Key Installed Software DeskTopBinder -
User Guide
Page 69
... "Digital Signature Not Found" or the [Found New Hardware Wizard] or [Hardware Installation] dialog box appears: • Click [Yes], [Continue Anyway] or [Install this driver software anyway] to continue the installation. • If the message prompting you accept its terms, click [I accept the agreement.], and then click [Next >]. 5. Read the entire...
... "Digital Signature Not Found" or the [Found New Hardware Wizard] or [Hardware Installation] dialog box appears: • Click [Yes], [Continue Anyway] or [Install this driver software anyway] to continue the installation. • If the message prompting you accept its terms, click [I accept the agreement.], and then click [Next >]. 5. Read the entire...

User Guide
Page 77
... click [Next >]. 75 Select an interface language, and then click [OK]. 3. Quit all applications currently running. 2. If your model is the GX e3350N, click [PCL/RPCS Raster Printer Drivers]. The software license agreement appears in the [] dialog box. 4. To use the SmartDeviceMonitor for Client port, you accept its terms, click [I accept the...
... click [Next >]. 75 Select an interface language, and then click [OK]. 3. Quit all applications currently running. 2. If your model is the GX e3350N, click [PCL/RPCS Raster Printer Drivers]. The software license agreement appears in the [] dialog box. 4. To use the SmartDeviceMonitor for Client port, you accept its terms, click [I accept the...
User Guide
Page 78
... to complete installation. • If the message "Digital Signature Not Found" or the [Software Installation], [Hardware Installation] or [Windows can't verify the publisher of this driver software] dialog box appears: • Click [Yes], [Continue Anyway] or [Install this driver software anyway] to use a printer not listed here, click [Specify address], and then enter...
... to complete installation. • If the message "Digital Signature Not Found" or the [Software Installation], [Hardware Installation] or [Windows can't verify the publisher of this driver software] dialog box appears: • Click [Yes], [Continue Anyway] or [Install this driver software anyway] to use a printer not listed here, click [Specify address], and then enter...

User Guide
Page 79
...:], [Driver:], and [Port:] vary depending on as necessary. 14. Configure the default printer as a member of the selected printer is the GX e3350N, click [PCL/RPCS Raster Printer Drivers]. Click [Next >]. 17. Click [Standard TCP/IP], and then click [OK]. Change this ...3. Click [Next >] in the [Printer Name or IP Address] box. Installing the Drivers for Device selection appears, select "RICOH Network Printer C model". 11. The software license agreement appears in the installation completion dialog box. Click [Finish] in the [] dialog box. 4. Click [Continue]. A ...
...:], [Driver:], and [Port:] vary depending on as necessary. 14. Configure the default printer as a member of the selected printer is the GX e3350N, click [PCL/RPCS Raster Printer Drivers]. Click [Next >]. 17. Click [Standard TCP/IP], and then click [OK]. Change this ...3. Click [Next >] in the [Printer Name or IP Address] box. Installing the Drivers for Device selection appears, select "RICOH Network Printer C model". 11. The software license agreement appears in the installation completion dialog box. Click [Finish] in the [] dialog box. 4. Click [Continue]. A ...