Operating Instructions
Page 2
About the Operating Instructions Your machine comes with the References: This Operating Instructions provides information you need for maintaining and troubleshooting the machine. Copyright © 2004. • Centronics is a trademark of Centronics Data Computer Corporation. • IBM and IBM PC are Trademark of International Business Machines ...
About the Operating Instructions Your machine comes with the References: This Operating Instructions provides information you need for maintaining and troubleshooting the machine. Copyright © 2004. • Centronics is a trademark of Centronics Data Computer Corporation. • IBM and IBM PC are Trademark of International Business Machines ...
Operating Instructions
Page 14
... Maintaining the Toner Cartridge 7.6 Redistributing Toner 7.7 Replacing the Toner Cartridge 7.8 Setting the Notify Toner Option 7.9 Cleaning the Drum 7.9 Ignoring the Toner Empty Message 7.10 Chapter 8: TROUBLESHOOTING Clearing Document Jams 8.2 Clearing Paper Jams 8.3 In Tray 1 8.3 In Tray 2 8.4 In the Paper Exit Area 8.5 In the Fuser Area or Around the Toner Cartridge . ...Clearing LCD Error Messages 8.8 Solving Problems 8.11 Paper Feeding Problems 8.11 Printing Problems 8.12 Printing Quality Problems 8.14 Copying Problems 8.19 Scanning Problems 8.20 Faxing Problems 8.21 xiii
... Maintaining the Toner Cartridge 7.6 Redistributing Toner 7.7 Replacing the Toner Cartridge 7.8 Setting the Notify Toner Option 7.9 Cleaning the Drum 7.9 Ignoring the Toner Empty Message 7.10 Chapter 8: TROUBLESHOOTING Clearing Document Jams 8.2 Clearing Paper Jams 8.3 In Tray 1 8.3 In Tray 2 8.4 In the Paper Exit Area 8.5 In the Fuser Area or Around the Toner Cartridge . ...Clearing LCD Error Messages 8.8 Solving Problems 8.11 Paper Feeding Problems 8.11 Printing Problems 8.12 Printing Quality Problems 8.14 Copying Problems 8.19 Scanning Problems 8.20 Faxing Problems 8.21 xiii
Operating Instructions
Page 144
8 TROUBLESHOOTING This chapter gives helpful information for what to do if you encounter an error. This chapter includes: • Clearing Document Jams • Clearing Paper Jams • Clearing LCD Error Messages • Solving Problems
8 TROUBLESHOOTING This chapter gives helpful information for what to do if you encounter an error. This chapter includes: • Clearing Document Jams • Clearing Paper Jams • Clearing LCD Error Messages • Solving Problems
Operating Instructions
Page 145
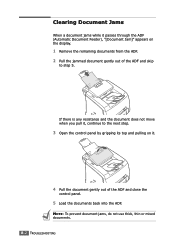
... and close the control panel. 5 Load the documents back into the ADF. NOTE: To prevent document jams, do not use thick, thin or mixed documents. 8.2 TROUBLESHOOTING
... and close the control panel. 5 Load the documents back into the ADF. NOTE: To prevent document jams, do not use thick, thin or mixed documents. 8.2 TROUBLESHOOTING
Operating Instructions
Page 146
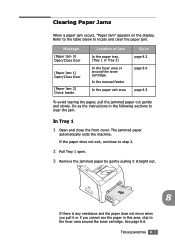
... area or around the toner cartridge. See page 8.6. In the manual feeder In the paper exit area Go to locate and clear the paper jam. TROUBLESHOOTING 8.3 Refer to the table below to page 8.3 page 8.6 page 8.5 To avoid tearing the paper, pull the jammed paper out gently and slowly. The jammed paper...
... area or around the toner cartridge. See page 8.6. In the manual feeder In the paper exit area Go to locate and clear the paper jam. TROUBLESHOOTING 8.3 Refer to the table below to page 8.3 page 8.6 page 8.5 To avoid tearing the paper, pull the jammed paper out gently and slowly. The jammed paper...
Operating Instructions
Page 147
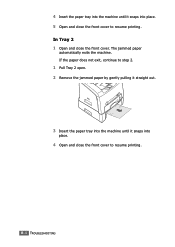
If the paper does not exit, continue to step 2. 1 Pull Tray 2 open. 2 Remove the jammed paper by gently pulling it straight out. 3 Insert the paper tray into the machine until it snaps into place. 5 Open and close the front cover to resume printing. 8.4 TROUBLESHOOTING The jammed paper automatically exits the machine. 4 Insert the paper tray into the machine until it snaps into place. 4 Open and close the front cover to resume printing. In Tray 2 1 Open and close the front cover.
If the paper does not exit, continue to step 2. 1 Pull Tray 2 open. 2 Remove the jammed paper by gently pulling it straight out. 3 Insert the paper tray into the machine until it snaps into place. 5 Open and close the front cover to resume printing. 8.4 TROUBLESHOOTING The jammed paper automatically exits the machine. 4 Insert the paper tray into the machine until it snaps into place. 4 Open and close the front cover to resume printing. In Tray 2 1 Open and close the front cover.

Operating Instructions
Page 148
In the Paper Exit Area 1 Open and close the front cover to step 2. 2 Gently pull the paper out of the front output tray. If there is any resistance and the paper does not move when you pull it or if you cannot see the paper in the front output tray, continue to step 3. 3 Open the rear cover. 4 Remove the jammed paper by gently pulling it straight out. 5 Close the rear cover. 6 Open and close the front cover. The jammed paper automatically exits the machine. If the paper does not exit, continue to resume printing. 8 TROUBLESHOOTING 8.5 Skip to step 6.
In the Paper Exit Area 1 Open and close the front cover to step 2. 2 Gently pull the paper out of the front output tray. If there is any resistance and the paper does not move when you pull it or if you cannot see the paper in the front output tray, continue to step 3. 3 Open the rear cover. 4 Remove the jammed paper by gently pulling it straight out. 5 Close the rear cover. 6 Open and close the front cover. The jammed paper automatically exits the machine. If the paper does not exit, continue to resume printing. 8 TROUBLESHOOTING 8.5 Skip to step 6.
Operating Instructions
Page 149
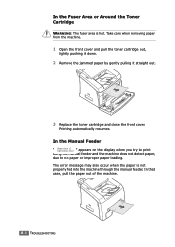
... by gently pulling it straight out. 3 Replace the toner cartridge and close the front cover. In that case, pull the paper out of the machine. 8.6 TROUBLESHOOTING Printing automatically resumes. In the Fuser Area or Around the Toner Cartridge WARNING: The fuser area is not properly fed into the machine through the...
... by gently pulling it straight out. 3 Replace the toner cartridge and close the front cover. In that case, pull the paper out of the machine. 8.6 TROUBLESHOOTING Printing automatically resumes. In the Fuser Area or Around the Toner Cartridge WARNING: The fuser area is not properly fed into the machine through the...

Operating Instructions
Page 150
When a paper jam occurs, follow the steps outlined in the paper tray. • Use only recommended print materials. See page 5.3. 8 TROUBLESHOOTING 8.7 Set the page orientation to Landscape in the manual feeder. • If paper jams frequently occur when you load paper. See "Paper Specifications" on the ...
When a paper jam occurs, follow the steps outlined in the paper tray. • Use only recommended print materials. See page 5.3. 8 TROUBLESHOOTING 8.7 Set the page orientation to Landscape in the manual feeder. • If paper jams frequently occur when you load paper. See "Paper Specifications" on the ...
Operating Instructions
Page 151
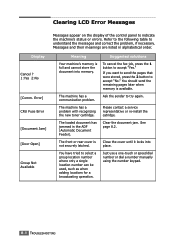
... cover until it locks into memory. Display Cancel ? 1:Yes 2:No [Comm. The loaded document has jammed in alphabetical order. Suggested solutions To cancel the fax job, press the 1 button to accept "No." If you want to send the pages that were stored, press the 2 button to accept "Yes."... Just use a one-touch or speed dial number or dial a number manually using the number keypad. 8.8 TROUBLESHOOTING The machine has a problem with recognizing the new toner cartridge. You should send the remaining pages later when memory is full and cannot store the...
... cover until it locks into memory. Display Cancel ? 1:Yes 2:No [Comm. The loaded document has jammed in alphabetical order. Suggested solutions To cancel the fax job, press the 1 button to accept "No." If you want to send the pages that were stored, press the 2 button to accept "Yes."... Just use a one-touch or speed dial number or dial a number manually using the number keypad. 8.8 TROUBLESHOOTING The machine has a problem with recognizing the new toner cartridge. You should send the remaining pages later when memory is full and cannot store the...
Operating Instructions
Page 152
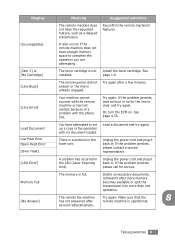
... ECM on. Load a document and try again. Try again. Unplug the power cord and plug it back in the LSU (Laser Scanning Unit). The remote fax machine Try again. Reconfirm the remote machine's features. [Incompatible] It also occurs if the remote machine does not have the requested... answer or the line is full. If the problem persists, please call for the line to set up a copy or fax operation with the phone line. TROUBLESHOOTING 8.9 Delete unnecessary documents, retransmit after remote machine is a problem in . Load Document Low Heat Error Open Heat Error [Over...
... ECM on. Load a document and try again. Try again. Unplug the power cord and plug it back in the LSU (Laser Scanning Unit). The remote fax machine Try again. Reconfirm the remote machine's features. [Incompatible] It also occurs if the remote machine does not have the requested... answer or the line is full. If the problem persists, please call for the line to set up a copy or fax operation with the phone line. TROUBLESHOOTING 8.9 Delete unnecessary documents, retransmit after remote machine is a problem in . Load Document Low Heat Error Open Heat Error [Over...
Operating Instructions
Page 153
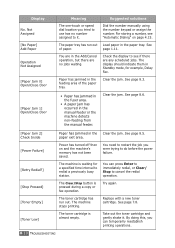
...were trying to do before the power failure. [Retry Redial?] The machine is waiting for example, Delay Fax. See page 7.8. [Toner Low] The toner cartridge is pressed during a copy or fax operation. By doing this, you tried to use has no jobs waiting. Display No. Not Assigned [...to immediately redial, or Clear/ Stop to redial a previously busy station. See page 1.11. You can temporarily reestablish printing operations. 8.10 TROUBLESHOOTING Take out the toner cartridge and gently shake it . The paper tray has run out. Clear the jam. Paper has jammed in the feeding...
...were trying to do before the power failure. [Retry Redial?] The machine is waiting for example, Delay Fax. See page 7.8. [Toner Low] The toner cartridge is pressed during a copy or fax operation. By doing this, you tried to use has no jobs waiting. Display No. Not Assigned [...to immediately redial, or Clear/ Stop to redial a previously busy station. See page 1.11. You can temporarily reestablish printing operations. 8.10 TROUBLESHOOTING Take out the toner cartridge and gently shake it . The paper tray has run out. Clear the jam. Paper has jammed in the feeding...

Operating Instructions
Page 154
...that meets the specifications required by the machine. Use only the transparencies specifically designed for service. If the problem persists, please call for a laser printer. If you are printing on page 9.9. • Remove paper from the tray. • The paper is being used. Use only...An incorrect type of only one type, size and weight. • If multiple sheets have caused a paper jam, clear the paper jam. TROUBLESHOOTING 8.11 Paper sticks together. • Ensure that may cause some conditions that there is not too much paper in the paper tray. Solving ...
...that meets the specifications required by the machine. Use only the transparencies specifically designed for service. If the problem persists, please call for a laser printer. If you are printing on page 9.9. • Remove paper from the tray. • The paper is being used. Use only...An incorrect type of only one type, size and weight. • If multiple sheets have caused a paper jam, clear the paper jam. TROUBLESHOOTING 8.11 Paper sticks together. • Ensure that may cause some conditions that there is not too much paper in the paper tray. Solving ...

Operating Instructions
Page 155
... front cover is not closed. • Paper is jammed. • No paper is loaded. • The toner cartridge is not connected properly. See page 5.8. 8.12 TROUBLESHOOTING The machine is indicating a system error. Disconnect the printer cable and reconnect it . • Close the cover. • Clear the paper jam. If the computer...
... front cover is not closed. • Paper is jammed. • No paper is loaded. • The toner cartridge is not connected properly. See page 5.8. 8.12 TROUBLESHOOTING The machine is indicating a system error. Disconnect the printer cable and reconnect it . • Close the cover. • Clear the paper jam. If the computer...
Operating Instructions
Page 156
... driver settings matches the paper in your machine is selected. The wrong printer driver was selected. Check the application's printer selection menu to another application. TROUBLESHOOTING 8.13 Right-click the Printer Driver Type 2200 printer icon, choose Properties, click the Details tab, and then choose the Spool Settings button. Try printing...
... driver settings matches the paper in your machine is selected. The wrong printer driver was selected. Check the application's printer selection menu to another application. TROUBLESHOOTING 8.13 Right-click the Printer Driver Type 2200 printer icon, choose Properties, click the Details tab, and then choose the Spool Settings button. Try printing...

Operating Instructions
Page 157
...; The paper may be able to temporarily extend the toner cartridge life. for example, the paper is too moist or too rough. See page 7.5. 8.14 TROUBLESHOOTING
...; The paper may be able to temporarily extend the toner cartridge life. for example, the paper is too moist or too rough. See page 7.5. 8.14 TROUBLESHOOTING
Operating Instructions
Page 158
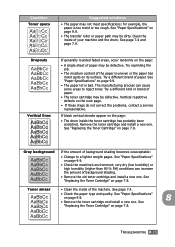
... or brand of the paper is bad. See "Replacing the Toner Cartridge" on page 9.9. • The transfer roller or paper path may not meet specifications; TROUBLESHOOTING 8.15 Condition Toner specs AaBbCc AaBbCc AaBbCc AaBbCc AaBbCc Suggested solutions • The paper may be dirty. Try a different brand of your machine and the...
... or brand of the paper is bad. See "Replacing the Toner Cartridge" on page 9.9. • The transfer roller or paper path may not meet specifications; TROUBLESHOOTING 8.15 Condition Toner specs AaBbCc AaBbCc AaBbCc AaBbCc AaBbCc Suggested solutions • The paper may be dirty. Try a different brand of your machine and the...
Operating Instructions
Page 159
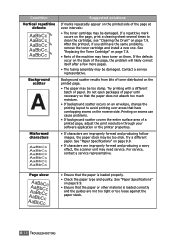
... unit may be damaged. see "Cleaning the Drum" on page 9.9. • If characters are not too tight or too loose against the paper stack. 8.16 TROUBLESHOOTING Contact a service representative.
... unit may be damaged. see "Cleaning the Drum" on page 9.9. • If characters are not too tight or too loose against the paper stack. 8.16 TROUBLESHOOTING Contact a service representative.
Operating Instructions
Page 160
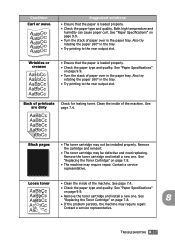
... Cartridge" on page 9.9. • Turn the stack of the machine. See "Paper Specifications" on page 7.8. 8 • If the problem persists, the machine may require repair. TROUBLESHOOTING 8.17
... Cartridge" on page 9.9. • Turn the stack of the machine. See "Paper Specifications" on page 7.8. 8 • If the problem persists, the machine may require repair. TROUBLESHOOTING 8.17
Operating Instructions
Page 161
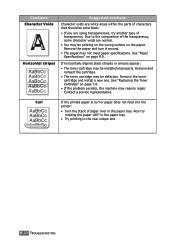
... on the wrong surface on page 9.9. Also try another type of transparency. See "Paper Specifications" on the paper. Due to the rear output slot. 8.18 TROUBLESHOOTING Remove and reinsert the cartridge. • The toner cartridge may be defective. If horizontally aligned black streaks or smears appear: • The toner cartridge may...
... on the wrong surface on page 9.9. Also try another type of transparency. See "Paper Specifications" on the paper. Due to the rear output slot. 8.18 TROUBLESHOOTING Remove and reinsert the cartridge. • The toner cartridge may be defective. If horizontally aligned black streaks or smears appear: • The toner cartridge may...


