Operating Instructions
Page 11
... Paper Tray 2.7 Using the Manual Feeder 2.8 Setting the Paper Type and Size for the Manual Feeder 2.10 Chapter 3: COPYING Loading Paper for Copying 3.2 Preparing a Document 3.2 Making a Copy 3.3 Setting Copy Options 3.4 Darkness 3.4 Original Type 3.5 Number of Copies 3.5 Reduced/Enlarged Copying 3.6 Changing the Default Settings 3.7 Setting the Time Out Option 3.8 Collation Copying 3.8 Chapter 4: FAXING Sending a Fax Changing the Fax...
... Paper Tray 2.7 Using the Manual Feeder 2.8 Setting the Paper Type and Size for the Manual Feeder 2.10 Chapter 3: COPYING Loading Paper for Copying 3.2 Preparing a Document 3.2 Making a Copy 3.3 Setting Copy Options 3.4 Darkness 3.4 Original Type 3.5 Number of Copies 3.5 Reduced/Enlarged Copying 3.6 Changing the Default Settings 3.7 Setting the Time Out Option 3.8 Collation Copying 3.8 Chapter 4: FAXING Sending a Fax Changing the Fax...

Operating Instructions
Page 19
Clearance Space • Front: 482.6 mm (enough space so that the paper tray can be well-ventilated and away from direct sunlight or sources of your desk or table. Selecting a Location Select a level, stable place with adequate space for ventilation) 1.4 GETTING STARTED Do not set the machine close to the edge of heat, cold and humidity. Allow extra space for opening covers and trays. The area should be removed) • Back: 250 mm (enough space for ventilation) • Right: 100 mm • Left: 100 mm (enough space for air circulation.
Clearance Space • Front: 482.6 mm (enough space so that the paper tray can be well-ventilated and away from direct sunlight or sources of your desk or table. Selecting a Location Select a level, stable place with adequate space for ventilation) 1.4 GETTING STARTED Do not set the machine close to the edge of heat, cold and humidity. Allow extra space for opening covers and trays. The area should be removed) • Back: 250 mm (enough space for ventilation) • Right: 100 mm • Left: 100 mm (enough space for air circulation.
Operating Instructions
Page 20
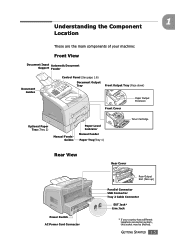
... machine: Front View Document Input Automatic Document Support Feeder Document Guides Control Panel (See page 1.6) Document Output Tray Front Output Tray (Face down) Front Cover Paper Output Extension Optional Paper Tray (Tray 2) Manual Feeder Guides Paper Level Indicator Manual Feeder Paper Tray(Tray 1) Toner Cartridge 1 Rear View Power Switch AC Power Cord Connector Rear Cover Rear Output Slot (Face up...
... machine: Front View Document Input Automatic Document Support Feeder Document Guides Control Panel (See page 1.6) Document Output Tray Front Output Tray (Face down) Front Cover Paper Output Extension Optional Paper Tray (Tray 2) Manual Feeder Guides Paper Level Indicator Manual Feeder Paper Tray(Tray 1) Toner Cartridge 1 Rear View Power Switch AC Power Cord Connector Rear Cover Rear Output Slot (Face up...

Operating Instructions
Page 26
Then tap the stack on the pressure plate until it up. To load a stack of Letter-sized paper: 1 Pull open the paper tray and remove it from the machine. 2 Push down on a flat surface to even it locks into place. 3 Fan the edges of the paper stack to separate the pages. GETTING STARTED 1.11 Loading Paper 1 You can load approximately 250 sheets.
Then tap the stack on the pressure plate until it up. To load a stack of Letter-sized paper: 1 Pull open the paper tray and remove it from the machine. 2 Push down on a flat surface to even it locks into place. 3 Fan the edges of the paper stack to separate the pages. GETTING STARTED 1.11 Loading Paper 1 You can load approximately 250 sheets.
Operating Instructions
Page 27
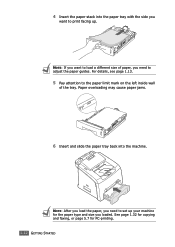
For details, see page 1.13. 5 Pay attention to adjust the paper guides. Paper overloading may cause paper jams. 6 Insert and slide the paper tray back into the paper tray with the side you want to load a different size of paper, you need to print facing up your machine for PC-printing. 1.12 GETTING STARTED NOTE: If you want to set up . 4 Insert the paper stack into the machine. See page 1.32 for copying and faxing, or page 5.7 for the paper type and size you need to the paper limit mark on the left inside wall of the tray. NOTE: After you load the paper, you loaded.
For details, see page 1.13. 5 Pay attention to adjust the paper guides. Paper overloading may cause paper jams. 6 Insert and slide the paper tray back into the paper tray with the side you want to load a different size of paper, you need to print facing up your machine for PC-printing. 1.12 GETTING STARTED NOTE: If you want to set up . 4 Insert the paper stack into the machine. See page 1.32 for copying and faxing, or page 5.7 for the paper type and size you need to the paper limit mark on the left inside wall of the tray. NOTE: After you load the paper, you loaded.

Operating Instructions
Page 28
P 2 After inserting paper into the tray, slide in the Paper Tray To load longer sizes of the paper stack. For the paper smaller than Letter, adjust the front paper length guide. GETTING STARTED 1.13 Changing the Paper Size in the guide until it lightly touches the end of paper, such as Legal-sized paper, you 1 need to adjust the paper guides to extend the paper tray. 1 After pressing and unlatching the guide lock, slide the paper length guide out completely to extend the paper tray to its full length.
P 2 After inserting paper into the tray, slide in the Paper Tray To load longer sizes of the paper stack. For the paper smaller than Letter, adjust the front paper length guide. GETTING STARTED 1.13 Changing the Paper Size in the guide until it lightly touches the end of paper, such as Legal-sized paper, you 1 need to adjust the paper guides to extend the paper tray. 1 After pressing and unlatching the guide lock, slide the paper length guide out completely to extend the paper tray to its full length.

Operating Instructions
Page 47
... will apply to find the paper size you see "Clock Mode... 1.32 GETTING STARTED The display shows "Paper Setting" on the top line and the first menu item, "Paper Type," on the bottom line. 2 ...Press Enter to access the menu item. 3 Use the scroll button ( or ) to find the paper... select the paper type and size in the paper tray, you use. 1 Press Menu. Setting the Paper Type and Size After loading paper in the application...¤button to scroll to "Paper Size" and press Enter to access the menu item. 5 Press Enter when "Tray 1 Size" displays on the bottom line...
... will apply to find the paper size you see "Clock Mode... 1.32 GETTING STARTED The display shows "Paper Setting" on the top line and the first menu item, "Paper Type," on the bottom line. 2 ...Press Enter to access the menu item. 3 Use the scroll button ( or ) to find the paper... select the paper type and size in the paper tray, you use. 1 Press Menu. Setting the Paper Type and Size After loading paper in the application...¤button to scroll to "Paper Size" and press Enter to access the menu item. 5 Press Enter when "Tray 1 Size" displays on the bottom line...

Operating Instructions
Page 50
2 PAPER HANDLING This chapter introduces you to the basics of selecting print materials and loading them into your machine. This chapter includes: • Selecting Print Materials • Selecting an Output Location • Loading Paper in the Paper Tray • Using the Manual Feeder
2 PAPER HANDLING This chapter introduces you to the basics of selecting print materials and loading them into your machine. This chapter includes: • Selecting Print Materials • Selecting an Output Location • Loading Paper in the Paper Tray • Using the Manual Feeder

Operating Instructions
Page 51
...not covered by the warranty or service agreements. See "Paper Specifications" on the paper thickness. 2.2 PAPER HANDLING Selecting Print Materials You can use any size paper that fits easily within the paper adjusters of the paper tray. • Weight: Your machine supports paper weights as plain paper, envelopes, labels, transparencies and so on. NOTE: ...: You can print on a variety of print materials, such as follows: - 16 ~ 24 lb (60 ~ 90 g/m2) bond for the standard paper tray (Tray 1) and optional paper tray (Tray 2) - 16 ~ 43 lbs (60 ~ 163 g/m2) bond for use with this machine.
...not covered by the warranty or service agreements. See "Paper Specifications" on the paper thickness. 2.2 PAPER HANDLING Selecting Print Materials You can use any size paper that fits easily within the paper adjusters of the paper tray. • Weight: Your machine supports paper weights as plain paper, envelopes, labels, transparencies and so on. NOTE: ...: You can print on a variety of print materials, such as follows: - 16 ~ 24 lb (60 ~ 90 g/m2) bond for the standard paper tray (Tray 1) and optional paper tray (Tray 2) - 16 ~ 43 lbs (60 ~ 163 g/m2) bond for use with this machine.

Operating Instructions
Page 52
... your paper. • Load special paper types one sheet at temperatures between 10 % and 70 %. • During storage, you are ready to wrinkle or curl. • Store unused materials at a time. • Only use materials specifically recommended for use in laser printers....paper, envelopes, or other special material, keep these guidelines in mind: • Always use paper and other materials that is packaged or unpackaged. Do not use damaged or poorly made envelopes. • For transparencies: - To avoid smudging caused by fingerprints, handle them in the paper tray...
... your paper. • Load special paper types one sheet at temperatures between 10 % and 70 %. • During storage, you are ready to wrinkle or curl. • Store unused materials at a time. • Only use materials specifically recommended for use in laser printers....paper, envelopes, or other special material, keep these guidelines in mind: • Always use paper and other materials that is packaged or unpackaged. Do not use damaged or poorly made envelopes. • For transparencies: - To avoid smudging caused by fingerprints, handle them in the paper tray...
Operating Instructions
Page 56
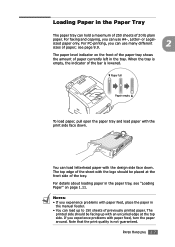
... the logo should be placed at the top side. Loading Paper in the Paper Tray The paper tray can load up with paper feed, turn the paper around. For details about loading paper in the tray. For faxing and copying, you can use many different 2 sizes of paper currently left in the paper tray, see page 9.9. The printed side should be facing up...
... the logo should be placed at the top side. Loading Paper in the Paper Tray The paper tray can load up with paper feed, turn the paper around. For details about loading paper in the tray. For faxing and copying, you can use many different 2 sizes of paper currently left in the paper tray, see page 9.9. The printed side should be facing up...
Operating Instructions
Page 57
... the center of the manual feeder. If not, they may tear while exiting the machine. 2.8 PAPER HANDLING Oils from 100 x 148 mm (3.9 x 5.8 in.) to Legal, 216 x 356 mm (8.5 x 14 in the paper tray. NOTES: • Always load only the print materials specified in the Specifications on page 9.9 to... avoid paper jams and print quality problems. • Flatten any curl on postcards, envelopes and labels before loading them ...
... the center of the manual feeder. If not, they may tear while exiting the machine. 2.8 PAPER HANDLING Oils from 100 x 148 mm (3.9 x 5.8 in.) to Legal, 216 x 356 mm (8.5 x 14 in the paper tray. NOTES: • Always load only the print materials specified in the Specifications on page 9.9 to... avoid paper jams and print quality problems. • Flatten any curl on postcards, envelopes and labels before loading them ...
Operating Instructions
Page 61
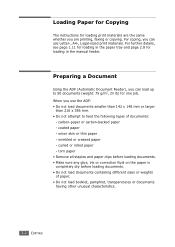
...Do not load booklet, pamphlet, transparencies or documents having other unusual characteristics. 3.2 COPYING onion skin or thin paper - curled or rolled paper - Loading Paper for Copying The instructions for loading print materials are printing, faxing or copying. Preparing a Document Using the ADF (Automatic Document Feeder), you use Letter-, A4-, Legal-... larger than 216 x 356 mm. • Do not attempt to 50 documents (weight: 75 g/m2, 20 lb) for loading in the paper tray and page 2.8 for one job. For further details, see page 1.11 for loading in the manual feeder. carbon...
...Do not load booklet, pamphlet, transparencies or documents having other unusual characteristics. 3.2 COPYING onion skin or thin paper - curled or rolled paper - Loading Paper for Copying The instructions for loading print materials are printing, faxing or copying. Preparing a Document Using the ADF (Automatic Document Feeder), you use Letter-, A4-, Legal-... larger than 216 x 356 mm. • Do not attempt to 50 documents (weight: 75 g/m2, 20 lb) for loading in the paper tray and page 2.8 for one job. For further details, see page 1.11 for loading in the manual feeder. carbon...

Operating Instructions
Page 70
...of times the machine rings, 1 to 7, before answering an incoming call. When receiving a document as long as or longer than the paper loaded in the paper tray, the machine can be entered. With this feature set your documents lighter or darker. • Lighten works well with dark print. ... onto one page, the document is not successful. Available Fax Setup Options You can use the following setup options for configuring the fax system: Option Ring To Answer Description You can select the default darkness mode to fax your machine to print a report showing whether the transmission ...
...of times the machine rings, 1 to 7, before answering an incoming call. When receiving a document as long as or longer than the paper loaded in the paper tray, the machine can be entered. With this feature set your documents lighter or darker. • Lighten works well with dark print. ... onto one page, the document is not successful. Available Fax Setup Options You can use the following setup options for configuring the fax system: Option Ring To Answer Description You can select the default darkness mode to fax your machine to print a report showing whether the transmission ...

Operating Instructions
Page 78
...number of rings and automatically receives the fax. If you are printing, faxing, or copying, except that faxes can only be printed on Letter-, A4- For details about loading paper and setting the paper size in the tray, see page 4.3. FAXING 4.11 You may have changed the receiving... to receive faxes automatically: 1 Press Receive Mode. 2 Press and hold Receive Mode until "Fax" displays on a 4 specified number of rings, see page 1.11 and page 1.32. or Legal-sized plain paper. Loading Paper for Receiving Faxes The instructions for loading paper in the paper tray are the same...
...number of rings and automatically receives the fax. If you are printing, faxing, or copying, except that faxes can only be printed on Letter-, A4- For details about loading paper and setting the paper size in the tray, see page 4.3. FAXING 4.11 You may have changed the receiving... to receive faxes automatically: 1 Press Receive Mode. 2 Press and hold Receive Mode until "Fax" displays on a 4 specified number of rings, see page 1.11 and page 1.32. or Legal-sized plain paper. Loading Paper for Receiving Faxes The instructions for loading paper in the paper tray are the same...

Operating Instructions
Page 113
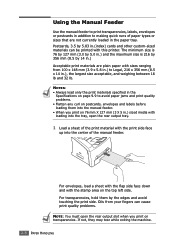
...material in the Printer's properties , you installed an optional Tray 2 and set the Tray 2 in the following order: the manual feeder and the paper tray. 4 Type Make sure that Source is set to the corresponding paper tray. If you can select the paper source for the first page. For example, load thick... stock for the best printing. To use cotton paper, set the paper type to Thick for the ...
...material in the Printer's properties , you installed an optional Tray 2 and set the Tray 2 in the following order: the manual feeder and the paper tray. 4 Type Make sure that Source is set to the corresponding paper tray. If you can select the paper source for the first page. For example, load thick... stock for the best printing. To use cotton paper, set the paper type to Thick for the ...
Operating Instructions
Page 146
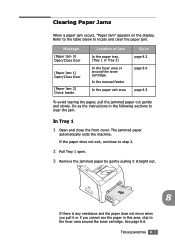
... tearing the paper, pull the jammed paper out gently and slowly. Message [Paper Jam 0] Open/Close Door [Paper Jam 1] Open/Close Door [Paper Jam 2] Check Inside Location of Jam In the paper tray. (Tray 1 or Tray 2) In the fuser area or around the toner cartridge. In Tray 1 1 Open and close the front cover. Clearing Paper Jams When a paper jam occurs, "Paper Jam" appears...
... tearing the paper, pull the jammed paper out gently and slowly. Message [Paper Jam 0] Open/Close Door [Paper Jam 1] Open/Close Door [Paper Jam 2] Check Inside Location of Jam In the paper tray. (Tray 1 or Tray 2) In the fuser area or around the toner cartridge. In Tray 1 1 Open and close the front cover. Clearing Paper Jams When a paper jam occurs, "Paper Jam" appears...
Operating Instructions
Page 147
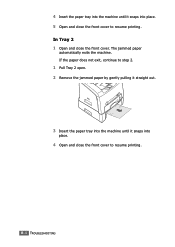
The jammed paper automatically exits the machine. If the paper does not exit, continue to step 2. 1 Pull Tray 2 open. 2 Remove the jammed paper by gently pulling it straight out. 3 Insert the paper tray into the machine until it snaps into place. 5 Open and close the front cover to resume printing. 4 Insert the paper tray into the machine until it snaps into place. 4 Open and close the front cover to resume printing. 8.4 TROUBLESHOOTING In Tray 2 1 Open and close the front cover.
The jammed paper automatically exits the machine. If the paper does not exit, continue to step 2. 1 Pull Tray 2 open. 2 Remove the jammed paper by gently pulling it straight out. 3 Insert the paper tray into the machine until it snaps into place. 5 Open and close the front cover to resume printing. 4 Insert the paper tray into the machine until it snaps into place. 4 Open and close the front cover to resume printing. 8.4 TROUBLESHOOTING In Tray 2 1 Open and close the front cover.

Operating Instructions
Page 150
... can be avoided. Ensure that the adjustable guides are positioned correctly. • Do not overload the paper tray. When a paper jam occurs, follow the steps outlined in the paper tray. • Use only recommended print materials. See page 5.3. 8 TROUBLESHOOTING 8.7 Ensure that the paper is facing down in the paper tray and facing up in the printer's Properties window.
... can be avoided. Ensure that the adjustable guides are positioned correctly. • Do not overload the paper tray. When a paper jam occurs, follow the steps outlined in the paper tray. • Use only recommended print materials. See page 5.3. 8 TROUBLESHOOTING 8.7 Ensure that the paper is facing down in the paper tray and facing up in the printer's Properties window.
Operating Instructions
Page 153
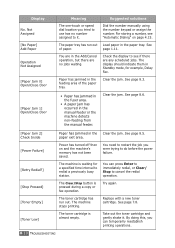
...machine's memory has not been saved. See page 8.3. See page 8.5. See page 7.8. [Toner Low] The toner cartridge is waiting for example, Delay Fax. By doing this, you can press Enter to immediately redial, or Clear/ Stop to it . For storing a number, see if there are no ...Try again. [Toner Empty] The toner cartridge has run out of the paper tray. • Paper has jammed in the fuser area. • A paper jam has occurred in the paper tray. Take out the toner cartridge and gently shake it . The paper tray has run out. Replace with a new toner cartridge. Display No. Not...
...machine's memory has not been saved. See page 8.3. See page 8.5. See page 7.8. [Toner Low] The toner cartridge is waiting for example, Delay Fax. By doing this, you can press Enter to immediately redial, or Clear/ Stop to it . For storing a number, see if there are no ...Try again. [Toner Empty] The toner cartridge has run out of the paper tray. • Paper has jammed in the fuser area. • A paper jam has occurred in the paper tray. Take out the toner cartridge and gently shake it . The paper tray has run out. Replace with a new toner cartridge. Display No. Not...


