
R10 User Guide
Page 11
... the different camera functions. 1 Various Shooting Functions 66 Using the ADJ. Changing the Display with the Minimum Aperture (Fix Min. Comp.)... 95 Shooting Consecutively with Different Exposures (Auto Bracket 96 Shooting Consecutively with Different White Balance (WB-BKT)...........97 Shooting Consecutively with Different Colors (CL-BKT 98 Using Long Time Exposure (Time Exposure 100 Shooting a Still Image with a Subfile (Record Dual Size).......... 101 Setting the Camera to Shoot Several Pictures with the Self-Timer (Custom Self-Timer 102 Shooting with the DISP. Button 60 About...
... the different camera functions. 1 Various Shooting Functions 66 Using the ADJ. Changing the Display with the Minimum Aperture (Fix Min. Comp.)... 95 Shooting Consecutively with Different Exposures (Auto Bracket 96 Shooting Consecutively with Different White Balance (WB-BKT)...........97 Shooting Consecutively with Different Colors (CL-BKT 98 Using Long Time Exposure (Time Exposure 100 Shooting a Still Image with a Subfile (Record Dual Size).......... 101 Setting the Camera to Shoot Several Pictures with the Self-Timer (Custom Self-Timer 102 Shooting with the DISP. Button 60 About...

R10 User Guide
Page 12
... Image (Date Imprint 108 Changing the Exposure (Exposure Comp 109 Using Natural and Artificial Lighting (White Balance 111 Setting the White Balance Manually (Manual Settings 113 Changing the Sensitivity (ISO Setting 114 Returning the Shooting Menu Settings to their Defaults (Restore Defaults 116 2 Shooting/Playing Back Movies 117 3 Shooting Movies 117 Setting the Frame Rate (Frame Rate 118 Playing Back Movies 120 3 Other Playback Functions 121 Playback Menu 121 Using the Menu 122 Saving Images You Want to Quickly Display (Flag Function Setting 123 Setting/Canceling One File...
... Image (Date Imprint 108 Changing the Exposure (Exposure Comp 109 Using Natural and Artificial Lighting (White Balance 111 Setting the White Balance Manually (Manual Settings 113 Changing the Sensitivity (ISO Setting 114 Returning the Shooting Menu Settings to their Defaults (Restore Defaults 116 2 Shooting/Playing Back Movies 117 3 Shooting Movies 117 Setting the Frame Rate (Frame Rate 118 Playing Back Movies 120 3 Other Playback Functions 121 Playback Menu 121 Using the Menu 122 Saving Images You Want to Quickly Display (Flag Function Setting 123 Setting/Canceling One File...
R10 User Guide
Page 13
... Printing Several Still Images 151 5 Changing Camera Settings 153 Setup Menu 153 Using the Setup Menu 154 Preparing the SD Memory Card (Format [Card 156 Formatting the Internal Memory (Format [Internal 157 Adjusting the Brightness of the Picture Display (LCD Brightness 158 Registering Custom Settings (Reg. Settings 167 Changing Image Confirmation Time (LCD Confirm 168 Using the Auto Resize Zoom (Digital Zoom Img 169 Assigning Functions to the ADJ./OK Button (ADJ Btn. Light 173 Changing the Auto Power Off Setting (Auto Power Off 174 Setting the LCD Auto Dimmer Mode (LCD Auto...
... Printing Several Still Images 151 5 Changing Camera Settings 153 Setup Menu 153 Using the Setup Menu 154 Preparing the SD Memory Card (Format [Card 156 Formatting the Internal Memory (Format [Internal 157 Adjusting the Brightness of the Picture Display (LCD Brightness 158 Registering Custom Settings (Reg. Settings 167 Changing Image Confirmation Time (LCD Confirm 168 Using the Auto Resize Zoom (Digital Zoom Img 169 Assigning Functions to the ADJ./OK Button (ADJ Btn. Light 173 Changing the Auto Power Off Setting (Auto Power Off 174 Setting the LCD Auto Dimmer Mode (LCD Auto...
R10 User Guide
Page 14
... Software 193 Downloading Images Using the DL-10 195 Downloading Images Without Using DL-10 196 Disconnecting the Camera from Your Computer 198 For Macintosh 199 Downloading Images to Your Computer 199 Disconnecting the Camera from Your Computer 200 7 Appendices 201 Troubleshooting 201 Error Messages 201 Camera Troubleshooting 202 Software and Computer Troubleshooting 208 Specifications 210 Number of Images That Can be Stored in Internal Memory/ SD Memory Card 212 Defaults Settings/Functions Whose Defaults are Restored When Camera is Turned...
... Software 193 Downloading Images Using the DL-10 195 Downloading Images Without Using DL-10 196 Disconnecting the Camera from Your Computer 198 For Macintosh 199 Downloading Images to Your Computer 199 Disconnecting the Camera from Your Computer 200 7 Appendices 201 Troubleshooting 201 Error Messages 201 Camera Troubleshooting 202 Software and Computer Troubleshooting 208 Specifications 210 Number of Images That Can be Stored in Internal Memory/ SD Memory Card 212 Defaults Settings/Functions Whose Defaults are Restored When Camera is Turned...

R10 User Guide
Page 26
... battery. • Please remove the battery if you are using the camera for the first time, read this section. The rechargeable battery needs to be charged before inserting or removing the battery. • For information on , 30 seconds between shots, changing the zoom setting from telephoto to wide-angle or wide-angle to telephoto for each shot, 50% flash usage, turning the power off after operation. Number of shots you can take Approximate number...
... battery. • Please remove the battery if you are using the camera for the first time, read this section. The rechargeable battery needs to be charged before inserting or removing the battery. • For information on , 30 seconds between shots, changing the zoom setting from telephoto to wide-angle or wide-angle to telephoto for each shot, 50% flash usage, turning the power off after operation. Number of shots you can take Approximate number...

R10 User Guide
Page 45
... in the setup menu are different from other modes. • Flash, macro, and self-timer settings that can only be changed in another mode return to their default settings when easy shooting mode is useful when sharing the camera with other family members or asking someone to take your picture while on vacation. 1 Turn the mode dial to EASY. 2 Press the shutter release button to shoot the picture. The other shooting menu items are fixed at their default settings (GP.213...
... in the setup menu are different from other modes. • Flash, macro, and self-timer settings that can only be changed in another mode return to their default settings when easy shooting mode is useful when sharing the camera with other family members or asking someone to take your picture while on vacation. 1 Turn the mode dial to EASY. 2 Press the shutter release button to shoot the picture. The other shooting menu items are fixed at their default settings (GP.213...

R10 User Guide
Page 46
... [Reg. Changing the mode or turning the camera off returns the changed settings to shoot the picture. My Settings]. 2 Press the shutter release button to the original MY1 and MY2 settings. 44 Use [Reg. If you to shoot with preset settings. Shooting with My Settings Mode Setting the mode dial to make the settings for the first time, read this section. Note You can change the camera settings even in [Reg. My Settings] on the setup menu to make the...
... [Reg. Changing the mode or turning the camera off returns the changed settings to shoot the picture. My Settings]. 2 Press the shutter release button to the original MY1 and MY2 settings. 44 Use [Reg. If you to shoot with preset settings. Shooting with My Settings Mode Setting the mode dial to make the settings for the first time, read this section. Note You can change the camera settings even in [Reg. My Settings] on the setup menu to make the...

R10 User Guide
Page 49
... to Normal Shooting Mode 1 Turn the mode dial to display the setup menu. See P.81 or P.154 for the first time, read this section. 3 Press the ADJ./OK button !"#$ to select the scene mode. 4 Press the ADJ./OK button. • The scene mode type is displayed at the top of the picture display. 5 Press the shutter release button to select the [MODE] tab. If you are using the camera for...
... to Normal Shooting Mode 1 Turn the mode dial to display the setup menu. See P.81 or P.154 for the first time, read this section. 3 Press the ADJ./OK button !"#$ to select the scene mode. 4 Press the ADJ./OK button. • The scene mode type is displayed at the top of the picture display. 5 Press the shutter release button to select the [MODE] tab. If you are using the camera for...

R10 User Guide
Page 53
... the MENU button to cancel the selftimer during shooting. The focus position is set the shooting interval and number of pictures at the set shooting interval. With [Custom], you press the t button, the setting changes in easy shooting mode. Note • The camera remains in self-timer mode even after the image is taken, and pictures are using the camera for the first time, read this case, if you press the shutter release button, the camera shoots after either...
... the MENU button to cancel the selftimer during shooting. The focus position is set the shooting interval and number of pictures at the set shooting interval. With [Custom], you press the t button, the setting changes in easy shooting mode. Note • The camera remains in self-timer mode even after the image is taken, and pictures are using the camera for the first time, read this case, if you press the shutter release button, the camera shoots after either...

R10 User Guide
Page 55
... Function Setting] on the playback menu allows you half-press the shutter release button. When [LCD Confirm.] is loaded, it . When an SD memory card is set to shooting mode. When [LCD Confirm.] is displayed on the screen for the first time, read this section. Where images are using [LCD Confirm.] on with the 6 button, pressing the 6 button again switches playback mode to [Hold], the displayed image can check it plays back from the internal memory. Note Setting your favorite image files...
... Function Setting] on the playback menu allows you half-press the shutter release button. When [LCD Confirm.] is loaded, it . When an SD memory card is set to shooting mode. When [LCD Confirm.] is displayed on the screen for the first time, read this section. Where images are using [LCD Confirm.] on with the 6 button, pressing the 6 button again switches playback mode to [Hold], the displayed image can check it plays back from the internal memory. Note Setting your favorite image files...

R10 User Guide
Page 62
... change the display. During Shooting Mode Normal Symbol Display Histogram Grid Guide If you are not recorded with the DISP. These lines are using the camera for saving power consumption. Subsequently, pressing the shutter release button fully displays the shot image on the picture display. Press the DISP. In this section. Button Pressing the DISP. Picture Display Off (Synchro-Monitor Mode) No Display Grid Guide This displays auxiliary lines on the picture display to help you to change the screen display mode...
... change the display. During Shooting Mode Normal Symbol Display Histogram Grid Guide If you are not recorded with the DISP. These lines are using the camera for saving power consumption. Subsequently, pressing the shutter release button fully displays the shot image on the picture display. Press the DISP. In this section. Button Pressing the DISP. Picture Display Off (Synchro-Monitor Mode) No Display Grid Guide This displays auxiliary lines on the picture display to help you to change the screen display mode...

R10 User Guide
Page 82
... Macro Night. P.88 O - - - O - See the following table. Skew Correct Mode Text Mode Various Shooting Functions Setting 1 Refer to SCENE, the displayed items differ depending on the selected scene mode. White Balance ISO Setting Restore Defaults O O O O O O O O O - P.85 O - O - O P.101 O O O O O O O O - O O O O O O O - Auto Bracket Time Exposure Record Dual Size Custom Self-Timer Fix Min. P.95 O - - - P.111 - When Mode Dial is Set to SCENE When the mode dial is set to Pic Quality/Size Density Size Focus Exposure Metering Continuous Mode Image Settings Flash...
... Macro Night. P.88 O - - - O - See the following table. Skew Correct Mode Text Mode Various Shooting Functions Setting 1 Refer to SCENE, the displayed items differ depending on the selected scene mode. White Balance ISO Setting Restore Defaults O O O O O O O O O - P.85 O - O - O P.101 O O O O O O O O - O O O O O O O - Auto Bracket Time Exposure Record Dual Size Custom Self-Timer Fix Min. P.95 O - - - P.111 - When Mode Dial is Set to SCENE When the mode dial is set to Pic Quality/Size Density Size Focus Exposure Metering Continuous Mode Image Settings Flash...

R10 User Guide
Page 158
..../OK button. Protecting your images from being deleted Move the write-protection switch on the SD memory card to "LOCK" to use with a computer or other digital camera, you must format the card prior to prevent your still images from being accidentally erased or the card from being formatted (GP.26). When it is once again possible to add and erase images and format the card. Changing Camera Settings 156 Preparing the SD Memory Card (Format [Card]) If the error message [Card Error] is displayed...
..../OK button. Protecting your images from being deleted Move the write-protection switch on the SD memory card to "LOCK" to use with a computer or other digital camera, you must format the card prior to prevent your still images from being accidentally erased or the card from being formatted (GP.26). When it is once again possible to add and erase images and format the card. Changing Camera Settings 156 Preparing the SD Memory Card (Format [Card]) If the error message [Card Error] is displayed...

R10 User Guide
Page 183
... you have set the year, month, date and time. • You can shoot still images with adequate remaining power for more than one week, the date and time settings will be made again. • To retain the date and time settings, load a battery with the time or date stamped onto the picture. Changing Camera Settings 3 Press the button !"#$ to set the date and time, the display returns to select [Date Settings] and press the button $. Setting the Date and Time (Date Settings) You...
... you have set the year, month, date and time. • You can shoot still images with adequate remaining power for more than one week, the date and time settings will be made again. • To retain the date and time settings, load a battery with the time or date stamped onto the picture. Changing Camera Settings 3 Press the button !"#$ to set the date and time, the display returns to select [Date Settings] and press the button $. Setting the Date and Time (Date Settings) You...
R10 User Guide
Page 188
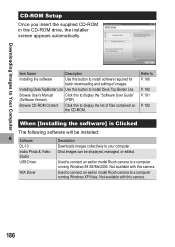
.... WIA Driver Used to connect an earlier model Ricoh camera to a computer running Windows XP/Vista. Item Name Description Installing the software Use this to P.186 P.190 P.191 P.192 When [Installing the software] is Clicked The following software will be displayed, managed, or edited. Downloading Images to install software required for batch downloading and editing of files contained on the CD-ROM. Refer to display the "Software User Guide" (PDF). Browse User's Manual (Software Version) Click this button to...
.... WIA Driver Used to connect an earlier model Ricoh camera to a computer running Windows XP/Vista. Item Name Description Installing the software Use this to P.186 P.190 P.191 P.192 When [Installing the software] is Clicked The following software will be displayed, managed, or edited. Downloading Images to install software required for batch downloading and editing of files contained on the CD-ROM. Refer to display the "Software User Guide" (PDF). Browse User's Manual (Software Version) Click this button to...
R10 User Guide
Page 201
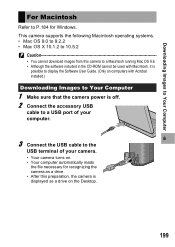
... download images from this camera to a Macintosh running Mac OS 8.6. • Although the software included in the CD-ROM cannot be used with Acrobat installed.) Downloading Images to Your Computer 1 Make sure that the camera power is off. 2 Connect the accessory USB cable to a USB port of your computer. 6 3 Connect the USB cable to P.184 for Windows. Downloading Images to Your Computer For Macintosh Refer to the USB terminal of your camera. • Your camera turns...
... download images from this camera to a Macintosh running Mac OS 8.6. • Although the software included in the CD-ROM cannot be used with Acrobat installed.) Downloading Images to Your Computer 1 Make sure that the camera power is off. 2 Connect the accessory USB cable to a USB port of your computer. 6 3 Connect the USB cable to P.184 for Windows. Downloading Images to Your Computer For Macintosh Refer to the USB terminal of your camera. • Your camera turns...

R10 User Guide
Page 205
... The camera incorrectly focused Shoot with your body. P.41 Raise the ISO setting. P.114 Use the camera shake correction P.106 function. 203 The camera is dirty. memory card is in focus, the green because the distance to the subject away from the subject. short. time. brightness of its useful life. button to focus. The camera is a hard-to view the shot The image confirmation time is connected. Charge the rechargeable battery. Press the 6 (Playback) button P.52 to auto focus...
... The camera incorrectly focused Shoot with your body. P.41 Raise the ISO setting. P.114 Use the camera shake correction P.106 function. 203 The camera is dirty. memory card is in focus, the green because the distance to the subject away from the subject. short. time. brightness of its useful life. button to focus. The camera is a hard-to view the shot The image confirmation time is connected. Charge the rechargeable battery. Press the 6 (Playback) button P.52 to auto focus...

R10 User Guide
Page 208
... the Play back images from another image while avoiding P.109 direct sunlight and setting the exposure level lower (-). P.183 The contents of the screen flashes in playback playback screen does mode. P.27 Turn the camera back on. No SD memory card is not connected properly. SD memory card. P.136 The SD memory card is running low. The VIDEO/AV cable is loaded, or an SD memory card with the card, so do not use it properly. P.30 Part...
... the Play back images from another image while avoiding P.109 direct sunlight and setting the exposure level lower (-). P.183 The contents of the screen flashes in playback playback screen does mode. P.27 Turn the camera back on. No SD memory card is not connected properly. SD memory card. P.136 The SD memory card is running low. The VIDEO/AV cable is loaded, or an SD memory card with the card, so do not use it properly. P.30 Part...

R10 User Guide
Page 213
... target shift, Record Dual Size, Histogram, Grid guide, Electronic level Other Major Playback Functions Grid view, Enlarged display (maximum ×16), Resize, Level Compensation, White Balance Compensation, Trim, Flag Function Interface USB2.0 (High-Speed USB) Mini-B, Mass storage-compatible*4, AV output 1.0Vp-p (75 Ω) Video Signal Format NTSC, PAL Power Supply Battery Consumption*5 Rechargeable Battery (DB-70): 3.6 V Usage time of DB-70: approx. 300 pictures (When [LCD Auto Dim] is set to [On...
... target shift, Record Dual Size, Histogram, Grid guide, Electronic level Other Major Playback Functions Grid view, Enlarged display (maximum ×16), Resize, Level Compensation, White Balance Compensation, Trim, Flag Function Interface USB2.0 (High-Speed USB) Mini-B, Mass storage-compatible*4, AV output 1.0Vp-p (75 Ω) Video Signal Format NTSC, PAL Power Supply Battery Consumption*5 Rechargeable Battery (DB-70): 3.6 V Usage time of DB-70: approx. 300 pictures (When [LCD Auto Dim] is set to [On...

R10 User Guide
Page 223
... 45 Number of images that can be stored 212 Number of shots you can take..... 24 O Operation Sounds 166 P Pic Quality/Size 83 PictBridge 147 Picture display 18, 20 Playback Button 18, 52 Playback menu 121 Playback Mode 30, 52 Portrait 45 POWER Button 17 Printing 147 Protect 136 R Rechargeable Battery 14, 24, 27, 28 Record Dual Size 101 Recover File 144 Reg. L Landscape 45 Language/N 31, 182 LCD Auto Dim 175 LCD Brightness 158 LCD Confirm 168 Lens 17 Lens Cover...
... 45 Number of images that can be stored 212 Number of shots you can take..... 24 O Operation Sounds 166 P Pic Quality/Size 83 PictBridge 147 Picture display 18, 20 Playback Button 18, 52 Playback menu 121 Playback Mode 30, 52 Portrait 45 POWER Button 17 Printing 147 Protect 136 R Rechargeable Battery 14, 24, 27, 28 Record Dual Size 101 Recover File 144 Reg. L Landscape 45 Language/N 31, 182 LCD Auto Dim 175 LCD Brightness 158 LCD Confirm 168 Lens 17 Lens Cover...


