Quick Start Guide
Page 1
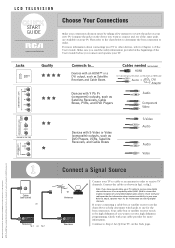
... (component) outputs, such as DVD Players, VCRs, Satellite Receivers, and Cable Boxes S-Video Audio Audio Video AUDIO/VIDEO INPUT 1 (VID1) RCA and associated marks are trademarks or registered trademarks of THOMSON S.A. HDMI, the HDMI logo, and High-Definition Multimedia Interface are trademarks of HDMI Licensing LLC. If you have regular cable, your TV is a tuner that enables reception of the User's Guide. Cable (wall outlet) OR ANTENNA/CABLE INPUT Television fig.1 OR fig.2 Connect a Signal Source or Antenna ANTENNA/CABLE INPUT Television Connect your...
... (component) outputs, such as DVD Players, VCRs, Satellite Receivers, and Cable Boxes S-Video Audio Audio Video AUDIO/VIDEO INPUT 1 (VID1) RCA and associated marks are trademarks or registered trademarks of THOMSON S.A. HDMI, the HDMI logo, and High-Definition Multimedia Interface are trademarks of HDMI Licensing LLC. If you have regular cable, your TV is a tuner that enables reception of the User's Guide. Cable (wall outlet) OR ANTENNA/CABLE INPUT Television fig.1 OR fig.2 Connect a Signal Source or Antenna ANTENNA/CABLE INPUT Television Connect your...
Quick Start Guide
Page 2
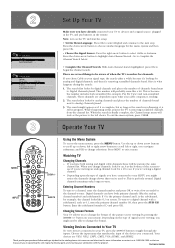
... ZOOM +/- Digital channels sometimes take longer to navigate submenus; Press the down arrow button to scroll up or down arrow buttons to highlight Auto Channel Search. The search might not be aware of the picture you have connected to the left or right, or to tune. Use the up or down ; Set Up Your TV Channel setup Go back Signal Type Auto Channel Search Cable... ... Changing Screen Formats Your TV...
... ZOOM +/- Digital channels sometimes take longer to navigate submenus; Press the down arrow button to scroll up or down arrow buttons to highlight Auto Channel Search. The search might not be aware of the picture you have connected to the left or right, or to tune. Use the up or down ; Set Up Your TV Channel setup Go back Signal Type Auto Channel Search Cable... ... Changing Screen Formats Your TV...
User Guide & Warranty
Page 2
...;rm, flat www.rca.com/television. This symbol indicates that unauthorized changes or modifications to this equipment may void the user's authority to operate it here and record the serial and model numbers in reduced lifetime from the rear of BBE Sound, Inc. FCC Regulations state that this product, maintain a spacing of 4 inches from the top and sides...
...;rm, flat www.rca.com/television. This symbol indicates that unauthorized changes or modifications to this equipment may void the user's authority to operate it here and record the serial and model numbers in reduced lifetime from the rear of BBE Sound, Inc. FCC Regulations state that this product, maintain a spacing of 4 inches from the top and sides...
User Guide & Warranty
Page 3
... power-supply cord or plug is used, use attachments/accessories specified by the manufacturer, or sold with respect to proper grounding of the mast and supporting structure, grounding of the obsolete outlet. 10. Refer all servicing to grounding electrodes, and requirements for long periods of antenna-discharge unit, connection to qualified service personnel. Keep these instructions. 2. Do not use...
... power-supply cord or plug is used, use attachments/accessories specified by the manufacturer, or sold with respect to proper grounding of the mast and supporting structure, grounding of the obsolete outlet. 10. Refer all servicing to grounding electrodes, and requirements for long periods of antenna-discharge unit, connection to qualified service personnel. Keep these instructions. 2. Do not use...
User Guide & Warranty
Page 4
... Important Safety Instructions i Chapter 1: Connections & Setup Things to Consider Before You Connect 5 Protect Against Power Surges 5 Protect Devices from Overheating 5 Position Cables Properly to Avoid Audio Interference 5 Use Indirect Light 5 Check Supplied Parts 5 Get the Picture 6 Getting Channels 6 Choose Your Connection 7 Video (Basic) Connection 8 Component Video (Advanced) Connection .......... 8 HDMI/DVI Connection 10 USB Connection 12 VGA Connection 13 Plug in the TV 14 Put Batteries in the Remote 14 Turn on the TV 14 How to Use the Remote Control to Complete...
... Important Safety Instructions i Chapter 1: Connections & Setup Things to Consider Before You Connect 5 Protect Against Power Surges 5 Protect Devices from Overheating 5 Position Cables Properly to Avoid Audio Interference 5 Use Indirect Light 5 Check Supplied Parts 5 Get the Picture 6 Getting Channels 6 Choose Your Connection 7 Video (Basic) Connection 8 Component Video (Advanced) Connection .......... 8 HDMI/DVI Connection 10 USB Connection 12 VGA Connection 13 Plug in the TV 14 Put Batteries in the Remote 14 Turn on the TV 14 How to Use the Remote Control to Complete...
User Guide & Warranty
Page 5
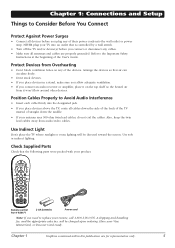
... heated air from audio/video cables. Use Indirect Light Don't place the TV where sunlight or room lighting will be directed toward the screen. ON•OFF TV PIP SAT•AUX DVD GO BACK VOL CH MENU MUTE INFO + CH CTRL ZOOMCLEAR PRESETS ZOOM+ GUIDE ?!+- Refer to replace your remote, call 1-800-338-0376. Have your product. Chapter 1: Connections and Setup Things to Avoid...
... heated air from audio/video cables. Use Indirect Light Don't place the TV where sunlight or room lighting will be directed toward the screen. ON•OFF TV PIP SAT•AUX DVD GO BACK VOL CH MENU MUTE INFO + CH CTRL ZOOMCLEAR PRESETS ZOOM+ GUIDE ?!+- Refer to replace your remote, call 1-800-338-0376. Have your product. Chapter 1: Connections and Setup Things to Avoid...
User Guide & Warranty
Page 9
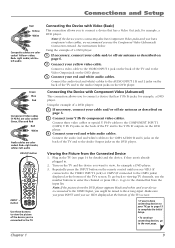
... Video (Basic) This connection allows you use the number buttons to enter the channel or press CH+/- Connect three video cables or special Y Pb Pr cables to the COMPONENT INPUT 1 (CMP1) Y Pb Pr jacks on the back of the device you to the TV. Plug in . 2. Note: If the picture from the Connected Device 1. Yellow= video; Connections and Setup Red Yellow White Composite cables are color coded- See instructions below. Connect your red and white audio cables. Connect the audio (red...
... Video (Basic) This connection allows you use the number buttons to enter the channel or press CH+/- Connect three video cables or special Y Pb Pr cables to the COMPONENT INPUT 1 (CMP1) Y Pb Pr jacks on the back of the device you to the TV. Plug in . 2. Note: If the picture from the Connected Device 1. Yellow= video; Connections and Setup Red Yellow White Composite cables are color coded- See instructions below. Connect your red and white audio cables. Connect the audio (red...
User Guide & Warranty
Page 11
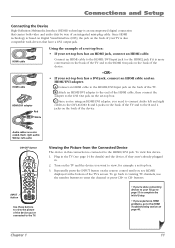
... viewing TV channels, use the number buttons to the TV. Chapter 1 11 Since HDMI technology is based on Digital Visual Interface (DVI), the jack on the remote control until you 've connected to enter the channel or press CH+ or CH- B. Audio cables are color coded- C. Repeatedly press the INPUT button on the back of your TV is also compatible with devices that carries both video and audio data by way of a set-top box...
... viewing TV channels, use the number buttons to the TV. Chapter 1 11 Since HDMI technology is based on Digital Visual Interface (DVI), the jack on the remote control until you 've connected to enter the channel or press CH+ or CH- B. Audio cables are color coded- C. Repeatedly press the INPUT button on the back of your TV is also compatible with devices that carries both video and audio data by way of a set-top box...
User Guide & Warranty
Page 13
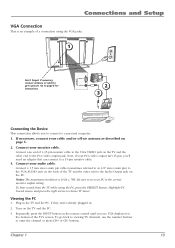
... using the VGA jacks. 1 Don't forget: If necessary, connect antenna or cable to page 6 for instructions. Turn on page 6. 2. Connect a 3.5 mm stereo mini pin cable (sometimes referred to as described on the TV and the PC. 3. Highlight PC Sound source and press the right arrow to the Audio Output jack on the remote control until you 'll need an adapter that can connect to a 15-pin monitor cable. 3. Viewing the PC 1. buttons...
... using the VGA jacks. 1 Don't forget: If necessary, connect antenna or cable to page 6 for instructions. Turn on page 6. 2. Connect a 3.5 mm stereo mini pin cable (sometimes referred to as described on the TV and the PC. 3. Highlight PC Sound source and press the right arrow to the Audio Output jack on the remote control until you 'll need an adapter that can connect to a 15-pin monitor cable. 3. Viewing the PC 1. buttons...
User Guide & Warranty
Page 14
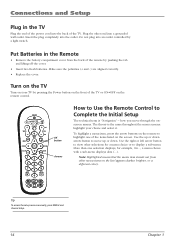
... to Use the Remote Control to view other selections for example, On...; Put Batteries in the TV Plug the end of the power cord into an outlet controlled by pressing the Power button on the front of the TV. Turn on the TV Turn on your choice and select it. a menu choice with a sub-menu displays dots (...). Use the up or down arrow button to display a sub-menu. Do not plug into...
... to Use the Remote Control to view other selections for example, On...; Put Batteries in the TV Plug the end of the power cord into an outlet controlled by pressing the Power button on the front of the TV. Turn on the TV Turn on your choice and select it. a menu choice with a sub-menu displays dots (...). Use the up or down arrow button to display a sub-menu. Do not plug into...
User Guide & Warranty
Page 17
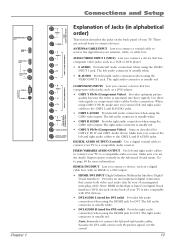
... right audio connection when using CMP1 Y Pb Pr, make sure you connect left and right audio cables to a compatible audio receiver. VGA INPUT ANTENNA/CABLE INPUT HDMI 2 INPUT HDMI 1/DVI INPUT R DVI AUDIO INPUT L VIDEO AUDIO Chapter 1 Connections and Setup R AUDIO L VIDEO R AUDIO L Pr Pb Y R AUDIO L Pr Pb Y R AUDIO L VIDEO OUTPUT DIGITAL AUDIO OUTPUT (Coaxial) FIXED/VARIABLE AUDIO OUTPUT COMPONENT INPUT 2 (CMP2) COMPONENT INPUT 1 (CMP1) AUDIO/VIDEO INPUT 1 (VID1) Explanation of Jacks (in the Advanced Sound menu. DIGITAL AUDIO OUTPUT (Coaxial) Use a digital coaxial cable to connect...
... right audio connection when using CMP1 Y Pb Pr, make sure you connect left and right audio cables to a compatible audio receiver. VGA INPUT ANTENNA/CABLE INPUT HDMI 2 INPUT HDMI 1/DVI INPUT R DVI AUDIO INPUT L VIDEO AUDIO Chapter 1 Connections and Setup R AUDIO L VIDEO R AUDIO L Pr Pb Y R AUDIO L Pr Pb Y R AUDIO L VIDEO OUTPUT DIGITAL AUDIO OUTPUT (Coaxial) FIXED/VARIABLE AUDIO OUTPUT COMPONENT INPUT 2 (CMP2) COMPONENT INPUT 1 (CMP1) AUDIO/VIDEO INPUT 1 (VID1) Explanation of Jacks (in the Advanced Sound menu. DIGITAL AUDIO OUTPUT (Coaxial) Use a digital coaxial cable to connect...

User Guide & Warranty
Page 20
... TV's volume. To return to the previous channel, press INPUT until you have connected to operate one of the remote) If programmed, provides transport control for example, VCRs or DVD players. Programming the Remote to Operate Other Devices The universal remote can 't be programmed. Find Out If You Need to Program the Remote To determine whether the universal remote needs to be programmed to view is entered, press the OK button to tune to change the screen format: 4/3, 16...
... TV's volume. To return to the previous channel, press INPUT until you have connected to operate one of the remote) If programmed, provides transport control for example, VCRs or DVD players. Programming the Remote to Operate Other Devices The universal remote can 't be programmed. Find Out If You Need to Program the Remote To determine whether the universal remote needs to be programmed to view is entered, press the OK button to tune to change the screen format: 4/3, 16...

User Guide & Warranty
Page 22
... the codes; Volume Punchthrough Feature You may not be compatible with your devices. You've also programmed your TV remote control to the audio system. There is connected to operate your DVD player. 2. Keep pointing the remote at the device. 5. Press the appropriate device button (SAT•AUX or DVD) to set the remote to control the device, for you are ready to use the TV's remote control to operate the volume...
... the codes; Volume Punchthrough Feature You may not be compatible with your devices. You've also programmed your TV remote control to the audio system. There is connected to operate your DVD player. 2. Keep pointing the remote at the device. 5. Press the appropriate device button (SAT•AUX or DVD) to set the remote to control the device, for you are ready to use the TV's remote control to operate the volume...

User Guide & Warranty
Page 27
... back Channel setup ... Current screen format. Autotuning Note: This feature only works with other RCA devices. The Autotuning feature automatically tunes the TV to the correct video input channel for example, when you press the corresponding button. To set up the channel the TV tunes to when you want to watch a tape on the VCR. Press MENU (the MAIN MENU appears). 2. Current time. Closed caption ... Displays the current tuner, channel and program...
... back Channel setup ... Current screen format. Autotuning Note: This feature only works with other RCA devices. The Autotuning feature automatically tunes the TV to the correct video input channel for example, when you press the corresponding button. To set up the channel the TV tunes to when you want to watch a tape on the VCR. Press MENU (the MAIN MENU appears). 2. Current time. Closed caption ... Displays the current tuner, channel and program...

User Guide & Warranty
Page 37
... and you want to control the sound by the signal you tune to a program that is also used to broadcast a program's audio with more spacious sound. The available audio modes are same as your Sound Type). Headphone Settings Displays a choice list of another Sound Preset option, press the right or left arrow until no band is selected and Frequency Range is highlighted. Advanced Settings Second Audio Program (SAP) Plays the program's audio in a second language...
... and you want to control the sound by the signal you tune to a program that is also used to broadcast a program's audio with more spacious sound. The available audio modes are same as your Sound Type). Headphone Settings Displays a choice list of another Sound Preset option, press the right or left arrow until no band is selected and Frequency Range is highlighted. Advanced Settings Second Audio Program (SAP) Plays the program's audio in a second language...
User Guide & Warranty
Page 38
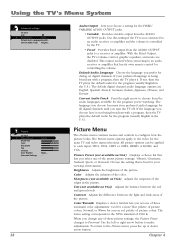
... arrow button to each input- This output is best for the program (usually English in the picture. If the language you change any of picture colors. Contrast Adjusts the difference between the red and green levels. To return to the video for the program (usually English in the U.S.). Chapter 4 Default Audio Language English... If your preferred audio language for all digital channels until you choose a setting for controlling the volume. Warm... ... 38 Audio Output Lets you turn...
... arrow button to each input- This output is best for the program (usually English in the picture. If the language you change any of picture colors. Contrast Adjusts the difference between the red and green levels. To return to the video for the program (usually English in the U.S.). Chapter 4 Default Audio Language English... If your preferred audio language for all digital channels until you choose a setting for controlling the volume. Warm... ... 38 Audio Output Lets you turn...
User Guide & Warranty
Page 45
... the volume up button to restore sound. • If using DVI, S-Video, or Y, PB, PR, remember to also connect the device's left and right audio output jacks to view. change channels. • If you might have your video cable connected to the VIDEO OUTPUT jack on the back of your TV. • If you're getting a black and white picture from that 's playing on • Make sure the TV is plugged in the Parental control menu...
... the volume up button to restore sound. • If using DVI, S-Video, or Y, PB, PR, remember to also connect the device's left and right audio output jacks to view. change channels. • If you might have your video cable connected to the VIDEO OUTPUT jack on the back of your TV. • If you're getting a black and white picture from that 's playing on • Make sure the TV is plugged in the Parental control menu...
User Guide & Warranty
Page 46
... Chapter 5 Black box appears on the screen • Closed-captioning might have been activated. If Acquiring Channel appears in again. Contact the manufacturer of a power surge. Reset the power by the HDMI1/DVI or HDMI2 input. Check Closed Caption in . Choose either 720p or 1080i. • 480i signals aren't supported by unplugging the power cord and plugging it back in the Parental Controls menu. • If using a VCR, check to change the picture quality output that...
... Chapter 5 Black box appears on the screen • Closed-captioning might have been activated. If Acquiring Channel appears in again. Contact the manufacturer of a power surge. Reset the power by the HDMI1/DVI or HDMI2 input. Check Closed Caption in . Choose either 720p or 1080i. • 480i signals aren't supported by unplugging the power cord and plugging it back in the Parental Controls menu. • If using a VCR, check to change the picture quality output that...
User Guide & Warranty
Page 47
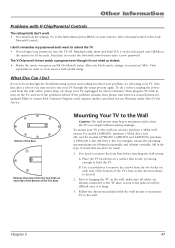
... www.rca.com/television for about 5 minutes. For model L32WD250, purchase a VESA 200 x 100, M4; A. B. Use a screwdriver to the Main Menu (press MENU on a surface that needs to be difficult once it 's not rated as the arrows indicate to purchase a VESA wall mount. Then plug the TV back in, turn the TV off. Other Information Problems with V-Chip/Parental Controls The rating limits don't work...
... www.rca.com/television for about 5 minutes. For model L32WD250, purchase a VESA 200 x 100, M4; A. B. Use a screwdriver to the Main Menu (press MENU on a surface that needs to be difficult once it 's not rated as the arrows indicate to purchase a VESA wall mount. Then plug the TV back in, turn the TV off. Other Information Problems with V-Chip/Parental Controls The rating limits don't work...
Spec Sheet
Page 2
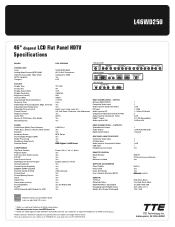
... PC Audio 2 2 L/R 2 ( 1 DVI Compatible) 1 L/R for Composite/S-Video USB Input Headphone Jack Output REMOTE CONTROL Model Number Type Batteries Included SUPPLIED ACCESSORIES Power Supply Power Cord Quick Start Guide User's Guide & Warranty (E/F/S) GENERAL TV Finish Detachable Base VESA Wall Mount Compatible Packaging Size (HxWxD) Inches Weight (lbs) (Product/Packaged) ENERGY STAR and the ENERGY STAR mark are subject to TTE CORPORATION. 1 1 1 L/R 1 - L46WD250 46" diagonal LCD Flat Panel HDTV Specifications BRAND RCA SCENIUM TECHNOLOGY Tuner Analog Video Formats (NTSC/480i) Video Formats...
... PC Audio 2 2 L/R 2 ( 1 DVI Compatible) 1 L/R for Composite/S-Video USB Input Headphone Jack Output REMOTE CONTROL Model Number Type Batteries Included SUPPLIED ACCESSORIES Power Supply Power Cord Quick Start Guide User's Guide & Warranty (E/F/S) GENERAL TV Finish Detachable Base VESA Wall Mount Compatible Packaging Size (HxWxD) Inches Weight (lbs) (Product/Packaged) ENERGY STAR and the ENERGY STAR mark are subject to TTE CORPORATION. 1 1 1 L/R 1 - L46WD250 46" diagonal LCD Flat Panel HDTV Specifications BRAND RCA SCENIUM TECHNOLOGY Tuner Analog Video Formats (NTSC/480i) Video Formats...


