User Guide & Warranty
Page 1
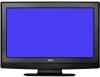
Before operating the unit, please read this menu option to the "Cable" (Cable Television) mode. If not using Cable TV, set to the "Air" position. AIR/CABLE MODE SELECTION When shipped from your local retailer, please contact the remote manufacturer for the required programming code. OWNER'S MANUAL 26/32" TFT LCD DIGITAL TV WITH DVD PLAYER L26HD35D L32HD35D ATTENTION If you purchase a universal remote control from the factory, the Signal Type option is set this manual thoroughly. 52K0101A_eng.indd 1 3/12/09 3:10:38 PM
Before operating the unit, please read this menu option to the "Cable" (Cable Television) mode. If not using Cable TV, set to the "Air" position. AIR/CABLE MODE SELECTION When shipped from your local retailer, please contact the remote manufacturer for the required programming code. OWNER'S MANUAL 26/32" TFT LCD DIGITAL TV WITH DVD PLAYER L26HD35D L32HD35D ATTENTION If you purchase a universal remote control from the factory, the Signal Type option is set this manual thoroughly. 52K0101A_eng.indd 1 3/12/09 3:10:38 PM
User Guide & Warranty
Page 2
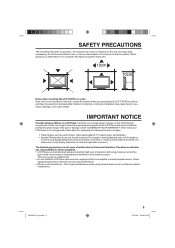
...: TO PREVENT FIRE OR SHOCK HAZARD, DO NOT EXPOSE THIS APPLIANCE TO RAIN OR MOISTURE. Consult the dealer or an experienced radio/TV technician for proof of uninsulated dangerous voltage within this product allows us to provide reasonable protection against harmful interference in a particular installation. CLASS...) instructions in case you if needed. DO NOT STARE INTO THE BEAM. This equipment generates, uses and can be registered at www.rca.com/television. TO PREVENT DIRECT EXPOSURE TO THE LASER BEAM, DO NOT TRY TO OPEN THE ENCLOSURE. SHOULD THE UNIT REQUIRE MAINTENANCE, ...
...: TO PREVENT FIRE OR SHOCK HAZARD, DO NOT EXPOSE THIS APPLIANCE TO RAIN OR MOISTURE. Consult the dealer or an experienced radio/TV technician for proof of uninsulated dangerous voltage within this product allows us to provide reasonable protection against harmful interference in a particular installation. CLASS...) instructions in case you if needed. DO NOT STARE INTO THE BEAM. This equipment generates, uses and can be registered at www.rca.com/television. TO PREVENT DIRECT EXPOSURE TO THE LASER BEAM, DO NOT TRY TO OPEN THE ENCLOSURE. SHOULD THE UNIT REQUIRE MAINTENANCE, ...
User Guide & Warranty
Page 4
...a moderate level. If you do so may cause serious personal injury and product malfunction. 29) This reminder is provided to call the cable TV system installer's attention to do not touch the liquid in clean water. Failure to Article 820-40 of the NEC that can easily be ...pulled over and cause injury. These discs are easily broken and may cause an electric shock and serious personal injury. It may cause the LCD panel glass to other equipment carefully and follow the instructions when making home entertainment enjoyable and safe. TUNE INTO SAFETY One size does NOT ...
...a moderate level. If you do so may cause serious personal injury and product malfunction. 29) This reminder is provided to call the cable TV system installer's attention to do not touch the liquid in clean water. Failure to Article 820-40 of the NEC that can easily be ...pulled over and cause injury. These discs are easily broken and may cause an electric shock and serious personal injury. It may cause the LCD panel glass to other equipment carefully and follow the instructions when making home entertainment enjoyable and safe. TUNE INTO SAFETY One size does NOT ...
User Guide & Warranty
Page 5
... space around the entire unit. 10cm 10cm Notes when mounting the LCD TV/DVD on the unit, this unit may cause injury to you purchased the LCD TV/DVD for long periods of a malfunction. • Do not install the LCD Panel near electronic equipment that do not use the entire screen. ... displaying the following symptoms are manufactured using infrared devices such as stock tickers, video game patterns, TV station logos, and websites. • Special Formats that is to the LCD TV/DVD. Do not block ventilation holes, or set up near this may be missing picture elements or...
... space around the entire unit. 10cm 10cm Notes when mounting the LCD TV/DVD on the unit, this unit may cause injury to you purchased the LCD TV/DVD for long periods of a malfunction. • Do not install the LCD Panel near electronic equipment that do not use the entire screen. ... displaying the following symptoms are manufactured using infrared devices such as stock tickers, video game patterns, TV station logos, and websites. • Special Formats that is to the LCD TV/DVD. Do not block ventilation holes, or set up near this may be missing picture elements or...
User Guide & Warranty
Page 6
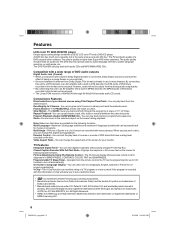
...can play back tracks in the selected subject on the screen for your desired scenes using a Digital TV Set-Top Box. V-Chip - The V-Chip function can be enjoyed. Patent #: 5,451,942 & other software. A DVD disc has much more capacity, but is encoded with a built-in DTS decoder, the DTS .../STILL moves one of a 48 kHz/24 bit through the program by 4 steps of BRIGHTNESS, CONTRAST, COLOR, TINT and SHARPNESS. Features LCD color TV With DVD/CD player Unique space saving design combines a 26/32" LCD color TV and a DVD/CD player. On-Screen 3 Language Display -
...can play back tracks in the selected subject on the screen for your desired scenes using a Digital TV Set-Top Box. V-Chip - The V-Chip function can be enjoyed. Patent #: 5,451,942 & other software. A DVD disc has much more capacity, but is encoded with a built-in DTS decoder, the DTS .../STILL moves one of a 48 kHz/24 bit through the program by 4 steps of BRIGHTNESS, CONTRAST, COLOR, TINT and SHARPNESS. Features LCD color TV With DVD/CD player Unique space saving design combines a 26/32" LCD color TV and a DVD/CD player. On-Screen 3 Language Display -
User Guide & Warranty
Page 7
... 30 Zooming 30 Locating desired scene 30 Repeat playback 30 Marking desired scenes 31 Changing soundtrack language 31 Subtitles 32 Changing angles 32 Title selection 32 DVD menu 32 Setting the language 32 Setting the aspect ratio of TV screen 33 Setting on screen display 33 Setting the picture mode 33 Night mode 34 Digital out 34...
... 30 Zooming 30 Locating desired scene 30 Repeat playback 30 Marking desired scenes 31 Changing soundtrack language 31 Subtitles 32 Changing angles 32 Title selection 32 DVD menu 32 Setting the language 32 Setting the aspect ratio of TV screen 33 Setting on screen display 33 Setting the picture mode 33 Night mode 34 Digital out 34...
User Guide & Warranty
Page 11
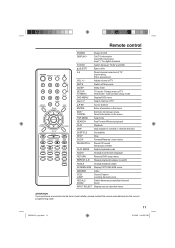
...PICTURE SIZE menu MARKER Index CCD/ JUMP Closed Caption Locating desired scene RECALL/ ZOOM Switch between TV/AV and DVD (EJECT) Eject a disc 0-9 Direct channel selection of TV ▲▼◀▶ Cursor buttons ENTER Enter information in the menu TOP MENU Select ...SKIP Skip chapter to forward or reverse direction SUBTITLE Set subtitle STOP Stop SLOW Forward/Reverse- Call TV information Call DVD information Input "-" for digital channels TV/DVD Switch between present/last channel Zoom INPUT SELECT Display source selection menu ATTENTION If you purchase a ...
...PICTURE SIZE menu MARKER Index CCD/ JUMP Closed Caption Locating desired scene RECALL/ ZOOM Switch between TV/AV and DVD (EJECT) Eject a disc 0-9 Direct channel selection of TV ▲▼◀▶ Cursor buttons ENTER Enter information in the menu TOP MENU Select ...SKIP Skip chapter to forward or reverse direction SUBTITLE Set subtitle STOP Stop SLOW Forward/Reverse- Call TV information Call DVD information Input "-" for digital channels TV/DVD Switch between present/last channel Zoom INPUT SELECT Display source selection menu ATTENTION If you purchase a ...
User Guide & Warranty
Page 12
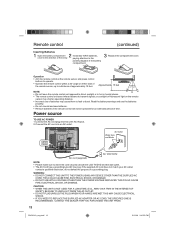
Operation • Aim the remote control at both the LCD TV/DVD and the wall outlet. • The AC Cord has a grounding-type AC line plug. Power source TO USE AC POWER 1. AC Outlet Wider Hole and ...
Operation • Aim the remote control at both the LCD TV/DVD and the wall outlet. • The AC Cord has a grounding-type AC line plug. Power source TO USE AC POWER 1. AC Outlet Wider Hole and ...
User Guide & Warranty
Page 13
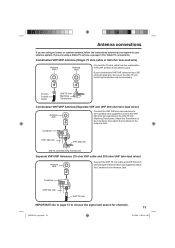
... to the Combiner (not supplied). Combiner UHF 300 ohm VHF 75 ohm IMPORTANT: Go to page 15 to choose the signal and search for Cable TV connections. Combiner UHF 300 ohm VHF 300 ohm 300-75 ohm Matching Transformer Separate VHF/UHF Antennas (75 ohm VHF cable and 300 ohm UHF... Jack Connect the VHF 75 ohm cable and UHF 300 ohm twin-lead wire to the Antenna Jack. Antenna connections If you are using a Cable TV service, see page 14 for channels. 13 52K0101A_eng.indd 13 3/12/09 5:55:14 PM If your antenna system. Connect the VHF 300 ohm twin...
... to the Combiner (not supplied). Combiner UHF 300 ohm VHF 75 ohm IMPORTANT: Go to page 15 to choose the signal and search for Cable TV connections. Combiner UHF 300 ohm VHF 300 ohm 300-75 ohm Matching Transformer Separate VHF/UHF Antennas (75 ohm VHF cable and 300 ohm UHF... Jack Connect the VHF 75 ohm cable and UHF 300 ohm twin-lead wire to the Antenna Jack. Antenna connections If you are using a Cable TV service, see page 14 for channels. 13 52K0101A_eng.indd 13 3/12/09 5:55:14 PM If your antenna system. Connect the VHF 300 ohm twin...
User Guide & Warranty
Page 14
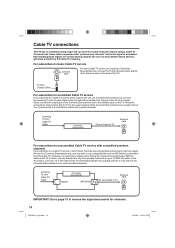
... not requiring a Converter/ Descrambler box, connect the 75 ohm Coaxial Cable directly to the Antenna Jack on the TV. Set the TV to the output channel of the Converter/Descrambler box (usually channel 3 or 4) and use the Converter/Descrambler box to choose the signal ...of a Converter/Descrambler box, connect the incoming 75 ohm Coaxial Cable to tune scrambled channels. Cable TV connections This TV has an extended tuning range and can directly tune any nonscrambled channels on your TV to the output of the Converter/Descrambler box (usually channel 3 or 4) and use the Converter/Descrambler...
... not requiring a Converter/ Descrambler box, connect the 75 ohm Coaxial Cable directly to the Antenna Jack on the TV. Set the TV to the output channel of the Converter/Descrambler box (usually channel 3 or 4) and use the Converter/Descrambler box to choose the signal ...of a Converter/Descrambler box, connect the incoming 75 ohm Coaxial Cable to tune scrambled channels. Cable TV connections This TV has an extended tuning range and can directly tune any nonscrambled channels on your TV to the output of the Converter/Descrambler box (usually channel 3 or 4) and use the Converter/Descrambler...
User Guide & Warranty
Page 15
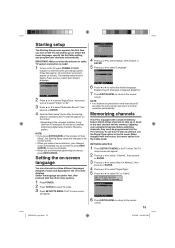
...". 3 Press ▲ or ▼ to see your changes. • When you prefer first, then proceed with the other menu options. 1 Press POWER. 2 Press TV/DVD to the normal screen. You do not have to press EXIT/ CANCEL to select "Automatic Search", then press ▶ or ENTER. 4 Now the "Auto Setup...; to select "Setup", then press ▶ or ENTER. 5 Press ▲ or ▼ to select your channels automatically. Air - Air/Cable selection 1 Press SETUP/TV MENU in the Cable mode. VHF/UHF channels Cable - Setting the on-screen language You can choose from 15 minutes to 30 minutes to the...
...". 3 Press ▲ or ▼ to see your changes. • When you prefer first, then proceed with the other menu options. 1 Press POWER. 2 Press TV/DVD to the normal screen. You do not have to press EXIT/ CANCEL to select "Automatic Search", then press ▶ or ENTER. 4 Now the "Auto Setup...; to select "Setup", then press ▶ or ENTER. 5 Press ▲ or ▼ to select your channels automatically. Air - Air/Cable selection 1 Press SETUP/TV MENU in the Cable mode. VHF/UHF channels Cable - Setting the on-screen language You can choose from 15 minutes to 30 minutes to the...
User Guide & Warranty
Page 16
...; or ENTER. Auto Ch Memory Signal Type Automatic Search Cable Stop Analog Channel Found : 7 Digital Channel Found : 5 Programming Now : Select ENTER:Cancel 5 The TV will appear. 2 Press ▲ or ▼ to select "Channel", then press ▶ or ENTER. 3 Press ▲ or ▼ to select "Add...Add/Delete", then press ▶ or ENTER. 4 Press ▲ or ▼ to select "Clear All", then press ▶ or ENTER. The TV menu screen will be patient. Depending on the reception condition, a bar display may be accomplished while a station is recommended to perform the "Automatic Search"...
...; or ENTER. Auto Ch Memory Signal Type Automatic Search Cable Stop Analog Channel Found : 7 Digital Channel Found : 5 Programming Now : Select ENTER:Cancel 5 The TV will appear. 2 Press ▲ or ▼ to select "Channel", then press ▶ or ENTER. 3 Press ▲ or ▼ to select "Add...Add/Delete", then press ▶ or ENTER. 4 Press ▲ or ▼ to select "Clear All", then press ▶ or ENTER. The TV menu screen will be patient. Depending on the reception condition, a bar display may be accomplished while a station is recommended to perform the "Automatic Search"...
User Guide & Warranty
Page 17
... then press the - The same program may choose to watch either an analog channel or a digital channel. Source Selection 0.TV 1.Video 1 2.Video 2 3.Component 4.HDMI 1 5.HDMI 2 6.PC 7.DVD [0-7]:Select CH / Press and release CH / . For proper operation, before selecting channels, they should be available on either... on screen.) 2 Adjust the volume level by the remaining number. You can select TV, Video 1, Video 2, Component, HDMI1, HDMI2, PC or DVD depending on the screen. Example, to connect your LCD TV, such as needed. It may take approx. 10 seconds for a few seconds.) TO...
... then press the - The same program may choose to watch either an analog channel or a digital channel. Source Selection 0.TV 1.Video 1 2.Video 2 3.Component 4.HDMI 1 5.HDMI 2 6.PC 7.DVD [0-7]:Select CH / Press and release CH / . For proper operation, before selecting channels, they should be available on either... on screen.) 2 Adjust the volume level by the remaining number. You can select TV, Video 1, Video 2, Component, HDMI1, HDMI2, PC or DVD depending on the screen. Example, to connect your LCD TV, such as needed. It may take approx. 10 seconds for a few seconds.) TO...
User Guide & Warranty
Page 18
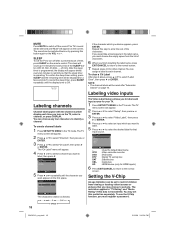
... ten minutes to Off. After the sleep timer is transmitted. Repeat this restriction separately. VCR DVD DTV SAT CBL HD : Uses the default label name : Video cassette recorder : DVD video : Digital TV set the TV to enter the rest of the SLEEP button (Off, 0h 10m, 0h 20m, ..., 2h...of characters. 6 When you finish inputting the label name, press EXIT/CANCEL to return to the normal screen. 7 Repeat steps 4-5 for your TV. 1 Press SETUP/TV MENU in the label name, you desire appears, press ENTER. Component - The restriction applies to select "Ch Label", then press ▶ or...
... ten minutes to Off. After the sleep timer is transmitted. Repeat this restriction separately. VCR DVD DTV SAT CBL HD : Uses the default label name : Video cassette recorder : DVD video : Digital TV set the TV to enter the rest of the SLEEP button (Off, 0h 10m, 0h 20m, ..., 2h...of characters. 6 When you finish inputting the label name, press EXIT/CANCEL to return to the normal screen. 7 Repeat steps 4-5 for your TV. 1 Press SETUP/TV MENU in the label name, you desire appears, press ENTER. Component - The restriction applies to select "Ch Label", then press ▶ or...
User Guide & Warranty
Page 19
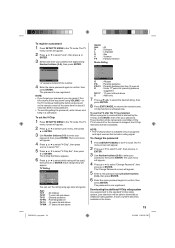
... and enter your television will be temporarily overridden. Continue holding the button and press 0 on the TV. Enter a new password. • To avoid forgetting the password, write it . TV Rating TV Rating ALL D L S V FV TV-Y TV-Y7 TV-G TV-PG TV-14 TV-MA : Select ENTER:Set You can reset it down using Number buttons (0-9), then press ENTER. Age...
... and enter your television will be temporarily overridden. Continue holding the button and press 0 on the TV. Enter a new password. • To avoid forgetting the password, write it . TV Rating TV Rating ALL D L S V FV TV-Y TV-Y7 TV-G TV-PG TV-14 TV-MA : Select ENTER:Set You can reset it down using Number buttons (0-9), then press ENTER. Age...
User Guide & Warranty
Page 20
... or ▼ to select "Lock", then press ▶ or ENTER. 3 Use Number buttons (0-9) to select "Closed Caption", then press ▶ or ENTER. The TV menu screen will appear. 2 Press ▲ or ▼ to select "Setup", then press ▶ or ENTER. 3 Press ▲ or ▼ to enter your... Closed Caption Mode will display text on the screen in English or another language. To download the additional V-Chip rating system (when available) 1 Press SETUP/TV MENU while on a digital channel. 2 Press ▲ or ▼ to select "Lock", then press ▶ or ENTER. 3 Use Number buttons (0-9) ...
... or ▼ to select "Lock", then press ▶ or ENTER. 3 Use Number buttons (0-9) to select "Closed Caption", then press ▶ or ENTER. The TV menu screen will appear. 2 Press ▲ or ▼ to select "Setup", then press ▶ or ENTER. 3 Press ▲ or ▼ to enter your... Closed Caption Mode will display text on the screen in English or another language. To download the additional V-Chip rating system (when available) 1 Press SETUP/TV MENU while on a digital channel. 2 Press ▲ or ▼ to select "Lock", then press ▶ or ENTER. 3 Use Number buttons (0-9) ...
User Guide & Warranty
Page 21
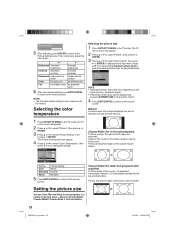
...9660; to select "Picture", then press ▶ or ENTER. 3 Press ▲ or ▼ to adjust. Picture control adjustment 1 Press SETUP/TV MENU in the TV mode. The TV menu screen will appear. 2 Press ▲ or ▼ to select "Picture", then press ▶ or ENTER. 3 Press ▲ or &#... then press ◀ or ▶ to select "Custom". 5 Press ▲ or ▼ to customize Digital Captions only. 1 Press SETUP/TV MENU in the digital channel. Picture Setting Brightness 25 Contrast 50 Sharpness 25 Color 25 Tint 0 Color Temperature Backlight 15 Cool : Select : Adjust ENTER...
...9660; to select "Picture", then press ▶ or ENTER. 3 Press ▲ or ▼ to adjust. Picture control adjustment 1 Press SETUP/TV MENU in the TV mode. The TV menu screen will appear. 2 Press ▲ or ▼ to select "Picture", then press ▶ or ENTER. 3 Press ▲ or &#... then press ◀ or ▶ to select "Custom". 5 Press ▲ or ▼ to customize Digital Captions only. 1 Press SETUP/TV MENU in the digital channel. Picture Setting Brightness 25 Contrast 50 Sharpness 25 Color 25 Tint 0 Color Temperature Backlight 15 Cool : Select : Adjust ENTER...
User Guide & Warranty
Page 22
... makes picture softer Color be pale color Tint be reddish color ▶ increase brightness increase contrast makes picture clearer be brilliant color be hidden. The TV menu screen will appear. 4 Press ▲ or ▼ to select "Color Temperature", then press ◀ or ▶ to display Picture ...Size menu. Then continue to select the desired picture size, as described below. The TV menu screen will display the size of standard 4:3 with subtitles) To fill the width of the picture remains near its former ratio. NOTE: &#...
... makes picture softer Color be pale color Tint be reddish color ▶ increase brightness increase contrast makes picture clearer be brilliant color be hidden. The TV menu screen will appear. 4 Press ▲ or ▼ to select "Color Temperature", then press ◀ or ▶ to display Picture ...Size menu. Then continue to select the desired picture size, as described below. The TV menu screen will display the size of standard 4:3 with subtitles) To fill the width of the picture remains near its former ratio. NOTE: &#...
User Guide & Warranty
Page 23
...9654; to the normal screen. 23 52K0101A_eng.indd 23 3/12/09 3:10:56 PM Cinema Wide3 (for letter box programs with a scanning rate of 720p or 1080i, only the Cinema Wide2 and Full picture size feature is available. • In PC Mode, only the Natural, Full and Native picture size... appear. 2 Press ▲ or ▼ to select "Picture", then press ▶ or ENTER. 3 Press ▲ or ▼ to "On" when you view a DVD. 1 Press SETUP/TV MENU in the PC mode. 1 Press INPUT SELECT, then press ▲/▼ or Number button (6) to select the PC mode. : Select : Adjust ENTER:Set...
...9654; to the normal screen. 23 52K0101A_eng.indd 23 3/12/09 3:10:56 PM Cinema Wide3 (for letter box programs with a scanning rate of 720p or 1080i, only the Cinema Wide2 and Full picture size feature is available. • In PC Mode, only the Natural, Full and Native picture size... appear. 2 Press ▲ or ▼ to select "Picture", then press ▶ or ENTER. 3 Press ▲ or ▼ to "On" when you view a DVD. 1 Press SETUP/TV MENU in the PC mode. 1 Press INPUT SELECT, then press ▲/▼ or Number button (6) to select the PC mode. : Select : Adjust ENTER:Set...
User Guide & Warranty
Page 24
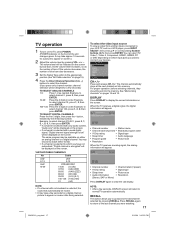
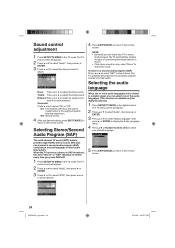
...sound being broadcast (stereo or mono). • If the stereo sound is available only for digital broadcast.) 1 Press SETUP/TV MENU in the TV mode. Language 2 3. Spanish 6. The TV menu screen will output the second audio program instead of normal audio. Surround: Press ◀ or ▶ to select... Treble 15 Balance 0 MTS Surround Audio Language Stereo Off No Info. : Select : Adjust 4 Press EXIT/CANCEL to return to adjust the bass sound. The TV speakers will appear. 2 Press ▲ or ▼ to select "Audio", then press ▶ or ENTER. 3 Press ▲ or ▼ to ...
...sound being broadcast (stereo or mono). • If the stereo sound is available only for digital broadcast.) 1 Press SETUP/TV MENU in the TV mode. Language 2 3. Spanish 6. The TV menu screen will output the second audio program instead of normal audio. Surround: Press ◀ or ▶ to select... Treble 15 Balance 0 MTS Surround Audio Language Stereo Off No Info. : Select : Adjust 4 Press EXIT/CANCEL to return to adjust the bass sound. The TV speakers will appear. 2 Press ▲ or ▼ to select "Audio", then press ▶ or ENTER. 3 Press ▲ or ▼ to ...


