
User Manual
Page 3
...IN WIRE GROUND CLAMP ANTENNA DISCHARGE UNIT (NEC SECTION 810-20) ELECTRIC SERVICE EQUIPMENT GROUNDING CONDUCTORS (NEC SECTION 810-21) GROUND CLAMPS POWER SERVICE GROUNDING ELECTRODE SYSTEM (NEC ART 250, PART H) To assure adequate ventilation for replacement of time. If the provided plug does not... maintain a spacing of 4 inches from the top and sides of the National Electrical Code and in accordance with the apparatus. Protect the power cord from being walked on the right for details. Install in Canada, Part 1 of the TV receiver and other apparatus (including ampli&#...
...IN WIRE GROUND CLAMP ANTENNA DISCHARGE UNIT (NEC SECTION 810-20) ELECTRIC SERVICE EQUIPMENT GROUNDING CONDUCTORS (NEC SECTION 810-21) GROUND CLAMPS POWER SERVICE GROUNDING ELECTRODE SYSTEM (NEC ART 250, PART H) To assure adequate ventilation for replacement of time. If the provided plug does not... maintain a spacing of 4 inches from the top and sides of the National Electrical Code and in accordance with the apparatus. Protect the power cord from being walked on the right for details. Install in Canada, Part 1 of the TV receiver and other apparatus (including ampli&#...
User Manual
Page 10
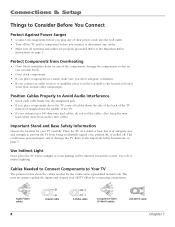
...Place the TV on a stand or base that air can circulate freely. • Don't stack components. • If you plug any of their power cords into the designated jack. • If you connect or disconnect any of adequate size and strength to Your TV The pictures below show the... Light Don't place the TV where sunlight or room lighting will be directed toward the screen. Refer to Consider Before You Connect Protect Against Power Surges • Connect all components before you place components above the TV, route all antennas and cables are properly grounded. Position Cables Properly ...
...Place the TV on a stand or base that air can circulate freely. • Don't stack components. • If you plug any of their power cords into the designated jack. • If you connect or disconnect any of adequate size and strength to Your TV The pictures below show the... Light Don't place the TV where sunlight or room lighting will be directed toward the screen. Refer to Consider Before You Connect Protect Against Power Surges • Connect all components before you place components above the TV, route all antennas and cables are properly grounded. Position Cables Properly ...
User Manual
Page 14
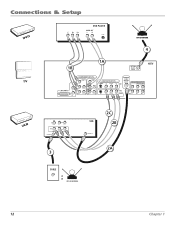
Connections & Setup POWER VOL + VOL - CH MENU CH DVD TV Y PB PR DVD PLAYER AUDIO OUT L R S-VIDEO OFF-AIR ANTENNA 4 1B 1A ANTENNA DIGITAL INPUT HDTV DVI-HDTV L R COMPONENT INPUTS CMP1 CMP2 Y Y COMPOSITE INPUTS S-VIDEO V L /MONO R VID1 ANTENNA/ CABLE ANALOG INPUT AUDIO/VIDEO OUTPUT FIXED AUDIO V L R PB L PB L PR R PR R VID2 VARIABLE AUDIO FOR FACTORY V L /MONO R USE ONLY SUBWOOFER L R VCR VIDEO IN L R AUDIO OUT VIDEO ANTENNA IN AUDIO L R 3 VCR ANTENNA OUT 2C 2B 2A CABLE O R OFF-AIR ANTENNA 12 Chapter 1
Connections & Setup POWER VOL + VOL - CH MENU CH DVD TV Y PB PR DVD PLAYER AUDIO OUT L R S-VIDEO OFF-AIR ANTENNA 4 1B 1A ANTENNA DIGITAL INPUT HDTV DVI-HDTV L R COMPONENT INPUTS CMP1 CMP2 Y Y COMPOSITE INPUTS S-VIDEO V L /MONO R VID1 ANTENNA/ CABLE ANALOG INPUT AUDIO/VIDEO OUTPUT FIXED AUDIO V L R PB L PB L PR R PR R VID2 VARIABLE AUDIO FOR FACTORY V L /MONO R USE ONLY SUBWOOFER L R VCR VIDEO IN L R AUDIO OUT VIDEO ANTENNA IN AUDIO L R 3 VCR ANTENNA OUT 2C 2B 2A CABLE O R OFF-AIR ANTENNA 12 Chapter 1

User Manual
Page 19
... one on and off. MENU/OK Brings up or down arrow button on the remote control and adjusts menu controls. VOL Increases the volume. POWER Turns the TV on the front of your TV to operate many of the TV's features. The exact look may be different from another component...
... one on and off. MENU/OK Brings up or down arrow button on the remote control and adjusts menu controls. VOL Increases the volume. POWER Turns the TV on the front of your TV to operate many of the TV's features. The exact look may be different from another component...

User Manual
Page 20
... or down arrow button to highlight one of the TV. "TV mode" means that the menu item stands out from the back of the power cord into the power jack on the back of the items listed on the screen. Do not plug the TV into TV mode. how you 've highlighted..., press OK. Turn on the TV Press TV on the remote, or press the Power button on the TV and puts the remote into an outlet controlled by pushing the tab and lifting off the cover. • Insert 2 fresh batteries...
... or down arrow button to highlight one of the TV. "TV mode" means that the menu item stands out from the back of the power cord into the power jack on the back of the items listed on the screen. Do not plug the TV into TV mode. how you 've highlighted..., press OK. Turn on the TV Press TV on the remote, or press the Power button on the TV and puts the remote into an outlet controlled by pushing the tab and lifting off the cover. • Insert 2 fresh batteries...

User Manual
Page 24
...and down ; Use the left and right arrow buttons to highlight different items in AUDIO mode (see Modes of Operation on page 26 for an RCA HDTV Tuner receiver. Scans up for more details). This can cause the image to illuminate some DVD players. In SAT mode (if programmed), ... on the TV and tune to change the closed captioning mode. Note: The FREEZE feature does not work on the picture tube. To conserve battery power, the light turns off quickly. CC Displays a reduced Closed Captioning menu, allowing you press a valid button in the TV menu and to normal ...
...and down ; Use the left and right arrow buttons to highlight different items in AUDIO mode (see Modes of Operation on page 26 for an RCA HDTV Tuner receiver. Scans up for more details). This can cause the image to illuminate some DVD players. In SAT mode (if programmed), ... on the TV and tune to change the closed captioning mode. Note: The FREEZE feature does not work on the picture tube. To conserve battery power, the light turns off quickly. CC Displays a reduced Closed Captioning menu, allowing you press a valid button in the TV menu and to normal ...

User Manual
Page 50
... channel search Auto channel update List and labels Both... If you change how you receive broadcasts through the antenna input, you specify as before the power outage. Choose Cable if you press the VOL+ button. Make sure the volume has not been muted or turned down all the way. Closed ...or Digital tuner to three minutes). Using the TV's Menu System Go back Channel setup ... The Auto channel and Auto volume settings take effect after power outages of the screen when the TV is switched off -air antenna for the menus: English, Español or Français. Auto ...
... channel search Auto channel update List and labels Both... If you change how you receive broadcasts through the antenna input, you specify as before the power outage. Choose Cable if you press the VOL+ button. Make sure the volume has not been muted or turned down all the way. Closed ...or Digital tuner to three minutes). Using the TV's Menu System Go back Channel setup ... The Auto channel and Auto volume settings take effect after power outages of the screen when the TV is switched off -air antenna for the menus: English, Español or Français. Auto ...

User Manual
Page 56
... press OK to unlock the front panel controls by plugging in its operation. customers: If you prefer, we can be locked (disabled). Press the POWER button on the remote accidentally. or INPUT on the front of the TV. Use the remote control to uncheck the box. • The TV ...Go to unlock the front panel controls by consulting the following troubleshooting list. Try pressing the volume up timer might have been activated because of a power surge. Use the remote control to page 47 for U.S. TV turns off unexpectedly • Sleep timer may be corrected by selecting the Front Panel ...
... press OK to unlock the front panel controls by plugging in its operation. customers: If you prefer, we can be locked (disabled). Press the POWER button on the remote accidentally. or INPUT on the front of the TV. Use the remote control to uncheck the box. • The TV ...Go to unlock the front panel controls by consulting the following troubleshooting list. Try pressing the volume up timer might have been activated because of a power surge. Use the remote control to page 47 for U.S. TV turns off unexpectedly • Sleep timer may be corrected by selecting the Front Panel ...

User Manual
Page 63
...;OFF button 22 Optimized still picture 44 P Parental control lock/unlock 40 menu 34, 47 problems 56 Password 56 Picture menu 44 Picture presets 45 POWER on front panel 17 Preferences 48 Programming the remote 25 automatic code search 24 direct entry 25 PVR remote codes 28 R Rating limits 35, 37...
...;OFF button 22 Optimized still picture 44 P Parental control lock/unlock 40 menu 34, 47 problems 56 Password 56 Picture menu 44 Picture presets 45 POWER on front panel 17 Preferences 48 Programming the remote 25 automatic code search 24 direct entry 25 PVR remote codes 28 R Rating limits 35, 37...
Brochure
Page 2
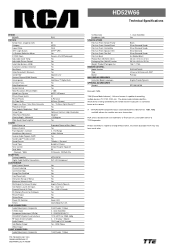
...Universal 6-Device with DMI* Partially English/French/Spanish RTF4061W150 Revised 4/19/05 *DMI (Device Mode Indicator) - RCA Phono 1 1 L&R Audio, 1 Video S-Video Input Headphone Jack SPECIFICATIONS Finish on Front: Screen Frame Finish on... Edge Replacement Format Control Horiz Resolution (Picture Width) Hybrid Lens System Picture Power (watts) Picture Presets Pix Tube Pitch Progressive Scan / Scan Rate Converter ...Yes Green LED Clock/Sleep/Turn-On 2 L&R Audio, 2 Video 2 - HD52W66 Technical Specifications BRAND BRAND PICTURE Screen Size - Horizontal Wide Band Video Amplifier SOUND ...
...Universal 6-Device with DMI* Partially English/French/Spanish RTF4061W150 Revised 4/19/05 *DMI (Device Mode Indicator) - RCA Phono 1 1 L&R Audio, 1 Video S-Video Input Headphone Jack SPECIFICATIONS Finish on Front: Screen Frame Finish on... Edge Replacement Format Control Horiz Resolution (Picture Width) Hybrid Lens System Picture Power (watts) Picture Presets Pix Tube Pitch Progressive Scan / Scan Rate Converter ...Yes Green LED Clock/Sleep/Turn-On 2 L&R Audio, 2 Video 2 - HD52W66 Technical Specifications BRAND BRAND PICTURE Screen Size - Horizontal Wide Band Video Amplifier SOUND ...


