
Warranty Card
Page 1
... externally generated static or noise, to correction of antenna problems, loss/interruptions of broadcast or internet service, to costs incurred for parts and repair labor. This Warranty is authorized to any liability other than expressed herein in connection with factory default settings, and without charge for installation, removal or reinstallation of product, to corruptions caused by removal or defacement of the factory serial number/bar code...
... externally generated static or noise, to correction of antenna problems, loss/interruptions of broadcast or internet service, to costs incurred for parts and repair labor. This Warranty is authorized to any liability other than expressed herein in connection with factory default settings, and without charge for installation, removal or reinstallation of product, to corruptions caused by removal or defacement of the factory serial number/bar code...
Owner/User Manual
Page 3
... • Do not use unauthorized chargers or power adapters. To minimize the risk of explosion if battery is incorrectly replaced. Never use an unauthorized battery. Exposure to direct sunlight or extreme heat (such as inside . • Before you exit, do not exceed 50°C (122°F). Important battery information Warning: Your product contains a battery and charging system which is designed to work in a program...
... • Do not use unauthorized chargers or power adapters. To minimize the risk of explosion if battery is incorrectly replaced. Never use an unauthorized battery. Exposure to direct sunlight or extreme heat (such as inside . • Before you exit, do not exceed 50°C (122°F). Important battery information Warning: Your product contains a battery and charging system which is designed to work in a program...

Owner/User Manual
Page 4
... radiate radio frequency energy and, if not installed and used in accordance with the instructions, may cause undesired operation. If this number. This equipment generates, uses, and can be determined by turning the equipment off and on, the user is connected. • Consult the dealer or an experienced radio/TV technician for help. Cet appareil numérique de la...
... radiate radio frequency energy and, if not installed and used in accordance with the instructions, may cause undesired operation. If this number. This equipment generates, uses, and can be determined by turning the equipment off and on, the user is connected. • Consult the dealer or an experienced radio/TV technician for help. Cet appareil numérique de la...

Owner/User Manual
Page 5
... memory card ...10 5. Content of the hand strap 14 Operation modes ...15 Recording videos Recording quality...16 Quality settings...16 Recording videos...17 Taking photos To take photos...19 Playback mode Playing back recordings...20 Deleting Deleting recordings...22 4 Charging the battery...9 4. Setting date and time ...11 General controls General controls ...12 Adjusting the length of the box...8 2. Turning on the camcorder ...11 7. Battery Installation ...8 3. Opening and rotating the LCD screen 10 6. Resetting the camcorder ...11 8. Contents Important safety instructions...
... memory card ...10 5. Content of the hand strap 14 Operation modes ...15 Recording videos Recording quality...16 Quality settings...16 Recording videos...17 Taking photos To take photos...19 Playback mode Playing back recordings...20 Deleting Deleting recordings...22 4 Charging the battery...9 4. Setting date and time ...11 General controls General controls ...12 Adjusting the length of the box...8 2. Turning on the camcorder ...11 7. Battery Installation ...8 3. Opening and rotating the LCD screen 10 6. Resetting the camcorder ...11 8. Contents Important safety instructions...
Owner/User Manual
Page 6
Menu settings Using the camcorder menu...23 Menu options and settings ...23 Connecting to external devices Viewing videos on TV ...24 Managing videos on your computer Computer system requirements...25 About RCA Memory Manager ...26 Viewing videos on PC ...26 Additional information Tips and troubleshooting...27 Product registration ...28 For your records ...28 Service Information...28 Copyright warning...28 Back up your data ...28 Visiting RCA website ...28 Technical specifications ...28 Warranty information Limited warranty ...30 5
Menu settings Using the camcorder menu...23 Menu options and settings ...23 Connecting to external devices Viewing videos on TV ...24 Managing videos on your computer Computer system requirements...25 About RCA Memory Manager ...26 Viewing videos on PC ...26 Additional information Tips and troubleshooting...27 Product registration ...28 For your records ...28 Service Information...28 Copyright warning...28 Back up your data ...28 Visiting RCA website ...28 Technical specifications ...28 Warranty information Limited warranty ...30 5

Owner/User Manual
Page 7
... DEFINED BELOW (COLLECTIVELY "AUDIOVOX"), FOR THE RCA BRANDED PORTABLE DIGITAL AUDIO/VIDEO DEVICE APPLICATION/DRIVER SOFTWARE PROGRAM WHICH MAY INCLUDE ASSOCIATED SOFTWARE COMPONENTS, SOFTWARE LICENSED BY AUDIOVOX FROM THIRD PARTIES ("LICENSORS") AND ASSOCIATED DOCUMENTATION, IF ANY (COLLECTIVELY, THE "PROGRAM"). You acknowledge and agree that replace and/or supplement the original Program, unless such upgrade or update is expressly prohibited by the U.S. or...
... DEFINED BELOW (COLLECTIVELY "AUDIOVOX"), FOR THE RCA BRANDED PORTABLE DIGITAL AUDIO/VIDEO DEVICE APPLICATION/DRIVER SOFTWARE PROGRAM WHICH MAY INCLUDE ASSOCIATED SOFTWARE COMPONENTS, SOFTWARE LICENSED BY AUDIOVOX FROM THIRD PARTIES ("LICENSORS") AND ASSOCIATED DOCUMENTATION, IF ANY (COLLECTIVELY, THE "PROGRAM"). You acknowledge and agree that replace and/or supplement the original Program, unless such upgrade or update is expressly prohibited by the U.S. or...

Owner/User Manual
Page 9
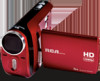
... insert the battery until a click sound is heard. 3 3. Content of the box • Small Wonder Camcorder • AC/DC adapter • USB cable • AV cable • Carrying case • Hand strap • Quick Start Guide • Owner Registration card • Warranty leaflet 2. This product will let you for purchasing the RCA Small Wonder Camcorder. Getting started Dear RCA customer, Thank you record videos with this...
... insert the battery until a click sound is heard. 3 3. Content of the box • Small Wonder Camcorder • AC/DC adapter • USB cable • AV cable • Carrying case • Hand strap • Quick Start Guide • Owner Registration card • Warranty leaflet 2. This product will let you for purchasing the RCA Small Wonder Camcorder. Getting started Dear RCA customer, Thank you record videos with this...

Owner/User Manual
Page 10
.../DC charger • Image is for reference only, the AC/DC adapter shown in the image may vary with a USB cable. actual battery life may vary from the actual product. • Once the battery is fully charged, the maximum recording times are approximately as follows*: EZ5000 series 122 minutes of HD video 128 minutes of Sports video 147 minutes of WebQ video 999 photos EZ5100...
.../DC charger • Image is for reference only, the AC/DC adapter shown in the image may vary with a USB cable. actual battery life may vary from the actual product. • Once the battery is fully charged, the maximum recording times are approximately as follows*: EZ5000 series 122 minutes of HD video 128 minutes of Sports video 147 minutes of WebQ video 999 photos EZ5100...
Owner/User Manual
Page 11
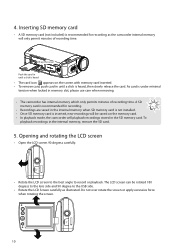
... use care when removing. • The camcorder has internal memory which only permits minutes of recording time. The LCD screen can be saved on the screen with memory card inserted. • To remove card, push card in the internal memory, remove the SD card. 5. Lift up the cover Push the card in the SD memory card. A SD memory card is heard • The card icon ( ) appears on the memory card. • In playback mode, the camcorder will only permit minutes of recording time...
... use care when removing. • The camcorder has internal memory which only permits minutes of recording time. The LCD screen can be saved on the screen with memory card inserted. • To remove card, push card in the internal memory, remove the SD card. 5. Lift up the cover Push the card in the SD memory card. A SD memory card is heard • The card icon ( ) appears on the memory card. • In playback mode, the camcorder will only permit minutes of recording time...

Owner/User Manual
Page 12
... power switch until the camcorder turns on the LCD screen when the camcorder is ready for more information on page 23 for recording. Recording quality LCD brightness Video light icon Memory card indicator Battery indicator (recharge when the icon is recommended to "Menu settings" on recording and other operations. 7. Setting date and time • It is empty) • Press and hold • "Ready" shows on . Refer to set the date and time before using the camcorder. 6. Resetting the camcorder...
... power switch until the camcorder turns on the LCD screen when the camcorder is ready for more information on page 23 for recording. Recording quality LCD brightness Video light icon Memory card indicator Battery indicator (recharge when the icon is recommended to "Menu settings" on recording and other operations. 7. Setting date and time • It is empty) • Press and hold • "Ready" shows on . Refer to set the date and time before using the camcorder. 6. Resetting the camcorder...

Owner/User Manual
Page 13
zoom during record and preview Audio speaker Lens Recording indicator Microphone Video light Lift up the cover Lift up the cover AV output (Lift up the cover to access the connector) HDMI video output (Lift up the cover to access the connector) SD card slot (Lift up the cover to show the card slot) Battery compartment (Lift up the cover to show the battery compartment) Camcorder strap hole 12 General controls General controls Take photo Zoom lever -
zoom during record and preview Audio speaker Lens Recording indicator Microphone Video light Lift up the cover Lift up the cover AV output (Lift up the cover to access the connector) HDMI video output (Lift up the cover to access the connector) SD card slot (Lift up the cover to show the card slot) Battery compartment (Lift up the cover to show the battery compartment) Camcorder strap hole 12 General controls General controls Take photo Zoom lever -
Owner/User Manual
Page 17
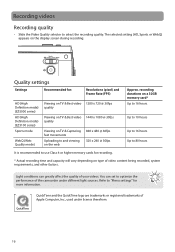
... videos. recording durations on type of the camcorder under license therefrom. 16 Light conditions can set to use Class 4 or higher memory cards for more information. Quality settings Settings Recommended for: Resolutions (pixel) and Frame Rate (FPS) HD (High Definition mode) (EZ5000 series) HD (High Definition mode) (EZ5100 series) Sports mode WebQ (Web Quality mode) Viewing on TV & Best video 1280 x 720 @ 30fps quality Viewing on TV & Best video...
... videos. recording durations on type of the camcorder under license therefrom. 16 Light conditions can set to use Class 4 or higher memory cards for more information. Quality settings Settings Recommended for: Resolutions (pixel) and Frame Rate (FPS) HD (High Definition mode) (EZ5000 series) HD (High Definition mode) (EZ5100 series) Sports mode WebQ (Web Quality mode) Viewing on TV & Best video 1280 x 720 @ 30fps quality Viewing on TV & Best video...
Owner/User Manual
Page 24
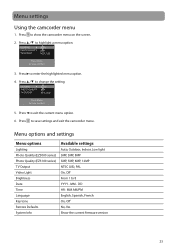
... the current menu option. 6. Press to Save and Exit 5. LIGHTING PHOTO QUALITY TV OUTOUT AUTO 8MP NTSC (US) Press Menu to show the camcorder menu on the screen. 2. MM - DD HR : MM AM/PM English, Spanish, French On, Off No, Yes Show the current firmware version 23 Press / to 8 YYYY - Menu options and settings Menu options Lighting Photo Quality (EZ5000 series) Photo Quality (EZ5100 series) TV Output Video Light Brightness Date Time Language Key...
... the current menu option. 6. Press to Save and Exit 5. LIGHTING PHOTO QUALITY TV OUTOUT AUTO 8MP NTSC (US) Press Menu to show the camcorder menu on the screen. 2. MM - DD HR : MM AM/PM English, Spanish, French On, Off No, Yes Show the current firmware version 23 Press / to 8 YYYY - Menu options and settings Menu options Lighting Photo Quality (EZ5000 series) Photo Quality (EZ5100 series) TV Output Video Light Brightness Date Time Language Key...

Owner/User Manual
Page 25
... standard by using the camcorder buttons. Switch recording device to the video input connected to the camcorder. • Refer to corresponding video (yellow) and audio left panel of the recording device (VHS or DVD recorder). 2. Turn on TV 1. Plug in the AV cable (provided) - Plug in the AV cable (provided) - Switch the TV to the selected video input. • Refer to "Menu settings" for 3 seconds to play and delete videos viewed on the camcorder and the recording device. 3. You may play all videos on the...
... standard by using the camcorder buttons. Switch recording device to the video input connected to the camcorder. • Refer to corresponding video (yellow) and audio left panel of the recording device (VHS or DVD recorder). 2. Turn on TV 1. Plug in the AV cable (provided) - Plug in the AV cable (provided) - Switch the TV to the selected video input. • Refer to "Menu settings" for 3 seconds to play and delete videos viewed on the camcorder and the recording device. 3. You may play all videos on the...

Owner/User Manual
Page 26
... the desktop. Windows: The first time you connect the camcorder to the computer. Double-click the MemoryMgr3 Mac Installer file in the RCAMacInstallers volume to the PC. Double-click MemoryMgr3_Windows_Installer.exe to start the installation. • The RCA Detective application is installed with the SMALLWONDER label. Managing videos on your computer USB cable 3. To access the Memory Manager 3 installer, open My Computer and double-click the drive letter associated...
... the desktop. Windows: The first time you connect the camcorder to the computer. Double-click the MemoryMgr3 Mac Installer file in the RCAMacInstallers volume to the PC. Double-click MemoryMgr3_Windows_Installer.exe to start the installation. • The RCA Detective application is installed with the SMALLWONDER label. Managing videos on your computer USB cable 3. To access the Memory Manager 3 installer, open My Computer and double-click the drive letter associated...

Owner/User Manual
Page 28
... battery Cannot view recorded videos on your PC. Press the power button to turn on your PC. • Use software Quicktime to keep steady during recording or use . The keytone is powered off ? • Yes. Can I have correctly selected the TV output system (PAL or NTSC) from the camcorder may be retrieved. The native files from the setting menu. Why the video and photo not clear? • Try to playback video file. Cannot record videos...
... battery Cannot view recorded videos on your PC. Press the power button to turn on your PC. • Use software Quicktime to keep steady during recording or use . The keytone is powered off ? • Yes. Can I have correctly selected the TV output system (PAL or NTSC) from the camcorder may be retrieved. The native files from the setting menu. Why the video and photo not clear? • Try to playback video file. Cannot record videos...

Owner/User Manual
Page 29
... software and firmware • RCA Memory Manager Software • User manual • Frequently asked questions (FAQ) • Customer service and technical support information Technical specifications Product: • Digital Camera Recorder Brand: • RCA Model: • EZ5000, EZ5000RD, EZ5000BL, EZ5000PL, EZ5000R, EZ5000RDR, EZ5000BLR, EZ5000PLR, EZ5100, EZ5100RD, EZ5100BL, EZ5100PL, EZ5100R, EZ5100RDR, EZ5100BLR, EZ5100PLR 28 Visiting RCA website Please visit www.mysmallwonder.com for lost data. Back up the drive regularly. Unauthorized recording...
... software and firmware • RCA Memory Manager Software • User manual • Frequently asked questions (FAQ) • Customer service and technical support information Technical specifications Product: • Digital Camera Recorder Brand: • RCA Model: • EZ5000, EZ5000RD, EZ5000BL, EZ5000PL, EZ5000R, EZ5000RDR, EZ5000BLR, EZ5000PLR, EZ5100, EZ5100RD, EZ5100BL, EZ5100PL, EZ5100R, EZ5100RDR, EZ5100BLR, EZ5100PLR 28 Visiting RCA website Please visit www.mysmallwonder.com for lost data. Back up the drive regularly. Unauthorized recording...

Owner/User Manual
Page 30
of photos can be taken (EZ5000 series) Up to 3000 Maximum no . Battery: • Replaceable 3.7V Lithium battery Power adapter: • Rated input: 100 - 120 V AC, 60 Hz, 0.3 A • Rated output: 5V DC, 1A Size and frame rate of video recordings: • HD mode (EZ5000 series): 1280 x 720 @ 30fps (H.264 video compression, MOV file format) • HD mode (EZ5100 series) 1440 x 1080 @ 30fps (H.264 video compression, MOV file format) •...
of photos can be taken (EZ5000 series) Up to 3000 Maximum no . Battery: • Replaceable 3.7V Lithium battery Power adapter: • Rated input: 100 - 120 V AC, 60 Hz, 0.3 A • Rated output: 5V DC, 1A Size and frame rate of video recordings: • HD mode (EZ5000 series): 1280 x 720 @ 30fps (H.264 video compression, MOV file format) • HD mode (EZ5100 series) 1440 x 1080 @ 30fps (H.264 video compression, MOV file format) •...

Owner/User Manual
Page 31
... coverage (e.g. This Warranty is to be responsible for installation, removal or reinstallation of product, to corruptions caused by computer viruses, spyware or other malware, to loss of media, files, data or content, or to damage to tapes, discs, removable memory devices or cards, speakers, accessories, computers, computer peripherals, other than expressed herein in connection with reconditioned product (at the address shown below...
... coverage (e.g. This Warranty is to be responsible for installation, removal or reinstallation of product, to corruptions caused by computer viruses, spyware or other malware, to loss of media, files, data or content, or to damage to tapes, discs, removable memory devices or cards, speakers, accessories, computers, computer peripherals, other than expressed herein in connection with reconditioned product (at the address shown below...

Quick Start Guide
Page 1
... user manual for recording. Momentarily press and hold until a click is heard To remove card: Push card in menu Record Play/pause Setup menu Delete recordings USB LCD screen 4. Lens Recording indicator Microphone Video Light SD card slot (Lift up the cover. 3 2. Adjust the brightness of the box • Small Wonder Camcorder • AC/DC adapter • USB cable • AV cable • Carrying case • Hand strap • Quick Start Guide • Owner Registration card • Warranty leaflet 2. fast rewind or forward - Installing battery Camcorder...
... user manual for recording. Momentarily press and hold until a click is heard To remove card: Push card in menu Record Play/pause Setup menu Delete recordings USB LCD screen 4. Lens Recording indicator Microphone Video Light SD card slot (Lift up the cover. 3 2. Adjust the brightness of the box • Small Wonder Camcorder • AC/DC adapter • USB cable • AV cable • Carrying case • Hand strap • Quick Start Guide • Owner Registration card • Warranty leaflet 2. fast rewind or forward - Installing battery Camcorder...


