
PRJ3D99TU Manual 1
Page 2
Img. Adj menu 41 Setup menu 42 Audio menu 43 Maintenance 46 Care of the projector 46 Cleaning the lens 46 Storing the projector 47 Transporting the projector 47 Specifications 48 2
Img. Adj menu 41 Setup menu 42 Audio menu 43 Maintenance 46 Care of the projector 46 Cleaning the lens 46 Storing the projector 47 Transporting the projector 47 Specifications 48 2

PRJ3D99TU Manual 1
Page 8
... leading LED projector manufacturers, we introduce the manufacturer's warranty. At 2 years/20,000 hours, it's maybe the most manufacturers fall short-offering you . Music2FM The audio of the sources is why we believe users should enjoy stress-free watching for better enjoyment. With this function, you can easily enjoy the wonderful...
... leading LED projector manufacturers, we introduce the manufacturer's warranty. At 2 years/20,000 hours, it's maybe the most manufacturers fall short-offering you . Music2FM The audio of the sources is why we believe users should enjoy stress-free watching for better enjoyment. With this function, you can easily enjoy the wonderful...
PRJ3D99TU Manual 1
Page 26
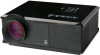
...the projector. 3.Connect one end to the HDMI output socket of the Video source device. 2.Connect the other end to a suitable audio amplifier. The weight of the DVI to HDMI adapter may be like that shown in the following diagram: Note: ● It ...is better. 1.Take an HDMI cable and connect one end of separate audio cable to the projector, and the other end of the HDMI cable to the HDMI input socket on the HDMI port, ... video image is not displayed after the projector is 26 Note: You can also connect the separate audio cable to a suitable...
...the projector. 3.Connect one end to the HDMI output socket of the Video source device. 2.Connect the other end to a suitable audio amplifier. The weight of the DVI to HDMI adapter may be like that shown in the following diagram: Note: ● It ...is better. 1.Take an HDMI cable and connect one end of separate audio cable to the projector, and the other end of the HDMI cable to the HDMI input socket on the HDMI port, ... video image is not displayed after the projector is 26 Note: You can also connect the separate audio cable to a suitable...
PRJ3D99TU Manual 1
Page 27
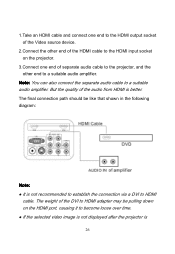
...the Component Video output sockets of the sockets; green to green, blue to blue, and red to red. 3.You should also connect the separate audio cable to the device. Also check that the video source device is turned on the projector. Match the color of the plugs to the COMPONENT...which method you can be separately output to red. 2.Connect the other end of the sockets; But in some circumstance, the audio can use to connect to a suitable audio amplifier. 27 turned on and the correct video source has been selected, please check that the signal cables have been connected ...
...the Component Video output sockets of the sockets; green to green, blue to blue, and red to red. 3.You should also connect the separate audio cable to the device. Also check that the video source device is turned on the projector. Match the color of the plugs to the COMPONENT...which method you can be separately output to red. 2.Connect the other end of the sockets; But in some circumstance, the audio can use to connect to a suitable audio amplifier. 27 turned on and the correct video source has been selected, please check that the signal cables have been connected ...
PRJ3D99TU Manual 1
Page 29
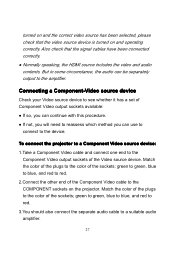
...on Page 22 for example, with some analog video cameras). The final connection path should be like that shown in preference to a suitable audio amplifier. See "Connecting Video source devices" on the video source device (for details. You need only connect using an S-video or Composite...on the projector. device again using a composite Video connection if neither Component Video nor S-video is available, you should also connect the separate audio cable to composite Video. source device. 2.Connect the other end of the 2.Connect the other end of the S-Video cable to the S-...
...on Page 22 for example, with some analog video cameras). The final connection path should be like that shown in preference to a suitable audio amplifier. See "Connecting Video source devices" on the video source device (for details. You need only connect using an S-video or Composite...on the projector. device again using a composite Video connection if neither Component Video nor S-video is available, you should also connect the separate audio cable to composite Video. source device. 2.Connect the other end of the 2.Connect the other end of the S-Video cable to the S-...
PRJ3D99TU Manual 1
Page 31
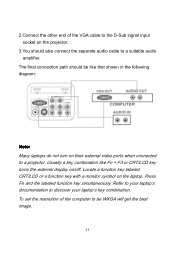
... be like Fn + F3 or CRT/LCD key turns the external display on the laptop. The final connection path should also connect the separate audio cable to discover your laptop's key combination. To set the resolution of the VGA cable to the D-Sub signal input socket on the projector.... 3.You should be WXGA will get the best image. 31 Refer to your laptop's documentation to a suitable audio amplifier. Press Fn and the labeled function key simultaneously. Usually a key combination like that shown in the following diagram: Note: Many laptops do not ...
... be like Fn + F3 or CRT/LCD key turns the external display on the laptop. The final connection path should also connect the separate audio cable to discover your laptop's key combination. To set the resolution of the VGA cable to the D-Sub signal input socket on the projector.... 3.You should be WXGA will get the best image. 31 Refer to your laptop's documentation to a suitable audio amplifier. Press Fn and the labeled function key simultaneously. Usually a key combination like that shown in the following diagram: Note: Many laptops do not ...

PRJ3D99TU Manual 1
Page 32
Connecting American ATSC TV The projector provides a built-in TV tuner that allows you to connect it to a suitable audio amplifier. 32 To connect the projector to ATSC TV 1.Take a TV cable and connect one end to the output socket of the TV source. 2.Connect the other end of the TV cable to the TV signal input socket on the projector. 3.You can also connect the audio cable from Audio Out sockets to ATSC TV.
Connecting American ATSC TV The projector provides a built-in TV tuner that allows you to connect it to a suitable audio amplifier. 32 To connect the projector to ATSC TV 1.Take a TV cable and connect one end to the output socket of the TV source. 2.Connect the other end of the TV cable to the TV signal input socket on the projector. 3.You can also connect the audio cable from Audio Out sockets to ATSC TV.

PRJ3D99TU Manual 1
Page 44
Exit Audio menu The Audio menu allows you to adjust the sound of the built-in speakers. 44 Closed Caption Menu Language HDMI Setting Return Subtitle Choose the OSD language. Set HDMI for the projector.
Exit Audio menu The Audio menu allows you to adjust the sound of the built-in speakers. 44 Closed Caption Menu Language HDMI Setting Return Subtitle Choose the OSD language. Set HDMI for the projector.

PRJ3D99TU Manual 1
Page 49
Computer WXGA / XGA / SVGA / VGA Inputs HDMI 2 x HDMI Component Video 3 x RCA (YUV) Composite Video 1 x RCA S-Video 1 x S-Video Computer 1 x RGB Audio 2 x RCA TV Set Built-in TV Tuner HD American ATSC TV Output Audio 2 x RCA Image and sound adjustments Keystone Correction ±40 degrees Others Weight 3 Kgs Dimensions 330*260*127(mm) Noise 28 dB 49
Computer WXGA / XGA / SVGA / VGA Inputs HDMI 2 x HDMI Component Video 3 x RCA (YUV) Composite Video 1 x RCA S-Video 1 x S-Video Computer 1 x RGB Audio 2 x RCA TV Set Built-in TV Tuner HD American ATSC TV Output Audio 2 x RCA Image and sound adjustments Keystone Correction ±40 degrees Others Weight 3 Kgs Dimensions 330*260*127(mm) Noise 28 dB 49
