
PRJ3D99TU Manual 1
Page 1
... 8 Projector exterior view 9 Controls and functions 10 Positioning your projector 15 Choosing a location 15 Obtaining a preferred screen size 16 Connection 22 Connecting video source devices 22 Connecting an HDMI device 24 Connecting a Component-Video source device 26 Connecting an S-video or a Composite Video source device..... 27 Connecting a computer 29 Connecting ATSC TV 31 Using the projector 32 Starting up 32 Switching input signal 32 Adjusting the projected image 33 Optimizing the image 35 Turning the power off 37 MENUS...38 Using the menus 38 Picture menu 40...
... 8 Projector exterior view 9 Controls and functions 10 Positioning your projector 15 Choosing a location 15 Obtaining a preferred screen size 16 Connection 22 Connecting video source devices 22 Connecting an HDMI device 24 Connecting a Component-Video source device 26 Connecting an S-video or a Composite Video source device..... 27 Connecting a computer 29 Connecting ATSC TV 31 Using the projector 32 Starting up 32 Switching input signal 32 Adjusting the projected image 33 Optimizing the image 35 Turning the power off 37 MENUS...38 Using the menus 38 Picture menu 40...

PRJ3D99TU Manual 1
Page 6
... your digital world. None of these has been designed for those top end home theater users. More than cost effective, Ultra-long lamp life Conventional filament bulb lamps offer you a semi-permanent life, 20,000 hours' life; with powerful media functions and revolutionary LED technology, to run. Conventional projectors have always been for single LCD projector, 6000 hours' life; HID lamp for office use of the ultra bright LED light source, compared...
... your digital world. None of these has been designed for those top end home theater users. More than cost effective, Ultra-long lamp life Conventional filament bulb lamps offer you a semi-permanent life, 20,000 hours' life; with powerful media functions and revolutionary LED technology, to run. Conventional projectors have always been for single LCD projector, 6000 hours' life; HID lamp for office use of the ultra bright LED light source, compared...

PRJ3D99TU Manual 1
Page 7
... projectors, it possible to switch the working state between Normal and Economic modes to the latest image-processing MCU, which is good, unless you like the noise of the temperature, thus doing away with the need for the lamp to Unique patented cooling system. All our projectors have... the best video programs you can cut the power. Then we will never again waste precious time waiting for big cooling fans, which has super quality upscale capacity, and higher native resolution LCD panel used in the projectors, all our projectors can offer you an HD Ready image. making it...
... projectors, it possible to switch the working state between Normal and Economic modes to the latest image-processing MCU, which is good, unless you like the noise of the temperature, thus doing away with the need for the lamp to Unique patented cooling system. All our projectors have... the best video programs you can cut the power. Then we will never again waste precious time waiting for big cooling fans, which has super quality upscale capacity, and higher native resolution LCD panel used in the projectors, all our projectors can offer you an HD Ready image. making it...

PRJ3D99TU Manual 1
Page 8
... so on. Music2FM The audio of the sources is 2 years. Note: 20,000 hours/2 years, by Home Theater Projectors. LED ENGINE Patented high efficiency LED optical engine, can be available due to local laws. 2 years/20'000 hours standard warranty The standard warranty for much longer. As one of the 8 Moreover, sitting in the world to projector lamp warranties, most manufacturers...
... so on. Music2FM The audio of the sources is 2 years. Note: 20,000 hours/2 years, by Home Theater Projectors. LED ENGINE Patented high efficiency LED optical engine, can be available due to local laws. 2 years/20'000 hours standard warranty The standard warranty for much longer. As one of the 8 Moreover, sitting in the world to projector lamp warranties, most manufacturers...
PRJ3D99TU Manual 1
Page 9
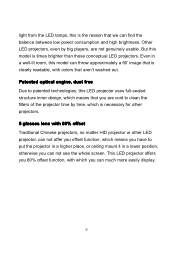
...' image that aren't washed out. But this model is times brighter than those conceptual LED projectors. Patented optical engine, dust free Due to patented technologies, this LED projector uses full-sealed structure inner design, which means that we can find the balance between low power consumption and high brightness. light from the LED lamps, this is the reason that you can much more easily display...
...' image that aren't washed out. But this model is times brighter than those conceptual LED projectors. Patented optical engine, dust free Due to patented technologies, this LED projector uses full-sealed structure inner design, which means that we can find the balance between low power consumption and high brightness. light from the LED lamps, this is the reason that you can much more easily display...
PRJ3D99TU Manual 1
Page 10
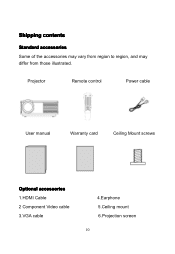
Shipping contents Standard accessories Some of the accessories may vary from region to region, and may differ from those illustrated. Projector Remote control Power cable User manual Warranty card Ceiling Mount screws Optional accessories 1.HDMI Cable 2 Component Video cable 3.VGA cable 4.Earphone 5.Ceiling mount 6.Projection screen 10
Shipping contents Standard accessories Some of the accessories may vary from region to region, and may differ from those illustrated. Projector Remote control Power cable User manual Warranty card Ceiling Mount screws Optional accessories 1.HDMI Cable 2 Component Video cable 3.VGA cable 4.Earphone 5.Ceiling mount 6.Projection screen 10

PRJ3D99TU Manual 1
Page 12
See "Choosing the image size and sharpening the clarity" on or off. Under side 12.Projector information 13.Caution 14.Serial number 15. Adjusting feet 16.Ceiling mount feet Controls and functions Projector 1.Focus adjustment Adjust the focus of the projected image. See Pages 32 and 37 for details. 2.POWER Turn the projector on Page 33 for details. 12
See "Choosing the image size and sharpening the clarity" on or off. Under side 12.Projector information 13.Caution 14.Serial number 15. Adjusting feet 16.Ceiling mount feet Controls and functions Projector 1.Focus adjustment Adjust the focus of the projected image. See Pages 32 and 37 for details. 2.POWER Turn the projector on Page 33 for details. 12

PRJ3D99TU Manual 1
Page 13
... flashes when the projector is operating. 4.Source button Sequentially selects the input signal from ATSC-TV, CVBS, S-VIDEO, YUV,HDMI1, HDMI2, and PC. See "Switching input signal" on Page 32 for details. buttons When the On-Screen Display (OSD) menu is also used to trigger the Musci2FM function. It is activated, the buttons are used to make adjustments. See "Using the menus" on Page 38 for details. 5.MENU button Toggle the On-Screen Display...
... flashes when the projector is operating. 4.Source button Sequentially selects the input signal from ATSC-TV, CVBS, S-VIDEO, YUV,HDMI1, HDMI2, and PC. See "Switching input signal" on Page 32 for details. buttons When the On-Screen Display (OSD) menu is also used to trigger the Musci2FM function. It is activated, the buttons are used to make adjustments. See "Using the menus" on Page 38 for details. 5.MENU button Toggle the On-Screen Display...

PRJ3D99TU Manual 1
Page 15
See Pages 32 and 37 for Music2FM or other functions. 8.SOURCE Press this button to select the input signal that you want 9.Nor/Eco Press this button the change TV channels. 4. Return to the last channel 7.FUNC Reserved key for details. 2.Mute Turn on or off . See "Zooming the projection size" on or off the volume. 3.Numeric key On TV source, press these keys to change the screen size. 1.POWER Turn the projector on Page 21 for short. 5.16:9/4:3 Use this button to allow your projector work in Normal or Economy 15 Use the key to choose the TV channels for details. 6.
See Pages 32 and 37 for Music2FM or other functions. 8.SOURCE Press this button to select the input signal that you want 9.Nor/Eco Press this button the change TV channels. 4. Return to the last channel 7.FUNC Reserved key for details. 2.Mute Turn on or off . See "Zooming the projection size" on or off the volume. 3.Numeric key On TV source, press these keys to change the screen size. 1.POWER Turn the projector on Page 21 for short. 5.16:9/4:3 Use this button to allow your projector work in Normal or Economy 15 Use the key to choose the TV channels for details. 6.
PRJ3D99TU Manual 1
Page 16
See "Switching input signal" on and off. and V+/VWhen the main menu is activated, the buttons are in high brightness and low noise mode,so there would be installed in one of four possible installation locations: 1.Floor in front of screen; 2.Ceiling in front of screen; 3.Floor at rear of screen; See "Using the menus" on Page 38 for details. 12..MENU Toggle the On-Screen Display (OSD) menu on...
See "Switching input signal" on and off. and V+/VWhen the main menu is activated, the buttons are in high brightness and low noise mode,so there would be installed in one of four possible installation locations: 1.Floor in front of screen; 2.Ceiling in front of screen; 3.Floor at rear of screen; See "Using the menus" on Page 38 for details. 12..MENU Toggle the On-Screen Display (OSD) menu on...

PRJ3D99TU Manual 1
Page 17
... in the Setup > PRPJECTION menu after you turn the projector on . 4.Ceiling rear: Select this location with the projector placed near the floor behind the screen. Set Ceiling Front in front of your projector on the ceiling. Take into consideration the size and position of your screen, the location of a suitable power outlet, as well as the location and distance between the projector and the rest of the screen. Set Floor...
... in the Setup > PRPJECTION menu after you turn the projector on . 4.Ceiling rear: Select this location with the projector placed near the floor behind the screen. Set Ceiling Front in front of your projector on the ceiling. Take into consideration the size and position of your screen, the location of a suitable power outlet, as well as the location and distance between the projector and the rest of the screen. Set Floor...

PRJ3D99TU Manual 1
Page 18
Obtaining a preferred screen size The distance from the projector to assist you turn the projector on Page 8 for this installation location. This prevents image distortion caused by angled projections (or projecting onto angled surfaces). If the projector is mounted on a ceiling, it projects at a slightly downward angle. How to the horizontal center of the projector for your screen, 16:9 or 4:3? 18 We have provided separate tables of dimensions...
Obtaining a preferred screen size The distance from the projector to assist you turn the projector on Page 8 for this installation location. This prevents image distortion caused by angled projections (or projecting onto angled surfaces). If the projector is mounted on a ceiling, it projects at a slightly downward angle. How to the horizontal center of the projector for your screen, 16:9 or 4:3? 18 We have provided separate tables of dimensions...

PRJ3D99TU Manual 1
Page 22
Set Zoom in the Img. Or use the 16:9/4:3 button on . Zooming the projection size This projector provides the zoom function to adjust your installation location. This will help you permanently install it best suits your projection size when the projector is fitted but the projection size is a little bigger than the screen. to permanently install the projector, you should physically test the projection size and distance using the actual projector for trial before you determine the exact...
Set Zoom in the Img. Or use the 16:9/4:3 button on . Zooming the projection size This projector provides the zoom function to adjust your installation location. This will help you permanently install it best suits your projection size when the projector is fitted but the projection size is a little bigger than the screen. to permanently install the projector, you should physically test the projection size and distance using the actual projector for trial before you determine the exact...
PRJ3D99TU Manual 1
Page 31
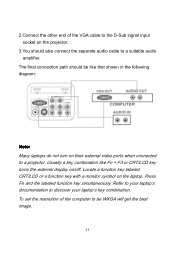
... symbol on their external video ports when connected to a projector. Press Fn and the labeled function key simultaneously. The final connection path should also connect the separate audio cable to discover your laptop's documentation to a suitable audio amplifier. To set the resolution of the VGA cable to the D-Sub signal input socket on the projector. 3.You should be WXGA will get the best image. 31 2.Connect the other end...
... symbol on their external video ports when connected to a projector. Press Fn and the labeled function key simultaneously. The final connection path should also connect the separate audio cable to discover your laptop's documentation to a suitable audio amplifier. To set the resolution of the VGA cable to the D-Sub signal input socket on the projector. 3.You should be WXGA will get the best image. 31 2.Connect the other end...

PRJ3D99TU Manual 1
Page 33
... Power indicator on the projector lights red after power has been applied. 2.Press the POWER button on the projector or remote control to choose the input source you want. Press the SOURCE button repeatedly on . Using the projector Starting up immediately. 3.Switch on the connected equipment. 4.Press the SOURCE button on the projector or remote control to turn the projector on the projector or remote control, then the input source will be connected to a lower setting. The projector will not operate normally. See "Switching input signal" on the projector. Please change...
... Power indicator on the projector lights red after power has been applied. 2.Press the POWER button on the projector or remote control to choose the input source you want. Press the SOURCE button repeatedly on . Using the projector Starting up immediately. 3.Switch on the connected equipment. 4.Press the SOURCE button on the projector or remote control to turn the projector on the projector or remote control, then the input source will be connected to a lower setting. The projector will not operate normally. See "Switching input signal" on the projector. Please change...

PRJ3D99TU Manual 1
Page 35
Note: ● When you turn the lens to get the optimal image size. You can move the projector forward or backward slightly to sharpen the image, the image size will be changed a little. Correcting keystone Keystoning occurs when the projector is not perpendicular to the screen and is where the projected image displays visible as a trapezoid shape like the following: 35 2.Then sharpen the image by turning the lens.
Note: ● When you turn the lens to get the optimal image size. You can move the projector forward or backward slightly to sharpen the image, the image size will be changed a little. Correcting keystone Keystoning occurs when the projector is not perpendicular to the screen and is where the projected image displays visible as a trapezoid shape like the following: 35 2.Then sharpen the image by turning the lens.

PRJ3D99TU Manual 1
Page 36
... on the screen. 36 Adj menu. You do put the projector at a surface place when operating. ● Only vertical keystone can adjust Brightness, Contrast, Sharpness, Color, Tilt and Color Temperature settings using the Picture submenus. ● All settings in the Picture menu will take effect right away. ● Some picture adjustments are available only when certain input ports are within ±40 degrees. For the operation of on the image you...
... on the screen. 36 Adj menu. You do put the projector at a surface place when operating. ● Only vertical keystone can adjust Brightness, Contrast, Sharpness, Color, Tilt and Color Temperature settings using the Picture submenus. ● All settings in the Picture menu will take effect right away. ● Some picture adjustments are available only when certain input ports are within ±40 degrees. For the operation of on the image you...

PRJ3D99TU Manual 1
Page 38
... seconds. 3.The Power indicator light is a steady red once the cooling process has finished and fans stop. 4.Turn off . 2.The Power indicator light flashes green, the lamps shut down, and the fans continue to run for two seconds, then the projector will be shut off the switch of the LCD panel is 16:10. As the projector uses LED lamps as light source, you can use the Zoom button on the projector or remote control for a few seconds to change the aspect...
... seconds. 3.The Power indicator light is a steady red once the cooling process has finished and fans stop. 4.Turn off . 2.The Power indicator light flashes green, the lamps shut down, and the fans continue to run for two seconds, then the projector will be shut off the switch of the LCD panel is 16:10. As the projector uses LED lamps as light source, you can use the Zoom button on the projector or remote control for a few seconds to change the aspect...

PRJ3D99TU Manual 1
Page 42
... the contrast. Change the colors of the image. The higher the value, the sharper the picture. Adjusts the color tones of the image. The lower the value, the more greenish the picture becomes. Adj menu The Image Adjustment menu allows you to adjust the image size, change the OSD menu place. 42 Adjust the degree of the image appear as black and that detail in the image. Adjust this control so the...
... the contrast. Change the colors of the image. The higher the value, the sharper the picture. Adjusts the color tones of the image. The lower the value, the more greenish the picture becomes. Adj menu The Image Adjustment menu allows you to adjust the image size, change the OSD menu place. 42 Adjust the degree of the image appear as black and that detail in the image. Adjust this control so the...
PRJ3D99TU Manual 1
Page 46
... a clean soft lens cloth with lens cleaner to remove dust. 2.If there is keep the lens clean and clean or replace the air filter. Cleaning the lens Clean the lens whenever you attempt to clean the lens, turn the projector off, unplug the power cable, and leave it several minutes to cool completely. 1.Use the lens cleaning paper to gently wipe the lens surface. Maintenance Care of the projector except the air filter. Never remove any parts of the projector Your projector...
... a clean soft lens cloth with lens cleaner to remove dust. 2.If there is keep the lens clean and clean or replace the air filter. Cleaning the lens Clean the lens whenever you attempt to clean the lens, turn the projector off, unplug the power cable, and leave it several minutes to cool completely. 1.Use the lens cleaning paper to gently wipe the lens surface. Maintenance Care of the projector except the air filter. Never remove any parts of the projector Your projector...


