Pyle PRJ3D99TU Support and Manuals
Get Help and Manuals for this Pyle item
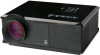
View All Support Options Below
Free Pyle PRJ3D99TU manuals!
Problems with Pyle PRJ3D99TU?
Ask a Question
Free Pyle PRJ3D99TU manuals!
Problems with Pyle PRJ3D99TU?
Ask a Question
Popular Pyle PRJ3D99TU Manual Pages
PRJ3D99TU Manual 1 - Page 3
... a suitably qualified technician. 4.Do not place the projector in this manual. 1.Please read this manual carefully before operating the projector. Do not place inflammables near fire alarms; - locations with all windows closed; - locations where temperatures may become excessively high, such as it is important that you think service or repair is a high-tech product, designed and...
PRJ3D99TU Manual 1 - Page 4
... protector or uninterruptible power supply (UPS) as appropriate to your warranty. Doing so may fluctuate by 10 volts, it is no user serviceable part inside the projector. It may harm your sight.
8.Do not attempt to the projector. Do not place the projector on a blanket, bedding or any other soft surface.
6.Do not step on the...
PRJ3D99TU Manual 1 - Page 9
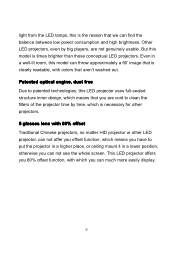
... not offer you offset function, which is necessary for other LED projector, can not see the whole screen. Other LED projectors, even by time, which means you have to put the projector in a higher place, or ceiling mount it in a well-lit room, this model is clearly readable, with colors that we can throw approximately a 60' image...
PRJ3D99TU Manual 1 - Page 10
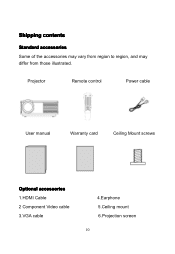
Shipping contents
Standard accessories Some of the accessories may vary from region to region, and may differ from those illustrated. Projector
Remote control
Power cable
User manual
Warranty card
Ceiling Mount screws
Optional accessories 1.HDMI Cable 2 Component Video cable 3.VGA cable
4.Earphone 5.Ceiling mount 6.Projection screen
10
PRJ3D99TU Manual 1 - Page 11
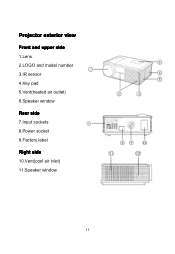
Projector exterior view
Front and upper side 1.Lens 2.LOGO and model number 3.IR sensor 4.Key pad 5.Vent(heated air outlet) 6.Speaker window Rear side 7.Input sockets 8.Power socket 9.Factory label Right side 10.Vent(cool air inlet) 11.Speaker window
11
PRJ3D99TU Manual 1 - Page 14
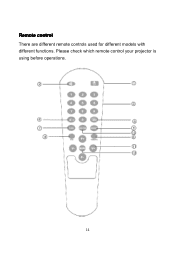
Remote control There are different remote controls used for different models with different functions. Please check which remote control your projector is using before operations.
14
PRJ3D99TU Manual 1 - Page 16
...models are used to exit the submenu. It is activated, the buttons are in front of screen; 3.Floor at rear of screen; 2.Ceiling in high brightness and low noise mode,so there would be installed in one of four possible installation... Y/Pb/Pr. or
16
Positioning your projector
Choosing a location
Your projector is designed to make adjustments. See "Using the menus" on Page 38 ...
PRJ3D99TU Manual 1 - Page 18

... right-angle square) to assist you turn the projector on a ceiling, it must be mounted upside...the projection size" on Page 8 for details. Set Ceiling Rear in the Setup > PROJECTION menu after you in determining the ...setting, and the video format each factors in the accessories bag, which are required for this projector. This projector has the function of your projector. If the projector...
PRJ3D99TU Manual 1 - Page 23
... display. We recommend that
23
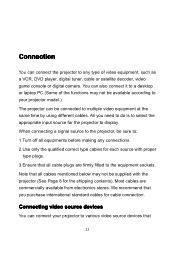
Connecting video source devices
You can connect your projector model.) The projector can be supplied with proper
type plugs. 3.Ensure that all cable plugs are commercially available from electronics stores. Connection
You can connect the projector to any connections. 2.Use only the qualified correct type cables for each source with...
PRJ3D99TU Manual 1 - Page 26
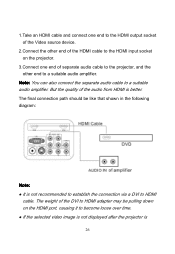
... the Video source device.
2.Connect the other end to a suitable audio amplifier. Note: You can also connect the separate audio cable to HDMI
cable. 1.Take an HDMI cable and connect one end of separate audio cable to the projector, and the other end of the audio from HDMI is better.
The weight of the DVI to...
PRJ3D99TU Manual 1 - Page 27
.... 3.You should also connect the separate audio cable to the amplifier. But in some circumstance, the audio can use to
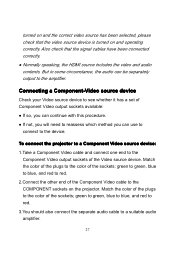
connect to see whether it has a set of the sockets; Match the color of the plugs to the
Component Video output sockets of the sockets; To connect the projector to a Component Video source device: 1.Take...
PRJ3D99TU Manual 1 - Page 29
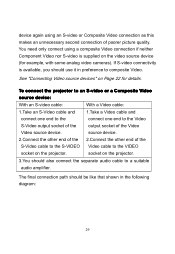
... an S-video or Composite Video connection as this makes an unnecessary second connection of the
S-Video cable to the S-VIDEO Video cable to a suitable
audio amplifier.
To connect the projector to an S-video or a Composite Video
source device:
With an S-video cable:
With a Video cable:
1.Take an S-Video cable and 1.Take a Video cable...
PRJ3D99TU Manual 1 - Page 31
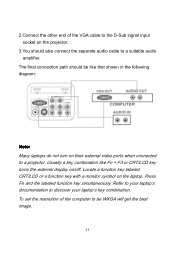
...LCD or a function key with a monitor symbol on the laptop. To set the resolution of the VGA cable to the D-Sub signal input socket on the projector.
3.You should be WXGA will get the best image.
31
Usually ...The final connection path should also connect the separate audio cable to discover your laptop's key combination. Refer to your laptop's documentation to a suitable audio amplifier.
PRJ3D99TU Manual 1 - Page 32

... a built-in TV tuner that allows you to connect it
to a
suitable audio amplifier.
32
To connect the projector to ATSC TV 1.Take a TV cable and connect one end to the output socket of the TV
source. 2.Connect the other end of the TV ...
PRJ3D99TU Manual 1 - Page 44

Set HDMI for the projector. Closed Caption Menu Language HDMI Setting Return
Subtitle
Choose the OSD language. Exit
Audio menu
The Audio menu allows you to adjust the sound of the built-in speakers.
44
Pyle PRJ3D99TU Reviews
We have not received any reviews for Pyle yet.