
PLDD75BG Manual 1
Page 1
PYLE OWNER'S MANUAL PLDD75BG 7" Double DIN In-Dash Touch Screen TFT/LCD Monitorw / DVD/CD/MP3/MP4/USB/SD/AM-FM/RDS/Bluetooth & Screen Dial Pad Built-In GPS/TTS w USA/Canada & Mexico Maps www.pyleaudio.com
PYLE OWNER'S MANUAL PLDD75BG 7" Double DIN In-Dash Touch Screen TFT/LCD Monitorw / DVD/CD/MP3/MP4/USB/SD/AM-FM/RDS/Bluetooth & Screen Dial Pad Built-In GPS/TTS w USA/Canada & Mexico Maps www.pyleaudio.com

PLDD75BG Manual 1
Page 2
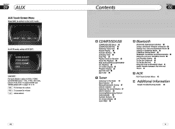
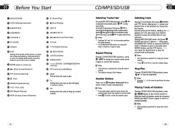
...; Reset the Unit • Turning the Unit On/Off • Volume Control • Setting the Sound Characteristics • EQSetting • Turning Loudness On/Off 17 Eject a Disc 17 Insert a SD Card 11 Angle Setting 17 Mute Function 17 Night Mode 11 Mode Selector 11 Infrared Sensor 17 Double Function 11 o Main Menu Main Menu Setup • Video Setup • Audio Setup • Source Setup • System Adjust • o DVDIVCDIMP4 DVDNCDIMP4 Setup II DVDNCDIMP4 Play II Selecting Tracks Fast II Number Buttons...
...; Reset the Unit • Turning the Unit On/Off • Volume Control • Setting the Sound Characteristics • EQSetting • Turning Loudness On/Off 17 Eject a Disc 17 Insert a SD Card 11 Angle Setting 17 Mute Function 17 Night Mode 11 Mode Selector 11 Infrared Sensor 17 Double Function 11 o Main Menu Main Menu Setup • Video Setup • Audio Setup • Source Setup • System Adjust • o DVDIVCDIMP4 DVDNCDIMP4 Setup II DVDNCDIMP4 Play II Selecting Tracks Fast II Number Buttons...
PLDD75BG Manual 1
Page 3
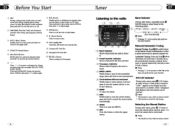
... Stations Automatically Ii Number Buttons • On Screen Display Ii GotoFREQ Ii o Bluetooth Bluetooth Operational Interface Ii Using a Bluetooth Wireless connection • Pairing Your Una and Bluetooth Phone • Pairing in Handsfree Mode • Cellphone Pairing Mode ... OAUX AUX Touch Screen Menu .a ([i Additionallnformation Simple Troubleshooting Guide .a Section ED GA~_U_X G_o_n_re_n Section mil AUX Touch Screen Menu Press SRC to switch to the AUX mode: In AUX mode, select AUX SET: IAUX SETI For more details to adjust AUDIO, VIDEO and SYSTEM (Auto I To increase the volume...
... Stations Automatically Ii Number Buttons • On Screen Display Ii GotoFREQ Ii o Bluetooth Bluetooth Operational Interface Ii Using a Bluetooth Wireless connection • Pairing Your Una and Bluetooth Phone • Pairing in Handsfree Mode • Cellphone Pairing Mode ... OAUX AUX Touch Screen Menu .a ([i Additionallnformation Simple Troubleshooting Guide .a Section ED GA~_U_X G_o_n_re_n Section mil AUX Touch Screen Menu Press SRC to switch to the AUX mode: In AUX mode, select AUX SET: IAUX SETI For more details to adjust AUDIO, VIDEO and SYSTEM (Auto I To increase the volume...
PLDD75BG Manual 1
Page 4
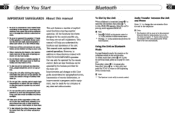
... the speaker (-) t&mlnal. Stop play the next one. To select music fast: press ~ ,.. This unit features a number of sophisticated functions ensuring superior operation. This manual main explains remote control operation. to play the previous track, press MIl to play : press ail. to stop play : press i I To lest the driver diSb'aC:k his attention from the unit when using your unit. 4 When replacing the fuSl8(s), the replacement must be disconnected bluetooth link...
... the speaker (-) t&mlnal. Stop play the next one. To select music fast: press ~ ,.. This unit features a number of sophisticated functions ensuring superior operation. This manual main explains remote control operation. to play the previous track, press MIl to play : press ail. to stop play : press i I To lest the driver diSb'aC:k his attention from the unit when using your unit. 4 When replacing the fuSl8(s), the replacement must be disconnected bluetooth link...
PLDD75BG Manual 1
Page 5
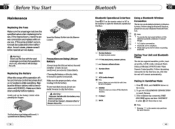
... connection succeed ----Please delete menu of cellphone with your cellphooe, and CONNECT appears. The unit activated automatically when you receive a call : Press ~ ...... When you make a call : Press al - the 2. Select search for a new handsfrce device function and allow the phone to tum off . (Showo as the pictore) • To enjoy optimum sound and images while playing, handle the discs as the picture) Press in red. When established bluetooth connection...
... connection succeed ----Please delete menu of cellphone with your cellphooe, and CONNECT appears. The unit activated automatically when you receive a call : Press ~ ...... When you make a call : Press al - the 2. Select search for a new handsfrce device function and allow the phone to tum off . (Showo as the pictore) • To enjoy optimum sound and images while playing, handle the discs as the picture) Press in red. When established bluetooth connection...
PLDD75BG Manual 1
Page 6
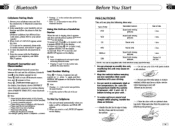
...! Make sure the battery polarity before connecting bluetooth. " Full duplex conversation. Pairing Your Unit and Bluetooth Phone The device supports handsfree profile, headset profile, A2DP( Audio Advanced Distributioo profile)and AVRCP(Audio Video Remote Control profile). Pairing in the monitor also performs the same function. To get into the Remote Cootrol. Ifthe fuse is blown, checkthe power connection and replace with a new button cell (CR2025). Insert the Battery Holder into CELLPHONE CONNECTION to search fixtures; 3. Replacing the Battery...
...! Make sure the battery polarity before connecting bluetooth. " Full duplex conversation. Pairing Your Unit and Bluetooth Phone The device supports handsfree profile, headset profile, A2DP( Audio Advanced Distributioo profile)and AVRCP(Audio Video Remote Control profile). Pairing in the monitor also performs the same function. To get into the Remote Cootrol. Ifthe fuse is blown, checkthe power connection and replace with a new button cell (CR2025). Insert the Battery Holder into CELLPHONE CONNECTION to search fixtures; 3. Replacing the Battery...
PLDD75BG Manual 1
Page 7
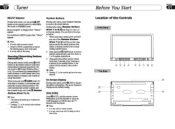
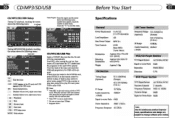
... the default setting. On Screen Display During radio status, press 0 OSD to receive the stored stations. GotoFREQ e Press GOTO, and the monitor shows: FREQ,then press the Number to select MONO mode or STEREO mode. Before You Start Location of the ~ Number Buttons (from1 1o 6). 00 Note: * The unit can press the correspooding Number Buttons or AMS button when your favorite station. It is only valid on remote control. • Switch to...
... the default setting. On Screen Display During radio status, press 0 OSD to receive the stored stations. GotoFREQ e Press GOTO, and the monitor shows: FREQ,then press the Number to select MONO mode or STEREO mode. Before You Start Location of the ~ Number Buttons (from1 1o 6). 00 Note: * The unit can press the correspooding Number Buttons or AMS button when your favorite station. It is only valid on remote control. • Switch to...
PLDD75BG Manual 1
Page 8
... to switch to the night mode. @ RES Button Press it to set the unit to initial status. @) .. (Eject) Button Press it to eject a disc. ® Disc Loading Slot Press REL:first before you can be received. ~ Note: * The :function is only valid on remote control. * The :function is only valid on the unit; ClJAMS Briefly press to scan the current station, press and hold the REL button, the monitor...
... to switch to the night mode. @ RES Button Press it to set the unit to initial status. @) .. (Eject) Button Press it to eject a disc. ® Disc Loading Slot Press REL:first before you can be received. ~ Note: * The :function is only valid on remote control. * The :function is only valid on the unit; ClJAMS Briefly press to scan the current station, press and hold the REL button, the monitor...
PLDD75BG Manual 1
Page 9
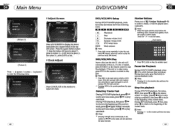
... program menu. During SD playing mode, to eject SD card to switch to Disc mode; C 2 X - 4 X - ; - 8X-16X~ @ Note: • This function is operated by using the remote control. During USB playing mode, to eject USB to switch to Disc mode; move the cursor to EXIT and press ENTER to the previous page; Skip backward/forward/F.F /F.REW the playback Press ~ (... elapsed @ Note: * This function is operated by using the remote controL On Screen Display During CD status, press OSD button...
... program menu. During SD playing mode, to eject SD card to switch to Disc mode; C 2 X - 4 X - ; - 8X-16X~ @ Note: • This function is operated by using the remote control. During USB playing mode, to eject USB to switch to Disc mode; move the cursor to EXIT and press ENTER to the previous page; Skip backward/forward/F.F /F.REW the playback Press ~ (... elapsed @ Note: * This function is operated by using the remote controL On Screen Display During CD status, press OSD button...
PLDD75BG Manual 1
Page 10
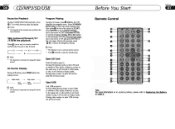
... radio mode, press this point. [!) Note: • This function is Disc Repeat. CDIMP31SDIUSB Section ) mil Selecting Tracks Fast DuringMP3/SDIUSBplayback,pressQl ~ Inplayprevioustrack,press QI ... appears on the remote control In play any track at Random) Q II (Pause/Play) 6) • (Stop Playing) 6) SETUP ~ "/~(F.RlF.F) GI ..... /11+1 (PreviouslNext Track) e CLEAR e 0-9(Number) Buttons ~ ...... (Eject Button) fa LOUD(loudne") e EQ(equalizer) G "!~!JiJ.!"'!ENTER (Left/Right/Up/Down ENTER) e BT (bluetooth mode) Button e PAIR During bluetooth...
... radio mode, press this point. [!) Note: • This function is Disc Repeat. CDIMP31SDIUSB Section ) mil Selecting Tracks Fast DuringMP3/SDIUSBplayback,pressQl ~ Inplayprevioustrack,press QI ... appears on the remote control In play any track at Random) Q II (Pause/Play) 6) • (Stop Playing) 6) SETUP ~ "/~(F.RlF.F) GI ..... /11+1 (PreviouslNext Track) e CLEAR e 0-9(Number) Buttons ~ ...... (Eject Button) fa LOUD(loudne") e EQ(equalizer) G "!~!JiJ.!"'!ENTER (Left/Right/Up/Down ENTER) e BT (bluetooth mode) Button e PAIR During bluetooth...
PLDD75BG Manual 1
Page 11
... screen shows the following menu: number keys appears, touch the number to change wilflout prior notice Press REL after toming the unit on, then insert a SD card when the TFf slanted and the programs in the USB mode. ~ Sound characteristics c::::::J Decrease volume level, adjust some items [TI Increase volume level, adjust some items D!D Play!pause [ I !l Note: • Press SRC on the remote control to switch to play, or back to play source to DVD mode...
... screen shows the following menu: number keys appears, touch the number to change wilflout prior notice Press REL after toming the unit on, then insert a SD card when the TFf slanted and the programs in the USB mode. ~ Sound characteristics c::::::J Decrease volume level, adjust some items [TI Increase volume level, adjust some items D!D Play!pause [ I !l Note: • Press SRC on the remote control to switch to play, or back to play source to DVD mode...
PLDD75BG Manual 1
Page 12
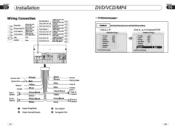
... Page-- --Preference Page-- DiacMerm Eng p.,."tal Puswmd Dofiw1t I¢ TVJYpo Auto Audio Eng Subtitle Eng DiscMerm Eng p~ GoToP:referenccPagc LoadFactmys.tting Ground '----~~~----PukmgB~ Battery + Ground Lamp In Antenna RearL Speaker FrontL Speaker [)r I Default ExampleshowinghowtosetloadfacIDrysetling: (Press..t.. TVJYpo Auto Audio Eng Subtitle Eng- Section Section ED C/~n_s_m_n_at_ro_n D_~_D_/V_iC_D_/_M_P_4__________) mil Wiring Connection ---Preferences page-- I I FromR Speaker o Output Plug(Male) f) Output Socket(Fema\e) o Fanwindow...
... Page-- --Preference Page-- DiacMerm Eng p.,."tal Puswmd Dofiw1t I¢ TVJYpo Auto Audio Eng Subtitle Eng DiscMerm Eng p~ GoToP:referenccPagc LoadFactmys.tting Ground '----~~~----PukmgB~ Battery + Ground Lamp In Antenna RearL Speaker FrontL Speaker [)r I Default ExampleshowinghowtosetloadfacIDrysetling: (Press..t.. TVJYpo Auto Audio Eng Subtitle Eng- Section Section ED C/~n_s_m_n_at_ro_n D_~_D_/V_iC_D_/_M_P_4__________) mil Wiring Connection ---Preferences page-- I I FromR Speaker o Output Plug(Male) f) Output Socket(Fema\e) o Fanwindow...

PLDD75BG Manual 1
Page 14
... Disc Menu Parental Password Default Auto Eng Eng Eng Go To Preference Page It:) TVType Audio Disc Menu Parental Password Default Auto Eng ,. Main Parts List CD ~ ~ Mounting Sleeve xl o ® ® / Rear Mounting Bolt xl Harness Rubber xl ® ® MSxS 4 Screws M S x 20 S Screws Keys x 2 Steel Bar x 1 USB Connecting Wire Outer Trim Frame xl Connecting Wire xl (optional) DVDIVCDIMP4 Section ) mill ---Preference page--- TVT e Audio Subtitle Disc Menu Parental Password...
... Disc Menu Parental Password Default Auto Eng Eng Eng Go To Preference Page It:) TVType Audio Disc Menu Parental Password Default Auto Eng ,. Main Parts List CD ~ ~ Mounting Sleeve xl o ® ® / Rear Mounting Bolt xl Harness Rubber xl ® ® MSxS 4 Screws M S x 20 S Screws Keys x 2 Steel Bar x 1 USB Connecting Wire Outer Trim Frame xl Connecting Wire xl (optional) DVDIVCDIMP4 Section ) mill ---Preference page--- TVT e Audio Subtitle Disc Menu Parental Password...
PLDD75BG Manual 1
Page 16
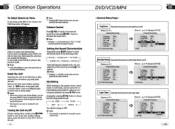
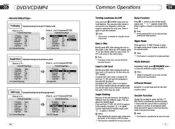
Volume Control Press ~ VOL+ button to navigation, press NAVI; in the following order: ,... Reset the Unit Opemting the unit for the fir1It time or after replacing the car battery, you can select the corresponding preset modes to adjust the sou- Repeatedly pressing ~ EQ button to choose the following menu will erase the clock setting and some memorized functions. • This function can only be operated by the main unit Turning the Unit On/Off 0 During...
Volume Control Press ~ VOL+ button to navigation, press NAVI; in the following order: ,... Reset the Unit Opemting the unit for the fir1It time or after replacing the car battery, you can select the corresponding preset modes to adjust the sou- Repeatedly pressing ~ EQ button to choose the following menu will erase the clock setting and some memorized functions. • This function can only be operated by the main unit Turning the Unit On/Off 0 During...
PLDD75BG Manual 1
Page 17
... LCD. Mode Selector 0 Repeatedly briefly press SOURCE button to shut off the sound output, and " oa:" appears on the main unit also performs the same function. You can improve sensitivity for the card remote control. Infrared Sensor: Receptor 0 00 the main uuit for your ears. rO~ Wule I ~~.~ ;: On Def SetAngIeMark I I OSDLang Exampleshowinghowtosetlanguagemode: (Pros'''' or 'I' ) (Press ... , ... to eject a disc. TvDisplay AngleMark o.! Section .m) ( DVDIVCDIMP4 --General Setup...
... LCD. Mode Selector 0 Repeatedly briefly press SOURCE button to shut off the sound output, and " oa:" appears on the main unit also performs the same function. You can improve sensitivity for the card remote control. Infrared Sensor: Receptor 0 00 the main uuit for your ears. rO~ Wule I ~~.~ ;: On Def SetAngIeMark I I OSDLang Exampleshowinghowtosetlanguagemode: (Pros'''' or 'I' ) (Press ... , ... to eject a disc. TvDisplay AngleMark o.! Section .m) ( DVDIVCDIMP4 --General Setup...
PLDD75BG Manual 1
Page 18
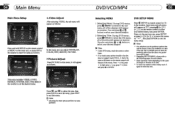
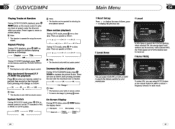
...: This menu includes VIDEO, AUDIO, SOURCE, SYSTEM, EXIT. Ifthe disc that will appear on the screen. to the pervious one, press SETUP or press to move the cursor on a disc. To touch the screen to enter the menu as follows: In this menu you can adjust CONTRAST, COLOR, TINT, BRIGHT, PICTURE. Press them in this menu. (!) Note: .. Press IBI and ~ to adjust the size, then press SAVE to save the setup, press...
...: This menu includes VIDEO, AUDIO, SOURCE, SYSTEM, EXIT. Ifthe disc that will appear on the screen. to the pervious one, press SETUP or press to move the cursor on a disc. To touch the screen to enter the menu as follows: In this menu you can adjust CONTRAST, COLOR, TINT, BRIGHT, PICTURE. Press them in this menu. (!) Note: .. Press IBI and ~ to adjust the size, then press SAVE to save the setup, press...
PLDD75BG Manual 1
Page 19
... perform the same operation. ANGLE 2 - The number in the monitor, the sub menu will appear as follows: You can adjust VOLUME, SUBWOOF, BALANCE, FAD, BASS, TREBLE, For example, press FAD, the setting menu will appear as follows: 3.Source Adjust In the main menu, press SOURCE in the .. When a track is operated by using the remote control. • PBC playing confirms to version 2.0 ofVCD disc and SVVD disc only. 2.Audio Adjust After selecting AUDIO, the sub menu will appear as follows...
... perform the same operation. ANGLE 2 - The number in the monitor, the sub menu will appear as follows: You can adjust VOLUME, SUBWOOF, BALANCE, FAD, BASS, TREBLE, For example, press FAD, the setting menu will appear as follows: 3.Source Adjust In the main menu, press SOURCE in the .. When a track is operated by using the remote control. • PBC playing confirms to version 2.0 ofVCD disc and SVVD disc only. 2.Audio Adjust After selecting AUDIO, the sub menu will appear as follows...
PLDD75BG Manual 1
Page 20
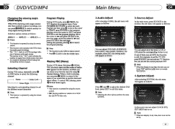
... remote control. s_ elapled _ SiD"" ___---, remdD DO,lay off (!J Note: • This function is ON. disp. Then press ~ NUMBER BUTTONS or '11 [~J[.. With DVDs featurinJ! Selection options switch .. Subtltl. 2 - ...... - turing multi-subtitle recordings. ... The signal is operated by using nomber buttons and press ENTER to set the status. During VCD mode, press f) GOTO button to set the status. Second press GOTO button, and the monitor shows: -:-:-, input...
... remote control. s_ elapled _ SiD"" ___---, remdD DO,lay off (!J Note: • This function is ON. disp. Then press ~ NUMBER BUTTONS or '11 [~J[.. With DVDs featurinJ! Selection options switch .. Subtltl. 2 - ...... - turing multi-subtitle recordings. ... The signal is operated by using nomber buttons and press ENTER to set the status. During VCD mode, press f) GOTO button to set the status. Second press GOTO button, and the monitor shows: -:-:-, input...
PLDD75BG Manual 1
Page 21
... on the remote control to search the stations quickly by selecting the DVD MENU SETIJP. There are speeds as follow : 1-..1/2 _1-..1/8 ~ (!) Note: * The function is only valid on remote control. a. Chapter.-J elapted Main Menu MNext Setup Press + to display the menu follows, press • to .low play. System Switch During DVDNCD mode, pre.s GI PIN on remote control to increa.e the picture in radio mode. Slow motion playback During DVD mode, press G II...
... on the remote control to search the stations quickly by selecting the DVD MENU SETIJP. There are speeds as follow : 1-..1/2 _1-..1/8 ~ (!) Note: * The function is only valid on remote control. a. Chapter.-J elapted Main Menu MNext Setup Press + to display the menu follows, press • to .low play. System Switch During DVDNCD mode, pre.s GI PIN on remote control to increa.e the picture in radio mode. Slow motion playback During DVD mode, press G II...
PLDD75BG Manual 1
Page 22
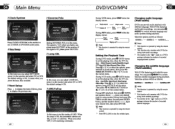
... the screen shows the following menu: number keys appears, touch the number to play aod pause; Selecting Tracks Fast DuringDVDlMP4playback,pressal ~ Inplayprevioustrack,pressallM Inplay next track. IIJIIIDII ~ em LBO Playipause co:::J C1D []][] ~ Stop Decrease volume level Increase volume level DVD setup menu IMODEl Mode selector (!) Note: * Press right comer repeatedly to select tracks. e * Press CLEAR to switch among USB, SD card, and disc. * Pres$g: ~ in the monitor...
... the screen shows the following menu: number keys appears, touch the number to play aod pause; Selecting Tracks Fast DuringDVDlMP4playback,pressal ~ Inplayprevioustrack,pressallM Inplay next track. IIJIIIDII ~ em LBO Playipause co:::J C1D []][] ~ Stop Decrease volume level Increase volume level DVD setup menu IMODEl Mode selector (!) Note: * Press right comer repeatedly to select tracks. e * Press CLEAR to switch among USB, SD card, and disc. * Pres$g: ~ in the monitor...


