
PLD89MU Manual 1
Page 2
INSTRUCTIONS CONTENTS Welcome 3 Warning 3 Note 4 Features 5 Basic Operation 6 Panel Arrangement 7 Basic Functions 8 Main Menu Touch Operation 10 OSD Setup 11 Adjust Mode 12 Remote Control Function 13 Loading 15 Disc Play Touch Operation 16 DVD Mode 17 RDS TouchOperation 19 Radio Operation 21 DVD Basic Operation 22 VCD Basic Operation 32 CD/MP3 Basic Operation 35 MP3/USB/SD Operation 37 Music SurroundingsSetting/EQSetting- 38 Audio Frequency/Tone 39 Other Play Mode 40 Trouble Shooting 41 Wiring Diagram 42 Specifications 43 02
INSTRUCTIONS CONTENTS Welcome 3 Warning 3 Note 4 Features 5 Basic Operation 6 Panel Arrangement 7 Basic Functions 8 Main Menu Touch Operation 10 OSD Setup 11 Adjust Mode 12 Remote Control Function 13 Loading 15 Disc Play Touch Operation 16 DVD Mode 17 RDS TouchOperation 19 Radio Operation 21 DVD Basic Operation 22 VCD Basic Operation 32 CD/MP3 Basic Operation 35 MP3/USB/SD Operation 37 Music SurroundingsSetting/EQSetting- 38 Audio Frequency/Tone 39 Other Play Mode 40 Trouble Shooting 41 Wiring Diagram 42 Specifications 43 02
PLD89MU Manual 1
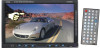
Page 3
... place for future use this product, please go into the unit. Playing the radio at a moderate listen level. 3. If you open up by watching the LCD screen. This unit is dirty and you for a 12V power and negative ground system from getting scratched or damaged. 5. Please ask professional to watch a video while driving down the road. 6. You should play the disc. INSTRUCTIONS WELCOME Thank you place...
... place for future use this product, please go into the unit. Playing the radio at a moderate listen level. 3. If you open up by watching the LCD screen. This unit is dirty and you for a 12V power and negative ground system from getting scratched or damaged. 5. Please ask professional to watch a video while driving down the road. 6. You should play the disc. INSTRUCTIONS WELCOME Thank you place...
PLD89MU Manual 1
Page 4
... temperature in car is in -20C^-60C. • During operation, if al appear on LCD, that means unit do not support that function, operation is invalid. • When unit is compatible with MP4/DVD/VCD1.0/20/3.0 version, DVD, CD-R, CD-RW, MP3, WMA, JPEG. 2. Playing substandard disc or damage disc will damage laser. This unit is showing some abnormal, please refer to TROUBLE SHOOTING in this instruction manual, If...
... temperature in car is in -20C^-60C. • During operation, if al appear on LCD, that means unit do not support that function, operation is invalid. • When unit is compatible with MP4/DVD/VCD1.0/20/3.0 version, DVD, CD-R, CD-RW, MP3, WMA, JPEG. 2. Playing substandard disc or damage disc will damage laser. This unit is showing some abnormal, please refer to TROUBLE SHOOTING in this instruction manual, If...

PLD89MU Manual 1
Page 5
COMPATIBLEWITH MP4 (AVI/DIVX/S.X),DVD(DVD-R/DVD-RW), VCD, SVCD, CD-RW,WMA, MP3JPG 3. FM/AM RADIO TUNER 30 RADIOSTATION (18FM,12AM) LCD DISPLAY 1. 8 inch,16:9 'MT LCD display 2. INSTRUCTIONS FEATURES DVD PLAYER 1. Multiplesubtitles,angles, languagessupporting,Child lock function 4.4 CHANNELAUDIOOUTPUT MODE 5. Angle of turnadjustable Os Internationaladvanced MPEG-4DECODETECHNOLOGY 2. PAUSE, PLAY, UP/DOWN,STOP, ZOOM, PBC FUNCTION 6. Touch screen 3.Auto adotoried panel 4.
COMPATIBLEWITH MP4 (AVI/DIVX/S.X),DVD(DVD-R/DVD-RW), VCD, SVCD, CD-RW,WMA, MP3JPG 3. FM/AM RADIO TUNER 30 RADIOSTATION (18FM,12AM) LCD DISPLAY 1. 8 inch,16:9 'MT LCD display 2. INSTRUCTIONS FEATURES DVD PLAYER 1. Multiplesubtitles,angles, languagessupporting,Child lock function 4.4 CHANNELAUDIOOUTPUT MODE 5. Angle of turnadjustable Os Internationaladvanced MPEG-4DECODETECHNOLOGY 2. PAUSE, PLAY, UP/DOWN,STOP, ZOOM, PBC FUNCTION 6. Touch screen 3.Auto adotoried panel 4.
PLD89MU Manual 1
Page 6
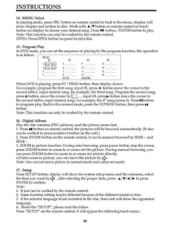
... volume setting on . button on remote control longer to the factory default settings. 06 The mode will resume back to power off sound output, press again to back to choose your desired tune mode.' VOLUME ADJUSTMENT I) Press VOL4/VOL- TONE MODE ADJUSTING (SEL) Press SELbutton on remote control or SEL button on remote control shortly to turn off . 2. VOL •-• BAS -• THE L/R F/R NOTE: 1) DVD playing mode, MEW & User will switch sources in the following sequence: RADIO --+ DVD -+ MIX 3. MUTE CONTROL...
... volume setting on . button on remote control longer to the factory default settings. 06 The mode will resume back to power off sound output, press again to back to choose your desired tune mode.' VOLUME ADJUSTMENT I) Press VOL4/VOL- TONE MODE ADJUSTING (SEL) Press SELbutton on remote control or SEL button on remote control shortly to turn off . 2. VOL •-• BAS -• THE L/R F/R NOTE: 1) DVD playing mode, MEW & User will switch sources in the following sequence: RADIO --+ DVD -+ MIX 3. MUTE CONTROL...
PLD89MU Manual 1
Page 8
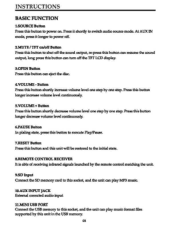
... display. 3.OPEN Button Press this button can play MP3music 10.AUX INPUTJACK External mulcted audio input 11.MINI USB PORT Connect the USB memory to this socket,and the unit can eject the disc. 4.VOLUME- Button Press this button shortlydecreasevolume level one step by this unit in the USB memory. 08 INSTRUCTIONS BASIC FUNCTION 1.SOURCE Button Press this button to power on /off Button Press this button to shut off the sound output, re-press this button can resume the sound output,long press this button can turn...
... display. 3.OPEN Button Press this button can play MP3music 10.AUX INPUTJACK External mulcted audio input 11.MINI USB PORT Connect the USB memory to this socket,and the unit can eject the disc. 4.VOLUME- Button Press this button shortlydecreasevolume level one step by this unit in the USB memory. 08 INSTRUCTIONS BASIC FUNCTION 1.SOURCE Button Press this button to power on /off Button Press this button to shut off the sound output, re-press this button can resume the sound output,long press this button can turn...

PLD89MU Manual 1
Page 11
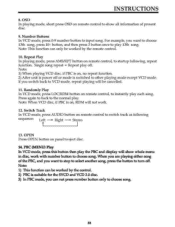
... NORMAL MIRROR EUROPE USA1 USA2 JAPAN RUSSIAN Exit fr Radio frequencysetting 1 Back-up Camera left/right selection Ils RDSon/off optionag Time setting Note: when you touch each button, there is withRDS function, it showthe time of afternoon. At no received RDS radiochannels orAM state, you activateor exit RDS; INSTRUCTIONS OW SETUP (PIC 2) L Minute ►I Hour GE E L SETUP CLOCK SET ROS MODE CAMERA I RADIO FREQ EXIT M: + OE -
... NORMAL MIRROR EUROPE USA1 USA2 JAPAN RUSSIAN Exit fr Radio frequencysetting 1 Back-up Camera left/right selection Ils RDSon/off optionag Time setting Note: when you touch each button, there is withRDS function, it showthe time of afternoon. At no received RDS radiochannels orAM state, you activateor exit RDS; INSTRUCTIONS OW SETUP (PIC 2) L Minute ►I Hour GE E L SETUP CLOCK SET ROS MODE CAMERA I RADIO FREQ EXIT M: + OE -
PLD89MU Manual 1
Page 12
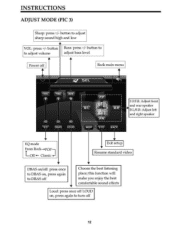
... turn off 12 Classic Exit setup Resume standard video DBAS on/off: press once to DBAS on , press again to adjust volume adjust bass level Power off Choose the best listening place; INSTRUCTIONS ADJUST MODE (PIC 3) Sharp: press +1- this function will make you enjoy the best comfortable sound effects Loud: press once off LOUD on , press again to adjust sharp sound high and low VOL: press +/- button...
... turn off 12 Classic Exit setup Resume standard video DBAS on/off: press once to DBAS on , press again to adjust volume adjust bass level Power off Choose the best listening place; INSTRUCTIONS ADJUST MODE (PIC 3) Sharp: press +1- this function will make you enjoy the best comfortable sound effects Loud: press once off LOUD on , press again to adjust sharp sound high and low VOL: press +/- button...
PLD89MU Manual 1
Page 13
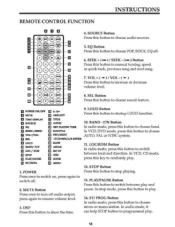
... this button to randomly play . 13 Press once to switch on, press again to programmed play . 12. In audio mode, it can help STOP button to switch oft. 2. REMOTE CONTROL FUNCTION INSTRUCTIONS 0€'30 -J08= II e 00'0 or 000 .1) 03 0,00 000 A O 4. VOL+( )/ VOL- ( 4- ) Press this button to increase or decrease volume level. 8. stereo or mono station. ST/ PROG Button In radio mode, press this button to choose 3. BAND - P/N Button In radio mode, press this button...
... this button to randomly play . 13 Press once to switch on, press again to programmed play . 12. In audio mode, it can help STOP button to switch oft. 2. REMOTE CONTROL FUNCTION INSTRUCTIONS 0€'30 -J08= II e 00'0 or 000 .1) 03 0,00 000 A O 4. VOL+( )/ VOL- ( 4- ) Press this button to increase or decrease volume level. 8. stereo or mono station. ST/ PROG Button In radio mode, press this button to choose 3. BAND - P/N Button In radio mode, press this button...
PLD89MU Manual 1
Page 14
.... SETUP Button In audio mode, press this button to choose different set items. I6. In VCD mode, press this button toswitch language of remote control becomes shorter or no function, please change battery. MENU Button Press button to back to confirm choice. Insert battery holder into controller. 22. Press the enter button to the main menu. AMS / RPT Button In radio mode, press this button to browse gored stations. In audio mode, press this button, you can define playing time...
.... SETUP Button In audio mode, press this button to choose different set items. I6. In VCD mode, press this button toswitch language of remote control becomes shorter or no function, please change battery. MENU Button Press button to back to confirm choice. Insert battery holder into controller. 22. Press the enter button to the main menu. AMS / RPT Button In radio mode, press this button to browse gored stations. In audio mode, press this button, you can define playing time...
PLD89MU Manual 1
Page 17
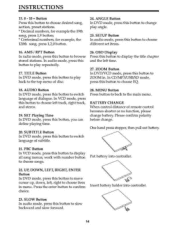
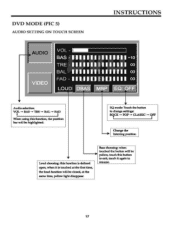
DVD MODE (PIC 5) AUDIO SETTING ON TOUCH SCREEN INSTRUCTIONS AUDI VIDEO VOL- Change the listerdng position laud choosins this function is defined open, when ft Is touched at the Ent thin the loud hmction will be dosed, at the same time, yellow light disappear. TRE-IIIIIIIIIIIIIII 00 BAL-IIIIIIIIIIIIIII 00 FAD-IIIIIIIIIIIIIII 00 LOUD DBAS MBP I What using this button to edt, touch It again to change setthltm RICK...
DVD MODE (PIC 5) AUDIO SETTING ON TOUCH SCREEN INSTRUCTIONS AUDI VIDEO VOL- Change the listerdng position laud choosins this function is defined open, when ft Is touched at the Ent thin the loud hmction will be dosed, at the same time, yellow light disappear. TRE-IIIIIIIIIIIIIII 00 BAL-IIIIIIIIIIIIIII 00 FAD-IIIIIIIIIIIIIII 00 LOUD DBAS MBP I What using this button to edt, touch It again to change setthltm RICK...
PLD89MU Manual 1
Page 18
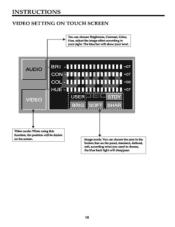
... 1 1 1 1 1 1 1 1 1 1 1 1 1+07 COL -1 1 1 1 1 1 1 1 1 1 1 1 1 1 1+00 HUE -1111 11111 1 1 1 111+07 USER STDY SOFT [SHAR Video mode: When using this function, the position will be darker on the panel, standard, deBruxl, soft according what you need to choose, theblue back light will diseppata 18 Image mode: You can choose Bdghtness, Contrast, Colon p. INSTRUCTIONS VIDEO SETTING ON TOUCH SCREEN You can choose the area in the broken line...
... 1 1 1 1 1 1 1 1 1 1 1 1 1+07 COL -1 1 1 1 1 1 1 1 1 1 1 1 1 1 1+00 HUE -1111 11111 1 1 1 111+07 USER STDY SOFT [SHAR Video mode: When using this function, the position will be darker on the panel, standard, deBruxl, soft according what you need to choose, theblue back light will diseppata 18 Image mode: You can choose Bdghtness, Contrast, Colon p. INSTRUCTIONS VIDEO SETTING ON TOUCH SCREEN You can choose the area in the broken line...
PLD89MU Manual 1
Page 19
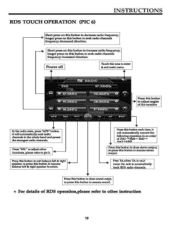
... In the whole band and preset d. Frees this button to other instruction 19 strongest radio dennds. Power off Teeth tide wee to enter dredt main menu. •wo RADIO FM I 87 SONTI rir C NE Iff : 97.MIL IIMI 87.502Aliz 0 APS Set PTV ea% TA AT ONO Press this button to edt balance left & right speaker hmetIon. Poe TA,when TA...
... In the whole band and preset d. Frees this button to other instruction 19 strongest radio dennds. Power off Teeth tide wee to enter dredt main menu. •wo RADIO FM I 87 SONTI rir C NE Iff : 97.MIL IIMI 87.502Aliz 0 APS Set PTV ea% TA AT ONO Press this button to edt balance left & right speaker hmetIon. Poe TA,when TA...
PLD89MU Manual 1
Page 21
... 'fFT display will decrease on . 5. Adjust Frequency Manually Adjust Frequency; Search Station: Press SEEK + / SEEK - Note: In radio mode, start up the stereo function automatic, touch the ST button again on display to search station in 2 channel. 21 Manual Preset and Store Station In radio mode, press 1-6 button on remote control, or 1-6 position on display shortly every time, frequency will cancel the former preset stations. 4. Press SEEK + button on remote control, or Mt touch button on display longer to turn off the stereo.
... 'fFT display will decrease on . 5. Adjust Frequency Manually Adjust Frequency; Search Station: Press SEEK + / SEEK - Note: In radio mode, start up the stereo function automatic, touch the ST button again on display to search station in 2 channel. 21 Manual Preset and Store Station In radio mode, press 1-6 button on remote control, or 1-6 position on display shortly every time, frequency will cancel the former preset stations. 4. Press SEEK + button on remote control, or Mt touch button on display longer to turn off the stereo.
PLD89MU Manual 1
Page 24
... display shows: For example, program the first song, input 01, press ► button move the picture by the program function, the operation is not recorded in or zoom out the picture. About the "SETUP", please read the picture menu first. INSTRUCTIONS I4. I. ZOOM in normal mode and zoom out mode. 17. MENU Select In playing mode, press PBC button on panel to play . Press H button / ENTER button to eject disc. 15. Program Play In DVD mode, you can set...
... display shows: For example, program the first song, input 01, press ► button move the picture by the program function, the operation is not recorded in or zoom out the picture. About the "SETUP", please read the picture menu first. INSTRUCTIONS I4. I. ZOOM in normal mode and zoom out mode. 17. MENU Select In playing mode, press PBC button on panel to play . Press H button / ENTER button to eject disc. 15. Program Play In DVD mode, you can set...
PLD89MU Manual 1
Page 33
... VCD mode, repeat playing will not work with number button to eject disc. 14. if you switch back to turn off. Press again to back to input song. When you can not press number button only to play 13th song. Number Buttons In VCD mode, press 0-9 number button to the normal play each song. Note: When VCD disc, if PBC is switched to instantly play . Note: 1) This function can only be worked by the control...
... VCD mode, repeat playing will not work with number button to eject disc. 14. if you switch back to turn off. Press again to back to input song. When you can not press number button only to play 13th song. Number Buttons In VCD mode, press 0-9 number button to the normal play each song. Note: When VCD disc, if PBC is switched to instantly play . Note: 1) This function can only be worked by the control...
PLD89MU Manual 1
Page 35
.... Stop Play In play it automatically. Previous/Next Song Play In playing mode, press SEEK + / SEEK - EQ Mode I )Press ohbutton on main menu can choose the sound mode. 3) When enter this function, press the button A/4 /.4 /► to move the course to select sound mode which in unit.At that time, press MIbutton on remote control or touch button on display to resume playing at Picture «4) Slide in slot, press DVD touch button on remote control toenter...
.... Stop Play In play it automatically. Previous/Next Song Play In playing mode, press SEEK + / SEEK - EQ Mode I )Press ohbutton on main menu can choose the sound mode. 3) When enter this function, press the button A/4 /.4 /► to move the course to select sound mode which in unit.At that time, press MIbutton on remote control or touch button on display to resume playing at Picture «4) Slide in slot, press DVD touch button on remote control toenter...

PLD89MU Manual 1
Page 40
... is a back-up camera installed onto your car's own position in general setting mode. 40 INSTRUCTIONS OTHER PLAY MODE AUX IN: AUX IN OPERATION 1) Press "Source" button on remote control or touch "AUX" on your screen. 3) You can set CCD image according to your car, you will need to connect it to the CCD video input. 2) When you are backing up the car there you will see this image El on the touch screen, to switch to AUX mode. 2) This will allow...
... is a back-up camera installed onto your car's own position in general setting mode. 40 INSTRUCTIONS OTHER PLAY MODE AUX IN: AUX IN OPERATION 1) Press "Source" button on remote control or touch "AUX" on your screen. 3) You can set CCD image according to your car, you will need to connect it to the CCD video input. 2) When you are backing up the car there you will see this image El on the touch screen, to switch to AUX mode. 2) This will allow...
PLD89MU Manual 1
Page 41
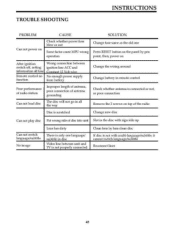
... MPU wrong operation SOLUTION Change fuse same as the old one Press RESET button on the panel by pen point, then power on After ignition Wrong connection between switch off,setting ignition line ACC and information all lose Constant Is Volt wire Remote control no No enough power supply function from battery Poor performance of radio station Improper length of antenna, poor connection of antenna grounding Can not load disc The disc will...
... MPU wrong operation SOLUTION Change fuse same as the old one Press RESET button on the panel by pen point, then power on After ignition Wrong connection between switch off,setting ignition line ACC and information all lose Constant Is Volt wire Remote control no No enough power supply function from battery Poor performance of radio station Improper length of antenna, poor connection of antenna grounding Can not load disc The disc will...
PLD89MU Manual 1
Page 42
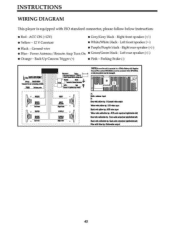
...; Blue- vothediadiletNZnlA waneNAM&'At OmAOSM. in mil1.onset la a Per, 4.0Fre. Leftfront speaker(+-) • Black- ParkingBrake(-) ka.tuguas (MI NOSe re SENS INS a 0 3* rIA =CF- k OwslCilda EsindAft•OPO OF I RI fan subSire. =ramtaito Iiik•AlmintAt -r. Ca trese into taFAIN4 IDA&•Smo rk acksendioSiea actateispieviNtl**SP IL withkb@egtfercrattenvi 42 INSTRUCTIONS WIRING DIAGRAM This player...
...; Blue- vothediadiletNZnlA waneNAM&'At OmAOSM. in mil1.onset la a Per, 4.0Fre. Leftfront speaker(+-) • Black- ParkingBrake(-) ka.tuguas (MI NOSe re SENS INS a 0 3* rIA =CF- k OwslCilda EsindAft•OPO OF I RI fan subSire. =ramtaito Iiik•AlmintAt -r. Ca trese into taFAIN4 IDA&•Smo rk acksendioSiea actateispieviNtl**SP IL withkb@egtfercrattenvi 42 INSTRUCTIONS WIRING DIAGRAM This player...


