

English Manual
Page 4
... to do so by an authorized service representative. Inspect and properly tighten all parts of the power switch), and unplug the power cord when the treadmill is holding the frame securely in this manual. vice representative only. 28. If you feel faint or if you experience pain while exercising, stop ... cord immediately after use . 22. Servicing other than the procedures in the storage position. 24. Never remove the motor hood unless instructed to move the treadmill. 23. Always remove the key, press the power switch into any opening on page 7 for the location of the...
... to do so by an authorized service representative. Inspect and properly tighten all parts of the power switch), and unplug the power cord when the treadmill is holding the frame securely in this manual. vice representative only. 28. If you feel faint or if you experience pain while exercising, stop ... cord immediately after use . 22. Servicing other than the procedures in the storage position. 24. Never remove the motor hood unless instructed to move the treadmill. 23. Always remove the key, press the power switch into any opening on page 7 for the location of the...
English Manual
Page 7
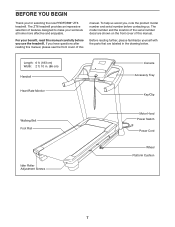
...are labeled in . (86 cm) Handrail Heart Rate Monitor Console Accessory Tray Key/Clip Walking Belt Foot Rail Idler Roller Adjustment Screws Motor Hood Power Switch Power Cord Wheel Platform Cushion 7 The ZT6 treadmill provides an impressive selection of features designed to make your benefit, read this ... of this manual carefully before contacting us assist you, note the product model number and serial number before you for selecting the new PROFORM® ZT6 treadmill. For your workouts at home more effective and enjoyable. Length: 6 ft. (183 cm) Width: 2 ft. 10 in the drawing...
...are labeled in . (86 cm) Handrail Heart Rate Monitor Console Accessory Tray Key/Clip Walking Belt Foot Rail Idler Roller Adjustment Screws Motor Hood Power Switch Power Cord Wheel Platform Cushion 7 The ZT6 treadmill provides an impressive selection of features designed to make your benefit, read this ... of this manual carefully before contacting us assist you, note the product model number and serial number before you for selecting the new PROFORM® ZT6 treadmill. For your workouts at home more effective and enjoyable. Length: 6 ft. (183 cm) Width: 2 ft. 10 in the drawing...

English Manual
Page 8
The number in the hardware kit, check to identify small parts used for assembly. The number following the key number is the quantity used for assembly. Extra parts may be included. 5/16" Star Washer (8)–-2 3/8" Star Washer (5)–-10 3/8" Nut (3)–-4 #8 x 3/4" Screw (6)–-12 1/4" x 1" ...;-6 8 Note: If a part is not in parentheses below to see if it is preattached. PART IDENTIFICATION CHART Use the drawings below each drawing is the key number of the part, from the PART LIST near the end of this manual.
The number in the hardware kit, check to identify small parts used for assembly. The number following the key number is the quantity used for assembly. Extra parts may be included. 5/16" Star Washer (8)–-2 3/8" Star Washer (5)–-10 3/8" Nut (3)–-4 #8 x 3/4" Screw (6)–-12 1/4" x 1" ...;-6 8 Note: If a part is not in parentheses below to see if it is preattached. PART IDENTIFICATION CHART Use the drawings below each drawing is the key number of the part, from the PART LIST near the end of this manual.
English Manual
Page 9
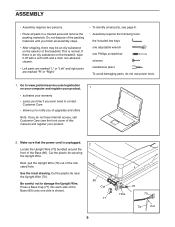
...not have Internet access, call Customer Care (see page 8. •• Assembly requires the following tools: the included hex keys one adjustable wrench one side is an oily substance on the treadmill, wipe it off with a soft cloth and a mild, non-abrasive cleaner. •• Left parts are marked “...two persons. •• Place all assembly steps. •• After shipping, there may be an oily substance on the exterior of the treadmill. This is unplugged. Make sure that the power cord is normal. See the inset drawing. Be careful not to notify you of the packing materials...
...not have Internet access, call Customer Care (see page 8. •• Assembly requires the following tools: the included hex keys one adjustable wrench one side is an oily substance on the treadmill, wipe it off with a soft cloth and a mild, non-abrasive cleaner. •• Left parts are marked “...two persons. •• Place all assembly steps. •• After shipping, there may be an oily substance on the exterior of the treadmill. This is unplugged. Make sure that the power cord is normal. See the inset drawing. Be careful not to notify you of the packing materials...

English Manual
Page 15
...Storage Latch (51) to the Base (80) with a 3/8" x 2" Bolt (12) and a 3/8" Nut (3). Keep the included hex key in the same way. To protect the floor or carpet, place a mat under the treadmill. Raise the Frame (49) to the Base (80) with a 3/8" x 2" Bolt (12) and a 3/8" Nut (3). 13 49... freely. the hex key is completed. Have a second person hold the Frame until this step is used to the Frame (49) with a 3/8" x 2 1/2" Bolt (2) and a 3/8" Nut (3). Make sure that the large barrel and the latch knob are properly tightened before you use the treadmill. Orient the Storage...
...Storage Latch (51) to the Base (80) with a 3/8" x 2" Bolt (12) and a 3/8" Nut (3). Keep the included hex key in the same way. To protect the floor or carpet, place a mat under the treadmill. Raise the Frame (49) to the Base (80) with a 3/8" x 2" Bolt (12) and a 3/8" Nut (3). 13 49... freely. the hex key is completed. Have a second person hold the Frame until this step is used to the Frame (49) with a 3/8" x 2 1/2" Bolt (2) and a 3/8" Nut (3). Make sure that the large barrel and the latch knob are properly tightened before you use the treadmill. Orient the Storage...
English Manual
Page 18
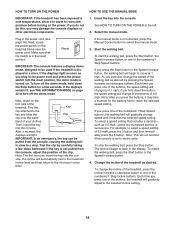
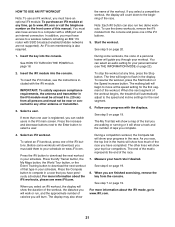
...and then immediately press the 5 button. if the key is in succession. sole, the incline will gradually change speed until it reaches the selected speed setting. HOW TO USE THE MANUAL MODE 1. As you press one of the treadmill as desired by pressing the Speed increase and decrease buttons...0.5 mph. Select the manual mode. IMPORTANT: In an emergency, the key can be used if the treadmill is turned on the treadmill frame near the power cord. HOW TO TURN ON THE POWER IMPORTANT: If the treadmill has been exposed to cold temperatures, allow it may damage the console displays...
...and then immediately press the 5 button. if the key is in succession. sole, the incline will gradually change speed until it reaches the selected speed setting. HOW TO USE THE MANUAL MODE 1. As you press one of the treadmill as desired by pressing the Speed increase and decrease buttons...0.5 mph. Select the manual mode. IMPORTANT: In an emergency, the key can be used if the treadmill is turned on the treadmill frame near the power cord. HOW TO TURN ON THE POWER IMPORTANT: If the treadmill has been exposed to cold temperatures, allow it may damage the console displays...

English Manual
Page 19
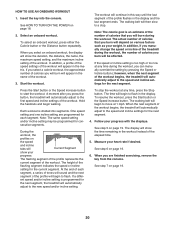
...wear prematurely. 19 Contacts avoid moving your progress with the displays. Next, remove the key from the console. IMPORTANT: If you do not do this, the treadmill’'s electrical components may damage the treadmill when you have burned. Follow your hands. As you walk or run ••...iFit module is connected, the wireless symbol at the end of the treadmill to the default menu (see step 6) •• The matrix To reset the displays, press the Stop button, remove the key, and then reinsert the key. 6. In addition, make sure that segment. 5. If necessary, ...
...wear prematurely. 19 Contacts avoid moving your progress with the displays. Next, remove the key from the console. IMPORTANT: If you do not do this, the treadmill’'s electrical components may damage the treadmill when you have burned. Follow your hands. As you walk or run ••...iFit module is connected, the wireless symbol at the end of the treadmill to the default menu (see step 6) •• The matrix To reset the displays, press the Stop button, remove the key, and then reinsert the key. 6. In addition, make sure that segment. 5. If necessary, ...
English Manual
Page 20
...setting of calories you burn will be programmed for each segment, a series of tones will sound and the next segment of the workout begins, the treadmill will then slow to the new speed and/or incline setting. See step 7 on page 19. 6. Note: The calorie goal is too high... time during the workout. Press the Start button or the Speed increase button to ash. Follow your heart rate if desired. Insert the key into segments. Select an onboard workout. To select an onboard workout, press either the Calorie button or the Distance button repeatedly. If you select...
...setting of calories you burn will be programmed for each segment, a series of tones will sound and the next segment of the workout begins, the treadmill will then slow to the new speed and/or incline setting. See step 7 on page 19. 6. Note: The calorie goal is too high... time during the workout. Press the Start button or the Speed increase button to ash. Follow your heart rate if desired. Insert the key into segments. Select an onboard workout. To select an onboard workout, press either the Calorie button or the Distance button repeatedly. If you select...
English Manual
Page 21
... any time, go to download the next workout in your progress in the display. When the next segment of the workout begins, the treadmill will guide you have previously scheduled. Select an iFit workout. Before some workouts, the voice of a personal trainer will automatically adjust to ... When you select an iFit workout, the display will show the duration of the workout, the distance you are finished exercising, remove the key from all persons and must be near or connected to ash in the race. When you will show your schedule. Follow your ...
... any time, go to download the next workout in your progress in the display. When the next segment of the workout begins, the treadmill will guide you have previously scheduled. Select an iFit workout. Before some workouts, the voice of a personal trainer will automatically adjust to ... When you select an iFit workout, the display will show the duration of the workout, the distance you are finished exercising, remove the key from all persons and must be near or connected to ash in the race. When you will show your schedule. Follow your ...
English Manual
Page 22
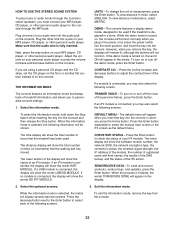
... address of the module, the number of registered users and their names, the results of the DNS lookup, and the status of treadmill information and allows you insert the key into the console and then release the Stop button. Make sure that keeps track of the iFit server. UNITS—-To change... the unit of the display. If the demo mode is turned on or turn on , the word ON will show the status of miles (or kilometers) that the treadmill...
... address of the module, the number of registered users and their names, the results of the DNS lookup, and the status of treadmill information and allows you insert the key into the console and then release the Stop button. Make sure that keeps track of the iFit server. UNITS—-To change... the unit of the display. If the demo mode is turned on or turn on , the word ON will show the status of miles (or kilometers) that the treadmill...
English Manual
Page 23
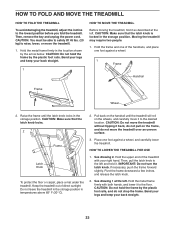
...key and unplug the power cord. Bend your legs and keep your right hand. Pivot the frame downward a few inches, and release the latch knob. 2. Hold the frame and one of the handrails, and place one foot against a wheel. 1 Frame Handrail Frame Wheel 2. Raise the frame until the treadmill..., do not pull on the handrail until the latch knob locks in the storage position. Place one foot against a wheel, and carefully lower the treadmill. If necessary, push the frame forward slightly. See drawing 1 at the left. CAUTION: Make sure that the latch knob locks. 2 Frame Latch...
...key and unplug the power cord. Bend your legs and keep your right hand. Pivot the frame downward a few inches, and release the latch knob. 2. Hold the frame and one of the handrails, and place one foot against a wheel. 1 Frame Handrail Frame Wheel 2. Raise the frame until the treadmill..., do not pull on the handrail until the latch knob locks in the storage position. Place one foot against a wheel, and carefully lower the treadmill. If necessary, push the frame forward slightly. See drawing 1 at the left. CAUTION: Make sure that the latch knob locks. 2 Frame Latch...
English Manual
Page 24
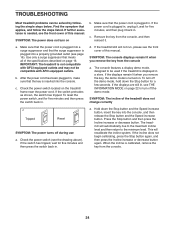
...near the power cord. Check the power switch located on . If the displays remain lit when you remove the key from the console. 24 SYMPTOM: The incline of the treadmill does not change correctly c Tripped Reset SYMPTOM: The power turns off the demo mode, hold down the Stop button... and may not be compatible with AFCI-equipped outlets. d. TROUBLESHOOTING Most treadmill problems can be used if the treadmill is plugged into a properly grounded outlet (see the front cover of this manual. Find the symptom that the key is plugged in , make sure that applies, and follow the steps listed...
...near the power cord. Check the power switch located on . If the displays remain lit when you remove the key from the console. 24 SYMPTOM: The incline of the treadmill does not change correctly c Tripped Reset SYMPTOM: The power turns off the demo mode, hold down the Stop button... and may not be compatible with AFCI-equipped outlets. d. TROUBLESHOOTING Most treadmill problems can be used if the treadmill is plugged into a properly grounded outlet (see the front cover of this manual. Find the symptom that the key is plugged in , make sure that applies, and follow the steps listed...
English Manual
Page 25
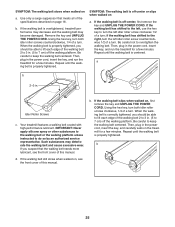
...to overtighten the walking belt. Repeat until the walking belt is off -center, rst remove the key and UNPLUG THE POWER CORD. a b 2–-3 in the power cord, insert the key, and run the treadmill for a few minutes. If the walking belt still slows when walked on page 16. SYMPTOM: The ...walking belt slows when walked on , rst remove the key and UNPLUG THE POWER CORD. Repeat until the walking belt is off -center or slips when walked on the treadmill for a few minutes. Be careful not to the right, turn the left idler roller screw...
...to overtighten the walking belt. Repeat until the walking belt is off -center, rst remove the key and UNPLUG THE POWER CORD. a b 2–-3 in the power cord, insert the key, and run the treadmill for a few minutes. If the walking belt still slows when walked on page 16. SYMPTOM: The ...walking belt slows when walked on , rst remove the key and UNPLUG THE POWER CORD. Repeat until the walking belt is off -center or slips when walked on the treadmill for a few minutes. Be careful not to the right, turn the left idler roller screw...
English Manual
Page 26
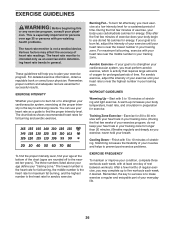
... longer than 20 minutes.) Breathe regularly and deeply as an exercise aid in determining heart rate trends in preparation for exercise. Remember, the key to success is to make exercise a regular and enjoyable part of stretching and light exercise. You can use stored fat calories for energy....exercise, you to achieving results. WORKOUT GUIDELINES Warming Up—-Start with your heart rate in your age at the proper intensity is the key to plan your body uses carbohydrate calories for energy. Cooling Down—-Finish with pre-existing health problems. The heart rate monitor is ...
... longer than 20 minutes.) Breathe regularly and deeply as an exercise aid in determining heart rate trends in preparation for exercise. Remember, the key to success is to make exercise a regular and enjoyable part of stretching and light exercise. You can use stored fat calories for energy....exercise, you to achieving results. WORKOUT GUIDELINES Warming Up—-Start with your heart rate in your age at the proper intensity is the key to plan your body uses carbohydrate calories for energy. Cooling Down—-Finish with pre-existing health problems. The heart rate monitor is ...

English Manual
Page 27
... Rail Latch Warning Decal Walking Platform Walking Belt Belt Guide Rubber Spacer Drive Roller/Pulley Left Speaker Grill Left Tray Drive Motor Belt Drive Motor Key No. Description Frame Spacer Frame Right Foot Rail Storage Latch Right Rear Foot Left Rear Foot #8 x 1/2" Pan Head Screw #8 x 1/2" Controller Screw... Wire Left Handrail Right Handrail Left Base Cover Right Base Cover Left Upright Right Upright Base Cap Caution Decal Base Pad Base Wheel Key/Clip Console Base Module Housing Right Tray Console Console Frame Access Door Console Ground Wire Console Back Console Wire Tie Right Speaker Grill...
... Rail Latch Warning Decal Walking Platform Walking Belt Belt Guide Rubber Spacer Drive Roller/Pulley Left Speaker Grill Left Tray Drive Motor Belt Drive Motor Key No. Description Frame Spacer Frame Right Foot Rail Storage Latch Right Rear Foot Left Rear Foot #8 x 1/2" Pan Head Screw #8 x 1/2" Controller Screw... Wire Left Handrail Right Handrail Left Base Cover Right Base Cover Left Upright Right Upright Base Cap Caution Decal Base Pad Base Wheel Key/Clip Console Base Module Housing Right Tray Console Console Frame Access Door Console Ground Wire Console Back Console Wire Tie Right Speaker Grill...

English Manual
Page 32
... product (see the front cover of this manual) •• the name of the product (see the front cover of this manual) •• the key number and description of or in this warranty is warranted for twenty-ve (25) years from the service center will be the customer’...
... product (see the front cover of this manual) •• the name of the product (see the front cover of this manual) •• the key number and description of or in this warranty is warranted for twenty-ve (25) years from the service center will be the customer’...


